Return to Service feature for tvOS
What
Even though devices can be erased remotely, getting them back into service is a manual process, as it requires someone to physically touch them and take them through Setup Assistant. Apple is removing the additional manual step with the introduction of Return to Service for tvOS. This feature was added in FileWave version 15.5.0 for tvOS 18. For iOS/iPadOS this same feature was added in FileWave 15.1.0.
When/Why
Return To Service is the following process. The MDM server sends an EraseDevice command to the device. The command includes additional information which allows the device to reset, securely erase all data, connect to Wi-Fi, enroll into MDM, and get back to the Home Screen, ready to be used.
How
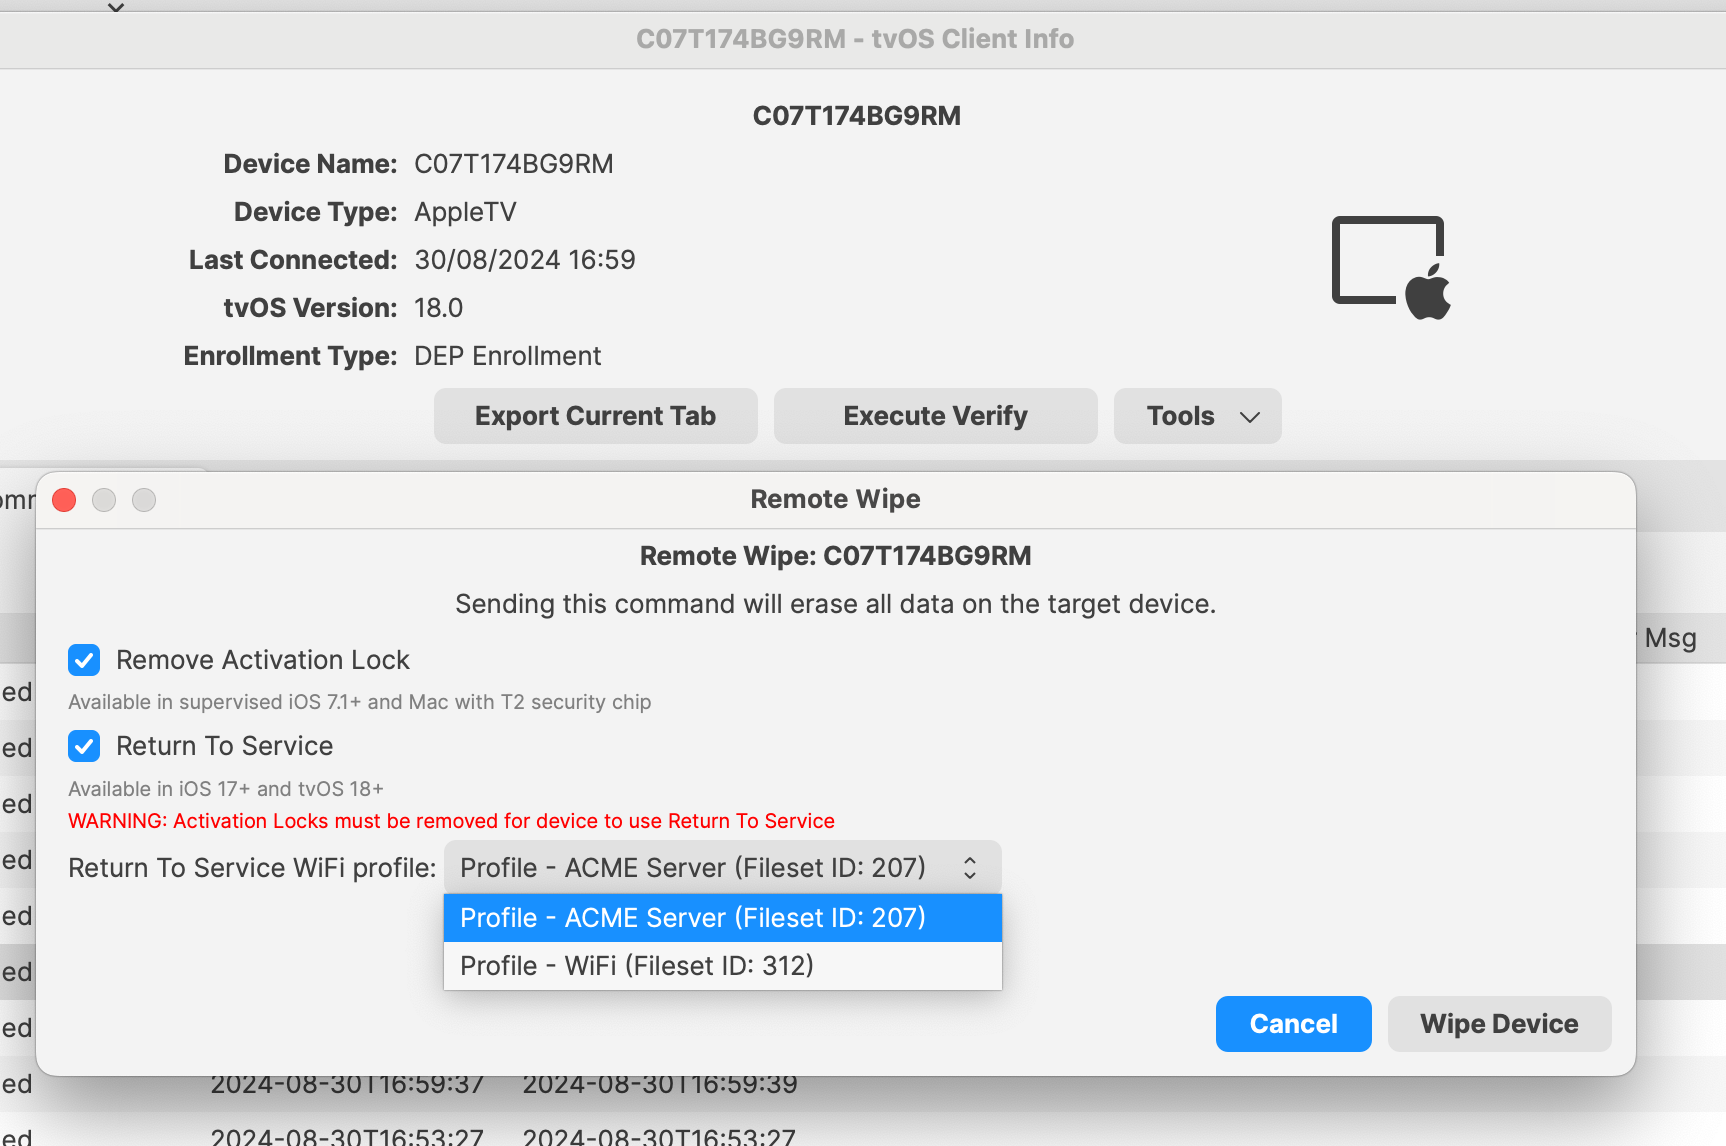
With FileWave 15.5.0 support of Return To Service was added for tvOS. To use Return To Service open Remote Wipe dialog for tvOS device. Checkbox Return To Service allows to specify whether feature should be enabled or disabled. It can be checked only if Remove Activation Lock checkbox is checked as well. The feature can be used only if there is at least one configured Wi-Fi profile (fileset containing Network payload with Network Interface “Wi-Fi“). Available Wi-Fi profiles are displayed on combobox. This allows Wi-Fi only AppleTVs to have zero-touch wipe and re-enroll process.
What happens on the device?
If Return To Service is enabled on FileWave side and then Wipe Device button is pressed, the device will be wiped and then connected to the Wi-Fi network specified in selected Wi-Fi profile without asking password. Also MDM profile will remain on the device, there will be no need for it to re-enroll in MDM. You will want to make sure the DEP profile for the device has Auto Advance enabled so that you don't have to be present at the device to get it through the setup wizard.
If you have an AppleTV that uses Ethernet then you could simply send a wipe to it and not need RTS since it will come back in to the server if it is enrolled via ADE/DEP. Just like for RTS you need to make sure Auto Advance is enabled in the enrollment profile or you would have to go to the device to move it through the re-enrollment.
Related Content
Troubleshooting
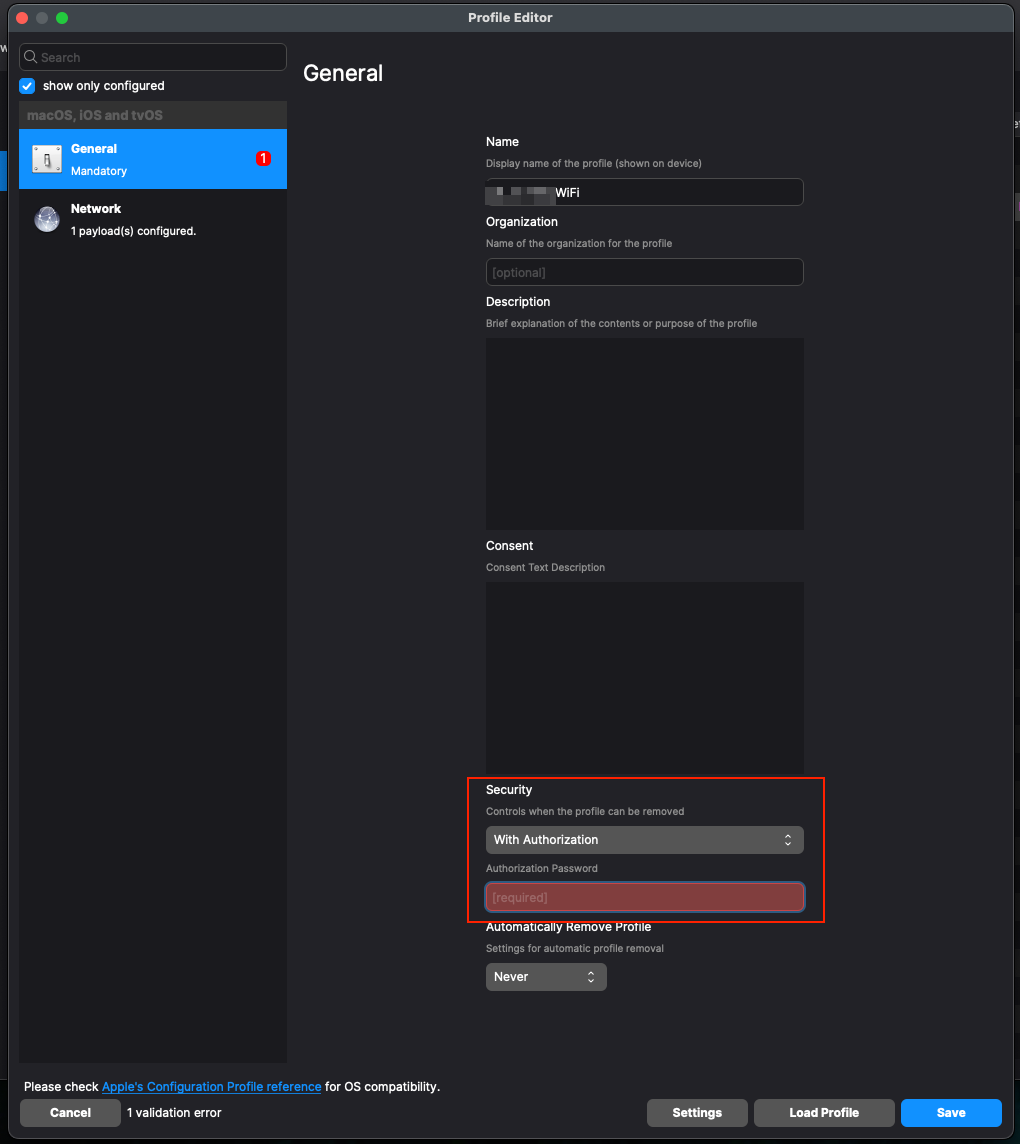
We have found that on the WiFi profile, setting Security to 'With Authorization' - even with the right password, will break Return to Service. What you will see is that the iPad will not be able to join the WiFi automatically when it boots up though you can manually join the WiFi.
Digging Deeper
When Remote Wipe dialog is opened the list of configured Wi-Fi profiles is loaded in format:
[(<file_id>, <fileset_id>, <fileset_name>, <payload_display_name>, <payload_identifier>),(...)]fileset_id and fileset_name are displayed on the UI, payload_display_name and payload_identifier are used for tool tip. file_id is used as internal data for combobox.
When Wipe Device button is pressed, on the backend side is generated MDM command EraseDevice with dictionary field ReturnToService and fields Enabled and WiFiProfileData according to values specified on the UI, then command is added to command queue.
When command is grabbed from command queue and is being composed for sending to the device MDMProfileData is added to ReturnToService dictionary. This data matches the final payload that is provided by MDM server when /ios/profile URL is used for OTA enrollment. MDMProfileData is not added for DEP devices.
API Command
Sending the command to wipe via an API command requires the following data format.
'{
    "ids": [<integer>, <integer>],
    "command": "EraseDevice",
    "options": {
        "DisallowProximitySetup": false,
        "PIN": "",
        "PreserveDataPlan": false,
        "ReturnToService": {
            "Enabled": true,
            "WiFiProfileID": <integer>
        }
    }
}'- 'ids' is a comma separated list of the Device IDs to be targeted
- 'WifiProfileID' is the File ID (this is not the Fileset ID)
To obtain the WifiProfileID, will require an additional query first. A full list of all Wi-Fi Profiles can be returned with the following API:
curl -X GET "https://${server_dns}/filewave/api/apple/profiles/wifi" -k -H "Content-Type: application/json" -H "authorization: ${auth}" | awk '{ gsub("\\]\\,\\[","\n"); gsub("\\]\\]",""); gsub("\\[\\[",""); print }'Where:
- ${server_dns} is the server name as seen in FileWave Central -> Preferences -> Mobile
- ${auth} is the application token as shown in FileWave Central -> Manage Administrators (each user has one or more tokens)
The returned list might look something like:
750959,669526,"Profile - HOME WIFI","HOME WIFI","ml1063.lan.4bf6fba8-9cfc-48b5-ad74-a251a65c8759.Configuration.4bf6fba8-9cfc-48b5-ad74-a251a65c8759"
780638,736322,"Profile - WLTC wifi","WLTC wifi","ml1063.local.7a00d6eb-9b4b-4e7e-b68b-7ee7e6414051.Configuration.7a00d6eb-9b4b-4e7e-b68b-7ee7e6414051"
504184,411265,"Profile - Wi-Fi BT 2.4GHz","Wi-Fi BT 2.4GHz","FW1063.local.e285dc3b-9c4b-4a7a-84a9-a3cd5169f92d.Configuration.e285dc3b-9c4b-4a7a-84a9-a3cd5169f92d"
504185,24571,"Profile - Wi-Fi BT 5GHZ","Wi-Fi BT 5GHZ","ML1063.local.02d6d9c3-5a7d-490c-afa8-f160ba9b4e40.Configuration.02d6d9c3-5a7d-490c-afa8-f160ba9b4e40"
The first number is the File ID, whilst the second is the Fileset ID.
Example
Considering the following 3 devices to be wiped using 'Return to Service':
| Server FQDN from Preferences | demo.filewave.ch |
| Authorisation Token |
e2E1OTU4ZmYyLTg4ZTYtNDEzNC1iZjdhLWE0ZmJmMTViNmI5OH0= |
| "Profile - WLTC wifi" [File ID of Fileset: 'Profile - WLTC wifi'] |
780638 |
| iPad001 [FileWave Device ID] |
3425 |
| iPad002 [FileWave Device ID] |
4342 |
| iPad003 [FileWave Device ID] |
3312 |
The API data block might look like:
'{
    "ids": [3425, 4342, 3312],
    "command": "EraseDevice",
    "options": {
        "DisallowProximitySetup": false,
        "PIN": "",
        "PreserveDataPlan": false,
        "ReturnToService": {
            "Enabled": true,
            "WiFiProfileID": 780638
        }
    }
}'
and the command:
curl -X POST "https://demo.filewave.ch/api/devices/v1/devices/mdm-command" -k -H "Content-Type: application/json" -H "authorization: e2E1OTU4ZmYyLTg4ZTYtNDEzNC1iZjdhLWE0ZmJmMTViNmI5OH0=" -d "<data block goes here>

