Booster Installation
macOSDescription
Booster software is compatible with either macOS, Windows Boosteror installDebian.
BasicAll Boosternecessary installers areor includedappliances can be found on the current download pages: FileWave Software Downloads
Installers
Debian
Linux has two options. FileWave provides (as with the FileWave downloads.Server) Youa runpre-built Debian VM. Alternatively, it is possible to self instal the installersoftware fromon PKG/a Debian system.
macOS & Windows
Installers are available as PKG or MSI.
As typically with MSI withininstallers, options exist not only for instal, but repair and deletion
Instal Paths
Booster instals the installer set.The macOS and Windows versions look about the same at install, but the Windows installer allows more featuresYou can repair a Booster's settings and delete the Booster from within the Windows installer.
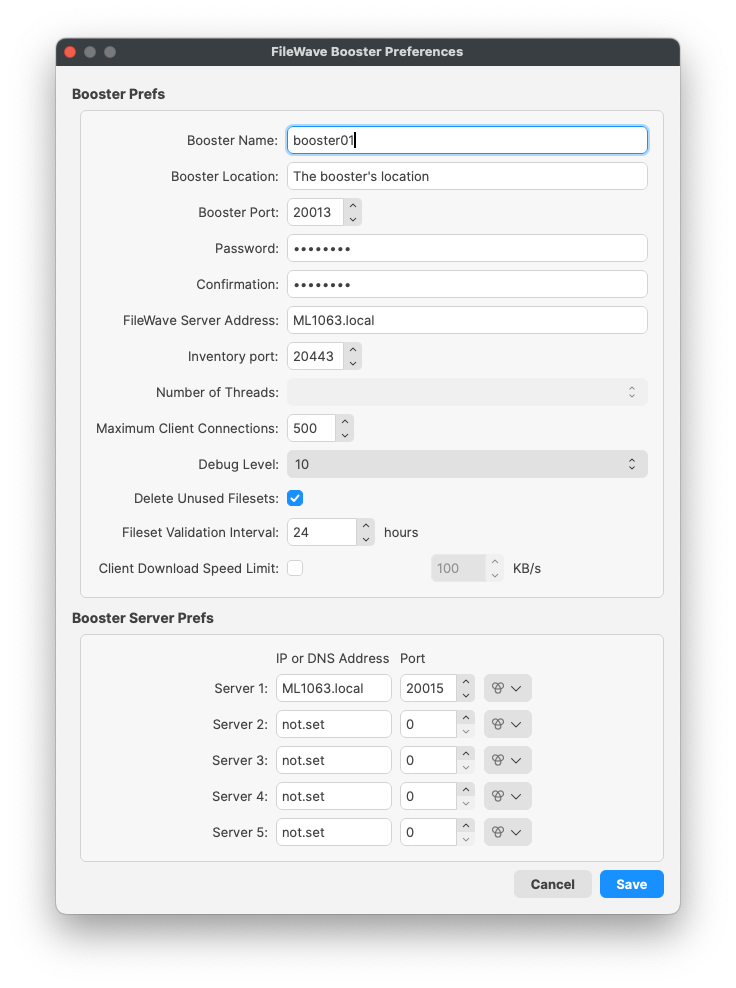
For both platforms, once you have installed the Booster, you will use the Booster Monitor to set and edit the preferences for that Booster. On your machine that has FileWave Central you should find Booster Monitor in /Applications/FileWave/ on macOS and it will show up in the Start Menu on Windows with the other FileWave applications.
The FileWave Booster executable resides in one of thesethe platform-dependentfollowing locations:
Booster
Windows: C:\Program Files\FileWave\fwBooster.exe
macOS,
Booster Configuration
Once installed, configuration is via the Booster Monitor application, available for both macOS and Windows from the same downloads page.
Linux Booster installInstallation
Debian
DownloadIf using the latestpre-built FileWaveDebian binariesAppliance, forsimply Linuxadd the VM to the VM infrastructure. Alternatively, follow the commands provided on the followingdownloads Website:page.
macOS after& youWindows
Run the appliancerelevant PKG or toMSI installinstaller, onaccepting aany cleanterms Linuxand system.agreements.
Configuration
Network usingAddress
Configure a static IP for the Booster and consider adding a Domain Name within the DNS for this IP.
macOS and Windows can be configured using the Settings. However, Debian will require some command line configuration.
Debian IP Setup
Network Interface
The current IP may be determined with the 'ip addr' command:
# ip addr
1: lo: <LOOPBACK,UP,LOWER_UP> mtu 65536 qdisc noqueue state UNKNOWN group default qlen 1000
    link/loopback 00:00:00:00:00:00 brd 00:00:00:00:00:00
    inet 127.0.0.1/8 scope host lo
       valid_lft forever preferred_lft forever
    inet6 ::1/128 scope host noprefixroute
       valid_lft forever preferred_lft forever
2: ens192: <BROADCAST,MULTICAST,UP,LOWER_UP> mtu 1500 qdisc mq state UP group default qlen 1000
    link/ether 00:0c:29:9d:4d:7e brd ff:ff:ff:ff:ff:ff
    altname enp11s0
    inet 192.168.1.98/24 brd 192.168.1.255 scope global dynamic ens192
       valid_lft 68853sec preferred_lft 68853sec
    inet6 fe80::20c:29ff:fe9d:4d7e/64 scope link
       valid_lft forever preferred_lft forever
The key part here is the name of the network interface. In the above example, this is 'ens192'.
Edit Network File
Make a backup of the current file:
cp /etc/network/interfaces /etc/network/interfaces-mybackupEdit the original file:
sudo nano /etc/network/interfacesAdd the chosen IP and other necessary details for this interface. Give the details above, it may look something like the below once edited:
# This file describes the network interfaces available on your system
# and how to activate them. For more information, see interfaces(5).

source /etc/network/interfaces.d/*

# The loopback network interface
auto lo
iface lo inet loopback

# The primary network interface
iface ens192 inet static
address 192.168.1.22
netmask 255.255.255.0
gateway 192.168.1.255
dns-nameservers 8.8.4.4 8.8.8.8
Once complete, save and then userestart the network service:
sudo systemctl restart networkingRe-running the 'ip addr' command should now show the new details.
Add a name with this IP on the DNS.
Booster Setup
Instal the Booster Monitor toon configurea it.chosen IfmacOS you'dor likeWindows todevice. installOn launching the Booster onMonitor, anuse existingthe Linuxabove systemcreated network address. The initial view is akin to the FileWave Client Monitor, but with Booster specific details:

Select Preferences, enter the created password (or default password as provided from the downloads page)
Consider changing this password at the earliest possible moment
This password is only used to access the Preferences from the Booster Monitor.
The Booster Monitor may then followbe used to configure the upgradeBooster. directionsAt a very basic level, the Server Address and port should be added.
Approving Boosters
Once a Booster is setup on the Downloadsnetwork page,with the relevant FileWave Server details, it should then check-in with the server and thatbe willvisible installin the software.Booster
Approvingof Boosters
If yourthe FileWave isCentral versionadmin application software.
As of FileWave 13.1.00, oradditional greatersecurity there are extraand certificates andwere securityintroduced, inrequiring placethe andapproval Booster may need to be approvedprocess.
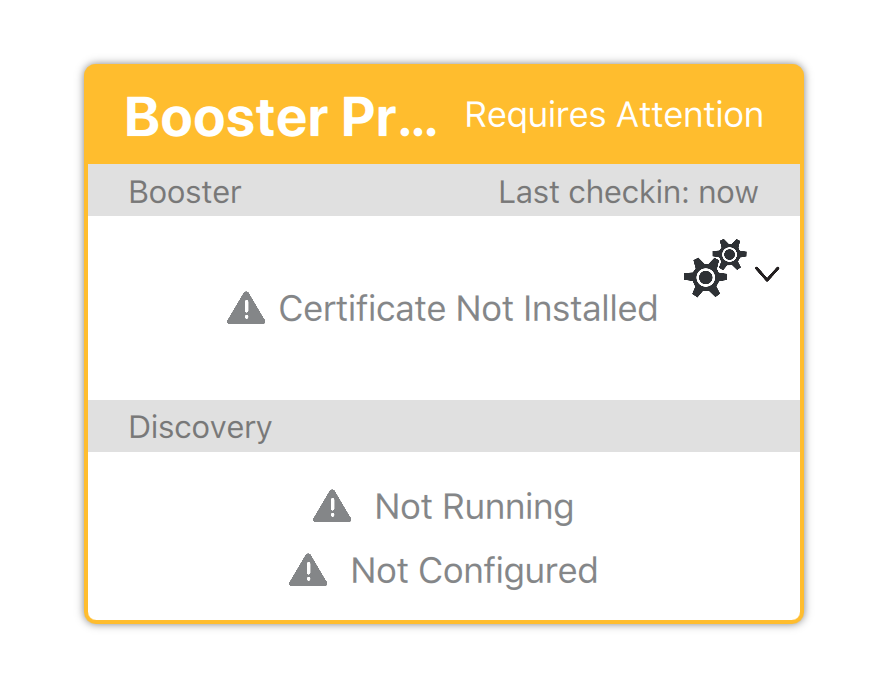
See:The Whatapproval isprocess Compatibilitygenerates Mode?a certificate for morethe information
There are four ways to generate a certificate for a booster.
- Select booster(s) in the Booster view → right-click → Create Certificate/Enroll Booster
- Select booster(s) in the Booster view → Create Certificate/Enroll Booster (in the button bar)
- Select booster(s) in the Booster Details → right-click → Create Certificate/Enroll Booster
- Select booster(s) in the Booster Details → Create Certificate/Enroll Booster (in the button bar)
Booster Deletion
When you deleteIf a boosterBooster were deleted from FileWave, this will revoke the server revokes that boosters certificate. MeaningIf itstill mayrunning, showon upa againsubsequent but requirecheck-in, the certificateapproval approvedprocess again.should need to be re-actioned.