
Export a .p12 SSL Certificate from Windows
When managing mobile devices, install a trusted SSL certificate on the FileWave Server. The server SSLServer certificate isand configuredprivate key were created on Windows, export them as a password-protected PKCS #12 bundle for upload in FileWave Central > Preferences > Mobile. If you generated the Certificate Signing Request (CSR) on a Windows-based system and completed the certificate generation process, Windows can export the SSL certificate and intermediate bundle as a .pfx file. ThatThe bundle should includecontain the private key, public certificate, Root CAserver certificate, and available intermediate certificateand bundle.root Renamecertificates. Windows saves the bundle with a .pfx extension; rename it to .p12 without changing its contents before upload.
Protect the exported bundle.
A .p12 file tocontains .p12,the thenserver's uploadprivate itkey. inUse a strong temporary export password, transfer the file through an approved secure method, and remove unnecessary desktop or transfer copies after FileWave Centralaccepts >the Preferencescertificate.
Export the certificate contents.and
Step-by-stepprivate guidekey
- Open a Run dialog and enter "mmc".
- Go to File > Add/Remove Snap-in.
- Add the Certificates snap-in and click the Add > button in the middle.
- Choose Computer account.
- Pick Local computer and click Finish.
- Click the OK button.
- In the MMC console browse to Certificates (Local Computer) > Personal > Certificates on the left. If your certificate is not there, browse the rest of the Certificates (Local Computer) tree until you find it.
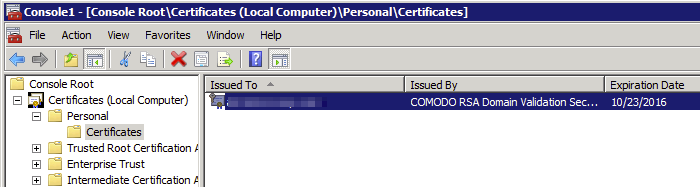
- Select your certificate in the middle pane, right-click, and pick All Tasks > Export.
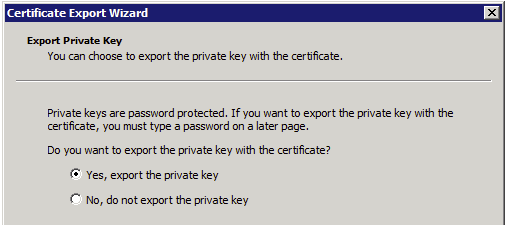
- When prompted,
pickchoose Yes, export the private key.
If that option is unavailable, the selected certificate does not have an exportable private key on this computer; return to the system where the CSR and private key were created.
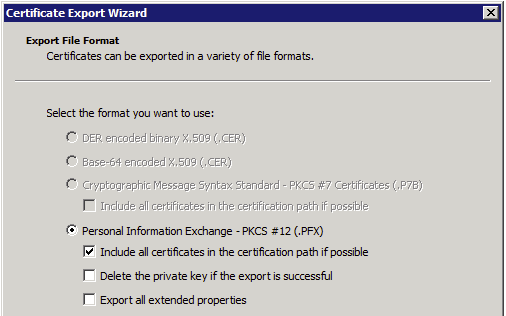
- Under Personal Information Exchange - PKCS #12 (.PFX), check Include all certificates in the certification path if possible. Leave the other two checkboxes unchecked.
ClickChoosetheNextbuttonandspecifysetana strong export password. FileWave Centralwill promptprompts for this passwordwhenduringyou upload the SSL certificate inPreferences > Mobile.upload.- Save the
.pfxfile toyouradesktop.temporary secured location. ChangeRename thefileextension from.pfxto..p12.p12- Upload the
.p12file in FileWave Central > Preferences > Mobile, enter theMobileexportpreferencespassword,tabandofverifyFileWavethatCentral.the expected certificate is shown before deleting temporary copies.