
Custom Fields
Extend Inventory even more? Check.
With FileWave you can even further extend your Inventory Reporting capabilities by creating Custom Fields forlet youryou add organization-specific inventory data to FileWave devices. FileWave's Custom FieldsYou can beenter manuallyvalues enteredmanually, perimport device,them importedfrom via CSV file,CSV, or scriptedpopulate forthem thewith client scripts on macOS and WindowsWindows. clients.Those These Custom Fieldsvalues can bethen leveragedappear in FileWave's scheduled Inventory Reports, Smart Groups, or accessed viaand API calls.results.
Create a Custom Field
This section will outline how to create the most commonly used Custom Field types in FileWave.
AllCreate Custom Fields willin firstFileWave be createdCentral by opening FileWave Admin and navigating to "Assistants > Custom Fields > Edit Custom Fields"Fields.
Static Custom Field
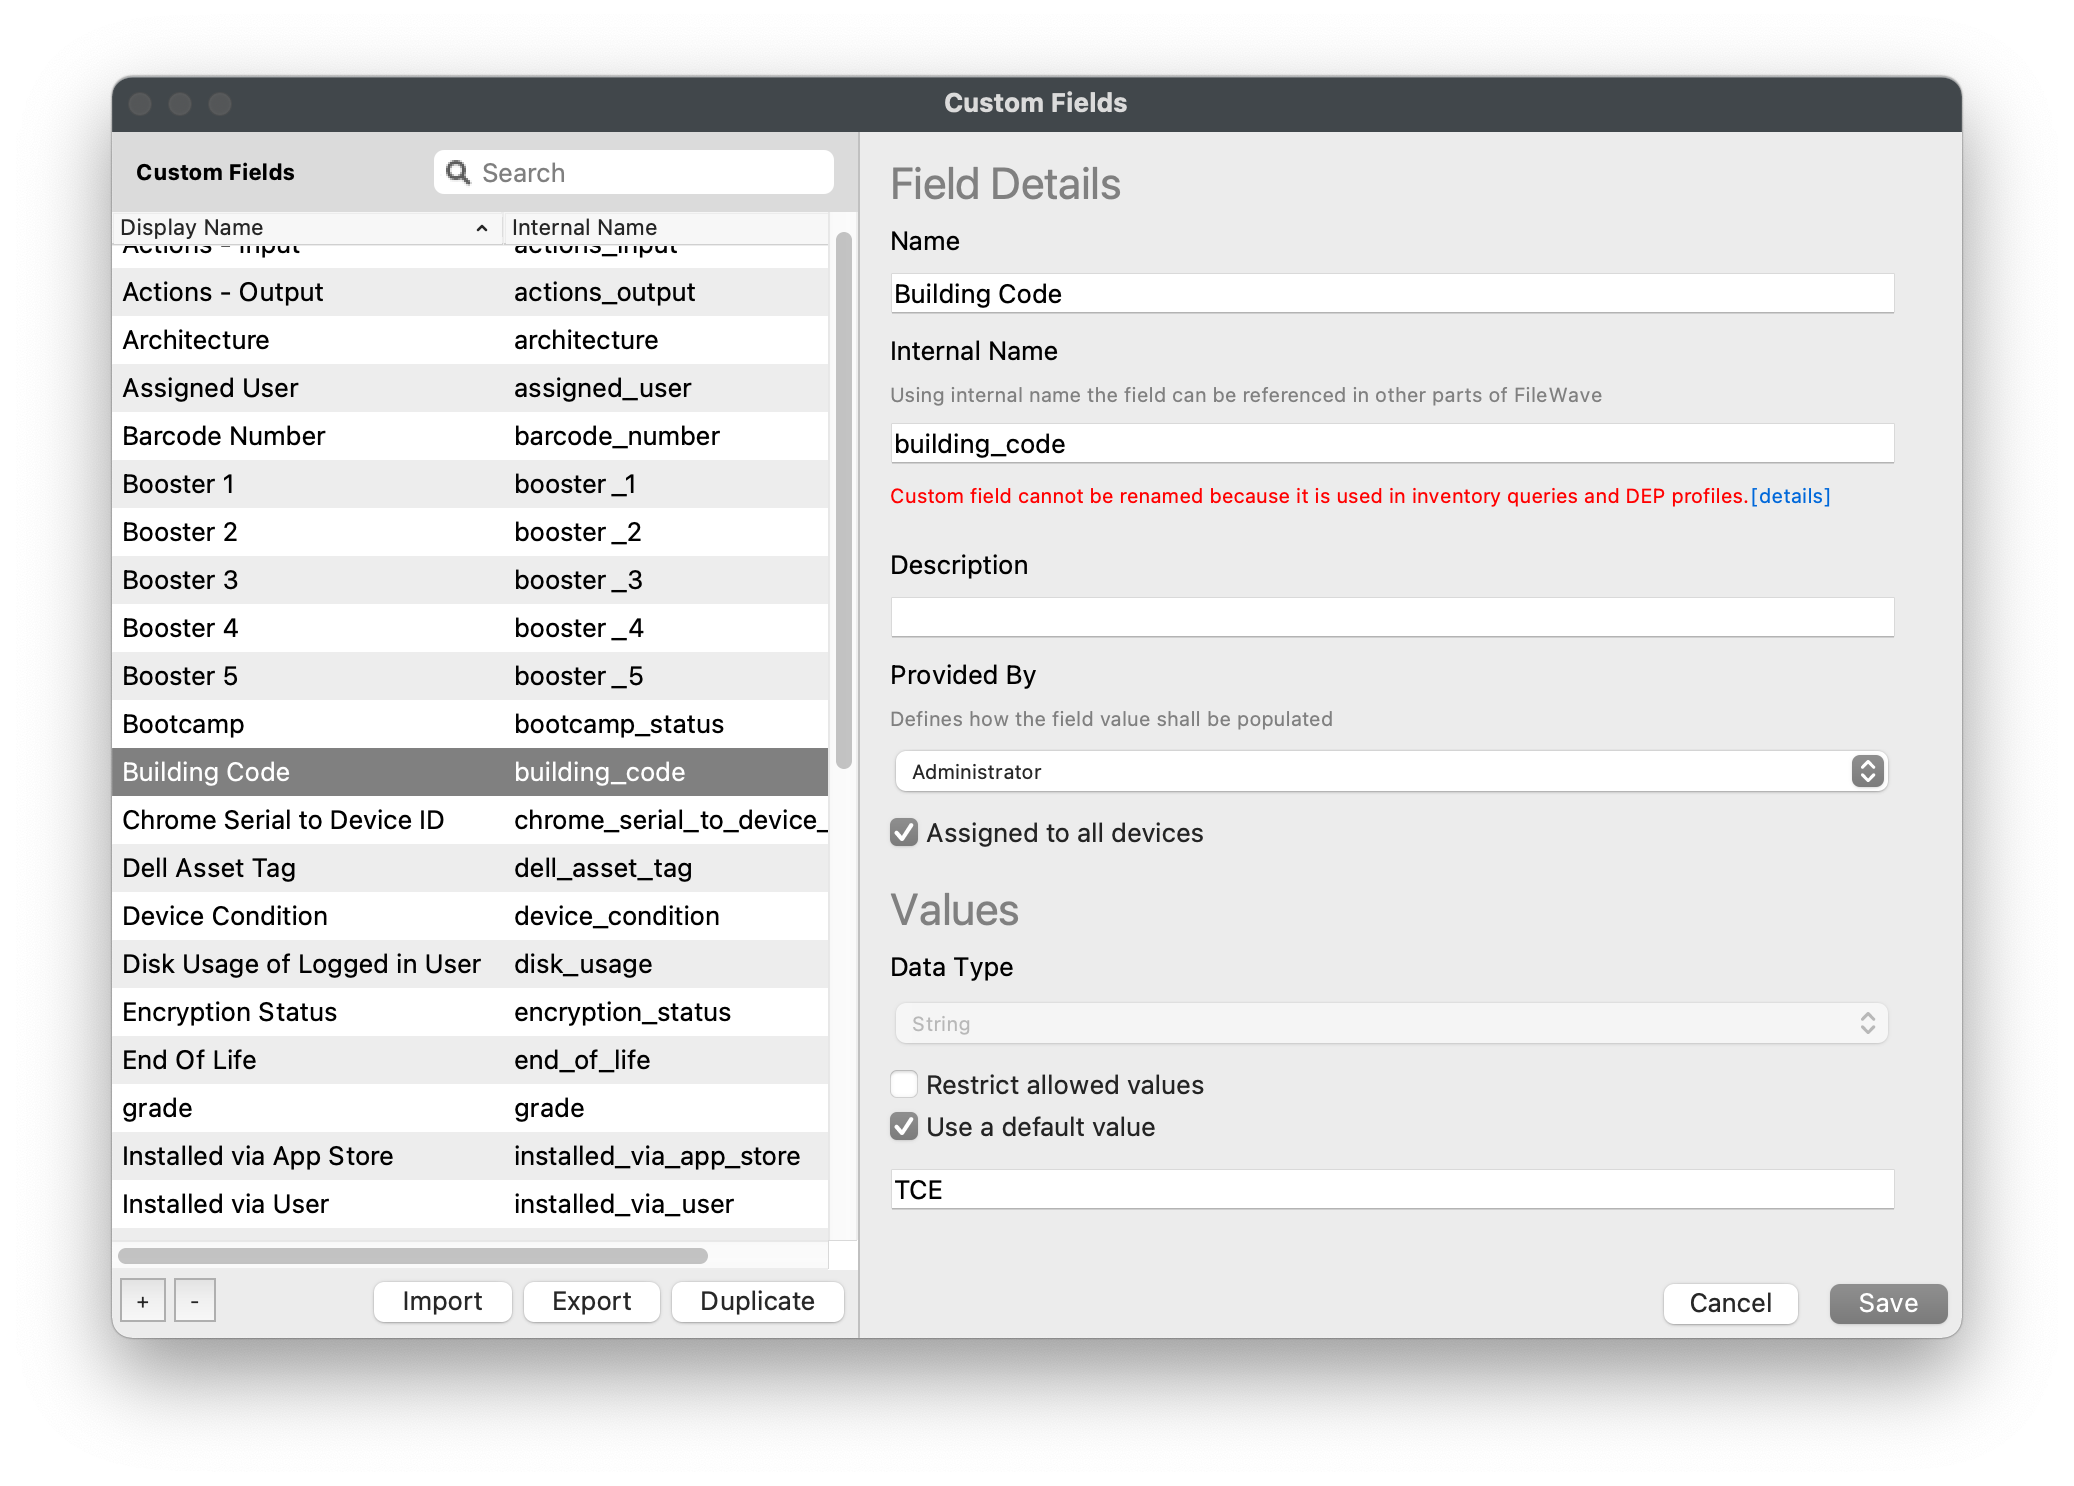
This section will cover creating a "static" Custom Field that can either be manually modified or imported via CSV. This example will create a "Building Code" Custom Field but other examples may include unique Asset Tag, Assigned Cart, or Department.
 Open FileWave
 AdminCentral and navigate to "Assistants > Custom Fields > Edit Custom Fields".- Click the "[+]" button in the lower left-hand corner.
- Name the Custom Field accordingly and take note of the automatically generated "Internal Name".
- Custom Fields
will be shownappear inthe"DeviceDetails"Details and arealphabeticallysortedsorted,alphabetically,namesoaccordingly.choose names that will be easy to scan later. - The "Internal Name" will be used as the variable name throughout FileWave. (ex: %building_code%).
- Custom Fields
- Optionally, enter a "Description" for the Custom Field so other team members know what the field is designed for.
- Change the "Provided By" drop-down menu to "Administrator".
"Administrator"Administratormeanmeansyou, thea FileWaveAdministratoradministratorwill provideprovides the Custom Fieldinput.value.
- Optionally, check the "Assigned to all devices" box.
- This is the recommended option for Custom Fields that can apply to all devices, even if not utilized immediately.
- If not "Assigned to all devices", please review the section below to learn how to manually assign Custom Fields to devices.
- Change the "Data Type" to "String".
"String"String is the default andrecommendedworks for most situations.
- Optionally, check the "Restrict allowed values" box.
- With the "Restrict allowed values" box checked, it will require you to input allowed values for the Custom Field.
- This will change the input method from a "free type" field to a drop-down menu of allowed values.
- Check the "Use default value" box and enter in a placeholder value.
- This is recommended to prevent blank Custom Fields, especially those used for Device Naming or other variable substitution.
- Click "Save".
Script-based Custom Field
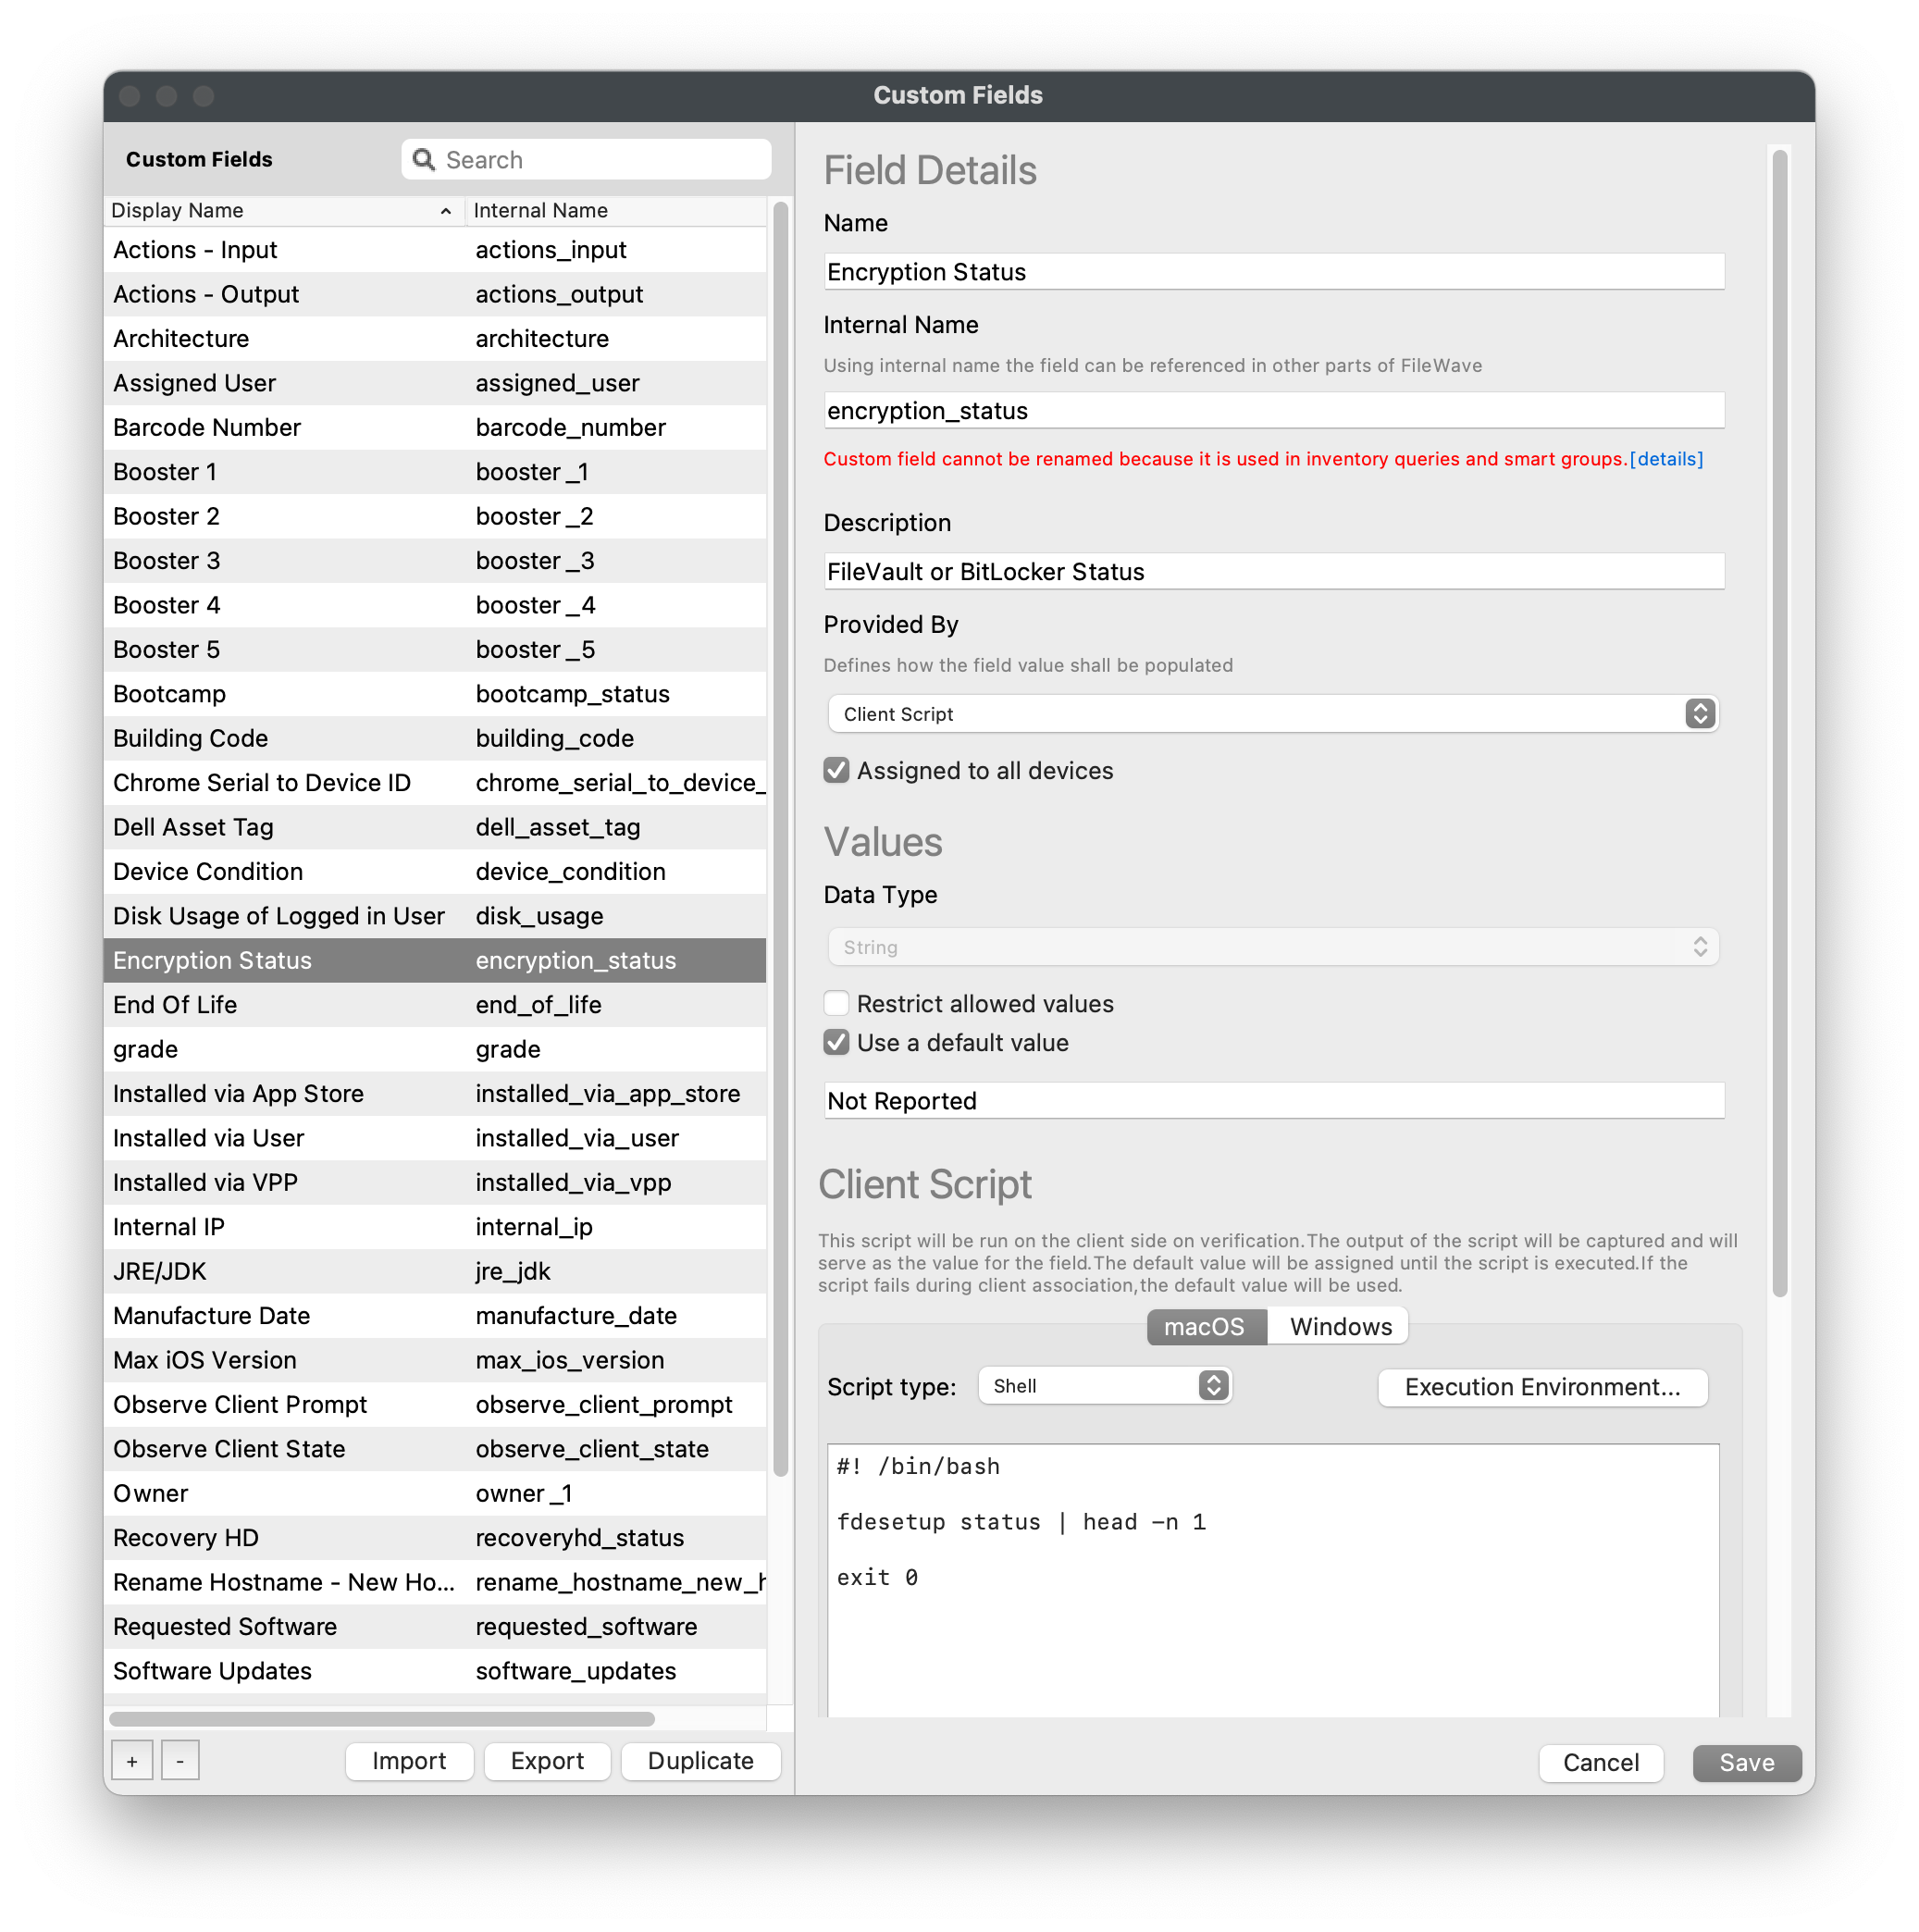
This section will cover creating a script-based Custom Field. A script-based Custom Field will runruns a script periodically on macOS and Windows clientsclients, andthen return the output ofreturns the script output to the Custom Field. TheseUse canthis bewhen usedFileWave toinventory supplementdoes FileWave'snot nativealready Inventorycollect eventhe moreexact dynamicallyvalue thanyou aneed, staticsuch Custom Fields. Examples may include device Encryption Status fromas FileVault or BitLocker,BitLocker Antivirusstate, threatsdetected detected,antivirus threats, registry values, or Registry keys / .plist values.
 Open FileWave
 AdminCentral and navigate to "Assistants > Custom Fields > Edit Custom Fields".- Click the "[+]" button in the lower left-hand corner.
- Name the Custom Field accordingly and take note of the automatically generated "Internal Name".
- Custom Fields
will be shownappear inthe"DeviceDetails"Details and arealphabeticallysortedsorted,alphabetically,namesoaccordingly.choose names that will be easy to scan later. - The "Internal Name" will be used as the variable name throughout FileWave. (ex: %encryption_status%).
- Custom Fields
- Optionally, enter a "Description" for the Custom Field so other team members know what the field is designed for.
- Change the "Provided By" drop-down menu to "Client Script".
"ClientScript"Scriptwill runruns a script periodically andreturnreturns thescript'sscript output to the Custom Field.AllScriptsscriptsrunwill be executedas eitheras the"root"rootuser on macOS or as the"SYSTEM"SYSTEMaccount on Windows.
- Optionally, check the "Assigned to all devices" box.
- This is the recommended option for Custom Fields that can apply to all devices, even if not utilized immediately.
- If not "Assigned to all devices", please review the section below to learn how to manually assign Custom Fields to devices.
- Change the "Data Type" to "String".
"String"String is the default andrecommendedworks for most situations.
 Optionally, check the "Restrict allowed values" box.
- With the "Restrict allowed values" box checked, it will require you to input allowed values for the Custom Field.
- This will change the input method from a "free type" field to a drop-down menu of allowed values.
- This is not recommended for script-based Custom Fields unless you can guarantee the output of the script will be consistent.
- Check the "Use default value" box and enter in a placeholder value.
- This is recommended to prevent blank Custom Fields, especially those used for Device Naming or other variable substitution.
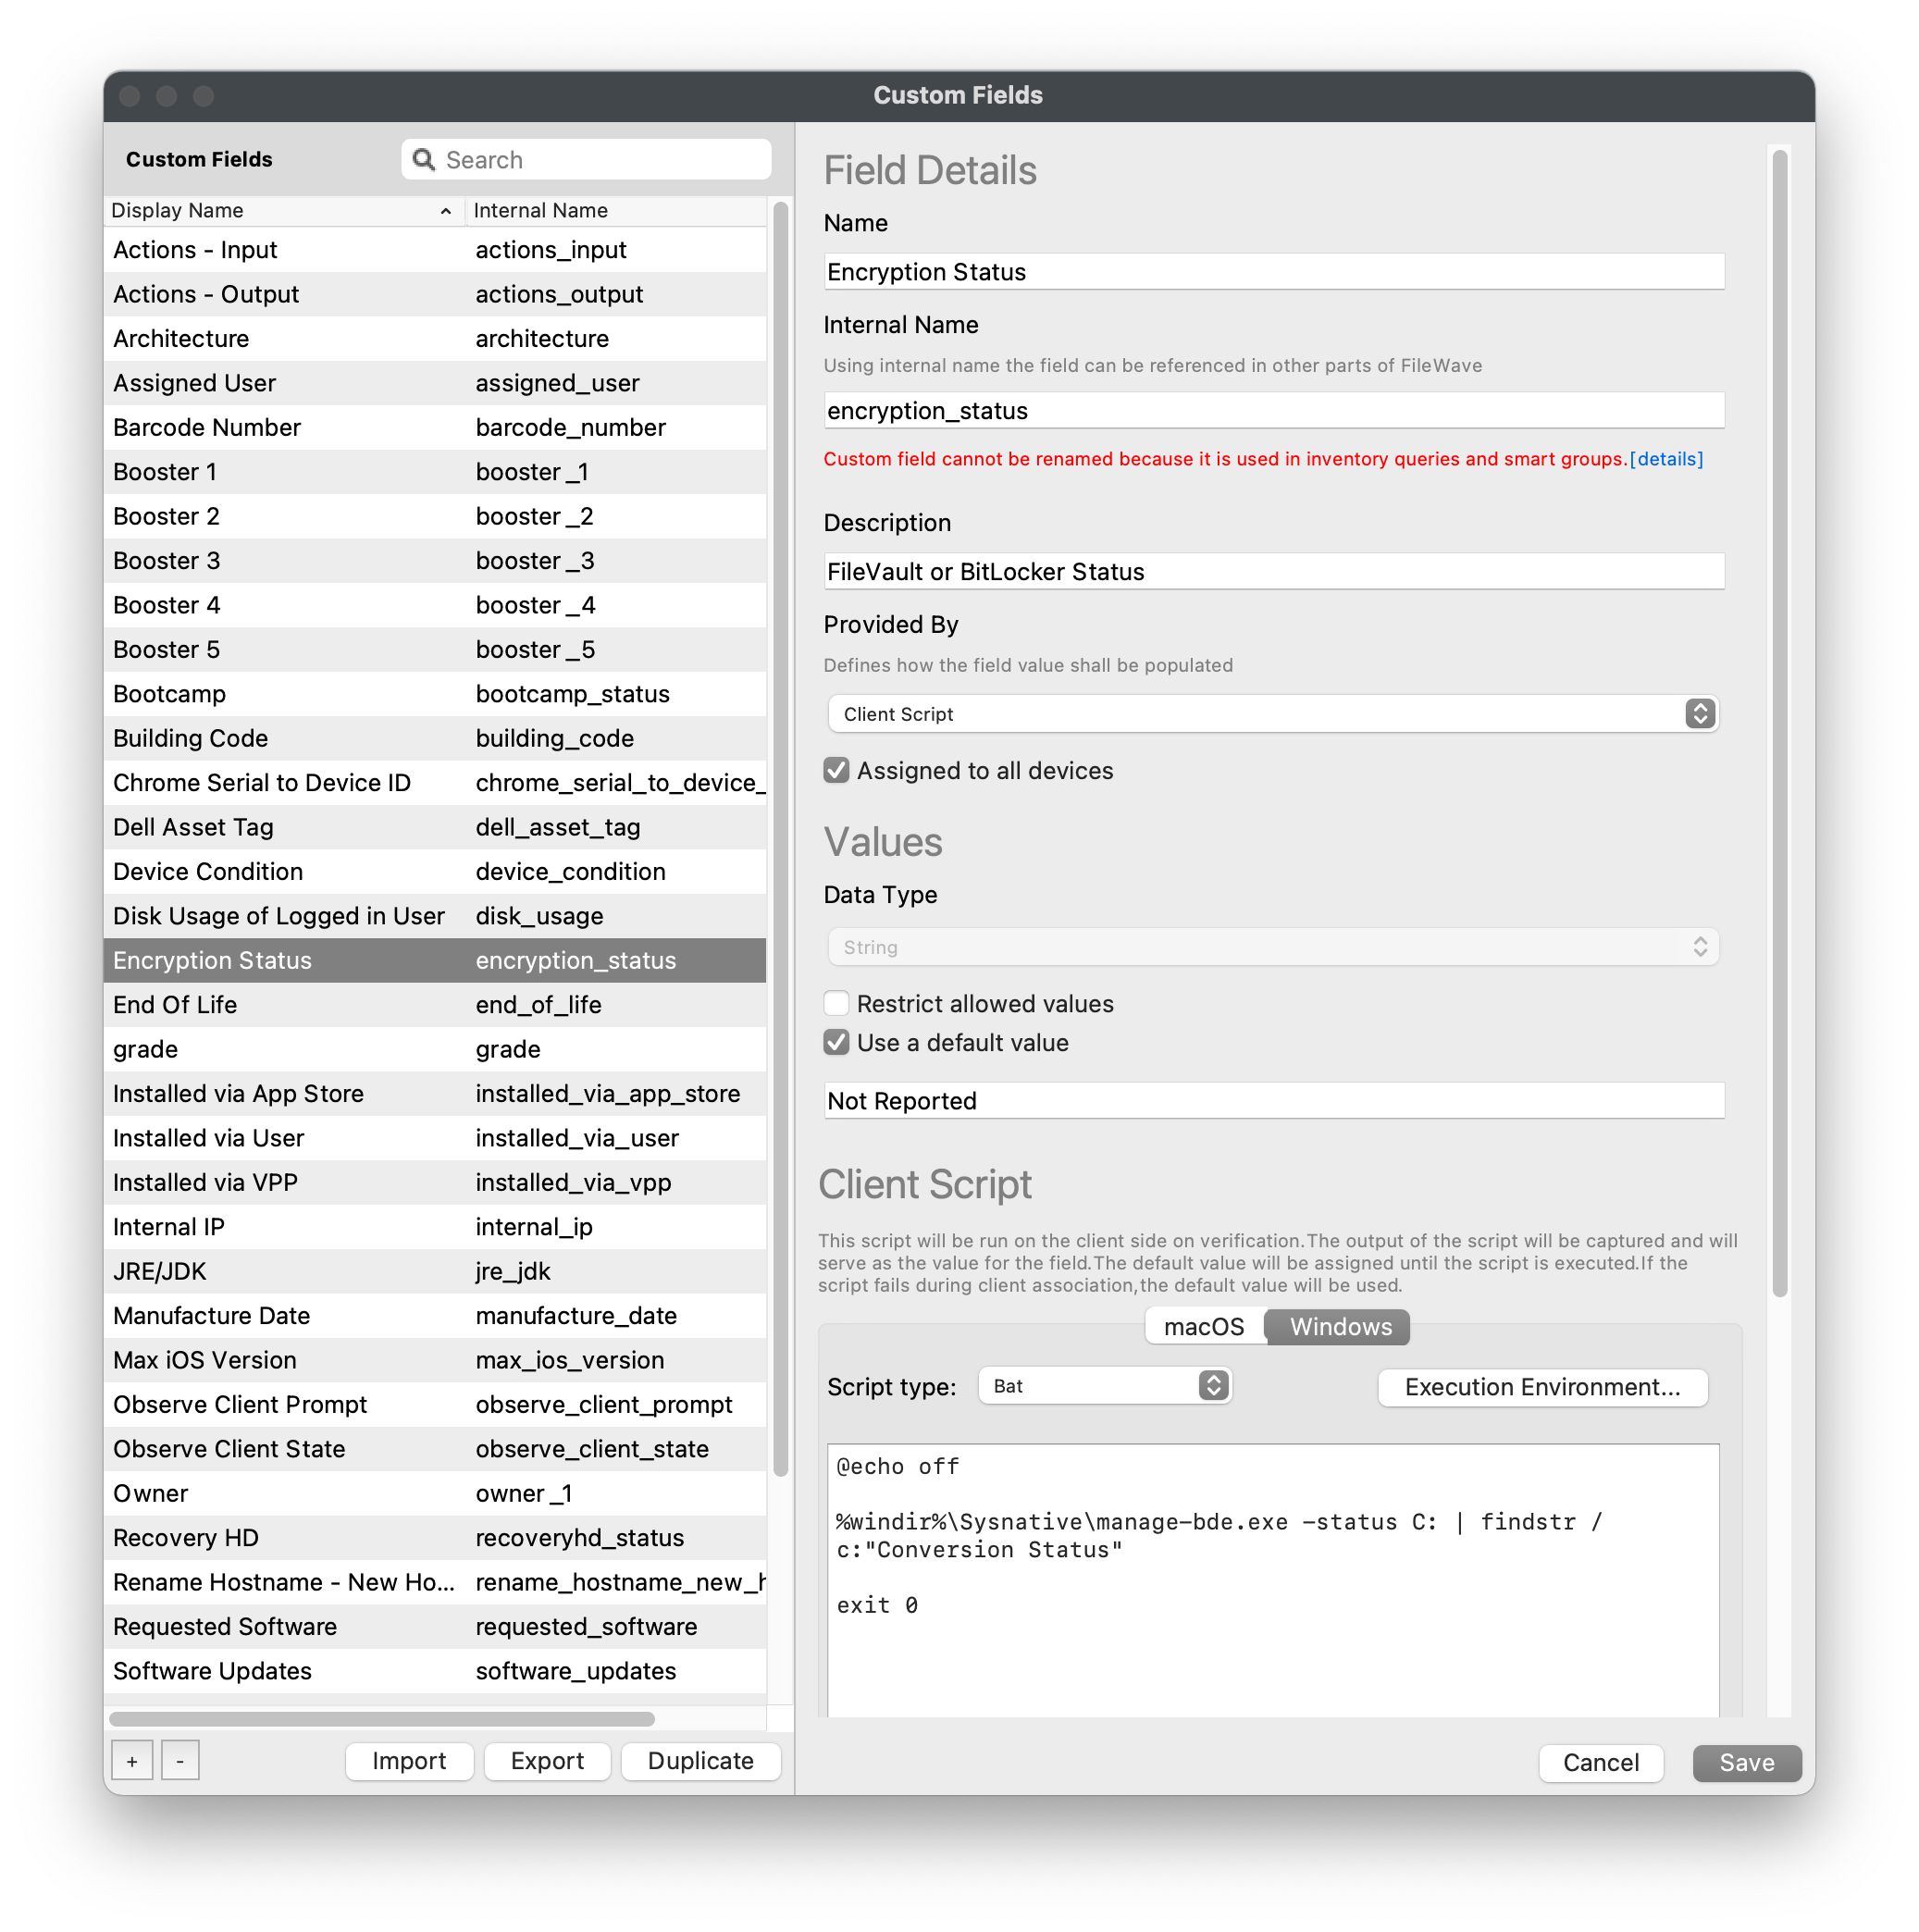
- Verify the correct scripting language and enter script for "macOS".
- Verify the correct scripting language and enter script for "Windows".
- Optionally, check
the"Use output only whenscriptsscript exits with code0"0box. *. Thiswill dependdepends on thescriptscript,you are running, howeverbut most successful scripts"exit0"withaftercodea successful execution. * You may be able to force "exit 0" by including it in your script.0. - Optionally, check
the"Replace line feed characters withspace"spacebox. * This is recommended as it will automaticallyto convert multi-line outputtointo a single-lineoutput.Custom Field value. - Click "Save".
Manually assign Custom Fields to devices
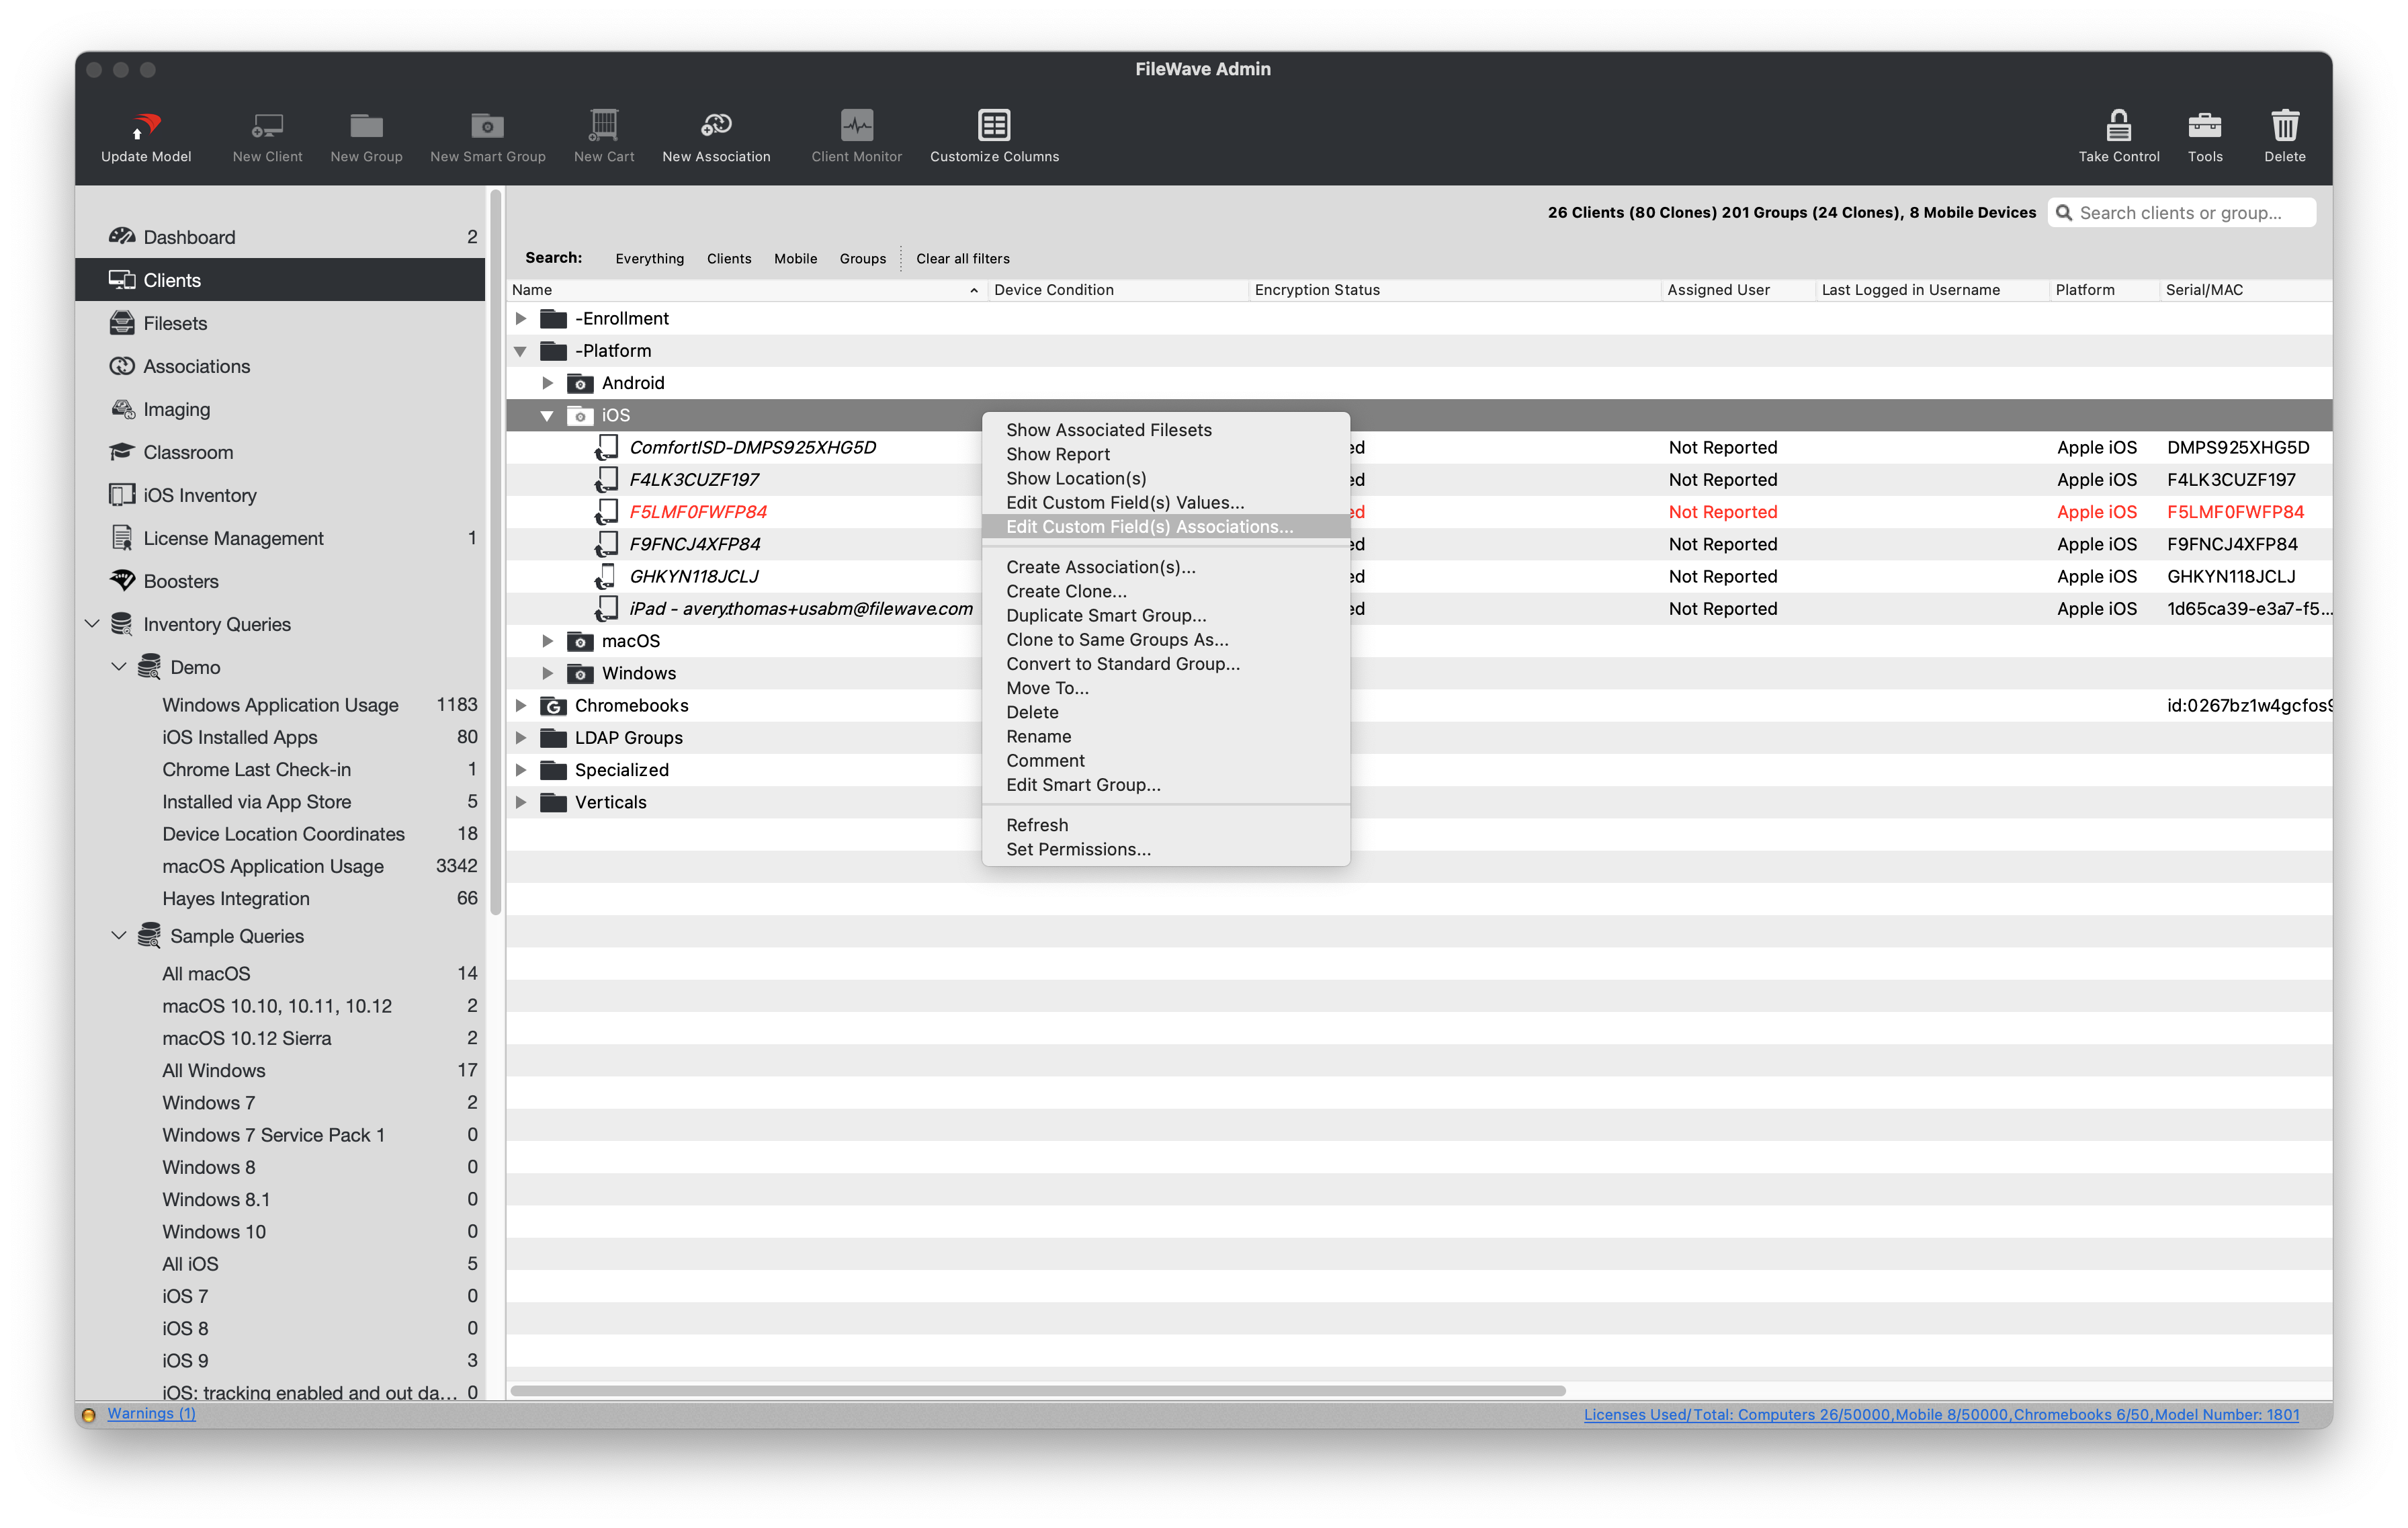
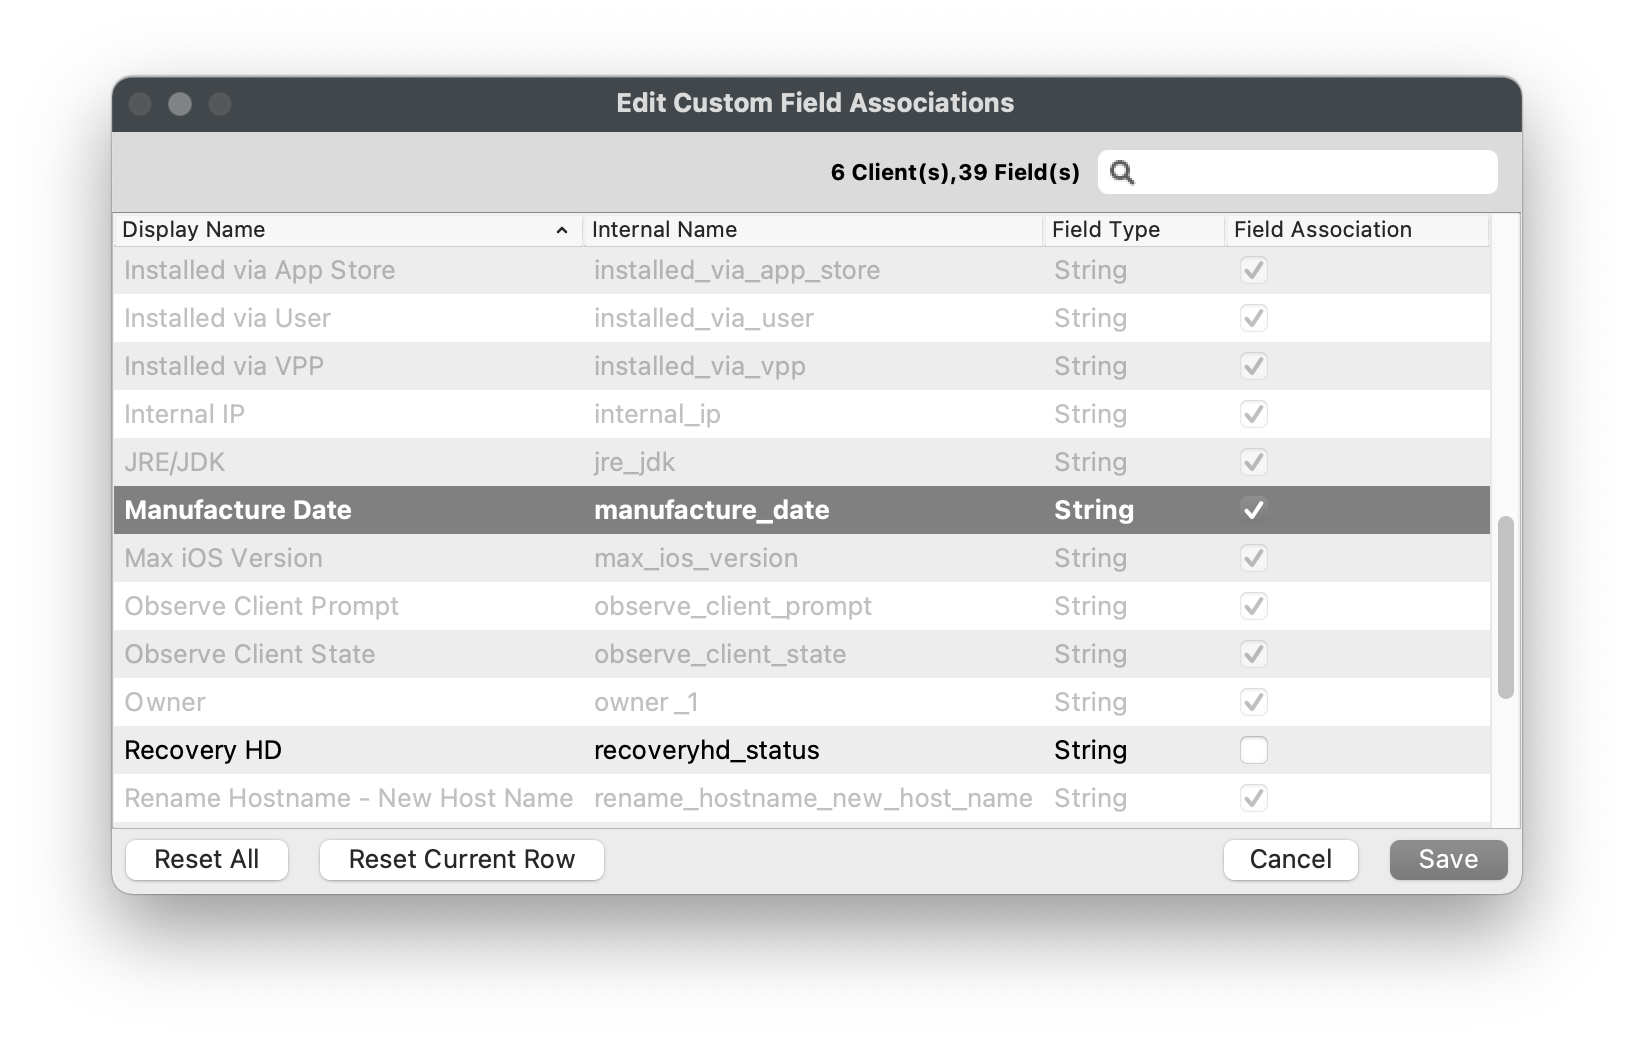
If you did not check the box "Assigned to all devices" when creating your Custom Field, you will need to manually assign the Custom Field to devices or device groups. In this example, we will assign the "Manufacture Date" Custom Field to the "iOS" Smart Group. Please note that new devices added to the "iOS" Smart Group will not automatically be assigned to the Custom Field and you may have to repeat this process to include new devices.
- Open FileWave
AdminCentral and navigate to "Clients". - Right-click on an individual device, multiple devices, or device group.
- Select "Edit Custom Field(s) Associations" from the right-click menu.
- Check the boxes for any Custom Fields you'd like to assign to the devices.
- Click "Save".
- You should now see the Custom Field listed in the device's "Device Details".
Manually edit Custom Field values
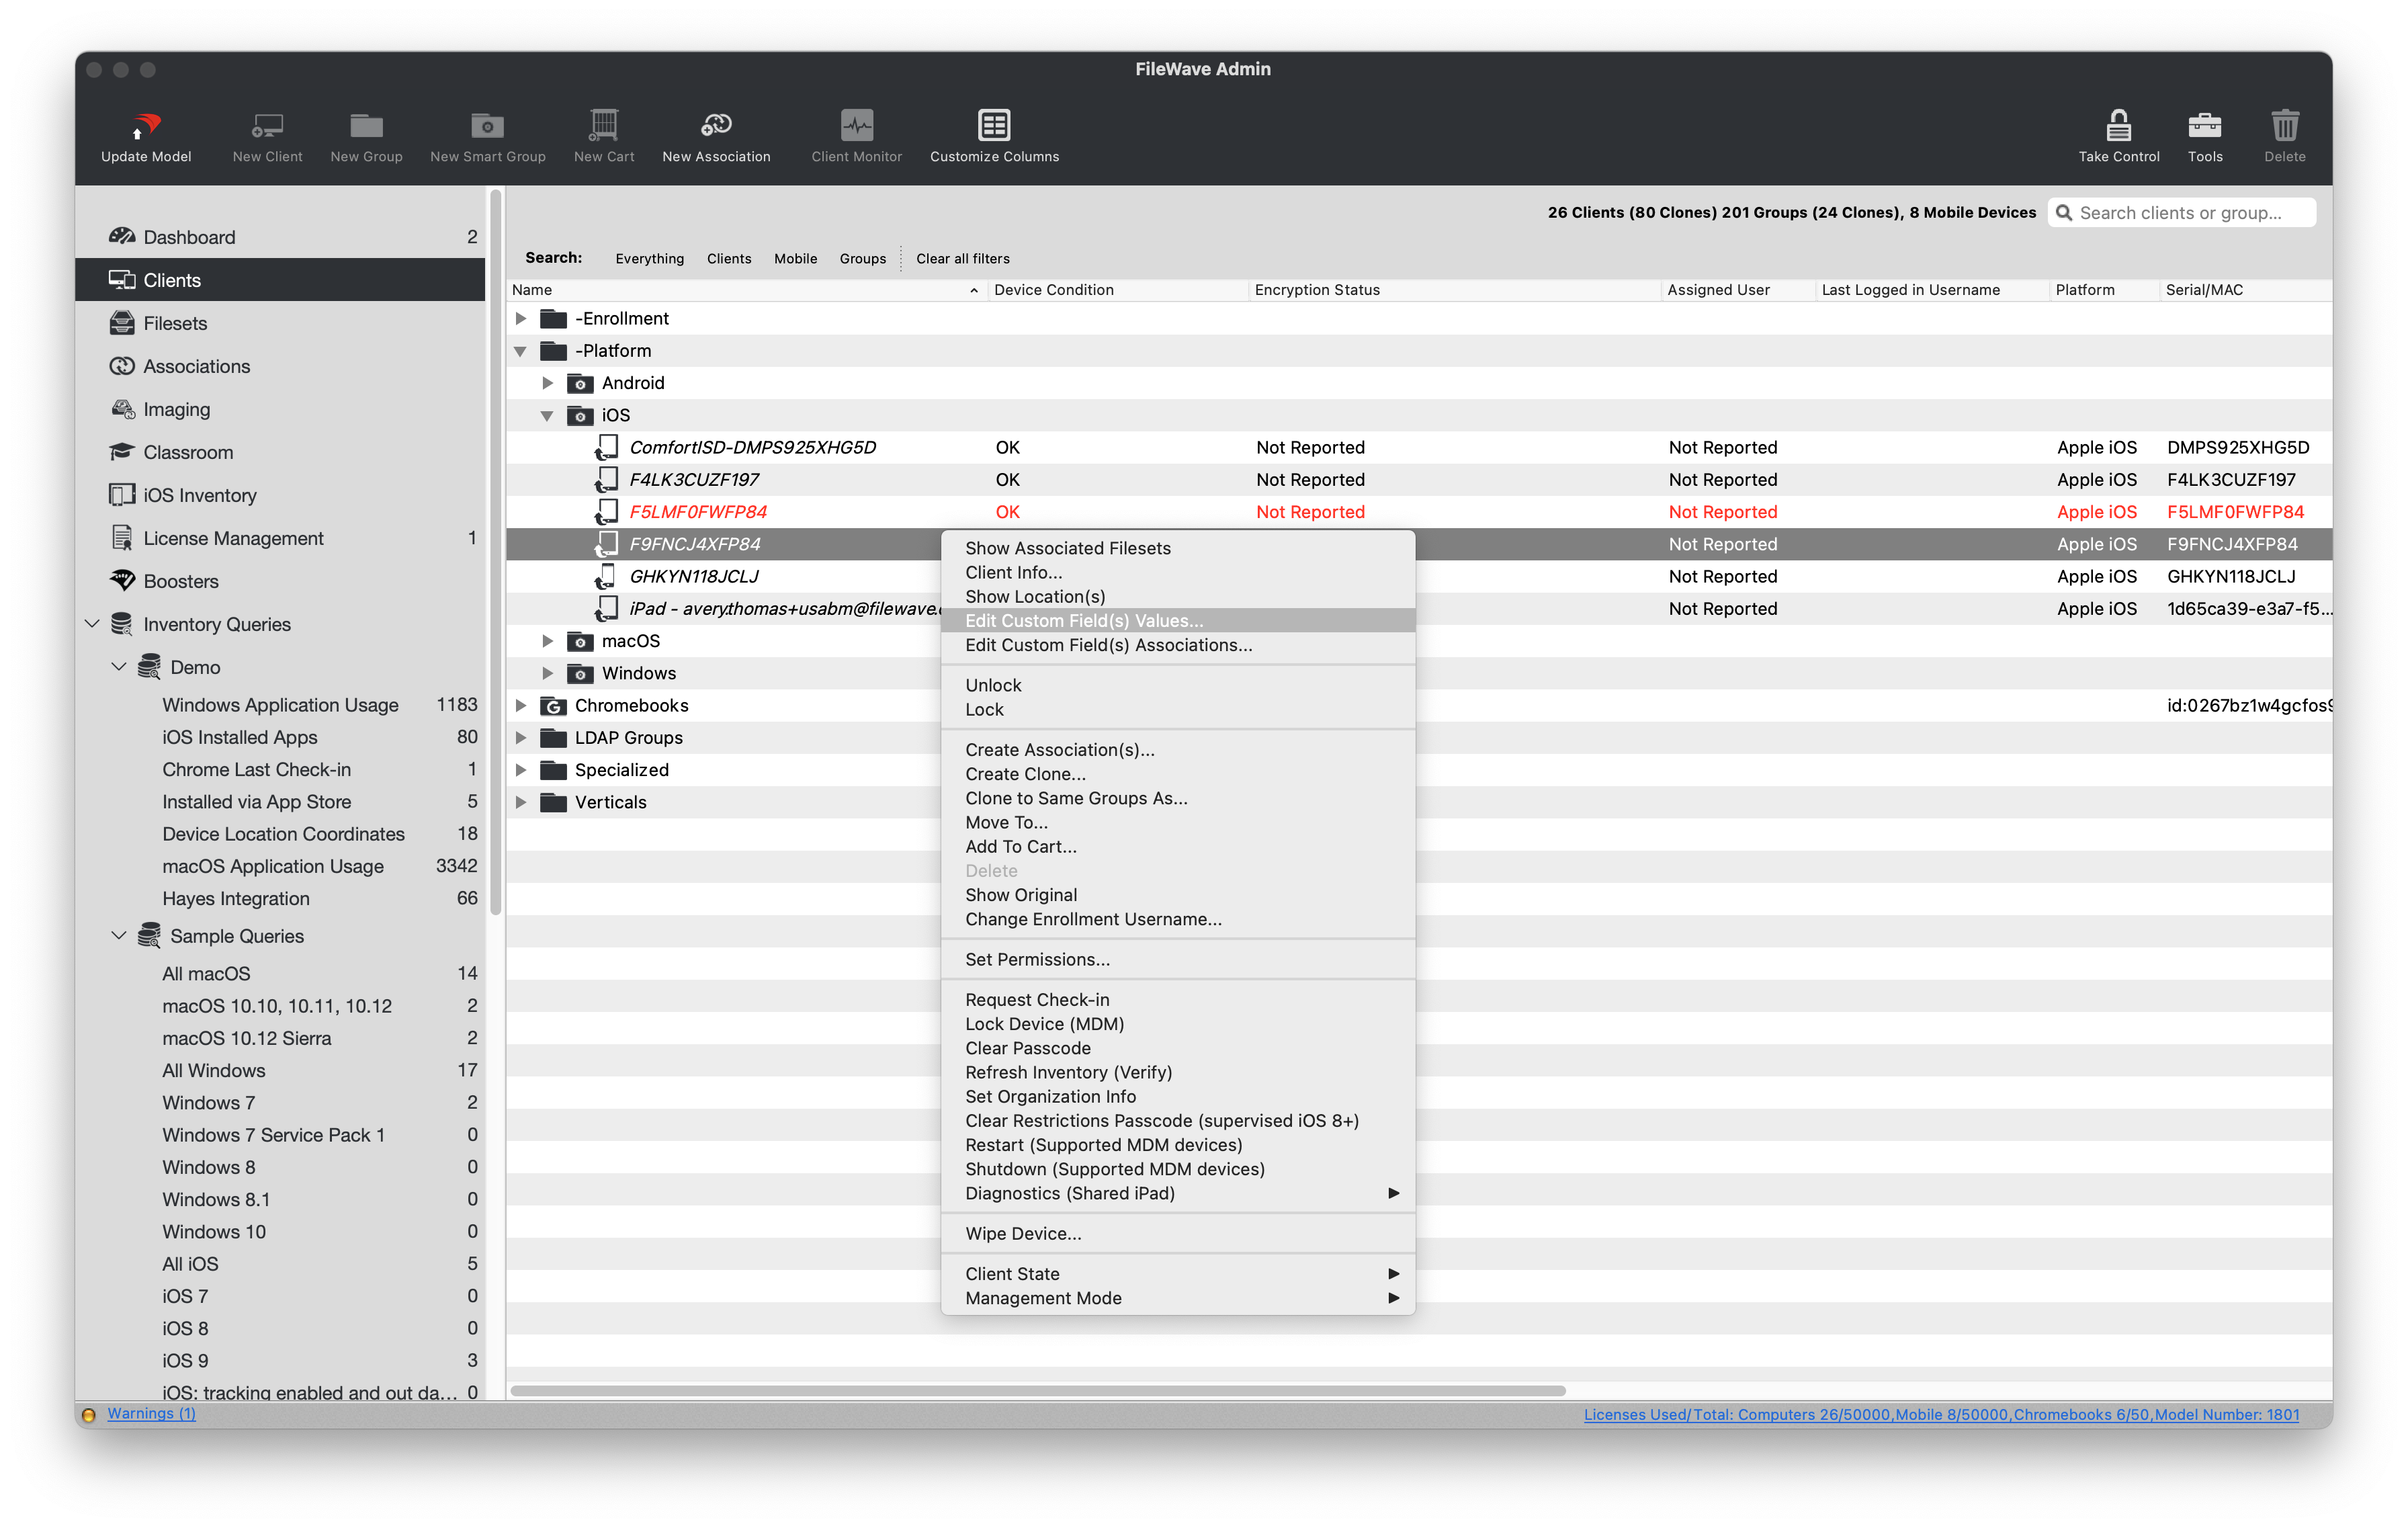
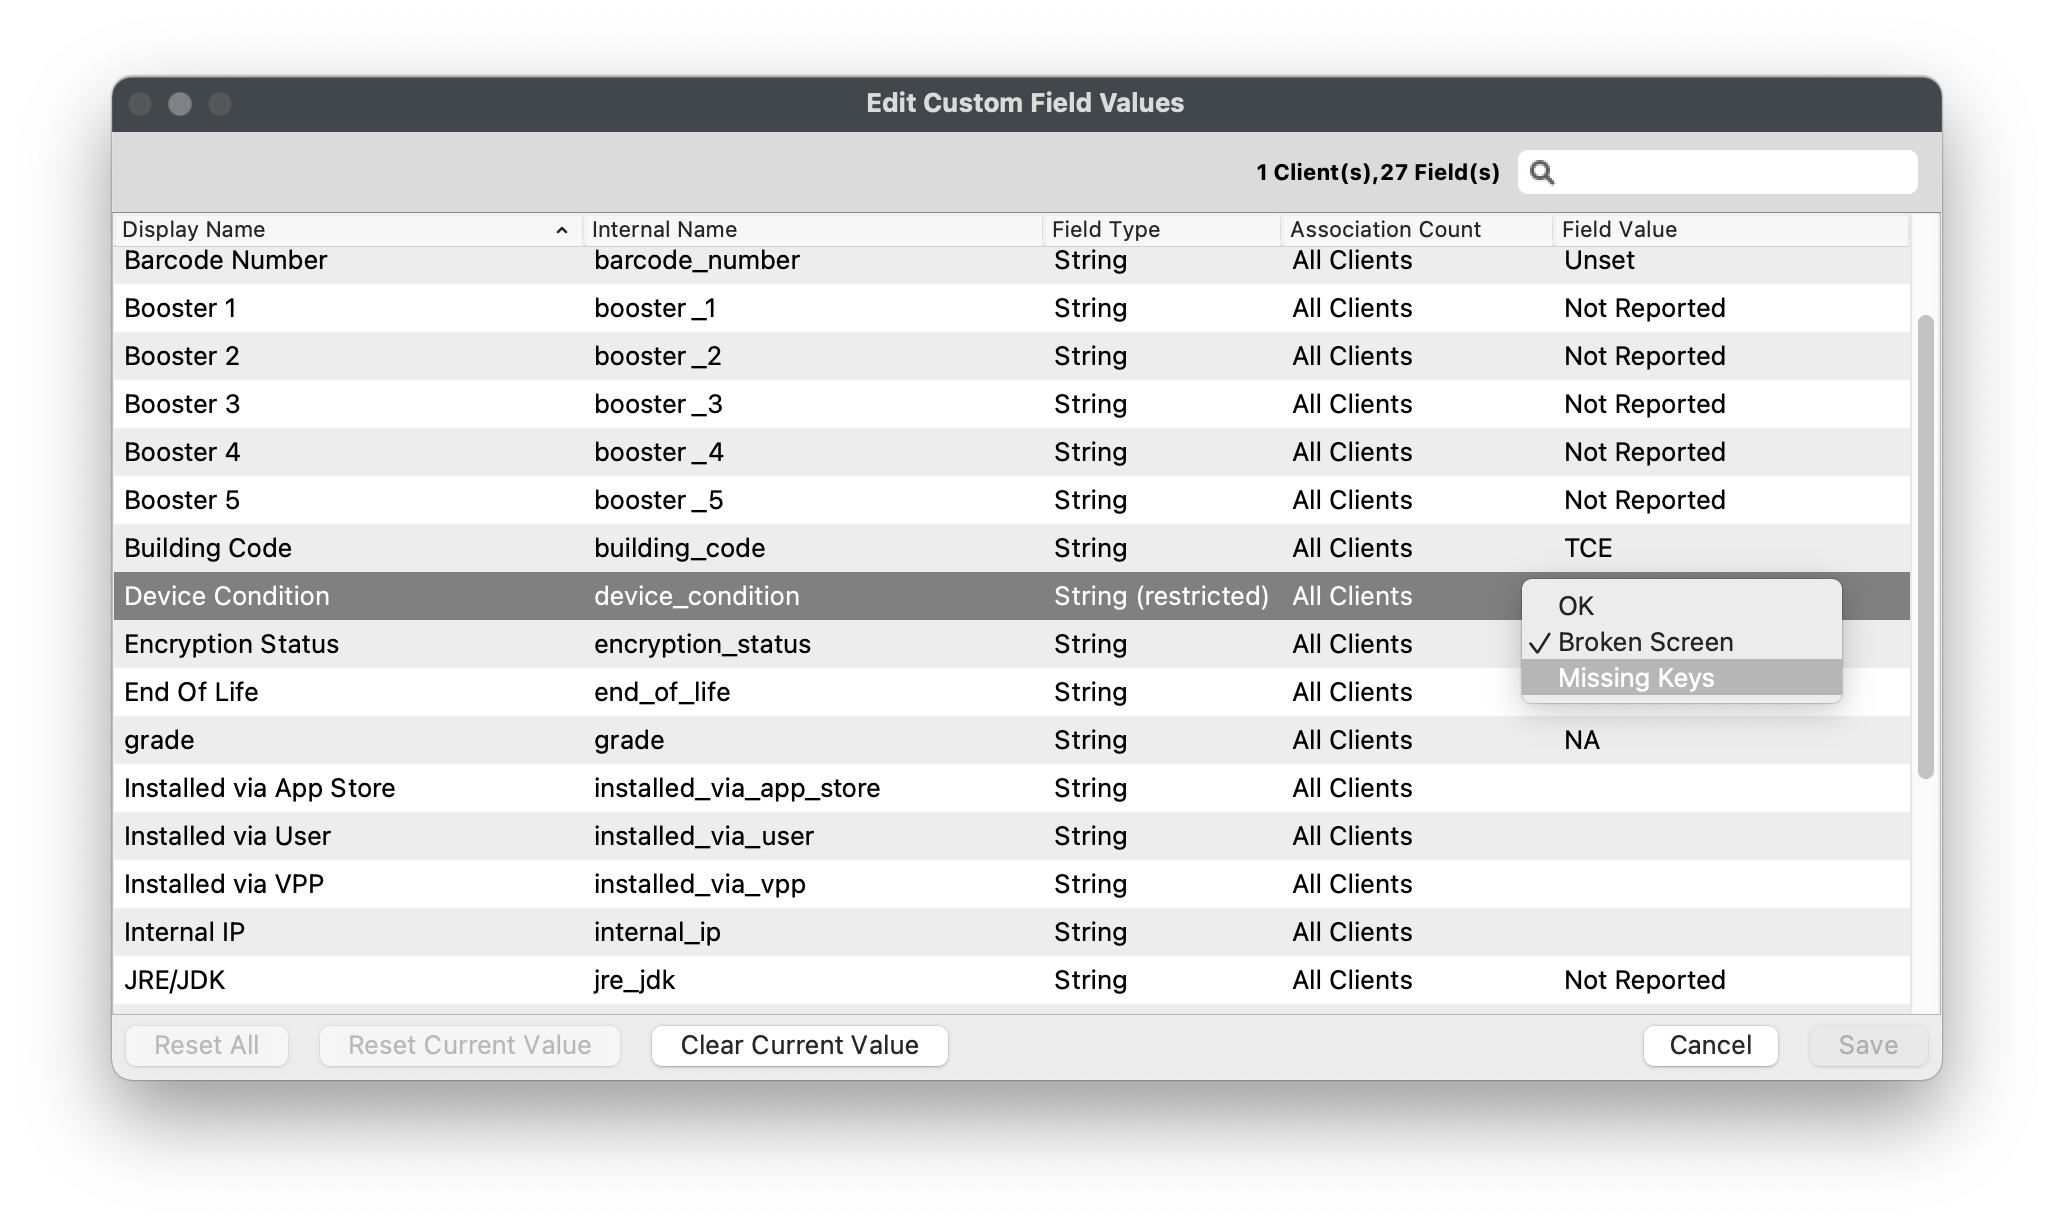
If youra Custom FieldsField is not being populated dynamically viaby CSV import or client script, you may have to manuallycan edit the Customvalue Field value.manually. This example will demonstrate changingchanges a device's "Device Condition"Condition Custom Field from a restricted list of "Restricted"allowed values.
- Open FileWave
AdminCentral and navigate to "Clients". - Right-click on an individual device, multiple devices, or device group.
- Select "Edit Custom Field(s) Values" from the right-click menu.
- Slow double-click the "Field Value" column or select option from drop-down menu for any Custom Fields you'd like to modify.
- Click "Save".
- You should now see the Custom Field modification in the device's "Device Details".
Import Custom Fields via CSV
IfFor youbulk needCustom to makeField updates or thefirst-time initialimports, import of a Custom Field en masse, you may consider usinguse a CSV templatetemplate. toOne speedCSV things up. Youfile can import anvalues individualfor one or multiplemore Custom Field(s) from one CSV file.Fields.
 Open FileWave
 AdminCentral and navigate to "Assistants > Custom Fields > Import CSV".- Click "Download Template".
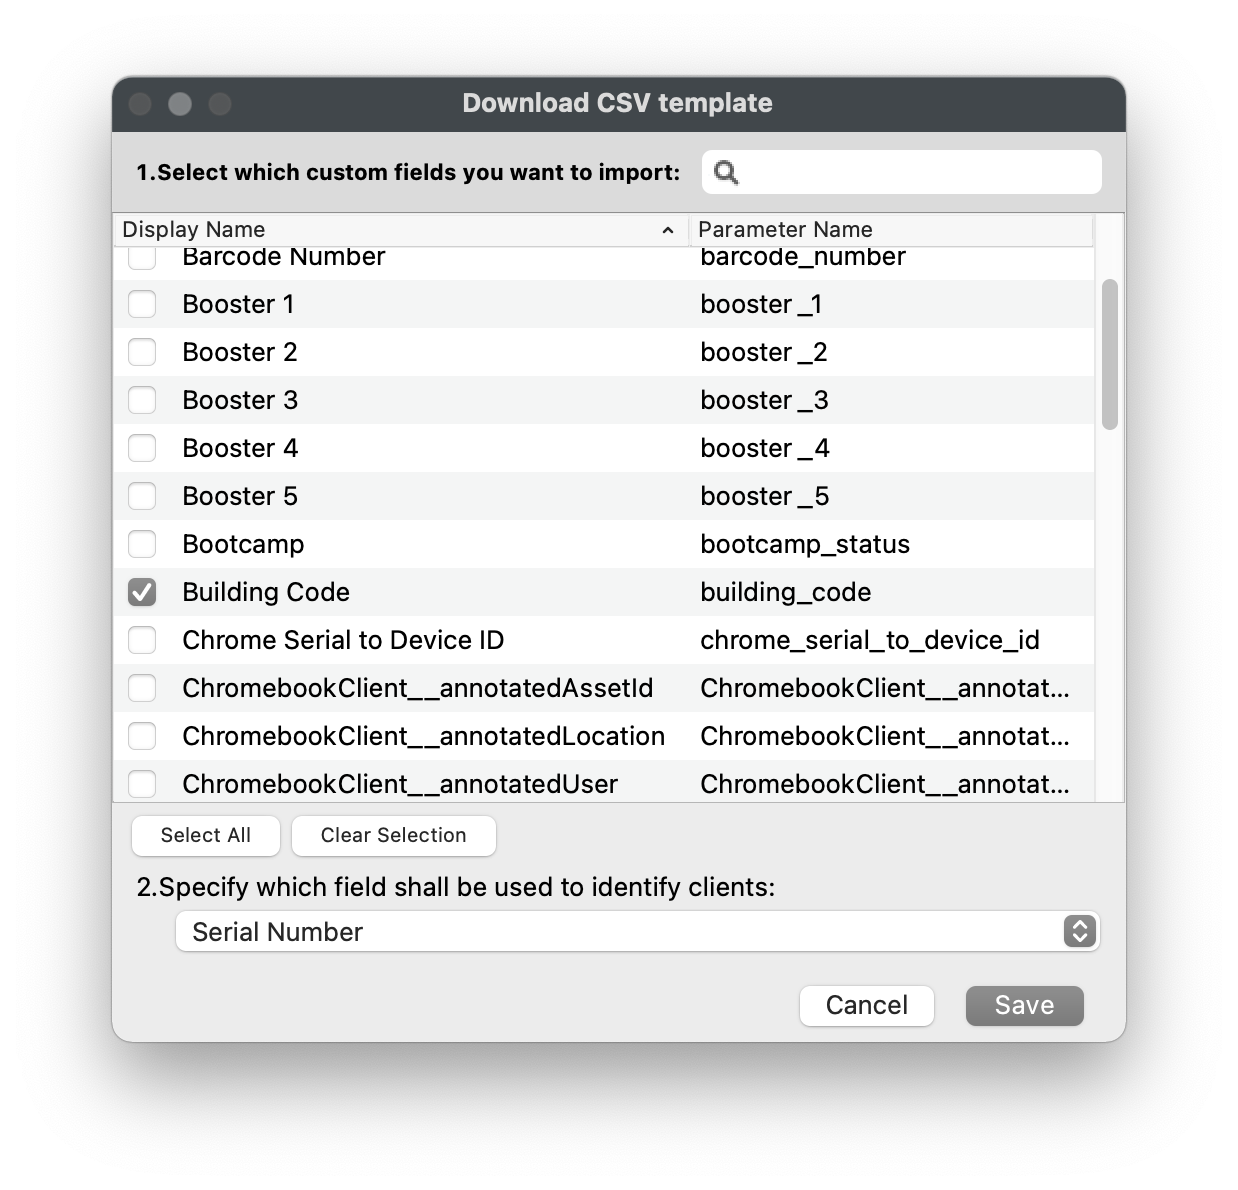
- Select all of the Custom Fields you'd like to import via CSV.
- Select the unique identifier from the drop-down menu.
- "Serial Number" is recommended for iOS, macOS, and Chromebooks.
- "Client Name" is recommended for Windows as it will reflect the Windows hostname.
- Click "Save" to download the CSV template.
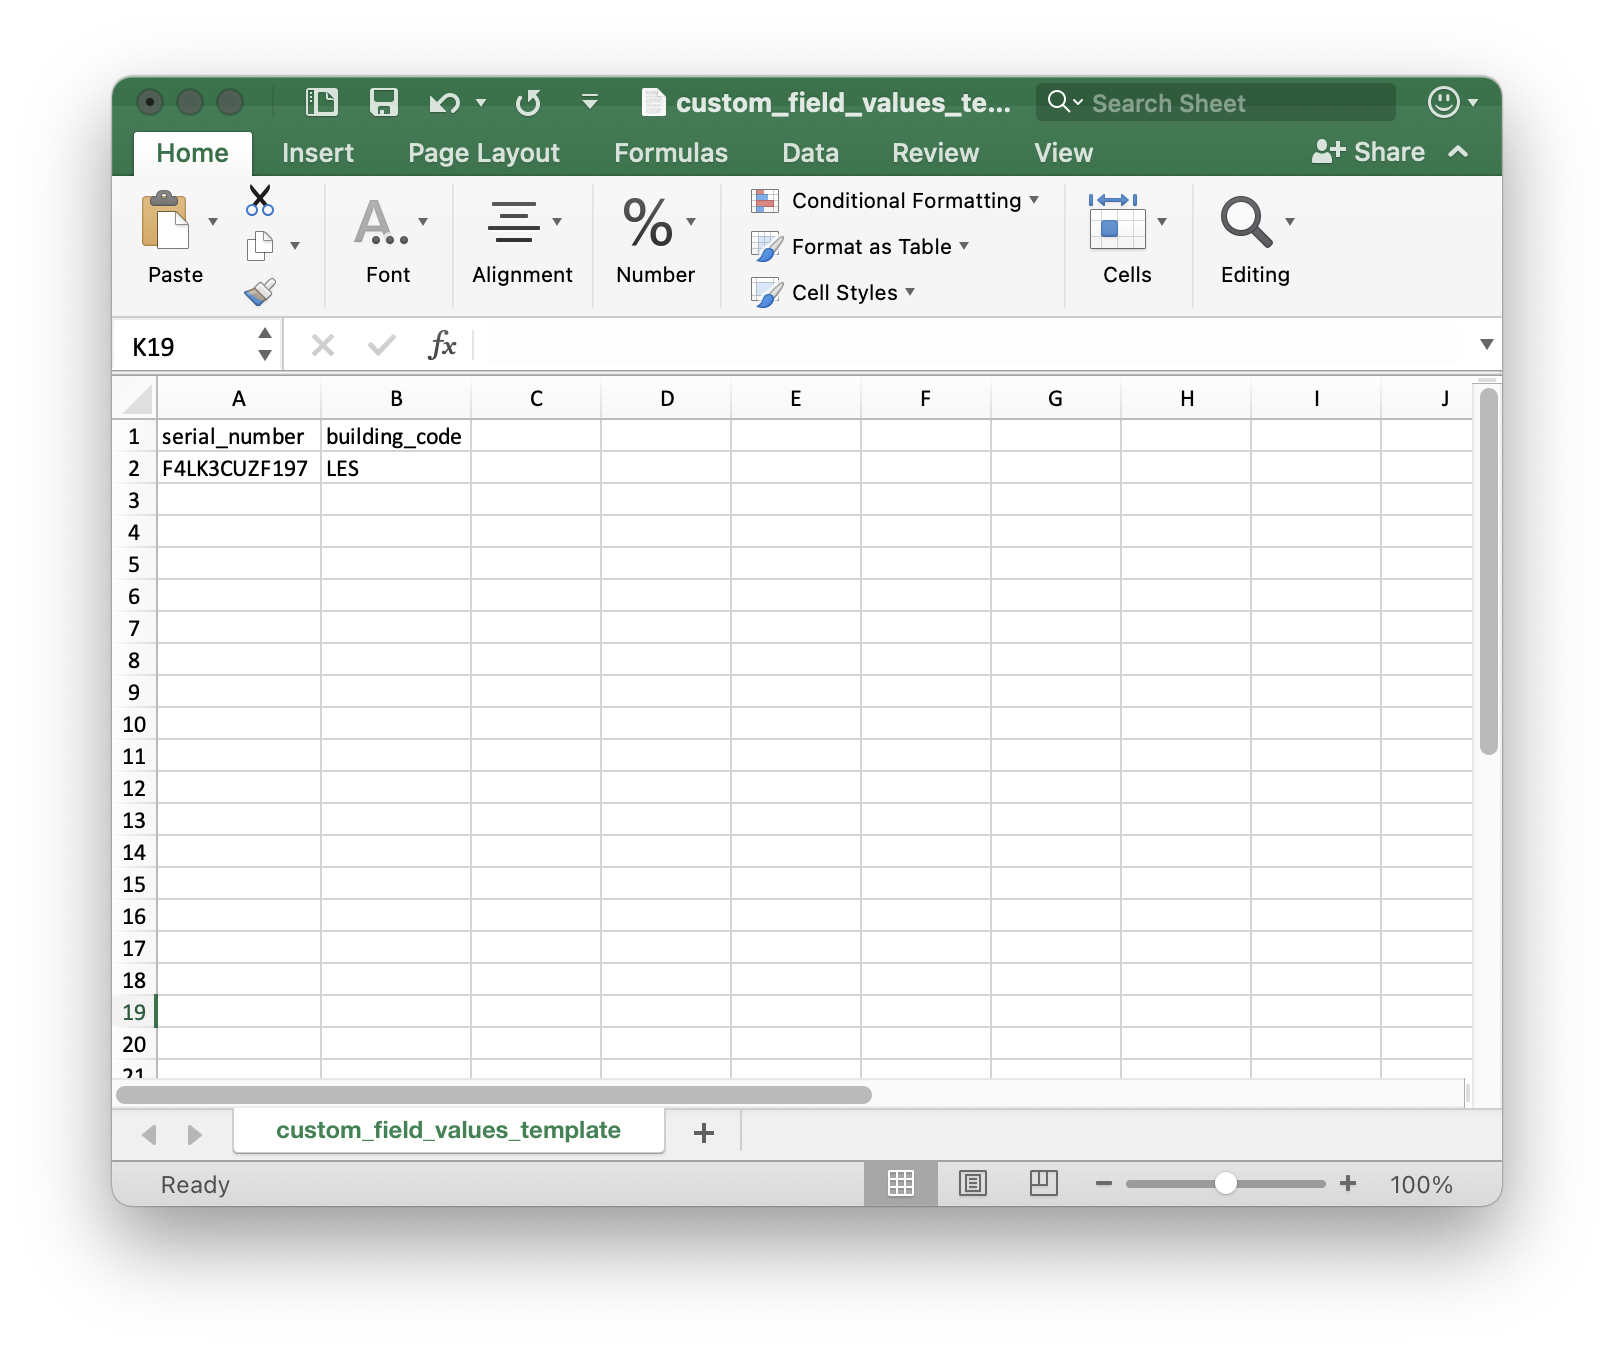
- Open the CSV template in your editor of choice (ex: Excel).
- Leave the "header" line intact, remove the comments, and add your values.
- The CSV template will default to using semicolons ";" as the delimiter.
- You can change to a comma "," delimiter by replacing all ";" with ",".
- If using Excel, split each value into a column with no delimiter and "Save as > CSV".
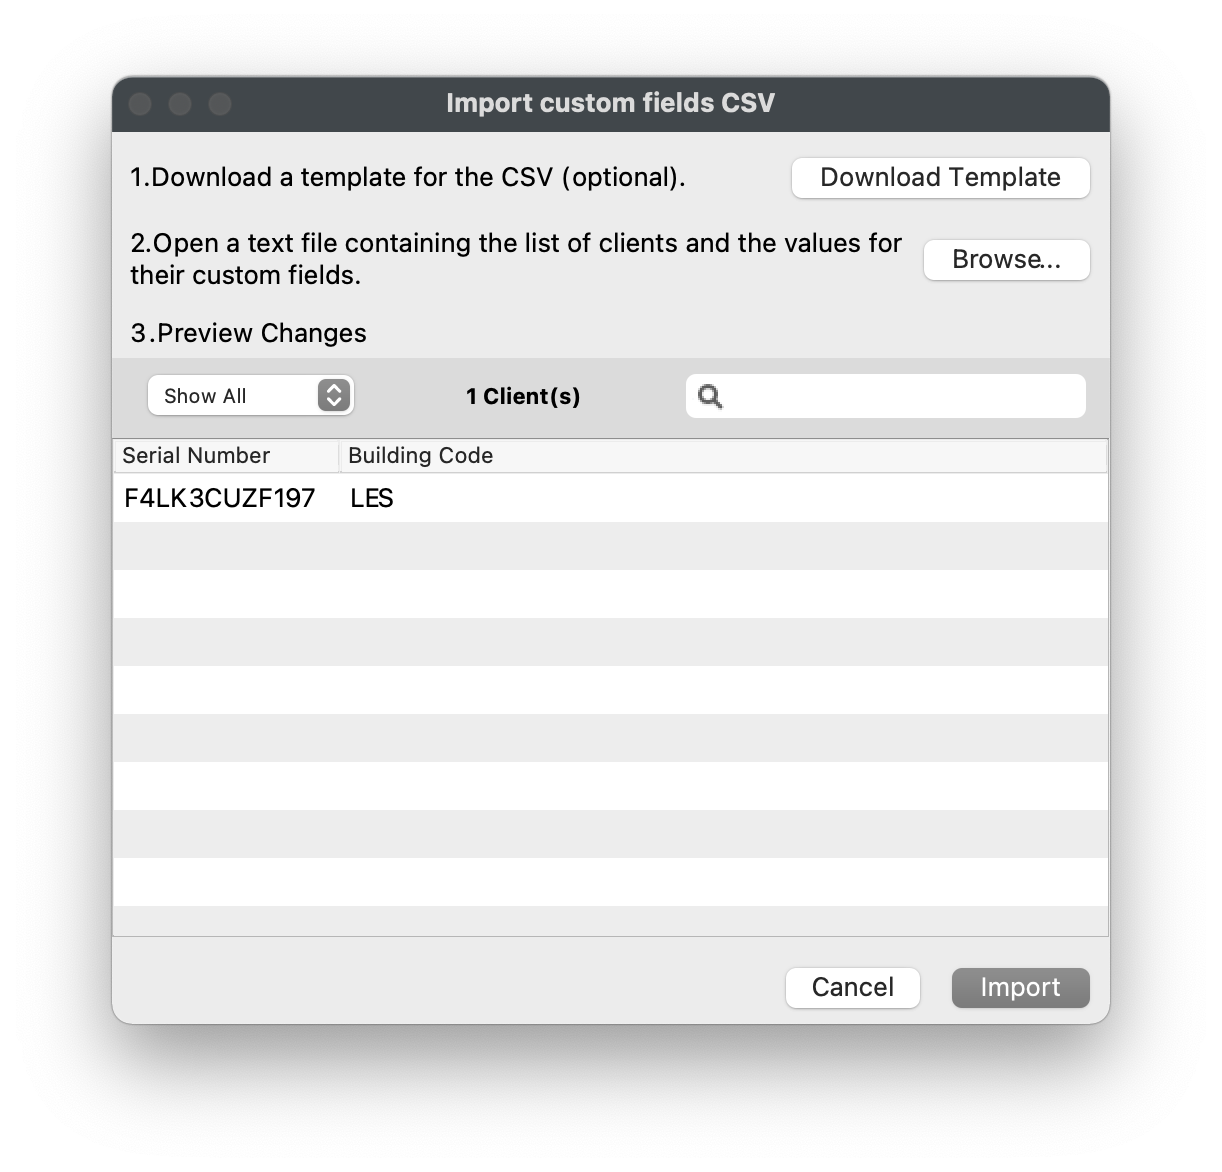
- Click
"Browse"Browsefromin the"Import custom fieldsCSV"CSV window and selectyouyour CSV template. - Verify the changes and that all entries are visible.
- Click "Import".
- You should now see the Custom Field modification in the device's "Device Details".
Troubleshooting
If you are receiving an error such as:
Error while processing CSV data: Error transferring https://yourserver.filewave.net:20445/inv/api/v1/custom_field/upload/?mode=dry-run - server replied: Bad Request: Unknown key field 'serial_number' in CSV
It is likely that the file was saved in a Windows application like Excel or text editor and included a BOM (Byte Order Mark) at the very start of the file. You should be able to re-open your .csv in your favorite text editor and save a copy as plain UTF-8 instead of 'UTF-8 with BOM'.