FileWave Server Setup
What server type is best for me?
The first step to begin your FileWave Evaluation is to determine your FileWave Server hosting preference. FileWave offers both a Cloud-Hosted server and an on-premise virtualized server appliance for either Hyper-V or VMWare.
Cloud-Hosted Server
If you desire a FileWave Cloud-Hosted server and have not already received the login information, please request a Cloud-Hosted server from your dedicated FileWave SE, and they will provide you with the server's address, username, and password. The FileWave Cloud-Hosted Server will be a "production" server so that any progress you make during the evaluation will persist if you choose to purchase FileWave.
Please note that choosing a Cloud-Hosted Server may have an additional cost, depending on the licensing structure selected at the time of your purchase. Also, to better manage the cost incurred by FileWave during your evaluation, your FileWave SE will discuss your organization's timeline to determine the best possible start date and expiration date for your evaluation. Thank you in advance for your understanding in regards to these matters.
Pros of FileWave's Cloud-Hosted Server
- Near instant availability with limited setup time required
- Managed public FQDN and SSL certificate
- Ability to manage devices on any network with an internet connection
- Free "hands-off" upgrades of FileWave
- Guaranteed server uptime
- Automated Backups
- Low maintenance
On-Premise Server
If you desire to host the FileWave Server on-premise by installing on a macOS machine or virtualizing our pre-built appliance in Hyper-V or VMWare, please continue to read the following section.
Requirements
Most steps required for an on-premise server will be in regards to your local network's infrastructure, including virtual environment, DNS, and Firewall/Content Filter. If you do not have direct access to these systems, please coordinate with your Network Administrator or other qualified personnel before proceeding.
Before importing the FileWave Server virtual appliance, we recommend setting aside a static IP and DNS name for it. This will make it easier to move the server to another IP in the future and possible to manage off-premise devices over the Internet. Although technically possible, it is highly unrecommended to only use an IP address to reference the FileWave Server, so please configure a valid and potentially publicly-resolvable fully qualified domain name (FQDN) for the FileWave Server.
Note that the FQDN selected must be resolvable on all network segments from which you plan to manage the client devices. If you want to manage devices both on and off your network, then the same FQDN must be resolvable both on and off your network. Inside your LAN, this FQDN will resolve to the internal IP address of your FileWave server. Externally, that same FQDN will resolve to the public IP address of the internet router in front of the FileWave Server. With mobile devices like iPhones and iPads that have a high possibility of leaving your LAN, they must be able to access the FileWave Server at all times, especially when they are off-network.
Off-Premise device management via the Internet
A static IP allows you to easily forward the ports used by the FileWave server to its internal IP on your LAN, ensuring that requests from client devices are still able to reach it even when they are off-network. The following ports must be forwarded to the FileWave Server. Some of the ports, such as 20016, are optional if the IT staff will only be accessing the FileWave Admin while on the LAN.
A full listing of FileWave ports and port diagrams is available here.
FileWave Server Installation
The FileWave Server can be installed onto any macOS 15+ machine with minimum specs of 16GB RAM / 8 CPU, or virtualized in either Hyper-V or VMWare using our pre-built virtual appliance based on Debian. If virtualization is available, we highly recommend using our pre-built server appliance versus a macOS machine because of the flexibility to extend allotted server resources. When choosing a virtualization platform for your FileWave Server virtual appliance, we recommend a server platform such as vSphere or Hyper-V over a client platform like VMware Workstation/Fusion or VirtualBox. A VM server platform does not require that you be logged into a user session for the VM to be running. AlsoAlso, in the event that the physical system hosting the VM server restartsrestarts, the VMs hosted on it can also be configured to start up automatically also.automatically.
Software Downloads
All software downloads outlined in the following steps can be found here. Please always select the latest version of FileWave unless instructed otherwise by your FileWave SE.
macOS
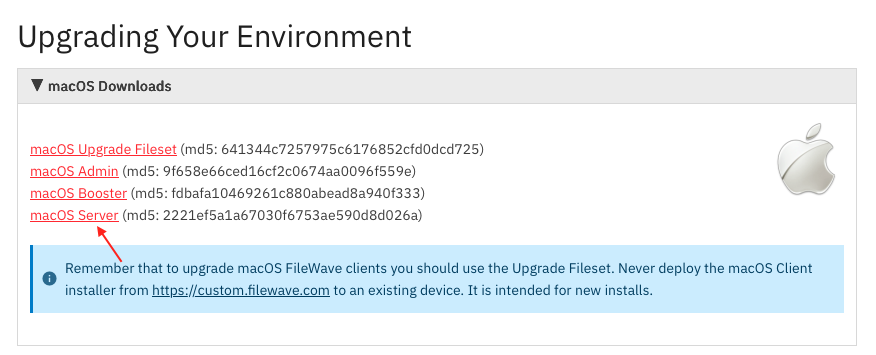
Importing the macOS Server PKG from the latest version's downloads page
Hyper-V Linux Appliance Import
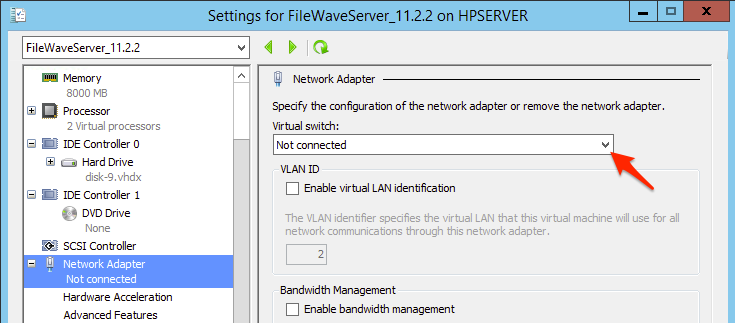
You Importing FileWave Virtual Appliance
-Hyper-V
VMware ESXi Linux Appliance Import
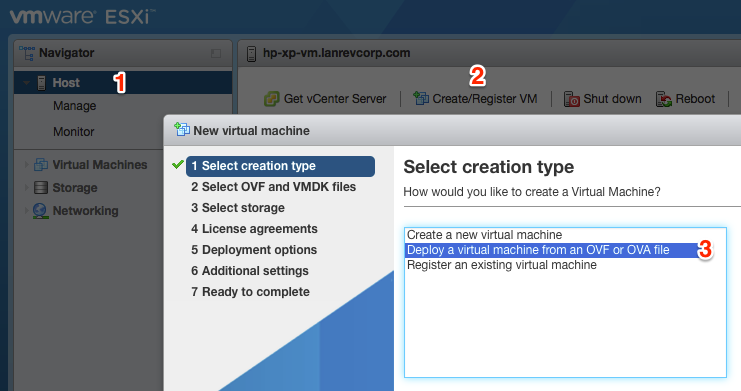
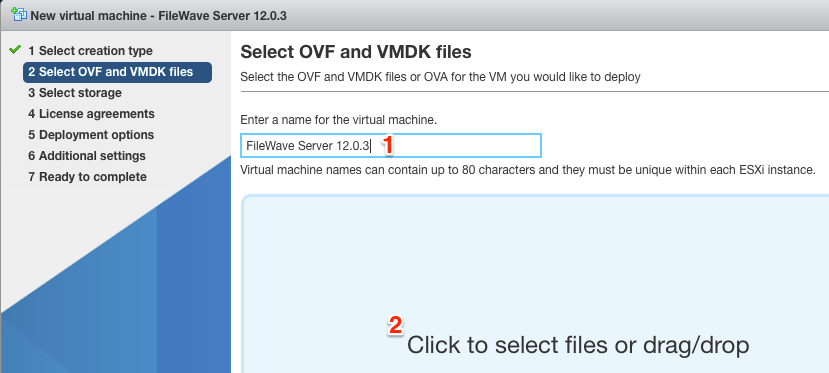

VMware Fusion Linux Appliance Import
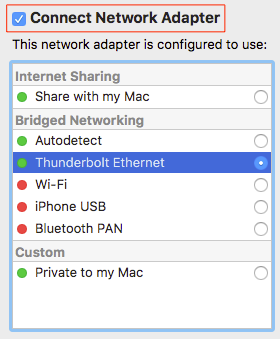
VMware Workstation Linux Appliance Import
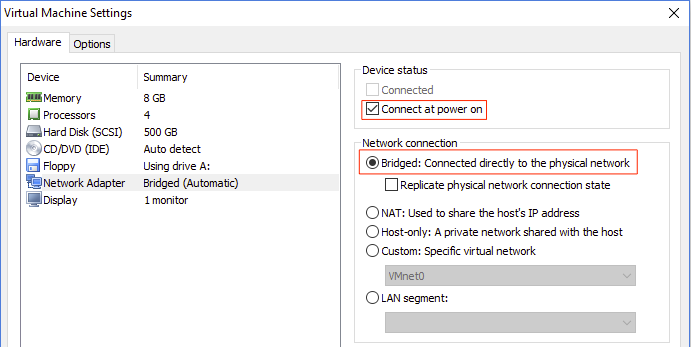
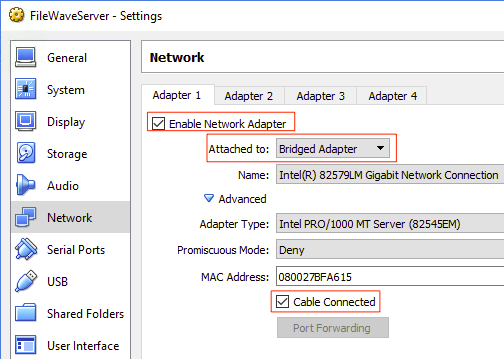
VirtualBox Linux Appliance Import
Debian (not appliance)
In the case maybe you need to setup your own Debian OS. This is fine to do. Refer to the Debian section of the latest version of FileWave that is on the DownloadsAppliances page to see the commands to run to install or upgrade. It's the same commands. One thing to note is that Webmin won't be installed, but you could download and easily install it if desired. Aside from Webmin there is not much different between a stock install and our Appliance.
Check the Downloads page for the most recent. Below is an example:
# login via ssh as root or use sudo for every line below
# OS Upgrades:
sudo apt update -y
sudo DEBIAN_FRONTEND=noninteractive apt-get upgrade -y -o Dpkg::Options::="--force-confold"
# Download and Install:
wget https://fwdl.filewave.com/15.2.1/fwxserver_15.2.1_amd64.deb
sudo dpkg -i ./fwxserver_15.2.1_amd64.deb
# If dependencies are not met then the below will install them allowing for the FW server to install:
sudo apt-get install -f
# If you needed to use the above command for dependencies then run the next line again.
# It will succeed once all dependencies are handled which can take a couple of tries:
sudo dpkg -i ./fwxserver_15.2.1_amd64.deb
sudo reboot
Configuring the Linux Appliance Network Settings
Once you are done importing the FileWave Server Linux appliance, please power it on and configure the network settings using one of the guides below. Once the network settings have been configured, please create an internal DNS A-Record to set a fully qualified domain name (FQDN) for your FileWave Server that points to the Static IP Address configured below. If you plan on managing devices off-network, please ensure the FQDN is resolvable via the Internet and that you have the ability to obtain an SSL certificate that can protect your FQDN.
You will find two sections below, Command Line and Webmin GUI. Please select only one of the two sections based on your preference to configure the settings.
Please disregard this section if using a macOS FileWave Server as you will configure macOS System Preference to configure Static IP address.
Debian Command Line
Debian Command Line Networking
Access FileWave Server's Command Line Interface (CLI) via direct console access or SSH using the "fwadmin" user and password "filewave" and you will be prompted to change the password. (For FileWave prior to 15.5.0 the user was root.)
SSH into FileWave Server
ssh fwadmin@192.168.1.85Change the FileWave Server's password when prompted and take note of it in a secure location. You will not see password being typed, press Enter when finished.
The following guide is tailored for Debian servers using the interfaces file, but you could also use Webmin (below) on your server assuming the server comes online initially with DHCP.
-
Locate Network Interface:
First, identify the network interface you wish to configure. You can list all network interfaces using:
networkctl list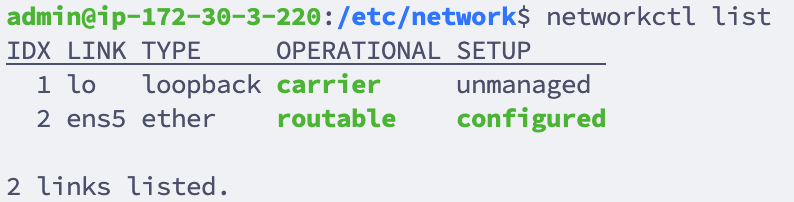
- Edit the /etc/network/interfaces file: Using 'nano', edit the interfaces file to set the network configurations.
nano /etc/network/interfacesYour default interfaces file should look something like this (your interface name may be different):
# The loopback network interface
auto lo eth0
iface lo inet loopback

# The primary network interface
iface eth0 inet dhcp
Change the file to look like this, using your network preferences (note 'dhcp' has been changed to 'static' in line 6)
# The loopback network interface auto lo eth0 iface lo inet loopback # The primary network interface iface eth0 inet static address 192.168.10.33 netmask 255.255.255.0 broadcast 192.168.10.255 dns-nameservers 192.168.10.254 192.168.10.255 - Verify Resolv.conf, hosts and hostname files: Verify that these files in /etc/ are configured correctly for your network and server.
/etc/resolv.conf: This file should list your DNS servers
/etc/hosts: This file should point your FQDN to localhost (127.0.0.1)
/etc/hostname: Specifies the hostname for your server. This is filewave by default. - Restart/Check Network Status:
systemctl restart networking.service systemctl status networking.service - Verify IP:
ip a

Webmin GUI
For Webmin on Debian know that you will need to go to Webmin -> Webmin Configuration -> Operating System and Environment and make sure it's set to Debian 12.4 (Or whatever version we are at when you set up your system. You can see this with cat /etc/debian_version on the server.
- At the login screen note the URL to remotely manage the server, ex: https://myorg.filwave.net:10000
- If there is no IP address specified because DHCP is not available on the subnet for your FileWave Linux Appliance, login with the username "fwadmin" with password "filewave" and in prior versions of FileWave it was username "root" with the same password.
- CentOS (Deprecated):
Run "nmtui" at the command prompt to launch the Network Manager Text UI so you can configure the networking for the FileWave VM appliance. You'll need to reload the IP stack with "service network restart". - Debian: Please see our KB on network configuration: Networking - Assign static IP Address for a FileWave Appliance
- Skip the network configuration steps later in the Webmin.
- Browse to this URL and log in with username "fwadmin" and password "filewave". We will change this password later.
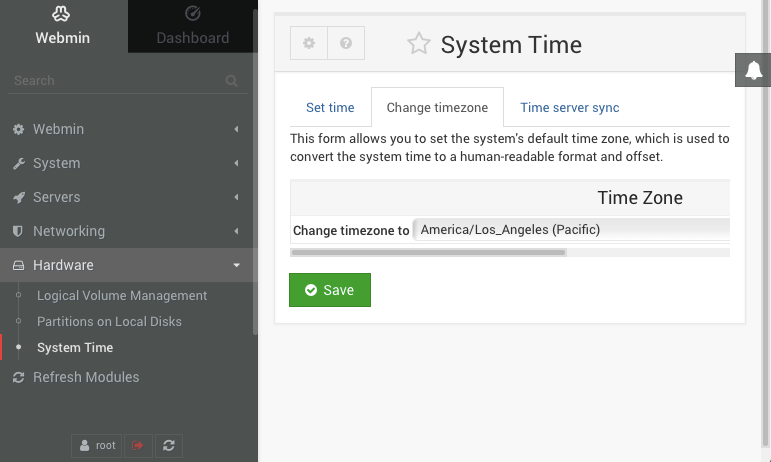
- Browse to Hardware > System Time on the left, pick the Change timezone tab on the right, pick your time zone and click Save. North American time zones all start with "America".
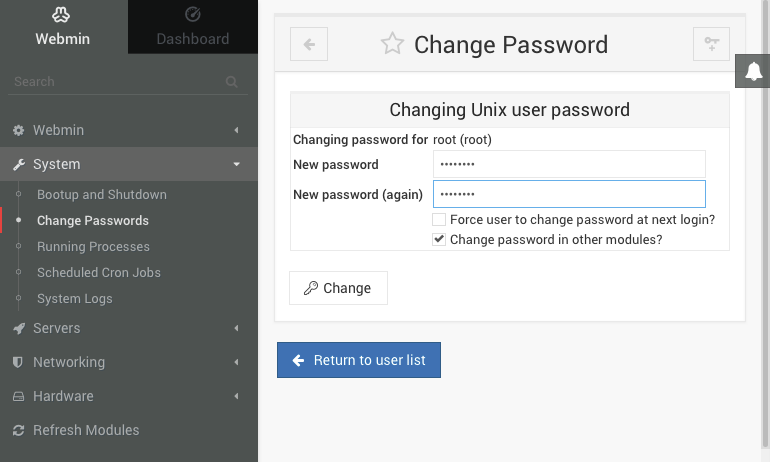
- Go to System > Change Passwords on the left and select the "root" account on the right from the list of usernames. Enter a new root password, confirm it, and click Change. Note that this will change the default password for the root account used to log into the server from "filewave" to whatever you choose so enter a secure password that is easy for you to remember.
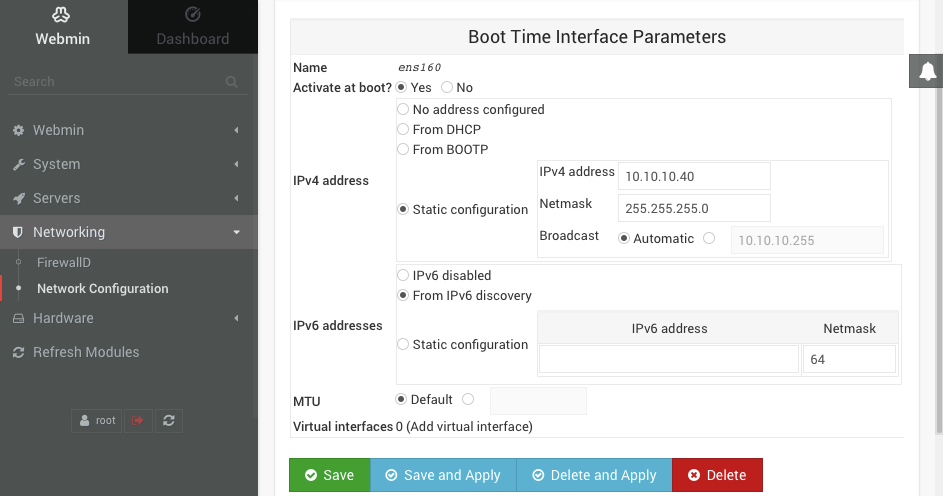
- Choose Networking > Network Configuration on the left, and Network Interfaces on the right. Click the blue link labeled "ens160" or "ens32" for the Ethernet adapter. Change the IPv4 address settings to "Static configuration", enter a static IP, enter a subnet mask, and click Save at the bottom to continue configuring the DNS and routing.
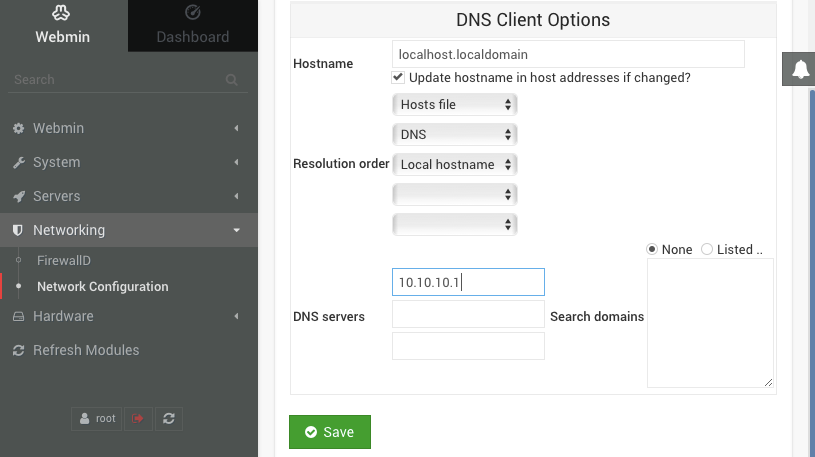
- You will no longer be able to access the Webmin UI for the FileWave servers via its old DHCP IP address. Change the address in your browser's address bar to use the new static IP address for the FileWave server that you configured in the previous step. Browse to Networking > Network Configuration on the left, and Hostname and DNS Client on the right. Enter the IP address for your DNS server and click Save.
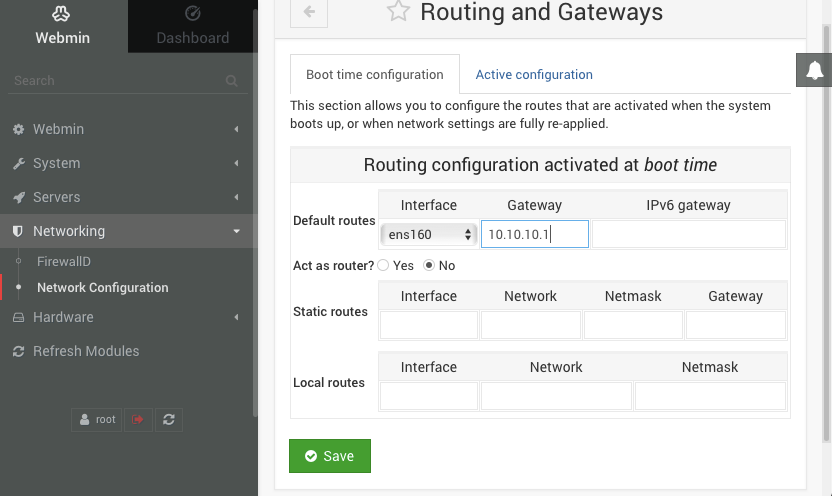
- Select Networking > Network Configuration on the left, and Routing and Gateways on the right. Pick "ens160" or "ens32" from the Default routes pull-down, enter the default gateway address for the subnet the FileWave server is hosted on, and click Save.
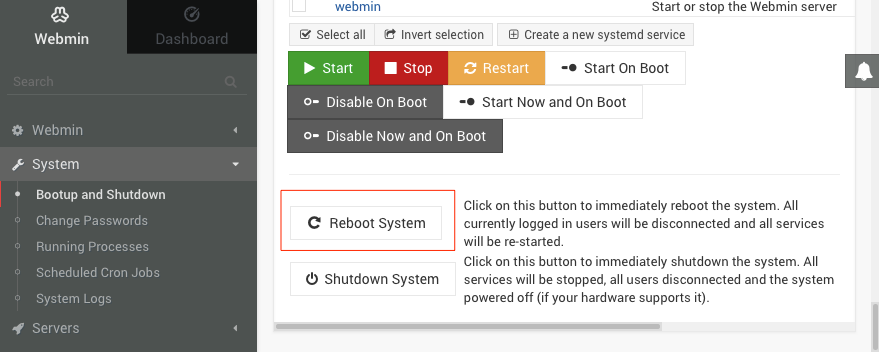
- Go to System > Bootup and Shutdown_ on the left, scroll to the bottom on the right, and click the Reboot System button. When asked to confirm if you want to reboot the system with "shutdown -r now" click the Reboot System button again.