Networking - Assign static IP Address for a FileWave Booster Appliance
For the Linux based Booster if you cannot use the port https://server:10000 to change network setting please follow the instructions below:
Instructions
Debian Linux
Debian Linux
Changing the IP address in Debian 12, which uses systemd-networkd for network management, involves different steps compared to CentOS. The following guide is tailored for Debian 12 servers using systemd-networkd but you could also use Webmin on your server assuming the server comes online initially with DHCP.
For Webmin know that you will need to go to Webmin -> Webmin Configuration -> Operating System and Environment and make sure it's set to Debian 12.4 (Or whatever version we are at when you set up your system. You can see this with cat /etc/debian_version on the server.
scpLocate Network Interface:
First, identify the network interface you wish to configure. You can list all network interfaces using:
networkctl list

systemd-networkd uses individual .network files for each network interface, located in /etc/systemd/network/.Create or edit the network configuration file for your interface, named like 10-eth0.network (replace eth0 with your interface name).
sudo nano /etc/systemd/network/10-eth0.networkIn the
.network file, add or modify the following sections:[Match]
Name=eth0
[Network]
Address=192.168.1.100/24
Gateway=192.168.1.1
DNS=8.8.8.8
DNS=8.8.4.4
LinkLocalAddressing=no
IPv6AcceptRA=noeth0 with your actual network interface name.Modify the
Address with your new IP and subnet mask (e.g., /24 for a 255.255.255.0 netmask).Set the
Gateway and DNS entries as per your network configuration.You'll also want to edit
/etc/network/interfaces because ens192 is configured there for DHCP. That's how you might have gotten to it via Webmin for instance. Edit the file to put a # before the 2 lines that have ens192 on them. Those 2 lines in the file will look like this after editing:# The primary network interface
#allow-hotplug ens192
#iface ens192 inet dhcpReload and Restart systemd-networkd:
After making changes, enable the Networkd service so interfaces come up at boot time, and reload the daemon and restart the network:
sudo systemctl enable systemd-networkd
sudo systemctl daemon-reload
sudo systemctl restart systemd-networkdCheck the status of your network interface to ensure the new settings are active:
networkctl status eth0ip addr show eth0 to view the IP configuration.CentOS Linux
CentOS Linux
Depending if you are using the appliance we offer for a CentOS Linux virtual appliance or a Linux machine you built the steps may be slightly different. The steps shown below will be for the FileWave virtual appliance that we offer.
Configure the "ifcfg-ens160" file on the server. (This file will be different if you are not using our Virtual Appliance and will have a different name like "ifcfg-eth1" for example)
vi /etc/sysconfig/network-scripts/ifcfg-xxx /etc/sysconfig/network-scripts/ifcfg-xxx.bakChange/add thisthe line:
following values of the file.
nameserver10.2.0.1Change
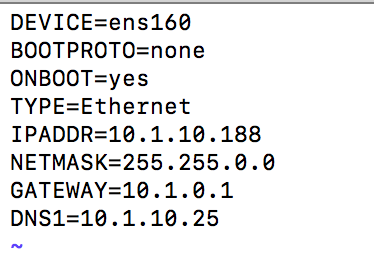
(hereBOOTPROTO=nonecomes
Add "IPADDR", "NETMASK", "GATEWAY", "DNS1" to the dns,file you might checkwith your network settingsconfigurations. )I attached a screen shot of a completed file below. (If you want to add more then one DNS server you can add DNS2, etc to the file)
Save the file using "esc" then ":wq"
Now commandyou forwill need to restart the changesnetwork toservices takeon affect:
the
/etc/init.d/network restart