
Part 3: Setting up the Portal App
What
The configuration of yourYour Windows MDM integration will all be driven byuses an application that you yourself create in the Microsoft Entra Portal.admin center.
When/Why
This application isconnects Windows Autopilot enrollment, the linchpinscoped thatMicrosoft tiesEntra yourusers, devices (in AutoPilot), through your user accounts (the group associated withand the app),MDM intodiscovery redirection to your FileWave MDM server. Detailed setup steps follow.
How
Add the Entra ID account in FileWave
-
Open
yourFileWaveAnyWhereAnywhere (Web Admin)pageand navigate tosourcesSources. -
Click the Microsoft tab.
-
Click on New account, and you should see the following form:
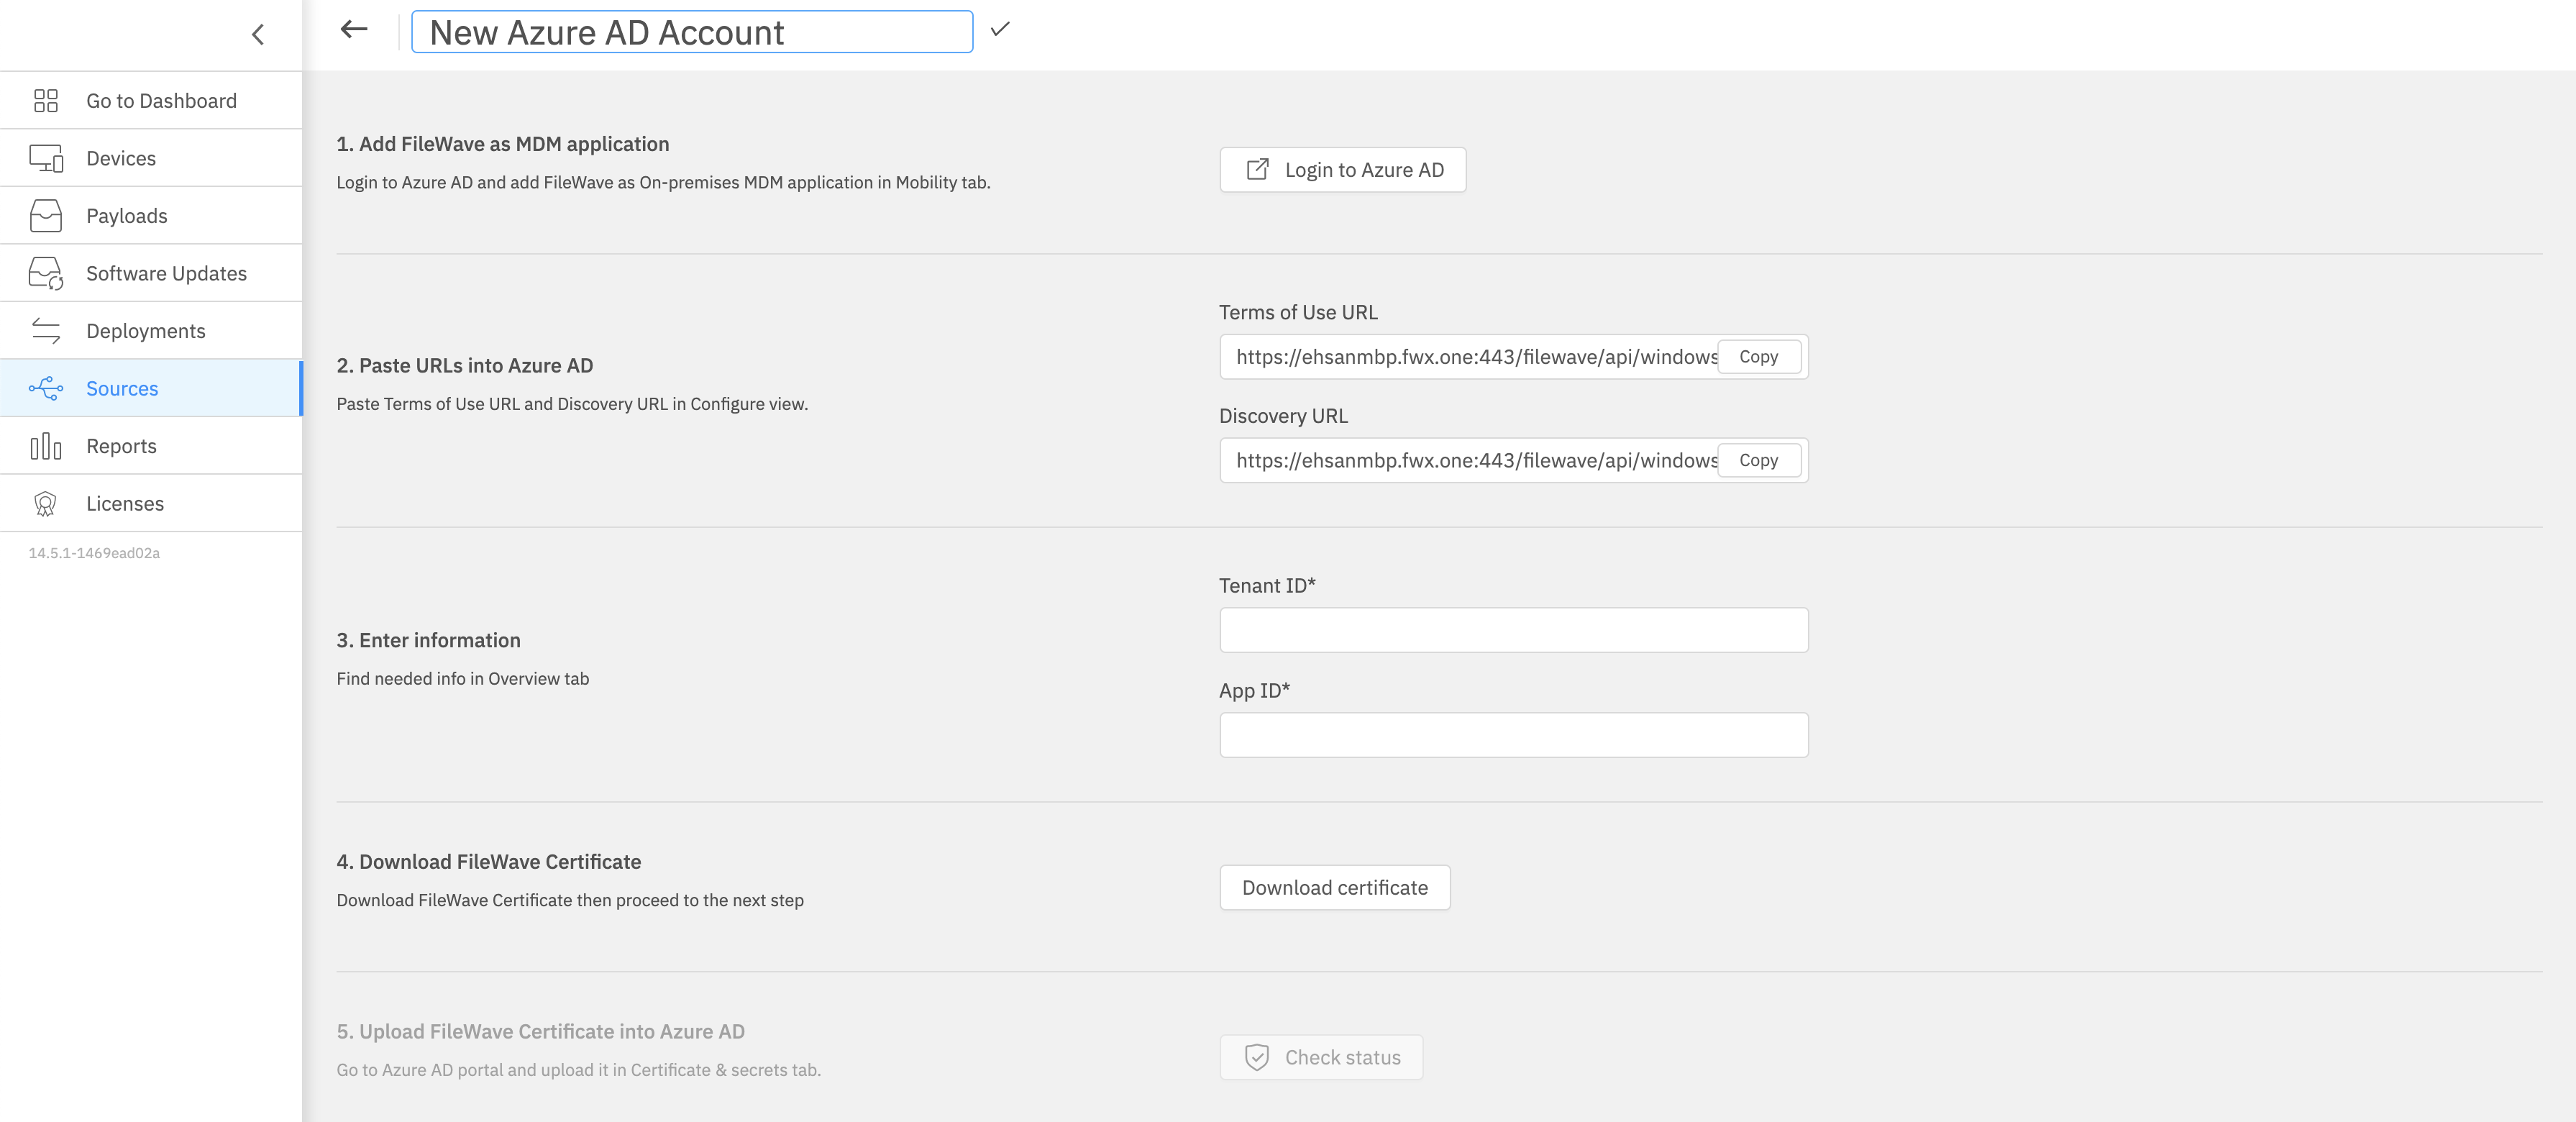
Keep this form open for completion in later steps.
Configuring Microsoft Entra ID
Creating an MDM application
To enable MDM enrollment, first, you need to configure your Microsoft Entra ID to recognize your FileWave server as your MDM.
-
Go to your Microsoft Entra ID portal: https://entra.microsoft.com
-
From Home, navigate to Entra ID → Mobility and then click Add application.
-
Select Create your own application, give it a name and
alogolog,if needed, and click Create.
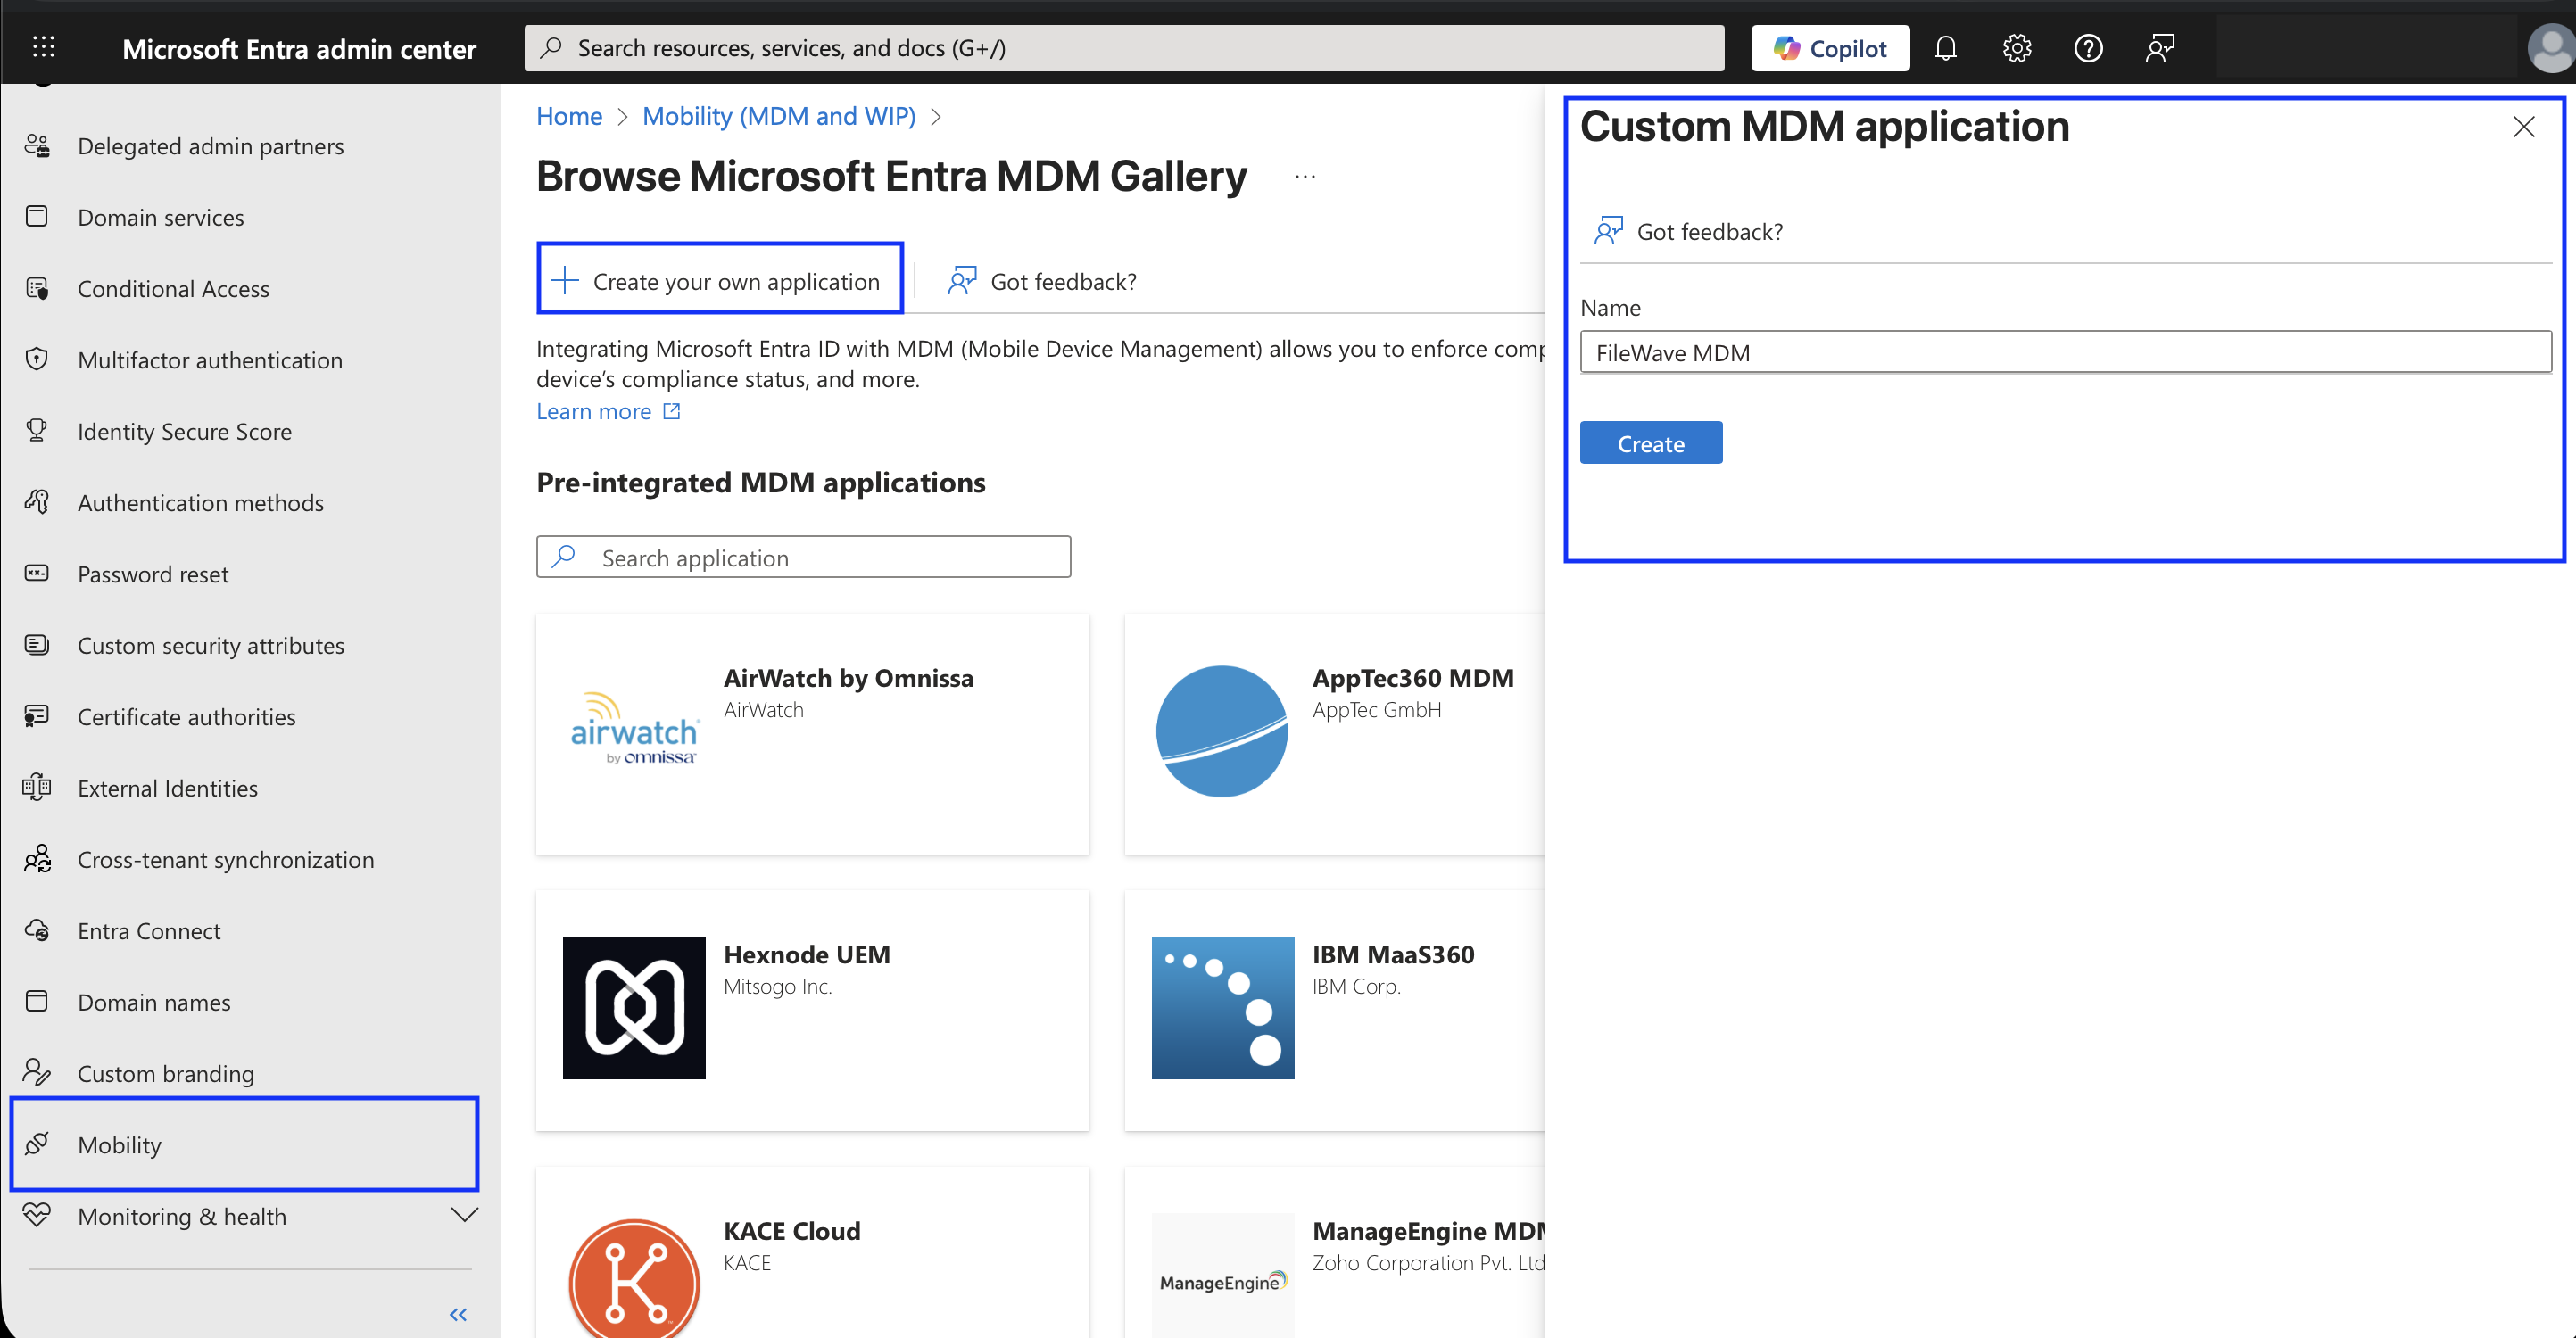
Configuring your MDM application
-
You will now be prompted to configure MDM user scope:
-
MDM user scope: This is where you indicate which users can enroll their devices using this MDM application. You can either choose:
-
All: Force all users to use this MDM application. (Preferred)
-
Some: You can select user groups that are allowed to use this MDM application to enroll their devices. If you do use this, then you will need to make sure that you make a Group to restrict this, and add all of the users who will have their devices managed by MDM in that same group.
-
-
MDM terms of use URL:
Copy the value from the form you opened up in FileWave
AnyWhereAnywhere (Web Admin) earlier. -
MDM discovery URL:
Copy the value from the form you opened up in FileWave
AnyWhereAnywhere (Web Admin) earlier.
-
ItIf another MDM service, such as Microsoft Intune, is veryalso important that if you have another solution in place, like InTune, you make sure that youconfigured, do not havescope the same users to both InTuneIntune MDM and FileWave enabledWindows MDM. A device should only enroll into one Windows MDM service. If the same user is scoped to two MDM services, enrollment can fail with a permissions or enrollment error. To test FileWave enrollment, set the competing MDM user scope to None for the sameaffected users.users, Youwait maya get an error about not having permission to enroll devices. You can test this by disabling the Intune MDM (or another vendor) in Microsoft Entra by setting it to None, waiting 5few minutes, and thenretry you will be able to enroll using FileWave.enrollment.
Think about which MDM solution you want to use for your different users in your environment. A single device can only really be in a single MDM. You can still enroll ina Windows device into Intune for MDM and install the FileWave agent,Client separately, but Windows MDM profiles would then come from Intune, not FileWave. Decide which MDM service owns Windows MDM enrollment for instance,each butuser thengroup youbefore could only push Windows Profiles from Intune. Everything else would work just fine in FileWave for those devices.rollout.
Integrating FileWave and Microsoft Entra
After configuring your MDM application, on the same page, click on the small link that reads: Create MDM application settings.
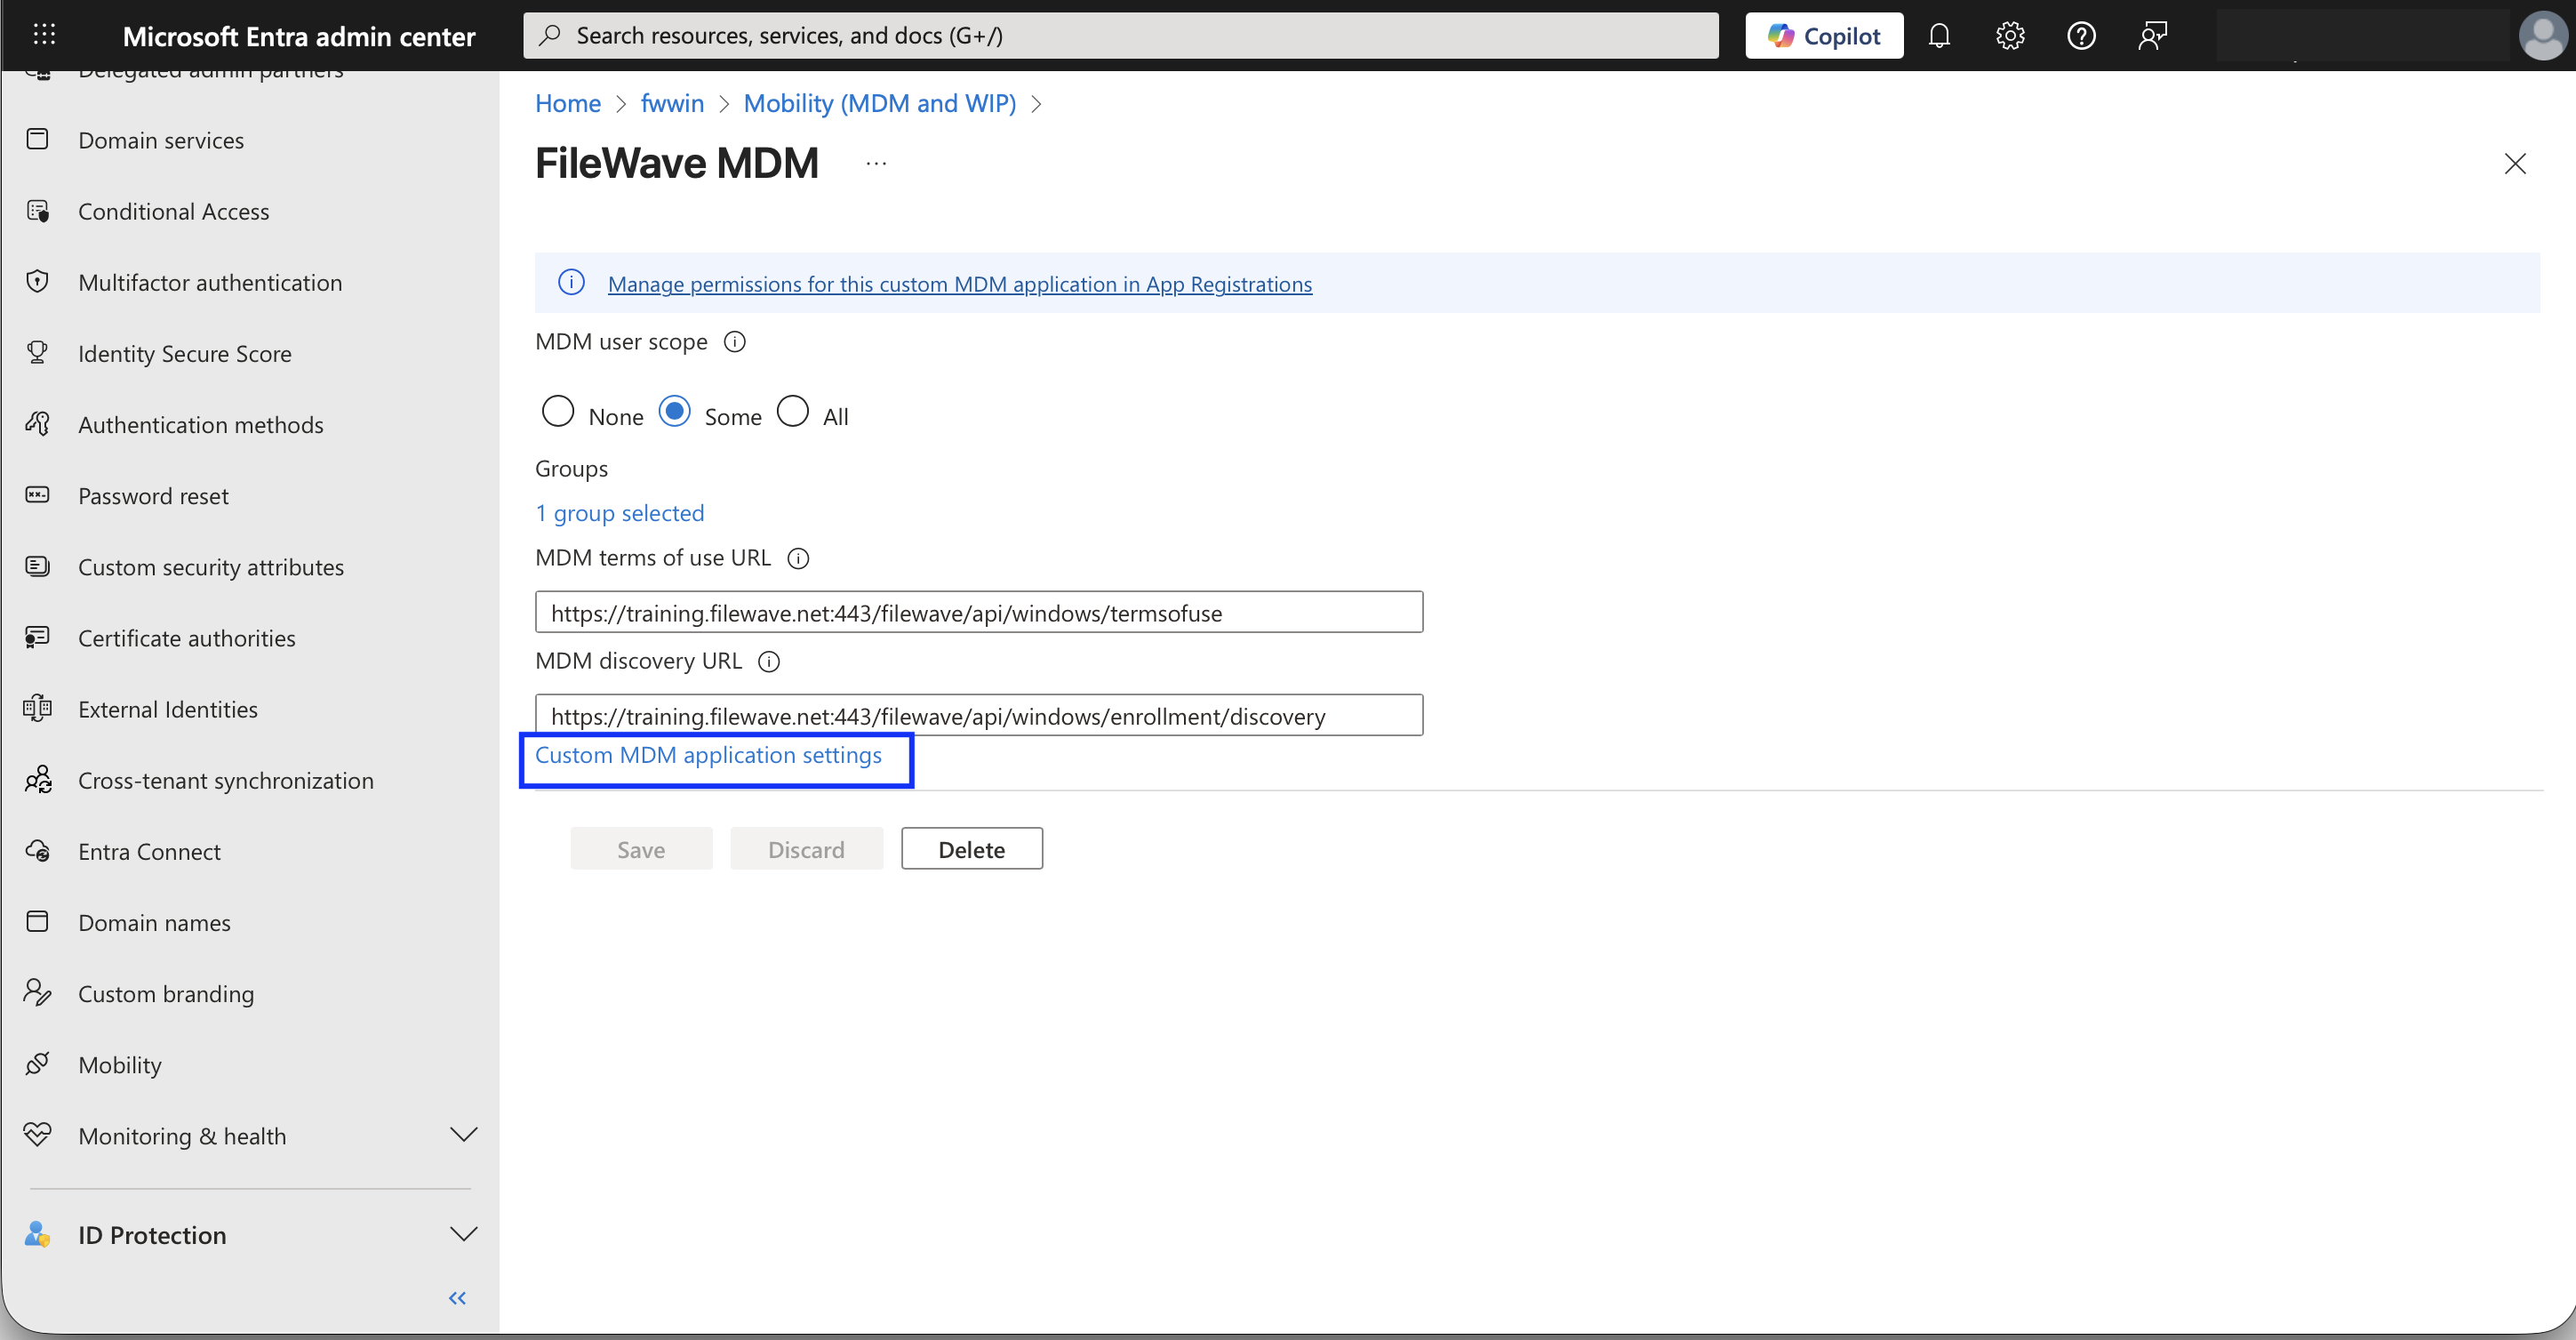
You should see the following page:
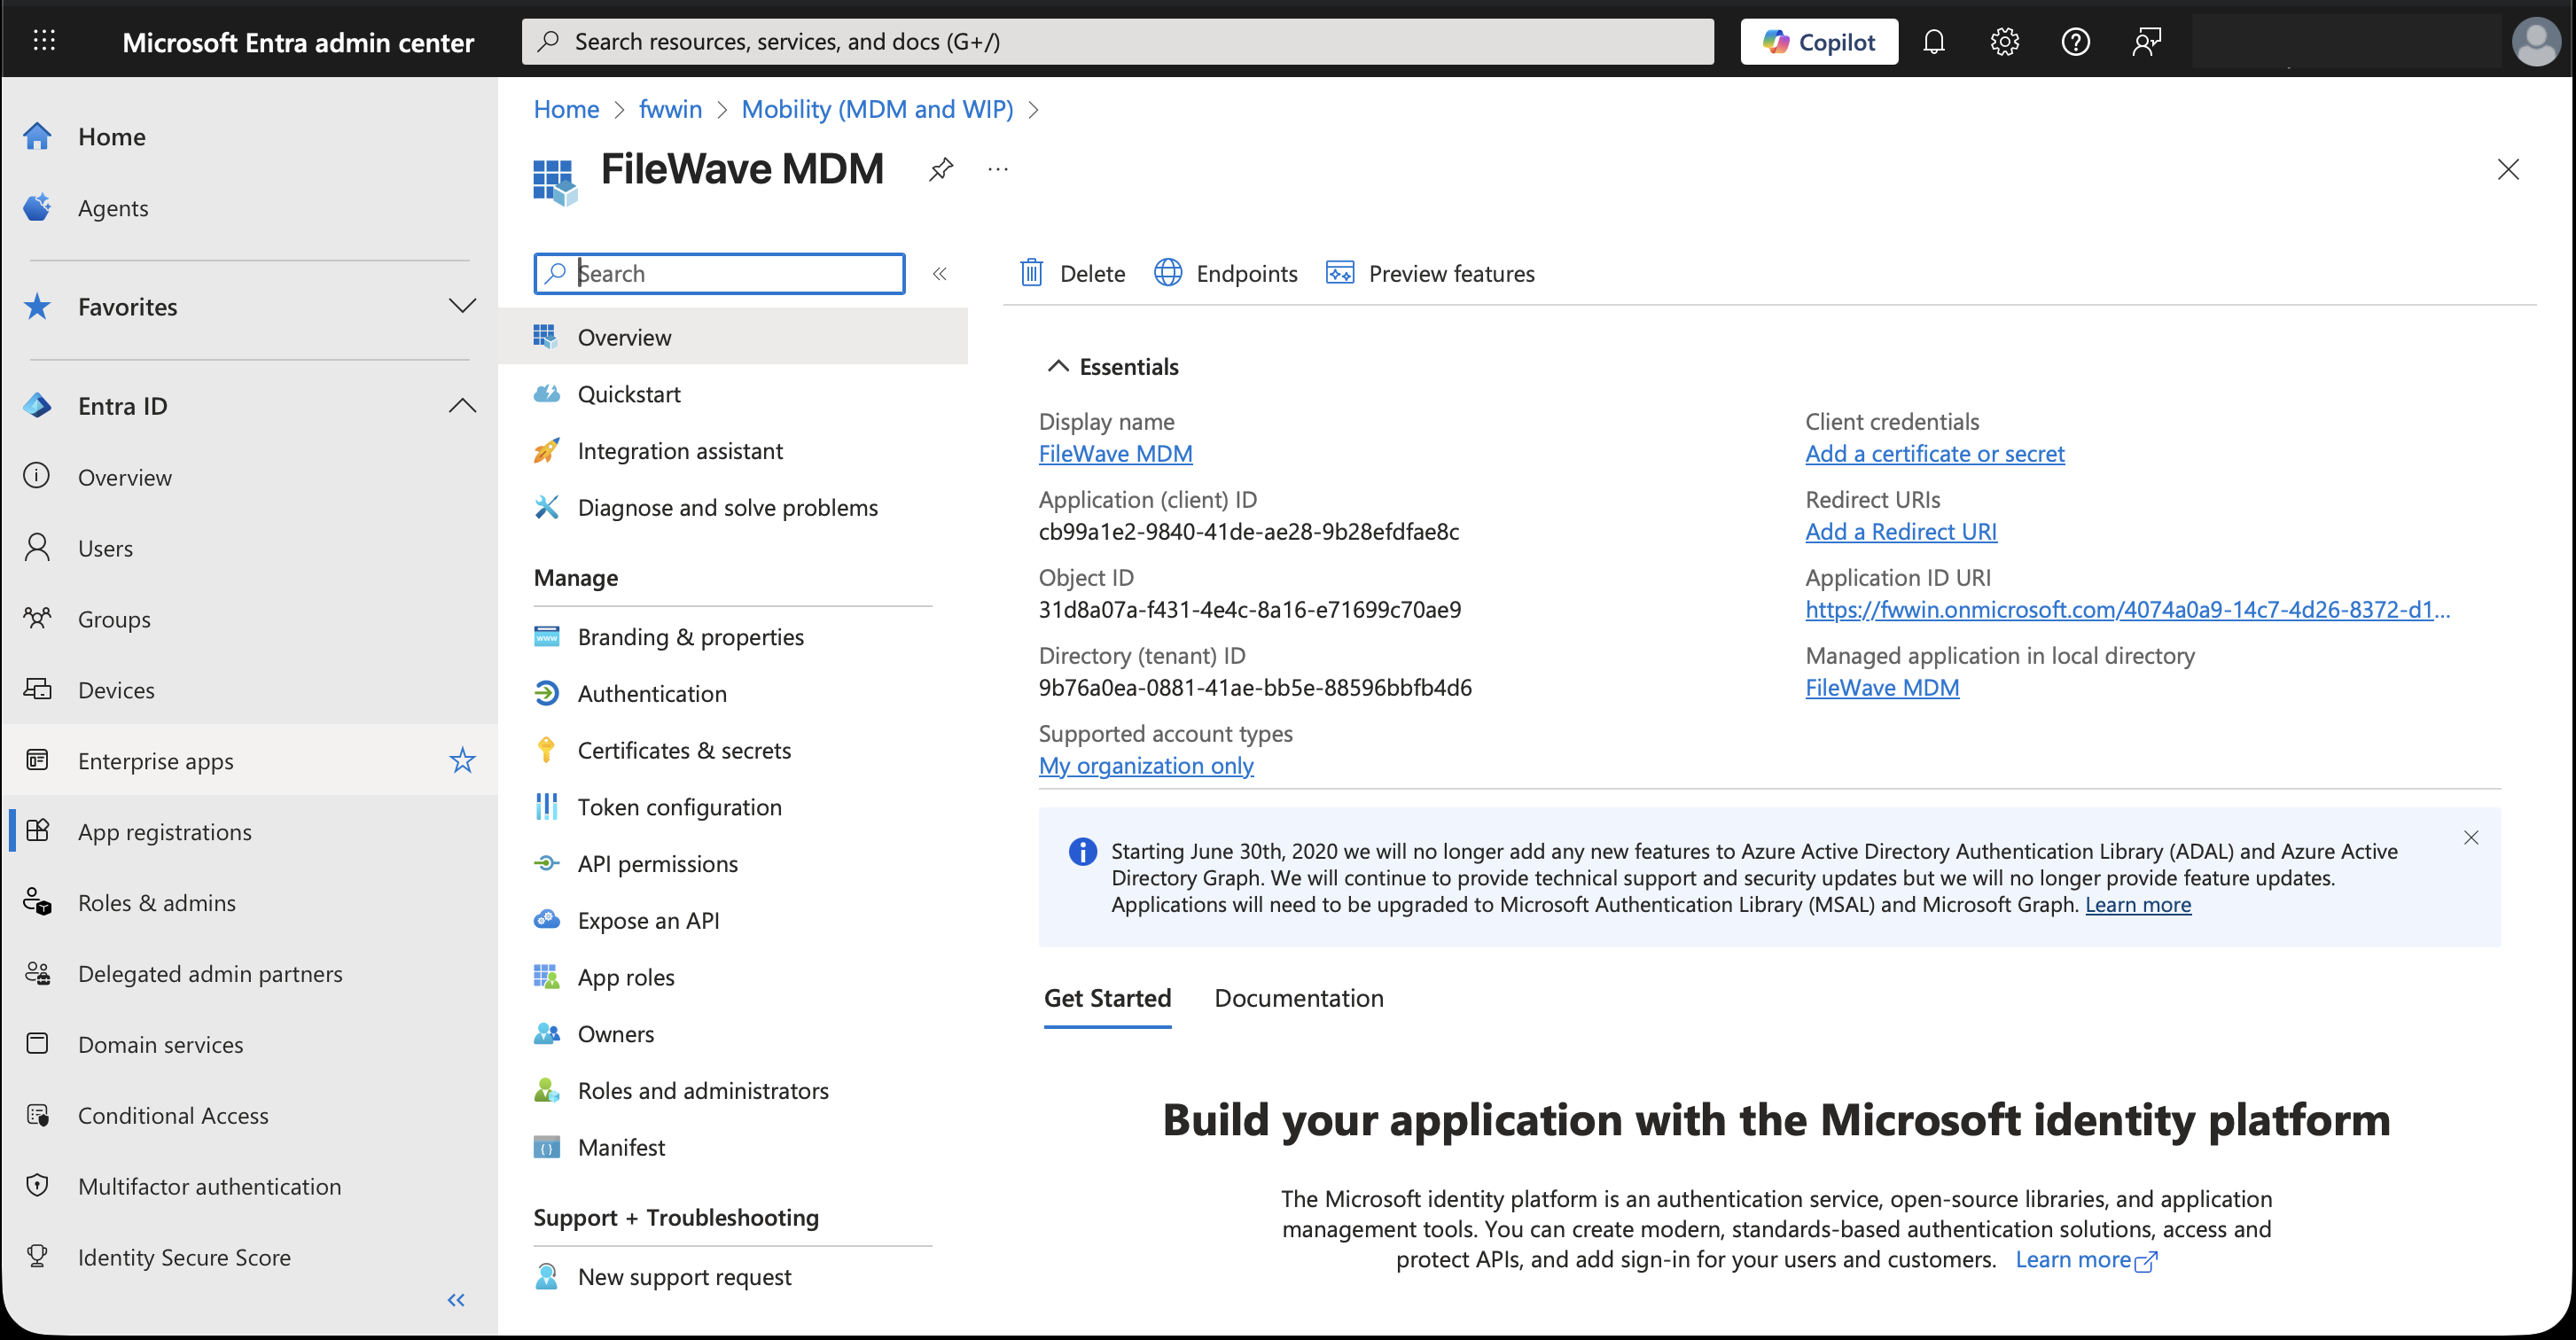
From here there are only few steps left!
-
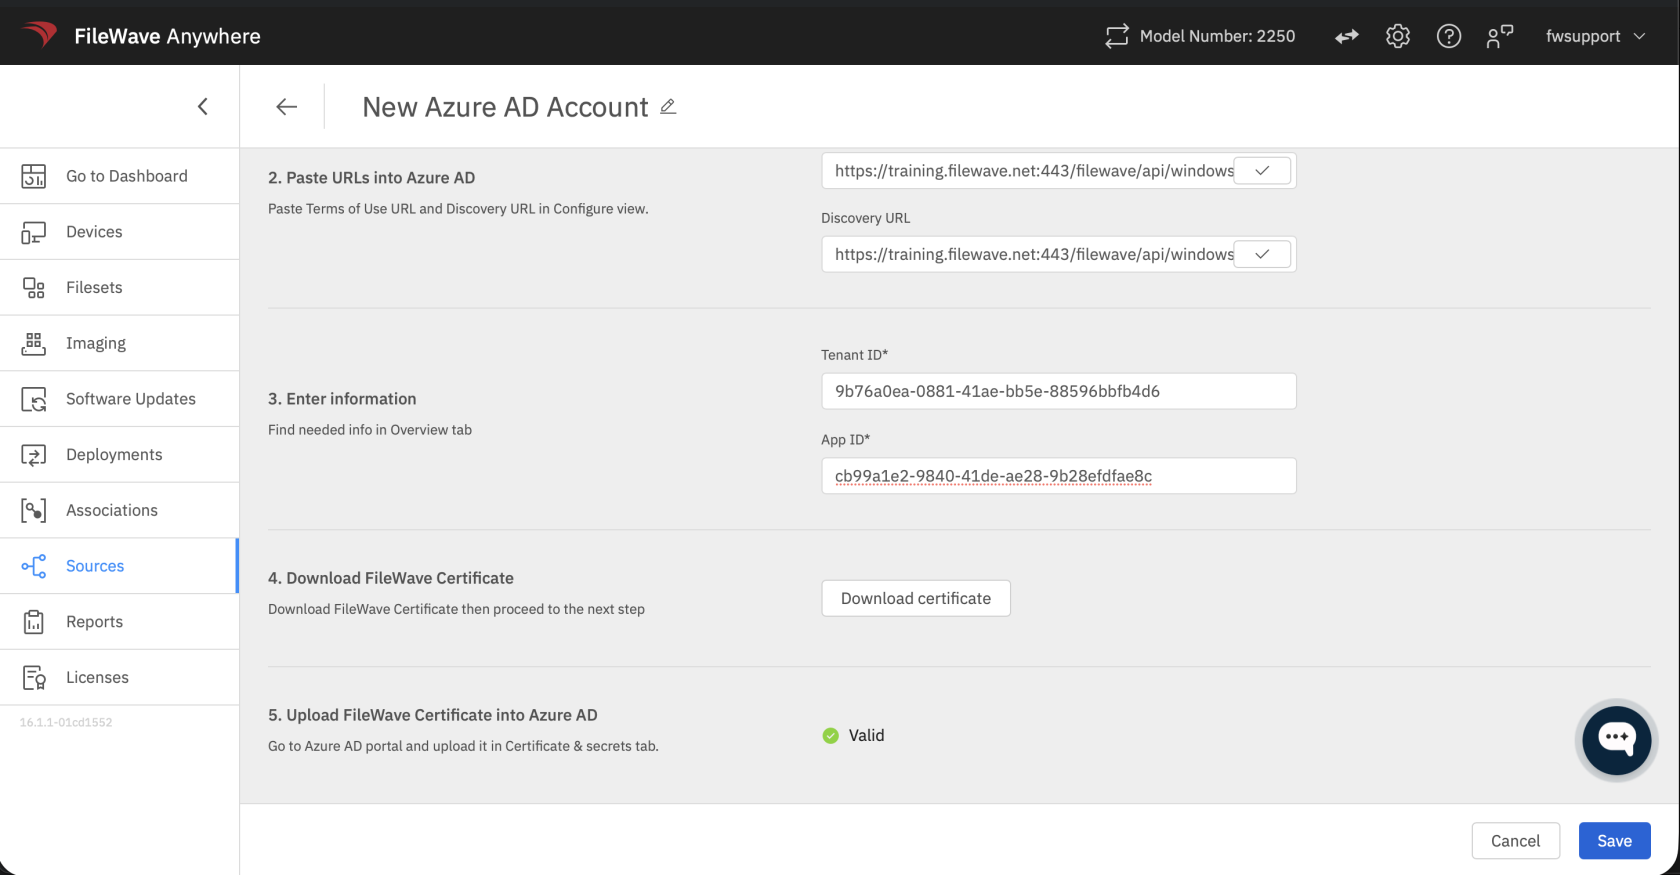
Copy the Application (client) ID and Directory (tenant) ID from this page and paste
itthemininto the Microsoft Entra Account form in FileWaveAnyWhereAnywhere (Web Admin),(which you kept openfrom earlier)earlier. -
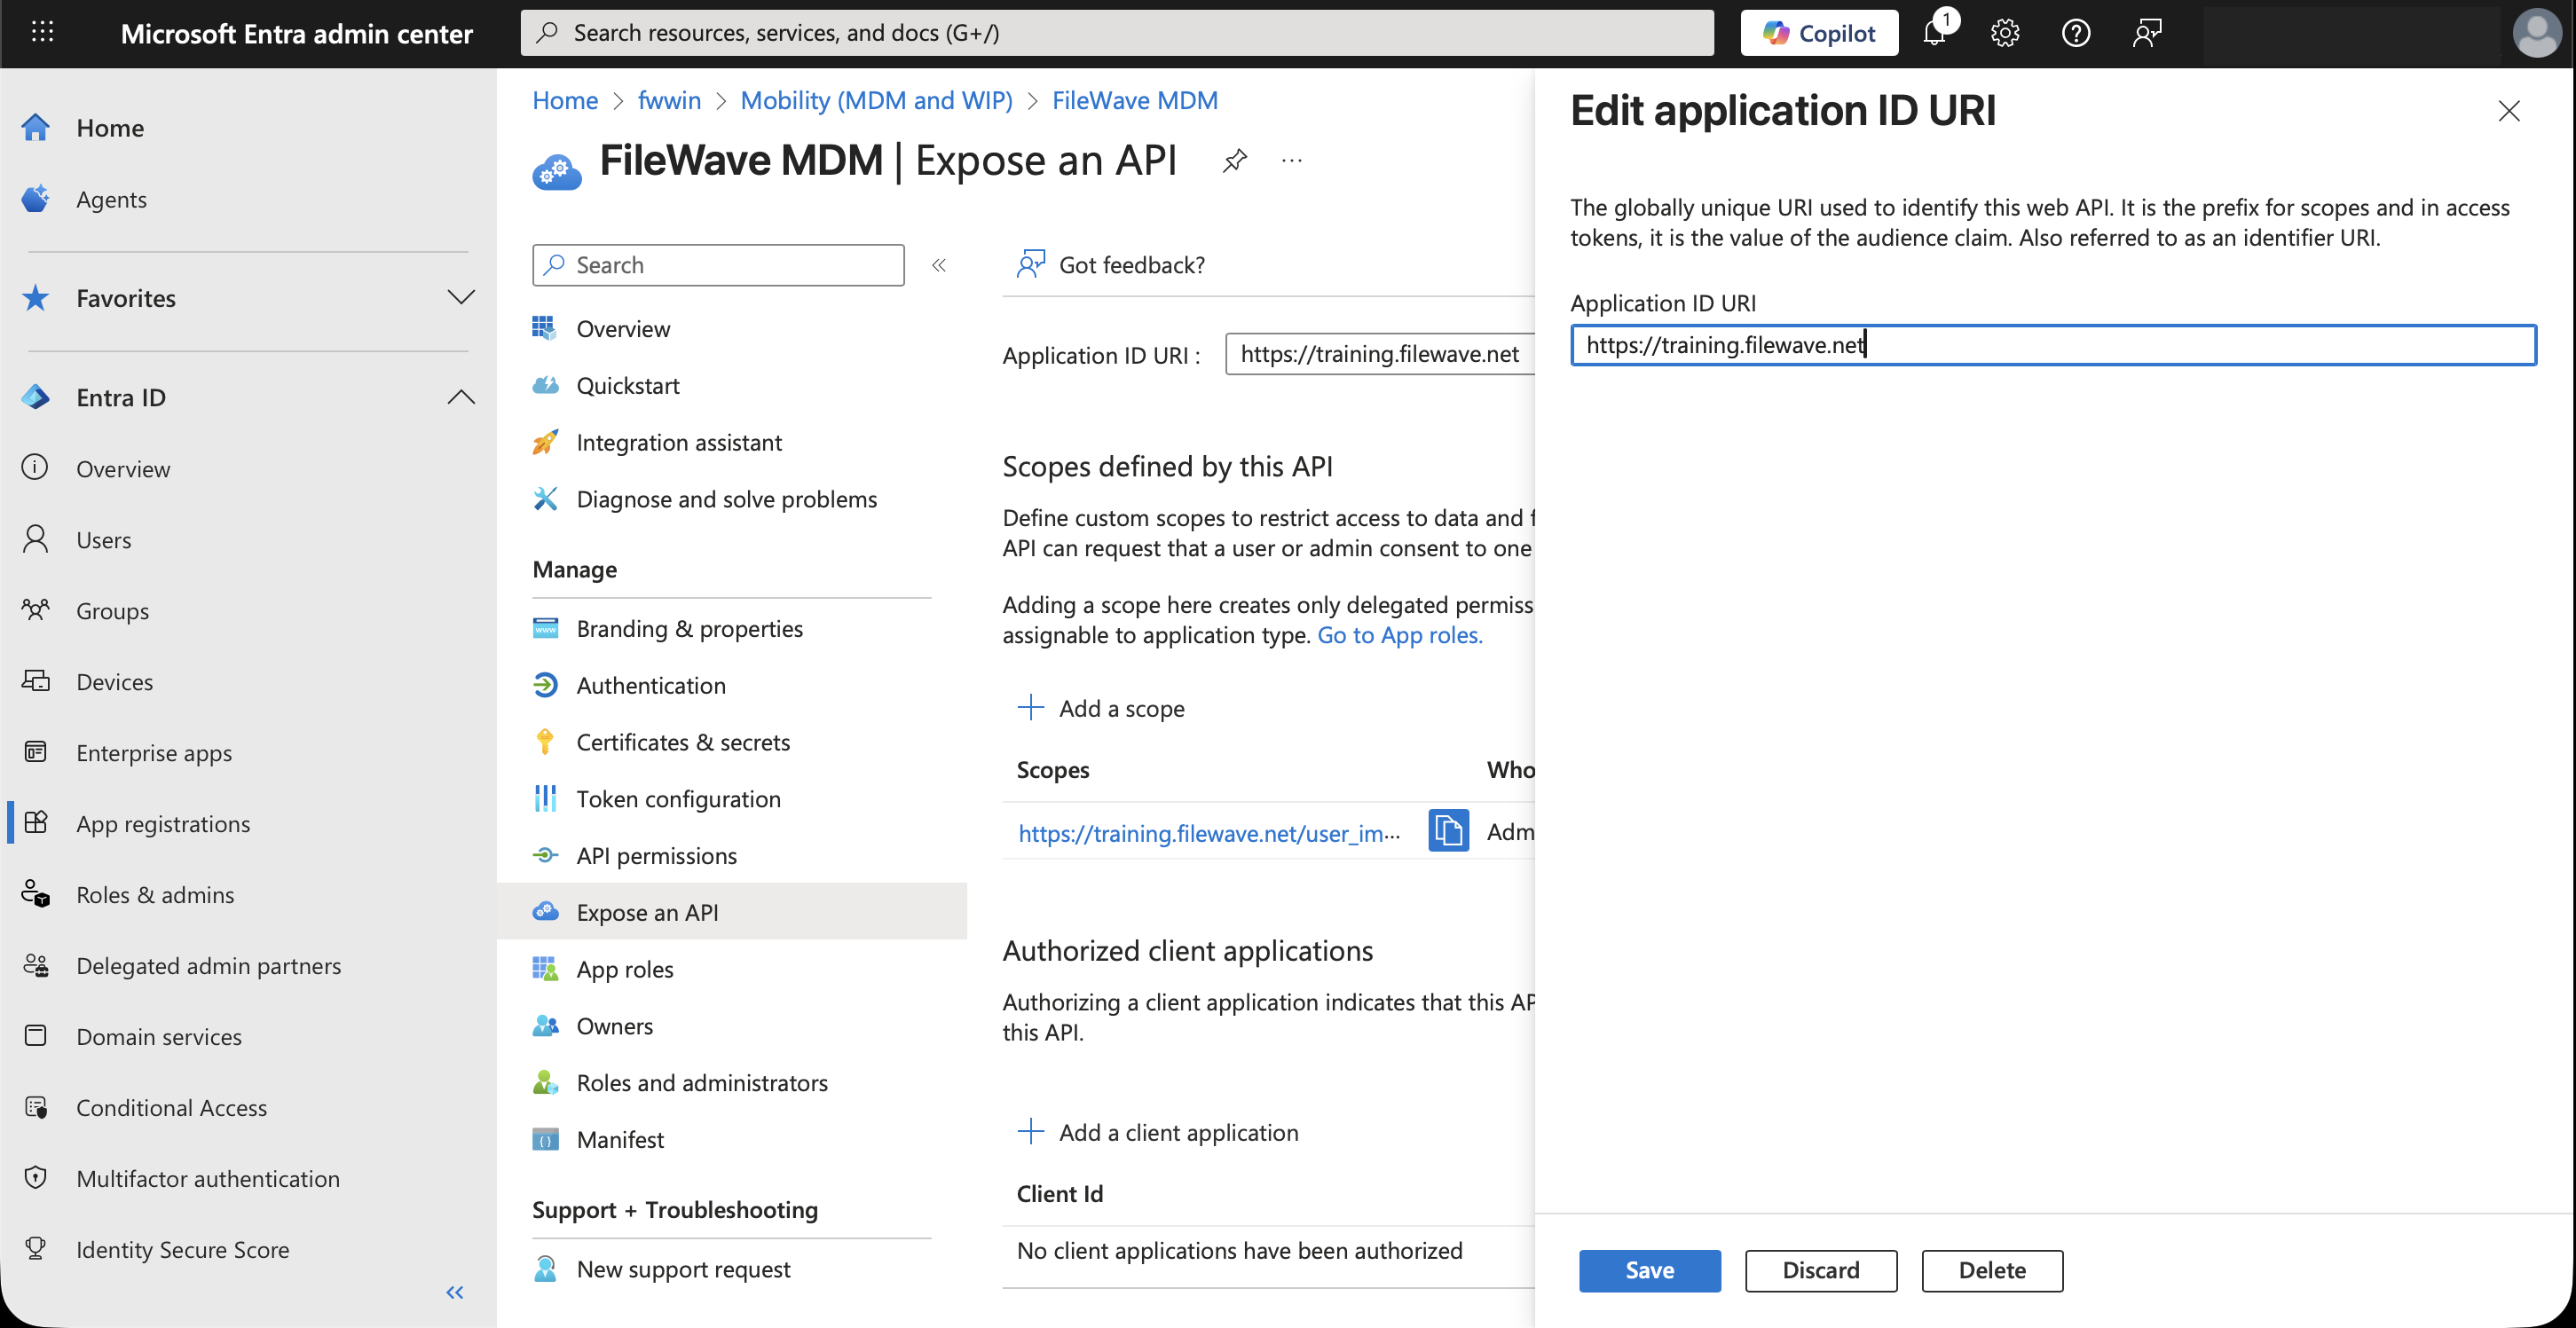
The Application ID URI value in your MDM app
(inmust match the FileWave server URL that Windows devices will use. In Microsoft EntraID) must match your FileWave server URL, to fix that,ID, go to Expose an APIon the left side,and edit theURLURI.there.UseTheyourURLcustomer-ownedshouldFileWavebeserverlikehostname, such ashttps://mdm.example.org, replacingfilewave.net,thatit with your server's DNS name.Microsoft requires the hostname used in a single-tenant Application ID URI to be in the tenant's initial
onmicrosoft.comdomain or in a verified custom domain. FileWave-hostedfilewave.nethostnames are owned by FileWave and cannot be verified in the customer's Microsoft Entra tenant. Hosted customers should use a customer-owned custom hostname for Windows MDM and follow FileWave-hosted custom-domain SSL guidance if they need FileWave Support to configure the hosted-server certificate.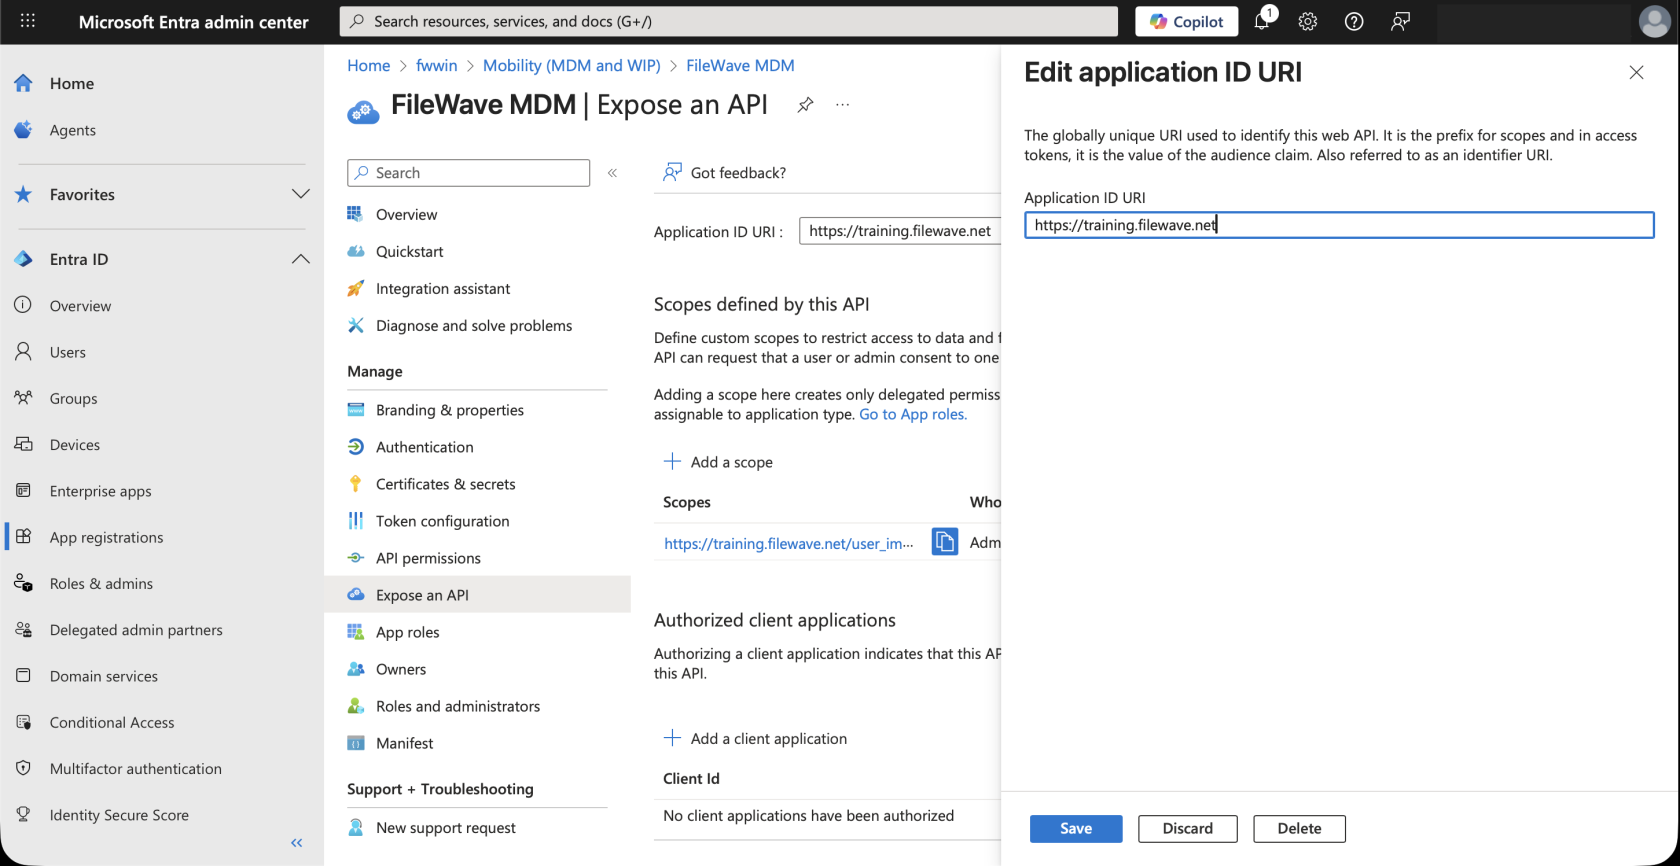
-
Go back to the Microsoft Entra account form in
yourFileWaveAnyWhereAnywhere (Web Admin), and download the FileWave certificate. -
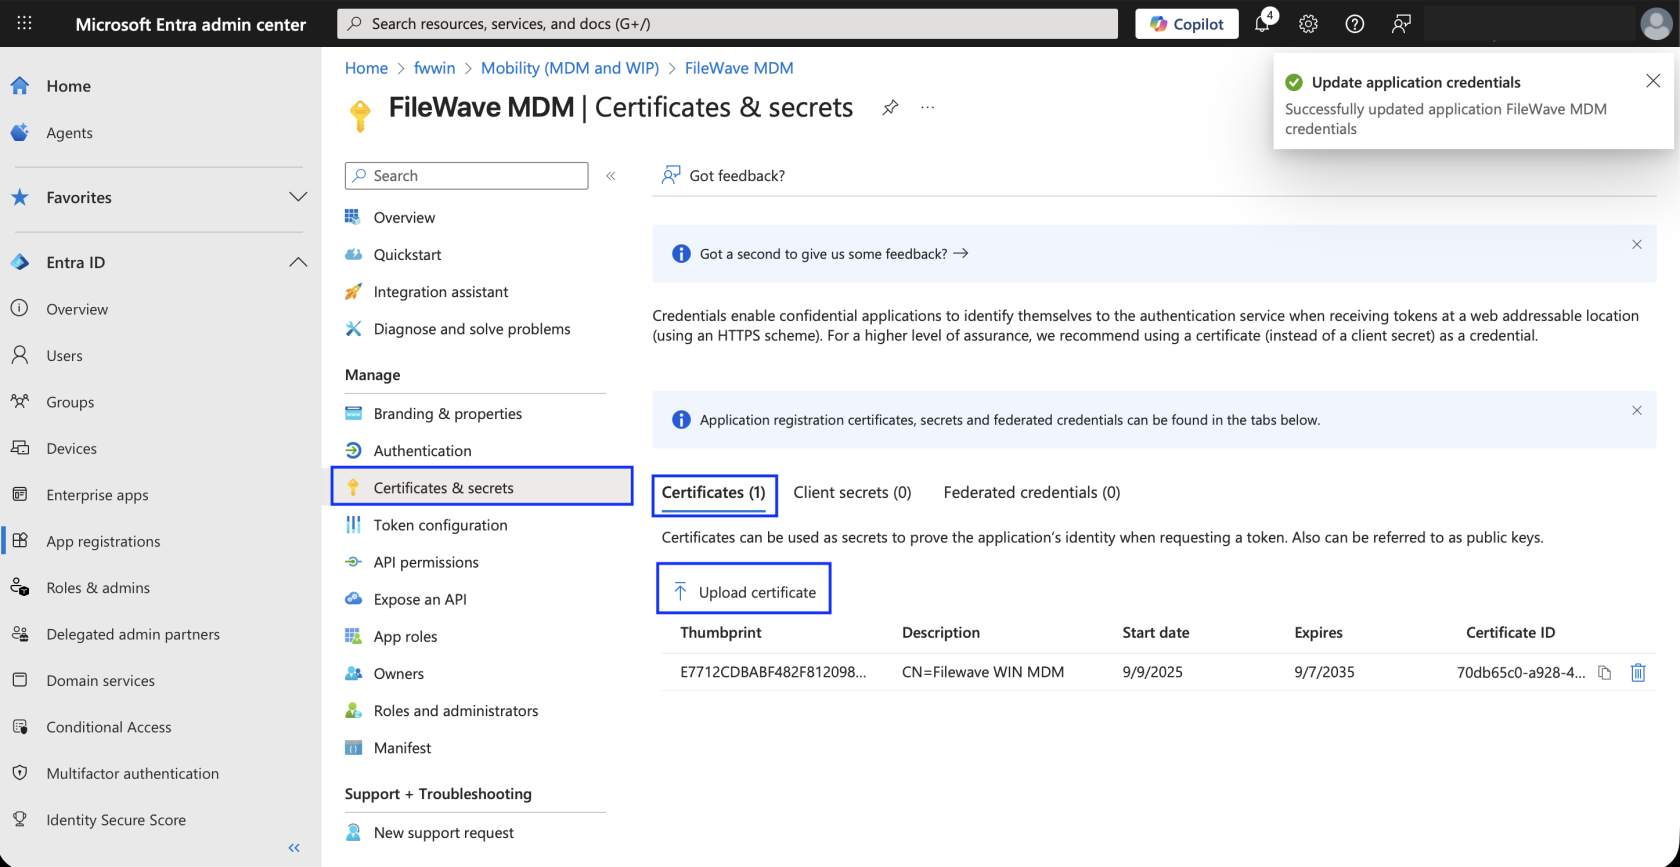
Once you have the certificate, go back to the Microsoft Entra ID portal, navigate to Certificates & secrets > Certificates and upload your certificate to your Microsoft Entra MDM application there.
-
OnceAfter theCertificatecertificate is uploaded, waitcoupleaoffew seconds, thengo backreturn toFileWave AnyWhere (Web Admin), inthealreadyopen Microsoft Entra account form in FileWave Anywhere (Web Admin) and clickonCheck Statusbutton.. -
As soon as you see the green light, go ahead and save your Microsoft Entra account.
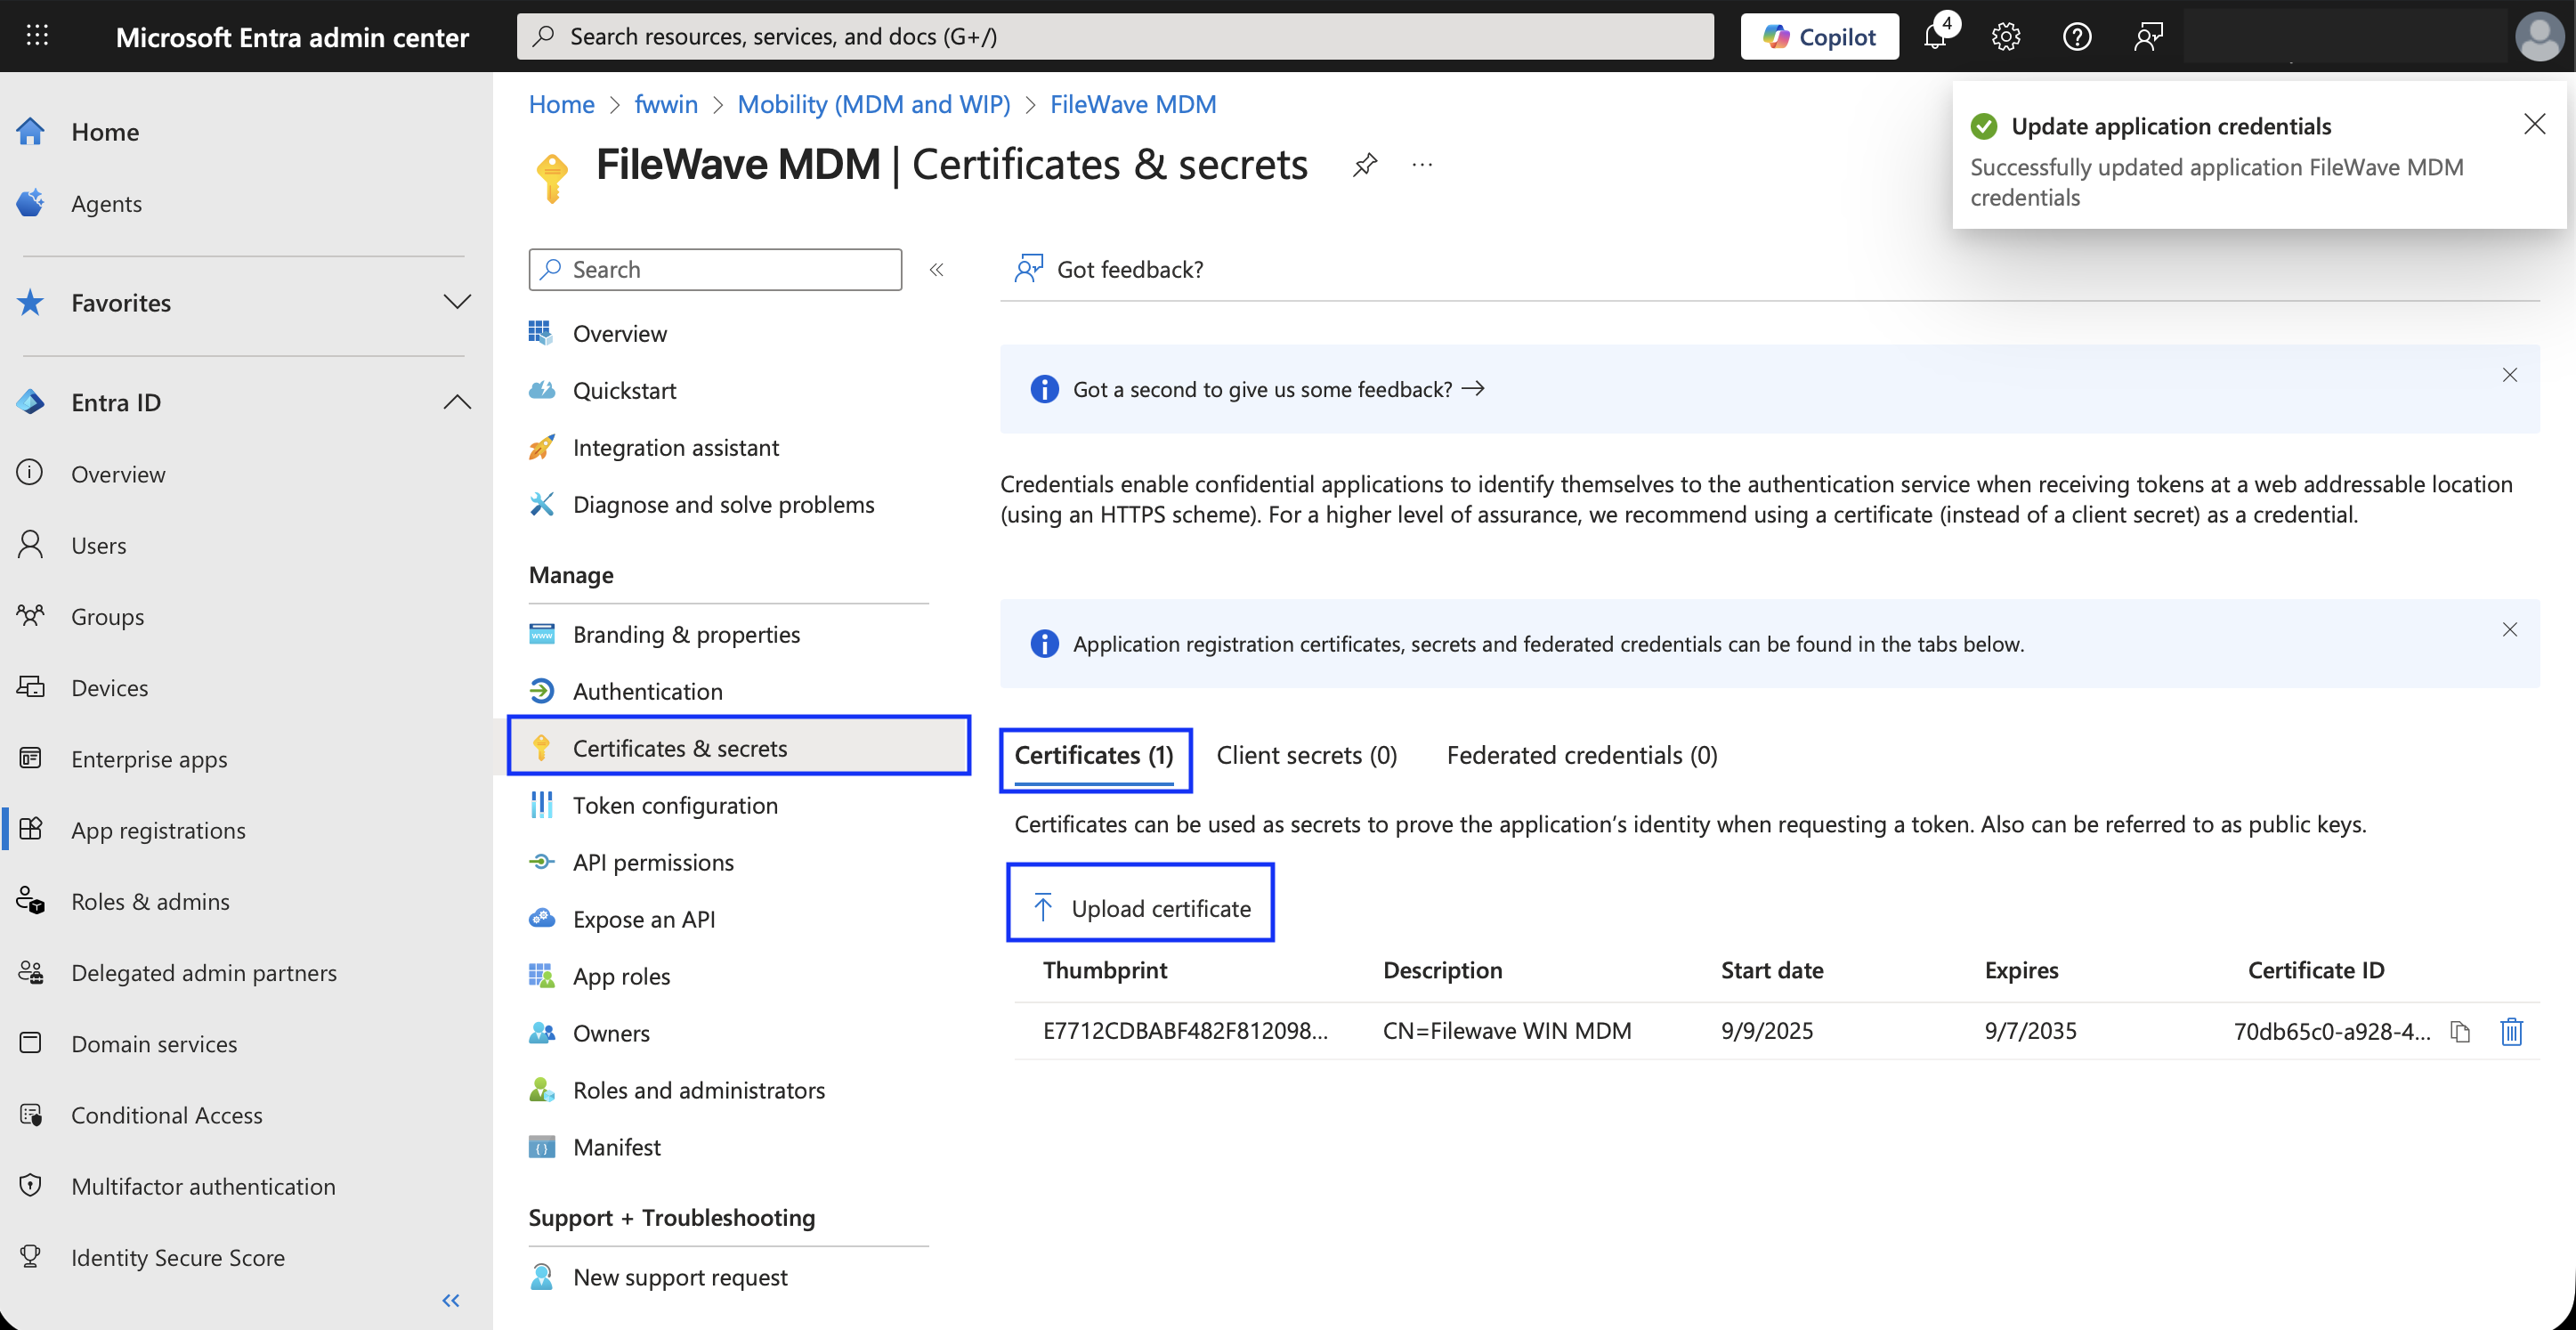
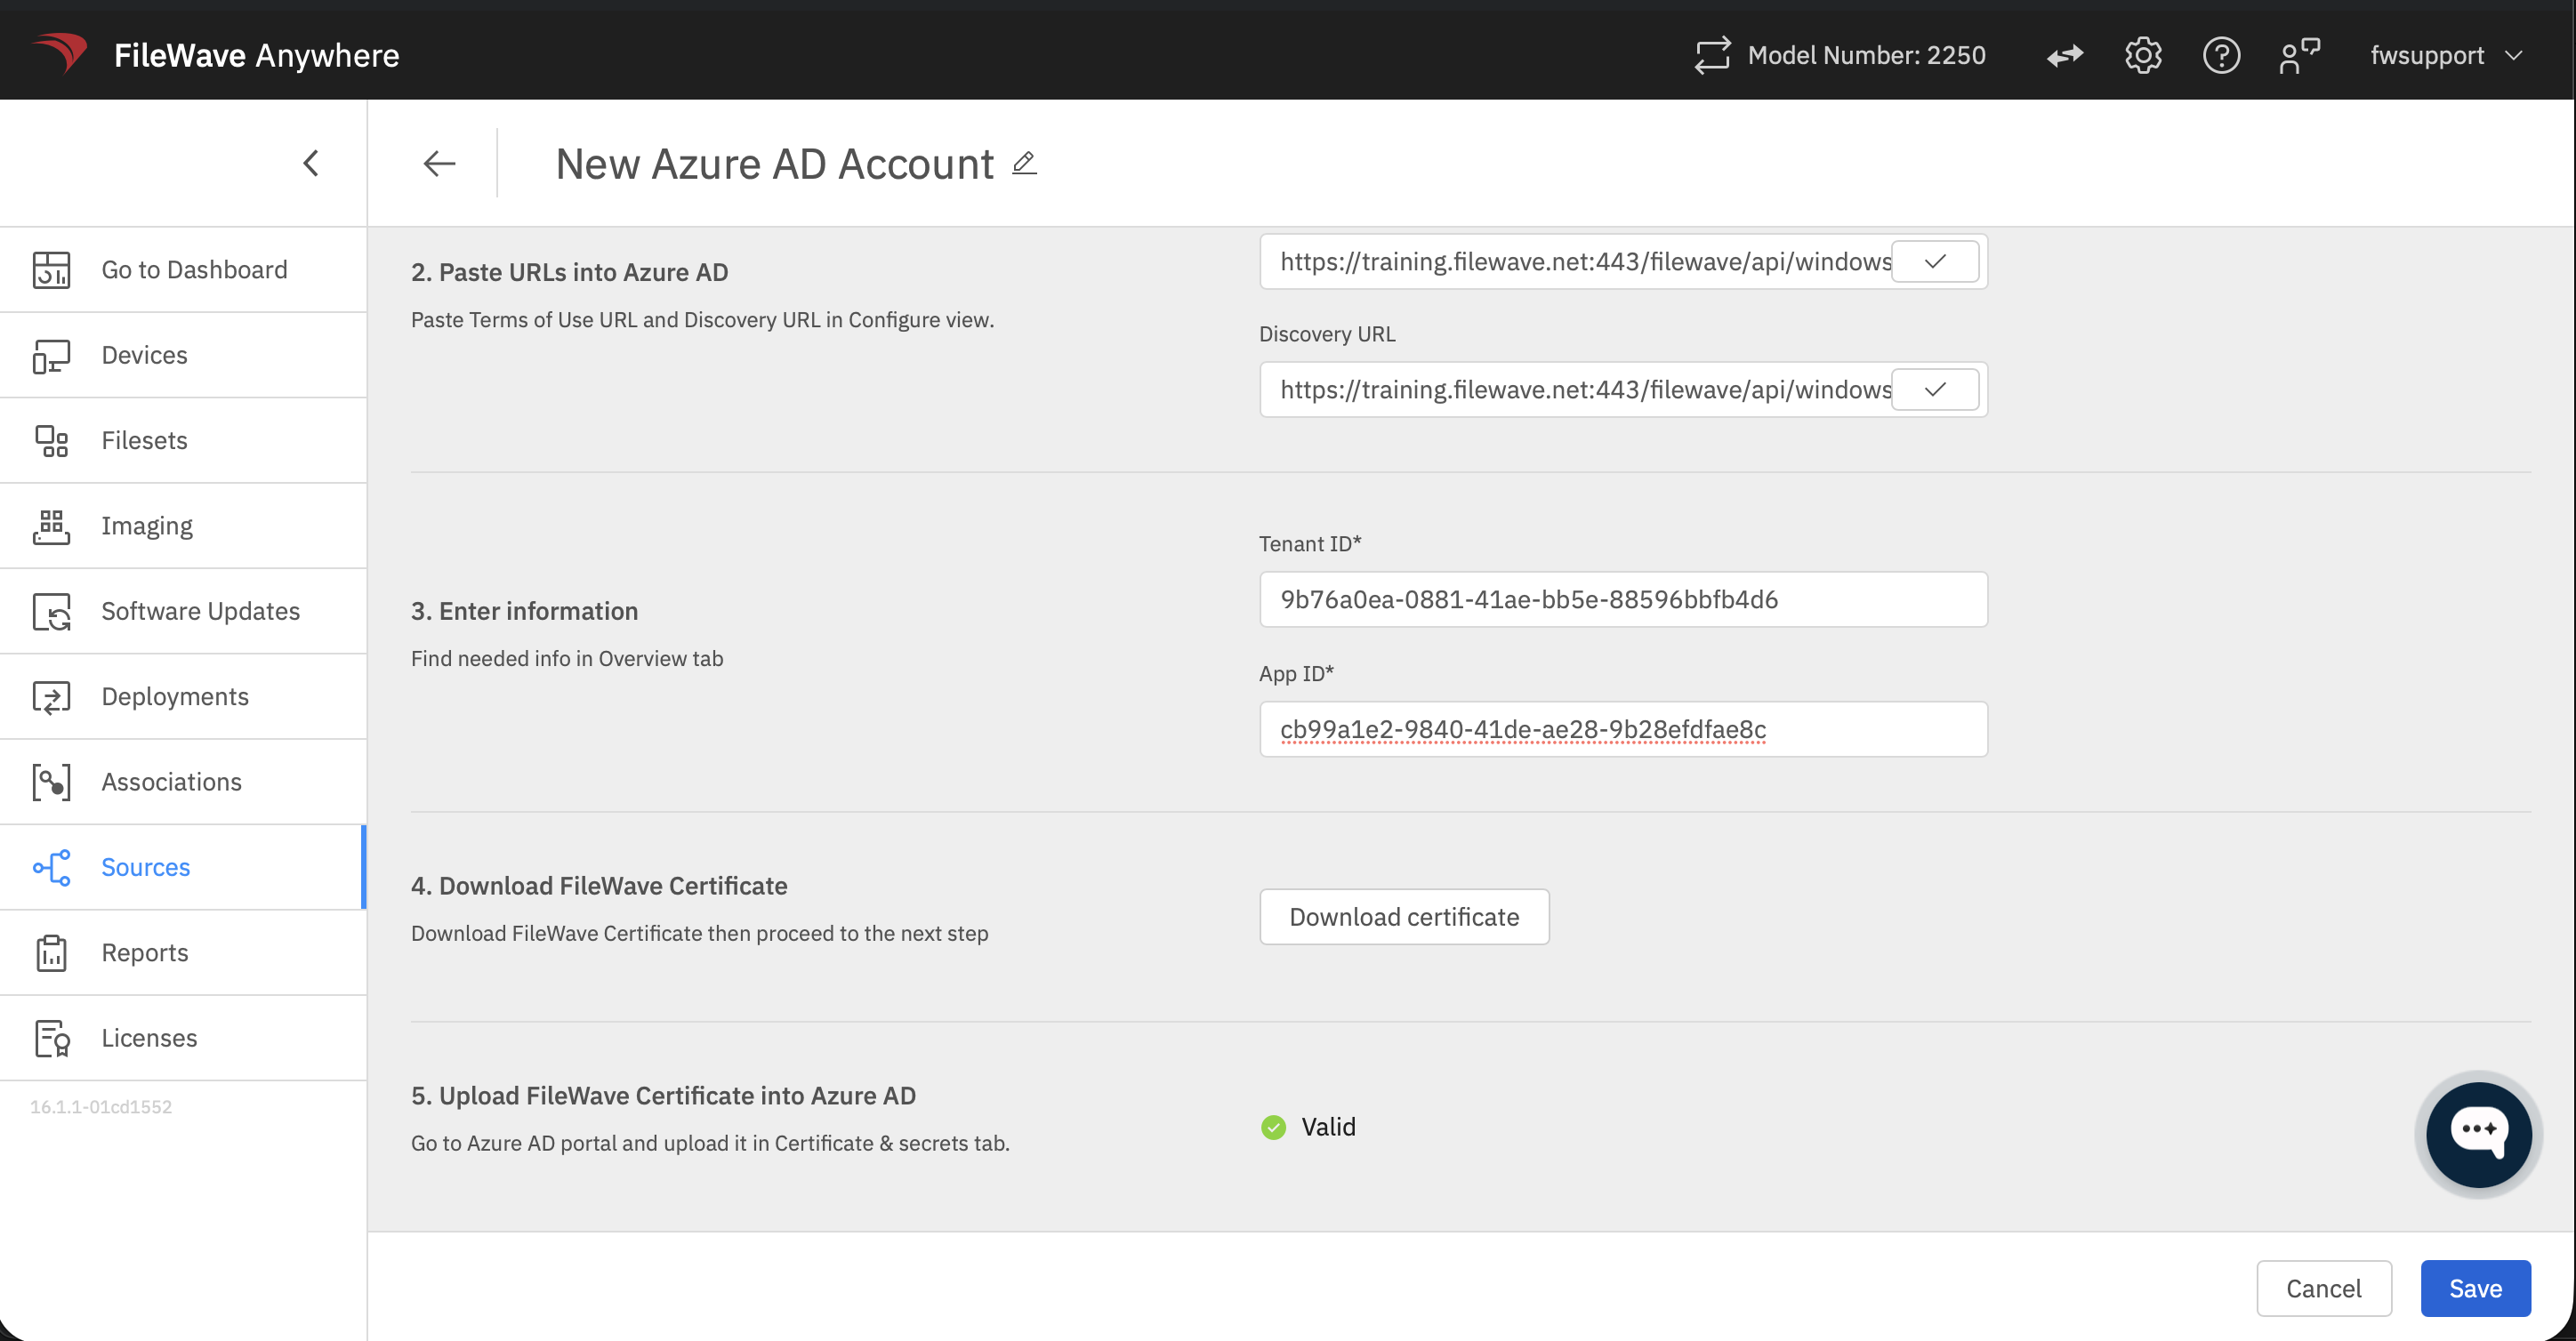
You are now ready to enroll a device ininto toFileWave Windows MDM.
Application tenant or consent messages
You may see a message similar to below:
- AADSTS500011 – The resource principal named [URI] was not found in the tenant named [guid]. This can happen if the application has not been installed by the administrator of the tenant or consented to by any user in the tenant. You might have sent your authentication request to the wrong tenant.
If you’re trying to log in from an application that doesn’t support user consent flow or you’re unable to use it otherwise, you can use the same special login URL crafting trick that I proposed in my article for resolving consent-related issues when getting error AADSTS650001, and create a URL like this:
If the application requires admin consent, you may replace "consent" with "admin_consent".