How to write to a custom field using the FileWave API
It is often desirable to alter FileWave Custom Field values, especially when it comes to driving automated workflows.
API calls have the distinct advantage of changing Custom Field values directly on the server, essentially making the change immediate.
Where Custom Field values are driving Smart Group device inclusion, despite the API call making an immediate change, there will still be a period of time before the next Smart Group evaluation.
How
Writing back to a Custom Field relies upon the following details:
- Server URL
- A way to recognise which device's Custom Field should be updated
- A way to recognise the Custom Field
- Custom Field type
- An authentication token
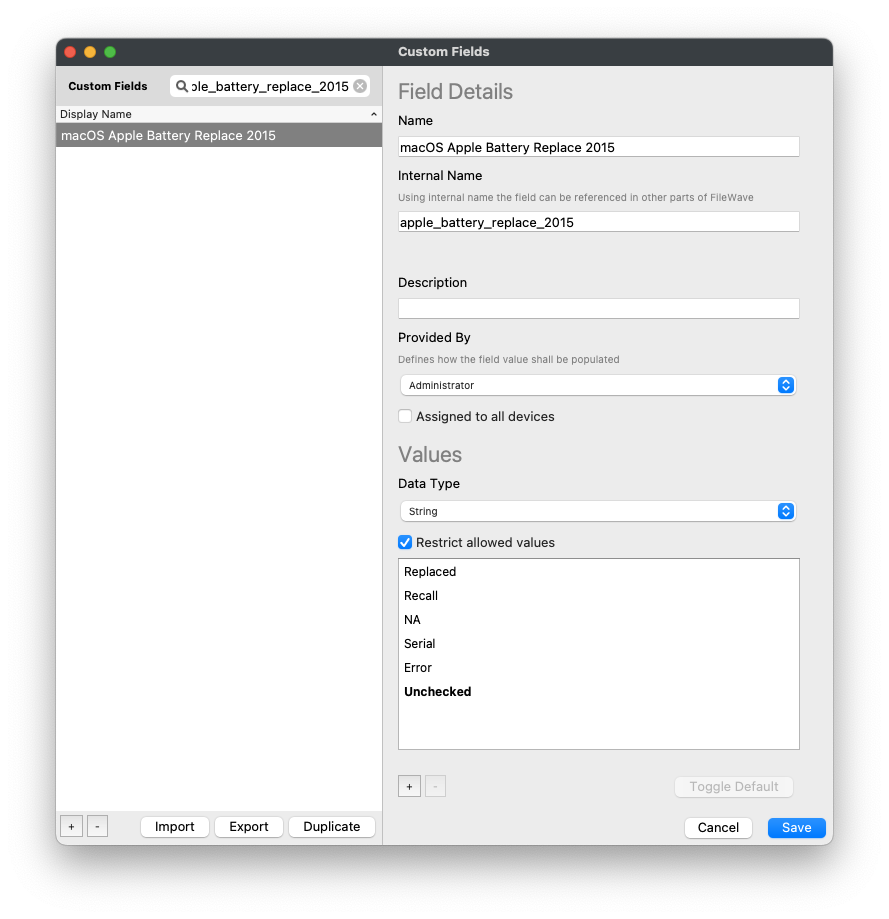
Some Custom Fields may have restricted values. Only one of these values should be posted in the API call to ensure expected behaviour.
Restricted Values
Value restriction may be observed from within the Custom Field definition.
It is also possible to use Swagger (or therefore another API call) to return the 'choices' list of any Custom Field, by observing the Custom Field definition:
URL path for query:
/api/inv/api/v1/custom_field/
Query response:
  {
    "to_be_deleted": false,
    "field_name": "apple_battery_replace_2015",
    "display_name": "macOS Apple Battery Replace 2015",
    "data_type": "string",
    "provider": 0,
    "metadata": {},
    "description": "",
    "default_value": "Unchecked",
    "choices": [
      "Replaced",
      "Recall",
      "NA",
      "Serial",
      "Error",
      "Unchecked"
    ],
    "is_global": false,
    "used_in_inventory_queries": false,
    "used_in_smart_groups": false,
    "used_in_filesets": false,
    "used_in_license_definitions": false,
    "used_in_dep_profiles": false,
    "used_in_dep_rules": false,
    "used_in_workflows": false
  },
Which API
Custom Fields, as mentioned in the other API KB documents, are best targeted with the Command Line RESTful API.
This example is demonstrating the possibility of targeting devices using both Serial Number and Device ID. The Server's FQDN, API authentication token and Device ID can be supplied as Launch Arguments, however, for security reasons it is better to supply the token as an Environment variable. When targeting Internal Names of Custom Fields (as either Launch Arguments or Environment Variables), surround the Internal Name with % symbols.
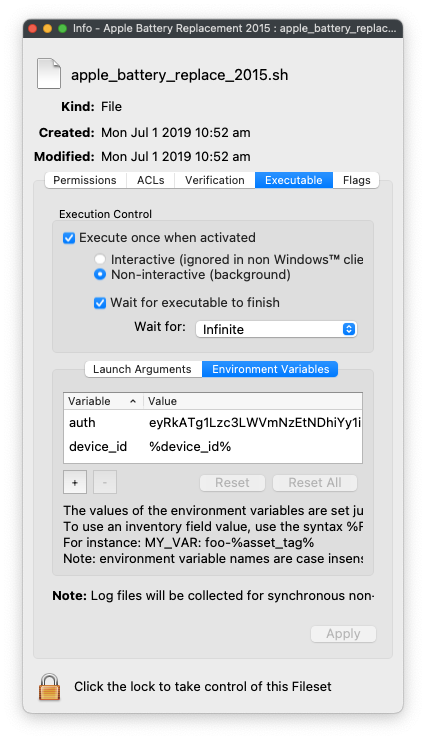
The start of a macOS script may look like:
#!/bin/zsh

# Environment Variables
# $auth - base64 authentication token
# $device_id  - Device ID

server_fqdn=$(defaults read /usr/local/etc/fwcld.plist server) # FW Server FQDN
serial_number=$(ioreg -l -d 2 | awk -F "\"" '/IOPlatformSerialNumber/ {print $(NF-1)}') # device serial number
It is of course possible that all of these values could be supplied to the script as Executable variables.
The start of a PowerShell script may look like:
# Environment Variables
# $Env:auth - base64 authentication token
# $Env:device_id - Device ID
# $Env:serial_number - device serial number
# $Env:server_fqdn - FW Server FQDN
Reading a Custom Field
It may be necessary to read the Custom Field during the script execution. A JSON will be required for the data portion of the command:
{"criteria":
  {
    "column":"serial_number",
    "component":"Client",
    "operator":"is",
    "qualifier":'\"$serial_number\"'
  },
  "fields":
  [
    {
      "column":"apple_battery_replace_2015",
      "component":"CustomFields"
    }
  ],
  "main_component":"Client"
}
To continue the scripts, this could be assigned in the script as a variable
macOS script:
query='{"criteria":{"column":"serial_number","component":"Client","operator":"is","qualifier":'\"$serial_number\"'},"fields":[{"column":"apple_battery_replace_2015","component":"CustomFields"}],"main_component":"Client"}'Windows PowerShell:
$query = '{"criteria":{"column":"serial_number","component":"Client","operator":"is","qualifier":"' + $serial_number + '"},"fields":[{"column":"apple_battery_replace_2015","component":"CustomFields"}],"main_component":"Client"}'With the server details and JSON configured, it is now possible to read the value with a command:
macOS script:
curl -s -H "Authorization: $auth" https://$server_fqdn:20445/inv/api/v1/query_result/ --data $query -H "Content-Type: application/json"The response may look something like:
{"offset":0,"fields":["CustomFields_apple_battery_replace_2015"],"values":[["Replaced"]],"filter_results":1,"total_results":1,"version":0}Windows PowerShell script:
$header = @{Authorization=“$auth"}
$api = "https://" + $server_dns + ":20445/inv/api/v1/query_result/"

Invoke-RestMethod -Method GET -Headers $header -Uri $api
Due to this being a Custom Field designed for an Apple replacement programme, hopefully the response will look something like:
{"offset":0,"fields":["CustomFields_apple_battery_replace_2015"],"values":[["NA"]],"filter_results":1,"total_results":1,"version":0}Handling JSON response
As noted earlier, since the response is also a JSON block, the desired information is somewhat buried within the response. Windows PowerShell has tools to directly work with JSON and as such the desired item is more easily attainable.
macOS on the other hand, it would be beneficial to either instal Python and use Pythons tools to extract the response or get crazy with a tool like 'AWK'.
curl -s -H "Authorization: $auth" \
  https://$server_fqdn:20445/inv/api/v1/query_result/ \
  --data $query -H "Content-Type: application/json" \
  | awk -F  '[\\\[|\\\]]' '{gsub(/\"/,"",$0);print  substr( $(NF-2), 1, length($(NF-2)))}'
Response with AWK:
ReplacedWriting a Custom Field
Once the script has continued and actioned anything else desired, it then may be desirable to set the Custom Field to a new value, which may vary depending upon the outcome of the scripting.
In this example, we will consider the script will be writing back NA to the Custom Field:
current_time=$(date -u +"%FT%TZ")
data='{"CustomFields":{"apple_battery_replace_2015":{"exitCode":null,"status":0,"updateTime":"'$current_time'","value":"NA"}}}'

curl -X PATCH https://$server_fqdn:20445/inv/api/v1/client/$device_id -d "$data" -H 'content-type: application/json'  -s -H "authorization: $auth_key"
Note:
- This is now using the PATCH option, since an already existing value is being altered by the script
- The date is being supplied as a variable to ensure the current time is pushed back with the API JSON data
- This command is referencing 'device_id' in the URL path
No comments to display
No comments to display