Allow External Devices to Connect to the FileWave Server and Boosters
Now that most Organizations are supporting E-Learn and/or remote work environments, you may want to open up your firewall to allow devices outside of your network to connect to the FileWave Server and Boosters.
If you have multiple Boosters, not all have to be opened up externally. We recommend roughly one Booster for around every 2000 Clients. If you'd like to create additional Boosters and keep your existing Boosters internal, you can find information about setting up a new Booster here: Booster installation
DNS Settings
In order for devices to connect on an external network, the FileWave Server and Boosters will first need to be set up with a Fully Qualified Domain Name (FQDN) that can be resolved outside the network.
Server and booster hostnames using local domains (.local, .corp etc.) or IP addresses will not be able to allow devices to connect outside of its private network. And, changing the hostname can not be taken lightly because this change on the server will cause Clients and mobile devices to stop communicating with the server. See more: Root Trusted Certificate
You can confirm your internal DNS settings by running the following commands on a computer inside your network.
Replace 'myserver.domain' with your Server/Booster FQDN.
This will use your devices current DNS settings
nslookup myserver.domainThen run the command doing an external lookup (on a device outside of the network).
nslookup myserver.domain 8.8.8.8If nslookup doesn't resolve to the correct IP (or not at all), you will need to make DNS changes...best to contact your Network Administrator to get this set up.
Inside, then an Outside Example:
$ nslookup server.filewave.com
Server:		192.168.1.1
Address:	192.168.1.1#53

Non-authoritative answer:
Name:	preview.filewave.com
Address: 10.1.10.45

$ nslookup server.filewave.com 8.8.8.8
Server:		8.8.8.8
Address:	8.8.8.8#53

Non-authoritative answer:
Name:	preview.filewave.com
Address: 52.38.32.242
See how inside we got a 10.1.10.45 address, and looking outside we got a 52.38.32.242 IP address? This server's FQDN is setup inside and outside properly.
Network Changes
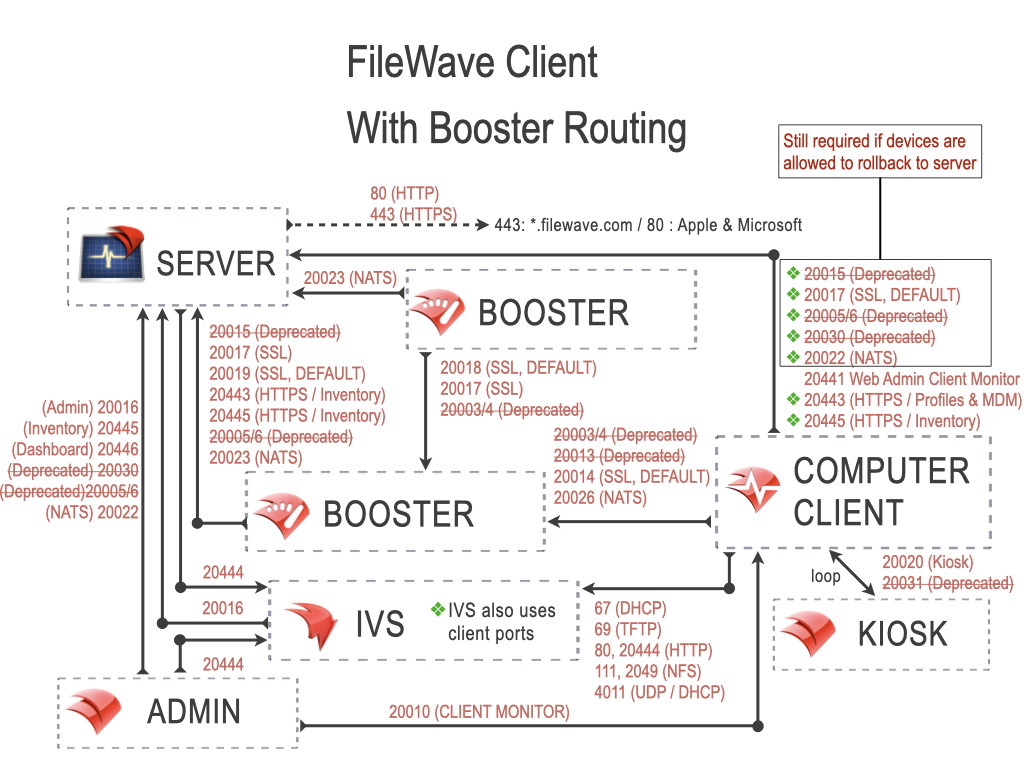
Once DNS is correct, the next thing you'll need to do is configure your firewall to allow external incoming traffic to your Server and Booster(s) on the following ports:
Server: 20015, 20017, 20022, 20441, 20443 and 20445
Boosters: 20026 and 20014
| Figure 1.1 - Network with ports |
If you'd like to know more about what these ports are used for, you can find that information here: Default TCP and UDP Port Usage
Testing the Network for External Communication
Once the changes are in place on the network, you will want to test the connection to be sure devices can communicate with the server.
First, download our Port Tester on a computer connected to an external network. You can find the Port Tester here: https://supportresources.filewave.com.
Once it's installed, input the Server/Booster's FQDN in the Hostname field. You can toggle the switch next to the port numbers to autofill the ports for the Server or Booster or input them yourself.
Select 'Go' and if all the necessary ports come back successful, you're all set!
Connecting your Clients to the External Boosters
If you don't already have your Clients pointing to the Boosters you selected to make available outside the network, you will need to create a Superprefs Fileset to deploy these changes.
You can learn more about creating and deploying Superprefs here: Creating a Superprefs Fileset
