Root Trusted SSL Certificate (Using and Renewing)
Description
To communicate with devices, a certificate is required. Our recommendation is for a root-trusted SSL certificate to be implemented. If you are currently using a self-signed certificate, we suggest moving to a trusted root certificate; wildcard certificates are supported. This article will discuss both self-signed as well as a certificate from an authority, and the process to renew the certificate.
Since Filewave v12+, the Admin console indicates when a certificate is self-signed; Preferences > Mobile tab > HTTPS Certificate Management

iOS 10.3+ devices can be enrolled with a self-signed certificate. Over the Air (OTA) though will experience warnings or errors; Self Signed Certificate Errors.
Apple provide a list of certificates automatically trusted per OS and OS version: Apple Trusted Certs
Information
Root trusted SSL certificates can be purchased from a Certificate Authority (CA). Apple provides lists of trusted root certificates: https://support.apple.com/en-gb/HT204132
CA Vendors include:
- GoDaddy
- Digicert
- GlobalSign / AlphaSSL
- Trustwave
- and many more...
As FileWave supports wildcard certificates, if you already have a wildcard certificate this could be uploaded without additional purchase. Wildcard certificates are indicated by a * before the domain name. e.g.
- Wildcard cert: *.initech.com
- Dedicated cert: filewave.initech.com
If you already have a certificate bundle but it isn’t in the .p12 format, you can use this link to convert the file - Digicert: How to convert a certificate into the appropriate format
Requirements
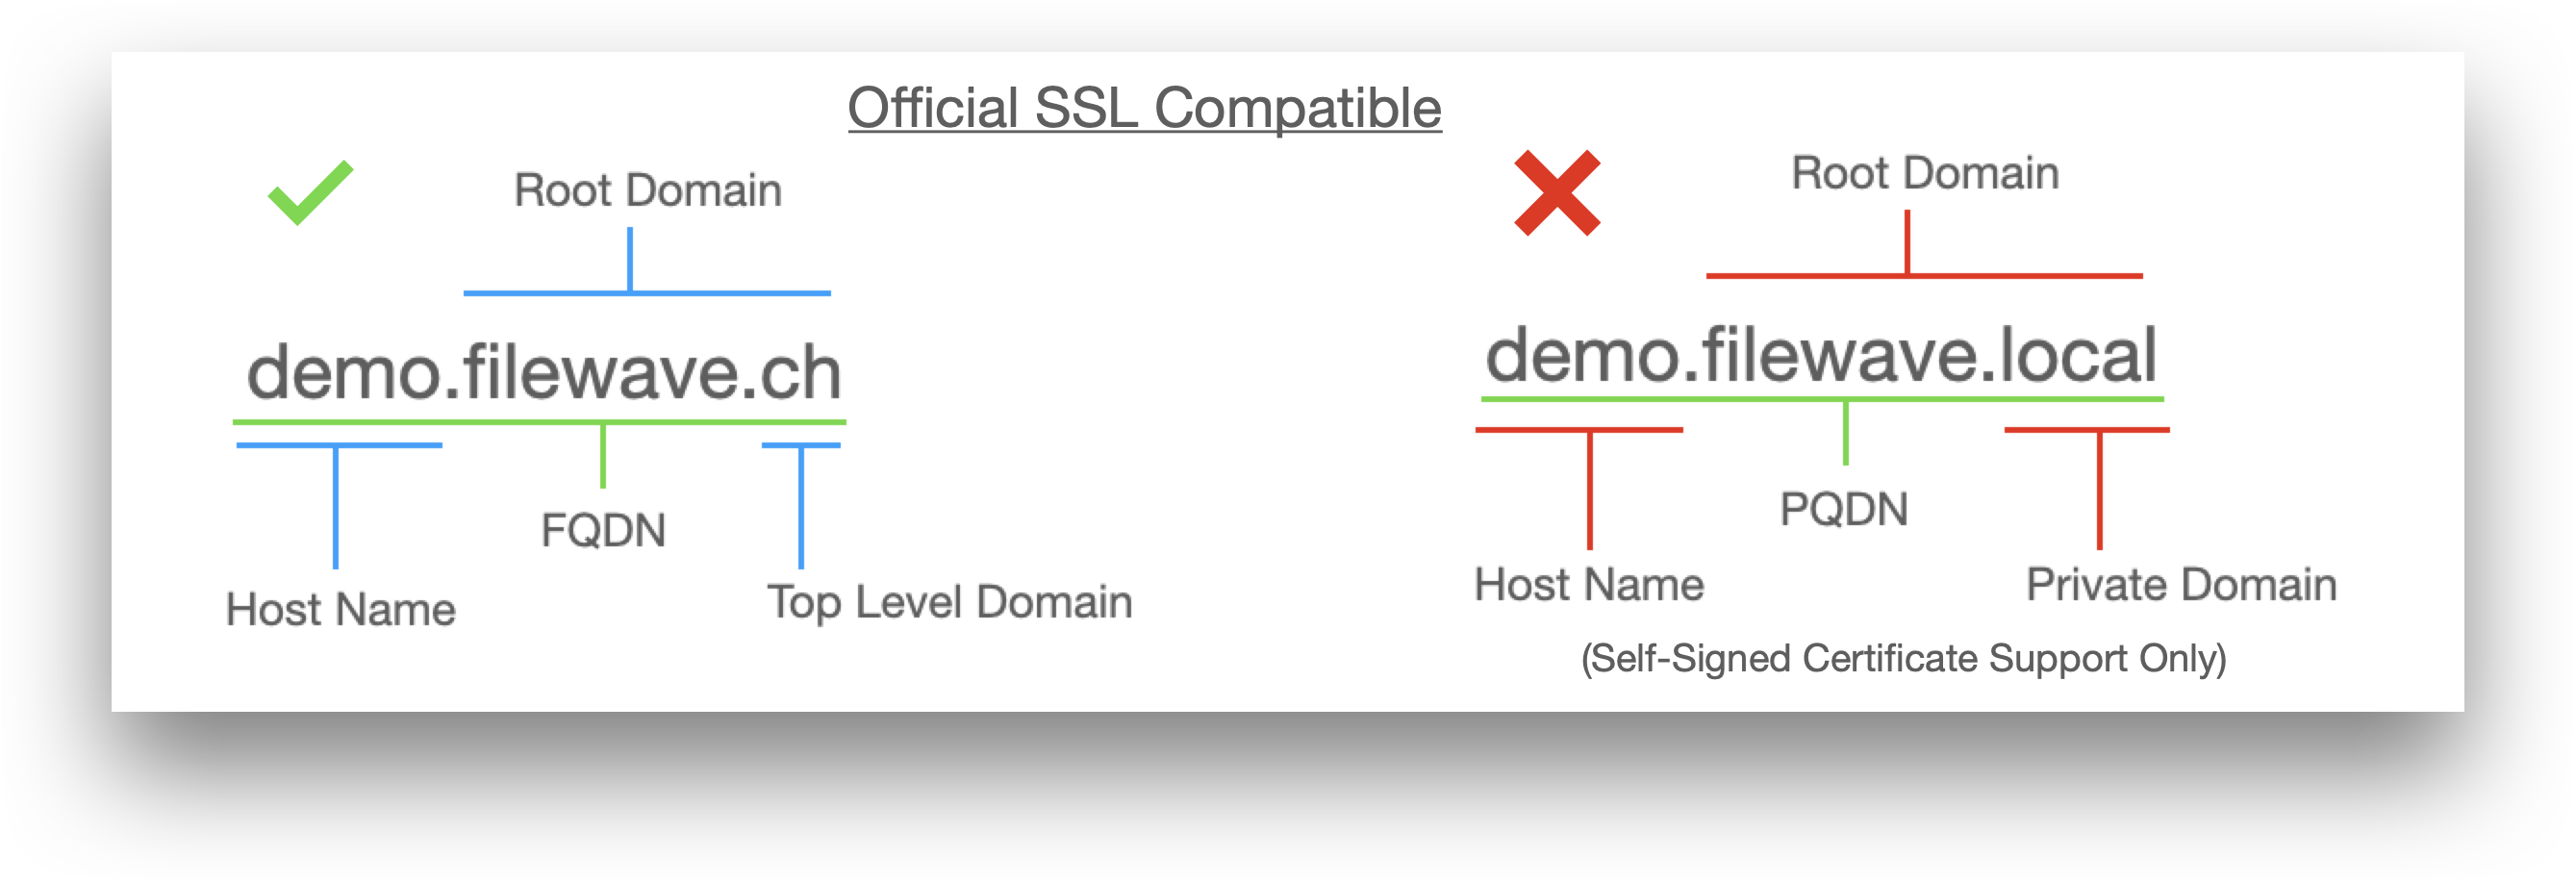
Obtaining an official 3rd party root trusted SSL certificate will be dependent upon the Server's current domain. Only a domain that includes an official 'Top Level Domain' (TLD) may qualify for a root trusted SSL certificate and the root domain must be registered to purchase a certificate. Where the Server uses an internal-only domain, it is not possible to transition to an official certificate without first changing the domain where the Server belongs. See migration below. Example TLD:
- .com
- .org
- .edu
In the context of a Website, the root domain refers to the highest level of the hierarchy, e.g apple.com, microsoft.com, google.com
For example:
- demo.filewave.ch is a Fully Qualified Domain Name (FQDN) of a server called 'demo' in the root domain 'filewave.ch', the TLD being 'ch'.
- demo.filewave.local does not have a TLD and instead is using a private internal domain of '.local'. Without a TLD they are known as a Partially Qualified Domain Name (PQDN)
Often the term FQDN is used as a way to indicate the idea of writing the Server name along with its connected domain. Strictly speaking, with internal private-only domains, this should be referred to as PQDN. Not only does FileWave recommend using an FQDN, but regardless of using an FQDN or PQDN, always specify the Server name along with its connected domain name (rather than just the hostname) when setting any preferences, be that for Server, Clients, Boosters, etc. We also discourage the use of IP in settings.
Migration
Migration of certificates will not pose any issues as long as:
- Wildcard cert: domain matches the domain name of the previous self-signed certificate
- Dedicated cert: Server name and domain matches the name of the previous self-signed certificate
If during migration the Server's Host Name and/or Domain Name changes, all MDM devices will lose MDM communication with the FileWave Server and require re-enrolment into MDM
|
Case |
Current Certificate |
New Certificate |
Result |
|
Any certificate to any certificate (changing name) |
Self-signed cert = filewave.initech.com |
Root trusted cert = fw.initech.com |
CHANGING THE FQDN WILL REQUIRE DEVICES TO BE ENROLLED AGAIN |
|
Self-signed to root trusted (keeping the same name) |
Self-signed cert = filewave.initech.com |
Root trusted cert = filewave.initech.com |
This will NOT require devices to be enrolled again |
|
Self-signed to wildcard |
Self-signed cert = filewave.initech.com |
Wild Card cert = *.initech.com |
This will NOT require devices to be enrolled again |
|
Root trusted to root trusted |
Root trusted cert = filewave.initech.com |
Root trusted cert = filewave.initech.com |
This will NOT require devices to be enrolled again |
Procedure
There are 3 key steps.
- Create a CSR and Key to request a certificate from a CA
- Create CRT files from the downloaded certificates
- Convert the certificate to p12 to upload to the FileWave Server
Renewing Certificates
When renewing a current expiring certificate with a CA, step 1 is not required, if your CA allows the use of previously used private keys and certificate requests. You will however require the key in step 3. If you have not stored the key elsewhere, the key should always be accessible on your current FileWave Server in /usr/local/filewave/certs/.
If you have not stored the key safely and the Server was to break such that the key was not retrievable, the whole process would need to be repeated instead.
Certificate Expiry
Certificate expiry should be avoided. Renewing certificates should be done in advance to maintain full working order. If the certificate expires before you have a chance to renew, managed devices will not be able to connect to the FileWave Server. However, once it is renewed your devices will check back in.
Example process
For example:
- FileWave Server FQDN = fw.initech.com
- Files will be saved to created folder Certificates
- The certificate was purchased from AlphaSSL
Pre-requisite: OpenSSL. Unix-based systems have this by default. To follow this process on Windows will require an appropriate version of OpenSSL
Step 1
Create the.CSR and . KEY from OpenSSL
From a command prompt type the following:
macOS and Unix
sudo openssl req -new -newkey rsa:2048 -nodes -keyout /certificates/fw.initech.com.key -out /certificates/fw.initech.com.csrWindows
C:\OpenSSL-Win64\bin\openssl.exe req -new -newkey rsa:2048 -nodes -keyout C:\certificates\fw.initech.com.key -out C:\certificates\fw.initech.com.csrYou will be prompted for the following:
- Country Name (2-letter code)
- State or Province Name Locality Name (eg, city)
- Organization Name (eg, company)
- Organizational Unit Name (eg, section)
- Common Name (e.g. Server FQDN or YOUR name)
- Email Address
- A challenge password
- An optional company name
For this example the details should be:
- Common Name: fw.initech.com
- Do not enter a password
The Certificates folder should now show:
fw.initech.com.csr
fw.initech.com.key
The KEY should be held safely. The CSR will need to be uploaded to the CA during the request of the certificate creation. You should receive confirmation from the CA, regarding domain ownership and how to retrieve the generated certificate along with some general instructions.
Step 2
Create CRT files from the downloaded certificates
It is typical, that the SSL certificate will also require an intermediate certificate. These should be readily available from the CA's website. If required, contact the CA for details of which intermediate you will require.
Once the SSL and intermediate certificate have been downloaded, instructions can be followed to create the CRT files. In the case of the email from AlphaSSL, only steps 1-4 should be followed.
Sample email from AlphaSSL.
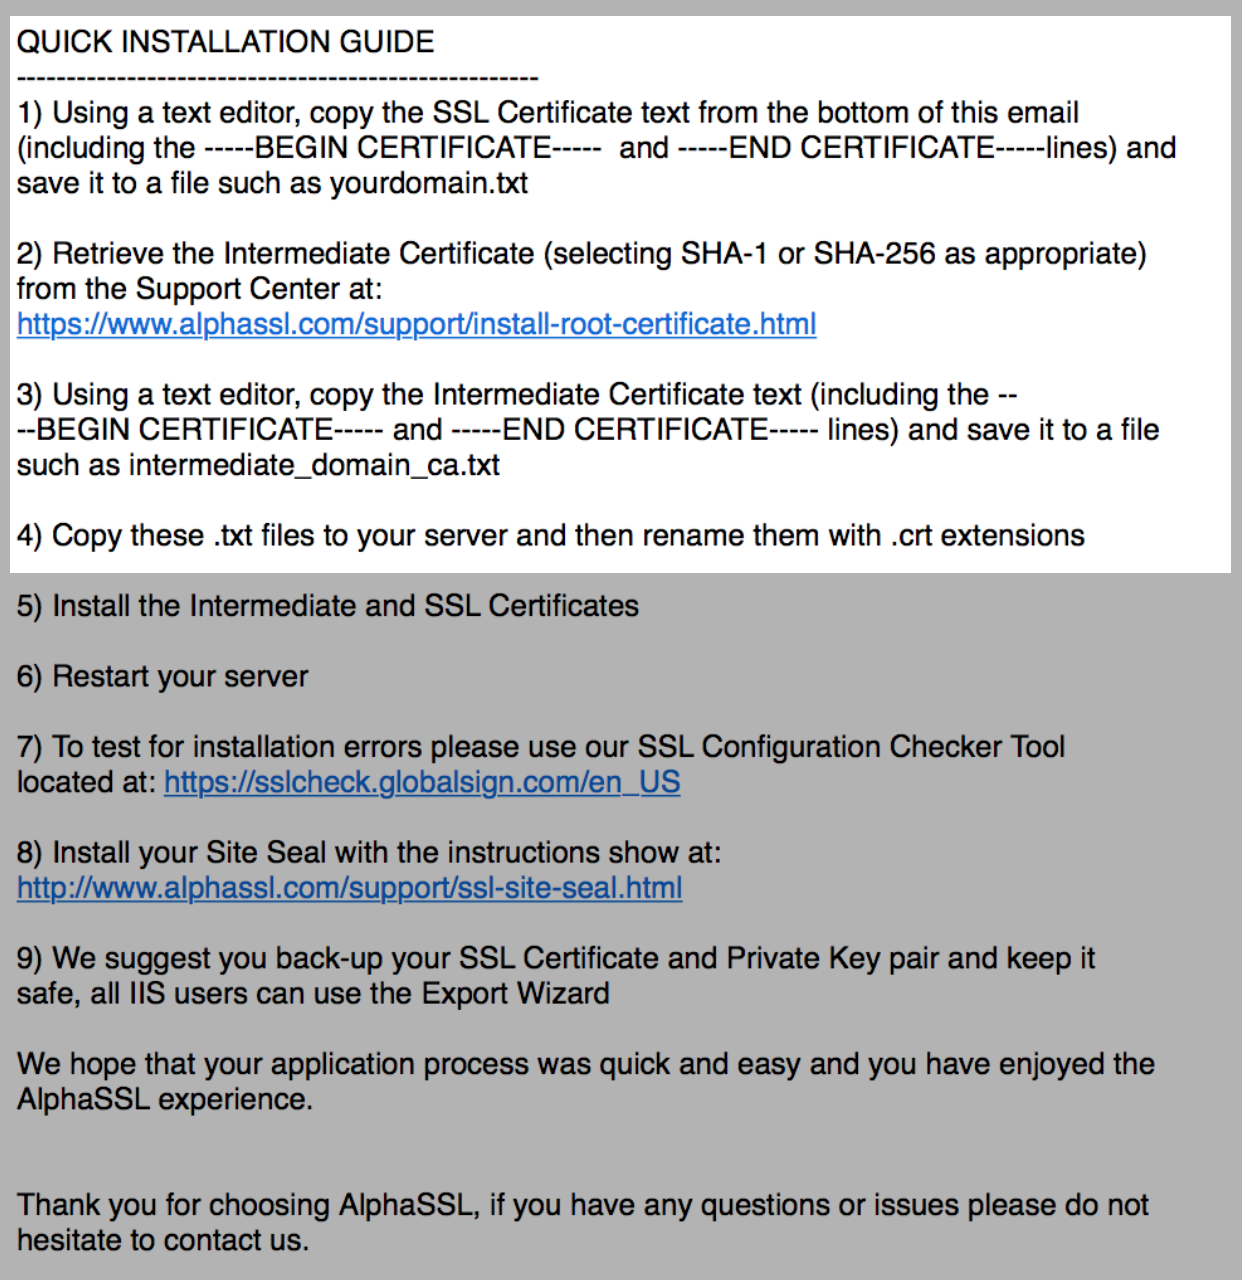
These 2 CRT files can be copied to the Certificates folder from Step 1.
From the example:
- SSL certificate: purchasedcert.crt
- Intermediate certificate: AlphaSSLCA.crt
The certificates folder should now show:
AlphaSSLCAS.crt
fw.initech.com.csr
fw.initech.com.key
purchasedcert.crt
Step 3
Convert the certificate to p12 to upload to the FileWave Server
The necessary files are now available to create the p12. From the command line type the following:
macOS/Linux
sudo openssl pkcs12 -export -out /certificates/fw.initech.p12 -inkey /certificates/fw.initech.key -in /certificates/purchasedcert.crt -certfile /certificates/AlphaSSLCA.crtWindows
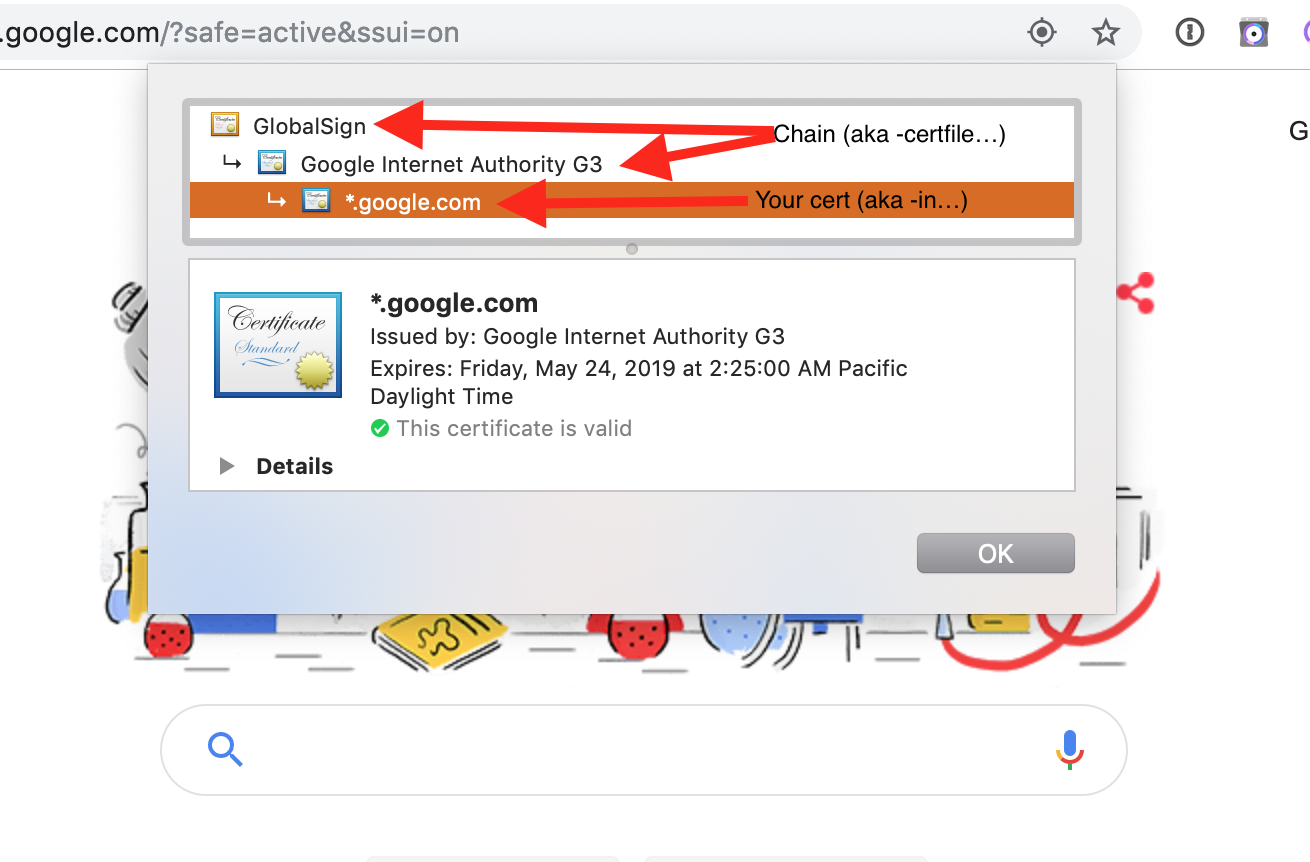
C:\OpenSSL-Win64\bin\openssl.exe pkcs12 -export -out C:\certificates\fw.initech.com.p12 -inkey C:\certificates\fw.initech.com.key -in C:\certificates\purchasedcert.crt -certfile C:\certificates\AlphaSSLCAS.crtWhen OpenSSL prompts for an export password, enter a password and keep it available for the upload step. The p12 certificate can then be uploaded to the Server through the Admin console: Preferences > General Tab > SSL Certificate Management; FileWave will request the p12 password during upload. Once uploaded, check the 'Common Name' on the General tab matches the Server name in the Mobile Tab. For wildcard certificates, only the domain should match.
Apache web server service will automatically restart and the FileWave Server is now ready for MDM.
Command Overview
Explanation of OpenSSL command
OpenSSL pkcs12 #Create a p12 (also know as pkcs12)
-export -out /certificates/fw.initrode.us.p12 #Output location and name of p12 to upload to FileWave
-inkey /certificates/fw.initrode.us.key #Location and name of the private key file used to generate the CSR
-in /certificates/purchasedcert.crt #Location and name of the purchased certificate provided by the 3rd party supplier
-certfile /certificates/AlphaSSLCA.crt #Location and name of Intermediate certificate, (will often contain more than one cert)
No comments to display
Thank you for this valuable guide, without which I would hardly have been able to install a working certificate.
However, I consider the following two points worth mentioning:
The blue info box under "Precedence" indicates that step 1 can be omitted when renewing a certificate. While the requirements for certificates are constantly increasing, our CA no longer allows the use of previously used private keys and certificate requests.
Step 3, "Convert the certificate to p12," omits the information that a password must be entered during creation, otherwise the upload to the server will be rejected.
Thanks. Page has been revised.
No comments to display