Export .p12 SSL Certificate from Windows
When managing mobile devices, install a trusted SSL certificate on the FileWave Server. The server SSL certificate is configured in FileWave Central > Preferences > Mobile. If you generated the Certificate Signing Request (CSR) on a Windows-based system and completed the certificate generation process, Windows can export the SSL certificate and intermediate bundle as a .pfx file. That bundle should include the private key, public certificate, Root CA certificate, and intermediate certificate bundle. Rename the .pfx file to .p12, then upload it in FileWave Central > Preferences > Mobile without modifying the certificate contents.
Step-by-step guide
- Open a Run dialog and enter "mmc".
- Go to File > Add/Remove Snap-in.
- Add the Certificates snap-in and click the Add > button in the middle.
- Choose Computer account.
- Pick Local computer and click Finish.
- Click the OK button.
- In the MMC console browse to Certificates (Local Computer) > Personal > Certificates on the left. If your certificate is not there, browse the rest of the Certificates (Local Computer) tree until you find it.
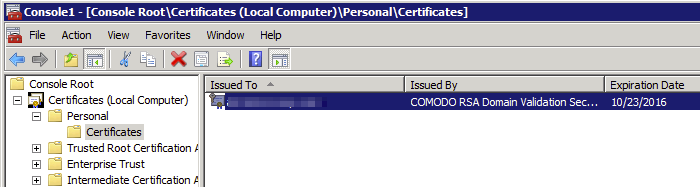
- Select your certificate in the middle pane, right-click, and pick All Tasks > Export.
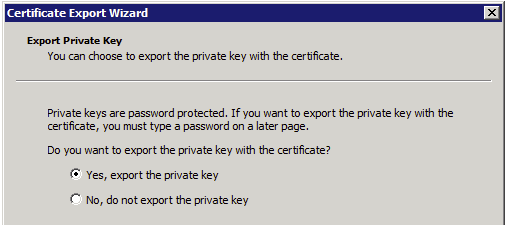
- When prompted, pick Yes, export the private key.
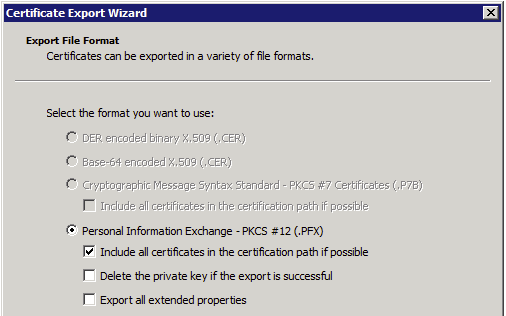
- Under Personal Information Exchange - PKCS #12 (.PFX), check Include all certificates in the certification path if possible. Leave the other two checkboxes unchecked.
- Click the Next button and specify an export password. FileWave Central will prompt for this password when you upload the SSL certificate in Preferences > Mobile.
- Save the file to your desktop.
- Change the file extension from .pfx to .p12.
- Upload the .p12 file in the Mobile preferences tab of FileWave Central.
No comments to display
No comments to display