
Set Up the FileWave Imaging Virtual Server (IVS)
You need IVS only if your evaluation includes Windows network imaging. You can enroll a Windows Client and deploy ordinary software without it. Hosted FileWave Server customers still use a customer-managed local IVS and must follow the hosted setup handoff below. Keep console access and your network settings available before changing the IVS address.
Plan the imaging lab after ordinary Windows management succeeds. Use an approved disposable build VM and an expendable imaging target. Confirm the version-matched appliance, networking, drivers, firmware/security requirements, backups, and recovery with the responsible administrators. If imaging is not your goal, use Windows Enrollment and return to Inventory Reports.
The registration images show an older FileWave interface. Use the corresponding controls in your installed release and your own approved Server and IVS settings. Do not copy the example addresses.
What the Imaging Virtual Server does
FileWave Windows network imaging uses an on-premises Imaging Virtual Server (IVS). The virtual appliance runs in Hyper-V or VMware, PXE boots Windows devices in UEFI or legacy BIOS mode, captures or deploys disk images, and transfers captured images to the FileWave Server. Keep the base image thin when possible and deploy ordinary applications after imaging. Windows Driver Filesets supply model-specific drivers during imaging, before Windows boots; they are not a post-imaging driver-installation workflow.
Import the IVS virtual appliance
- Download the latest version of the FileWave IVS that matches your FileWave Server version and virtual environment.
- Import the virtual appliance into Hyper-V or VMware. The FileWave Server Setup article shows the same virtual-appliance import pattern.
Configure IVS network settings
- Open the IVS console in your hypervisor and keep it available for recovery.
- On a new Debian-based FileWave appliance delivered with 15.5.0 or later, sign in as fwadmin and complete the required first-login password change. Use sudo for approved administrative work; direct root login is disabled. Existing older appliances can retain their previous account configuration. Follow Setting the Password on First Login to FileWave Appliances.
- Have the appliance and network administrators confirm the installed IVS release, active networking configuration, approved stable address, subnet, default gateway, and DNS servers. Record the current settings and agree on console recovery before changing the address.
- Use the network-configuration procedure confirmed for that IVS release. Do not copy Server-appliance settings or a command from a different IVS version. If the applicable procedure is unclear, stop and ask your FileWave representative to coordinate setup.
- After any approved change, confirm the actual address, route, DNS, and reachability from the intended management and imaging networks. An address displayed in the console alone is not proof that the IVS can communicate with the FileWave Server or boot a target.
Check the IVS network settings against the approved network plan before registering it in Central.
Add the IVS to FileWave Central
Hosted FileWave Server: ask your assigned evaluation representative to coordinate the hosted IVS setup. FileWave Technical Support performs the Server-side uploader-account work; your administrator completes the IVS-side configuration with securely supplied values. Local capture alone does not prove the image can upload to the hosted Server.
- Open FileWave Central and go to Preferences > Imaging.
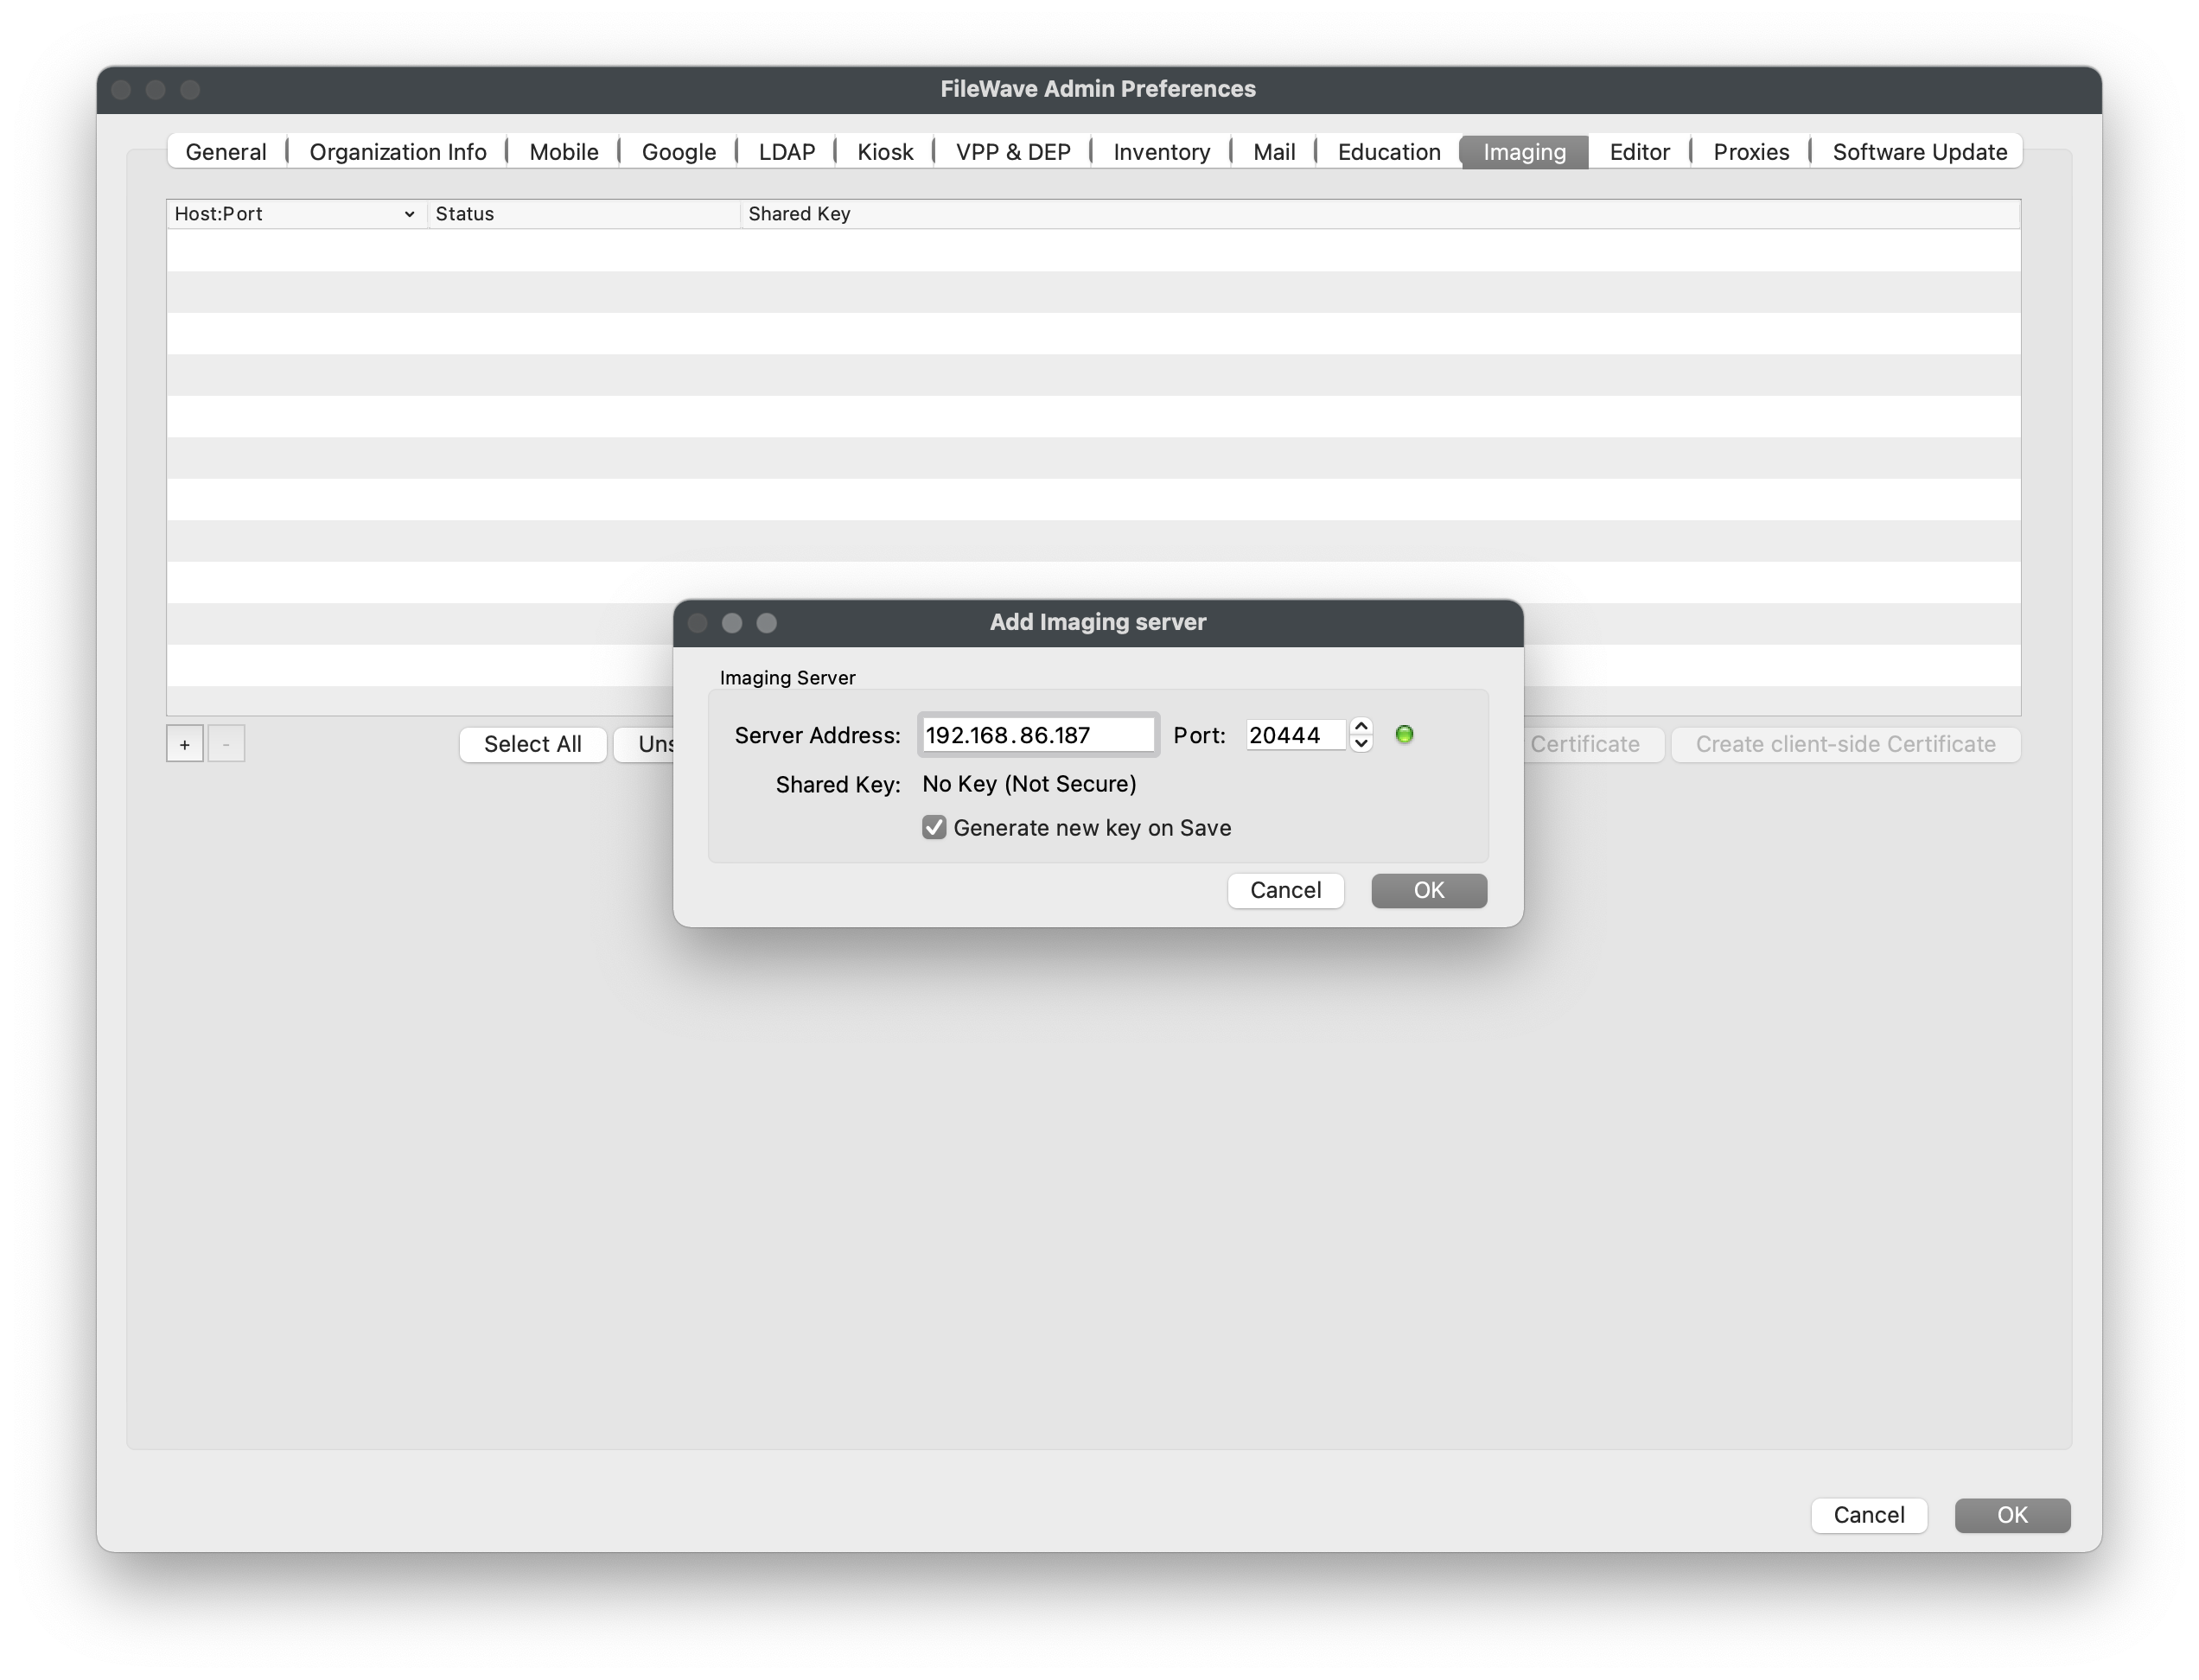
- Click the "[+]" button to add a new FileWave IVS.
- Enter the IP address of the FileWave IVS and confirm that the status light turns green.
- Leave the port as "20444".
- Verify that the "Generate new key on Save" box is checked.
- Click "OK" on the "Add Imaging Server" window.
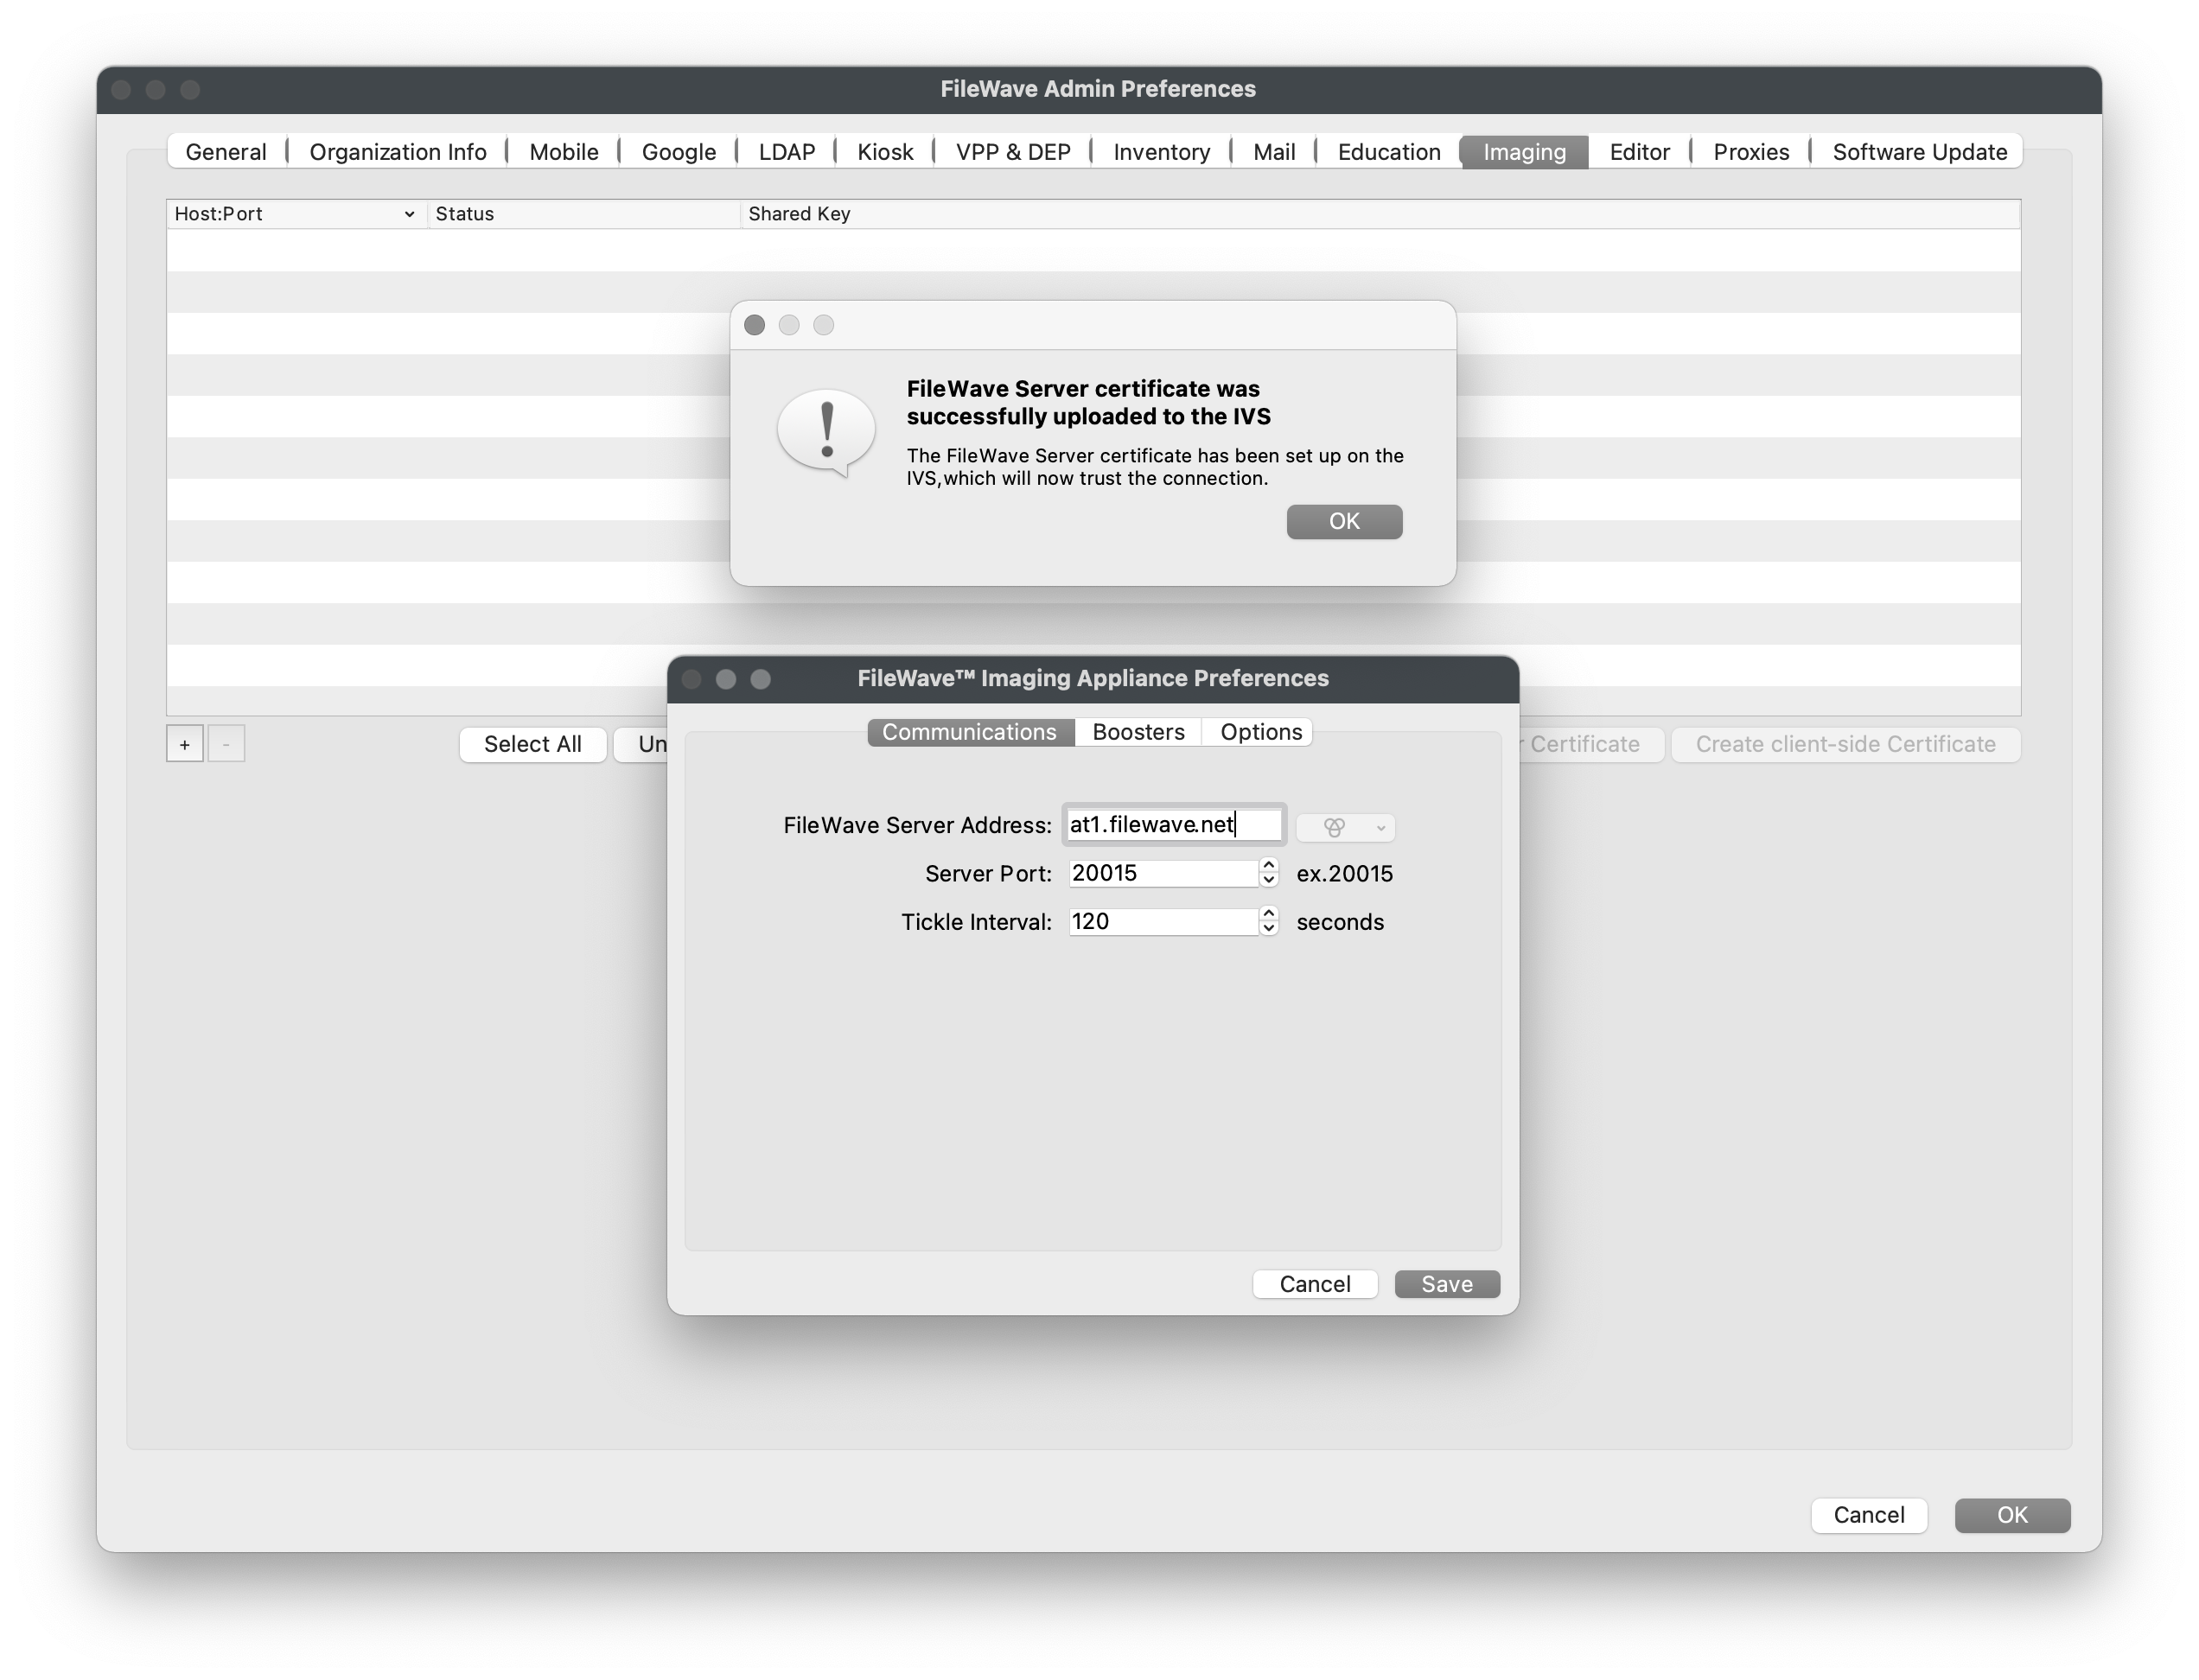
- Verify that the "FileWave certificate was successfully uploaded to the IVS" pop-up appears.
- Verify that the "FileWave Server Address" is correct within the "FileWave Imaging Appliance Preferences" window.
- Leave the port as "20015". Note: SSL is required, so the system automatically uses port 20017 when you enter 20015. Do not manually set the port to 20017.
- Click "OK" within the "FileWave Imaging Appliance Preferences" window.
- Select OK in FileWave Central Preferences to save the changes and generate the shared key.
- Open FileWave Central Preferences again and return to Imaging.
- Click the right-most button for either "Enroll Imaging Server" or "Create client-side Certificate".
- Wait for the "Imaging Server enrolled successfully" pop-up message.
- Select OK in FileWave Central Preferences to save the changes.
- For the approved capture lab, continue to Windows Imaging - Capture Image from the beginning. Complete build-machine preparation before creating the placeholder and capture association, then confirm IVS check-in and Model synchronization. Do not create an association with a production device or group merely to test readiness.
Confirm the Imaging Server enrolled successfully message, then check the IVS status. Do not share the Shared Key value in screenshots. If the status shows a credentials mismatch, do not assume that the enrollment message means it is resolved.
Next: the approved capture lab
Before continuing to Windows Imaging - Capture Image, complete the setup for your IVS release and get approval for the lab plan. If you use a hosted FileWave Server, the hosted-server handoff must also be complete. Use its placeholder and Model checks before capture. If check-in, credentials, network reachability, or readiness is unresolved, stop and contact your FileWave representative. If you are skipping imaging, return to Inventory Reports or the Evaluation Guide introduction.
No comments to display
No comments to display