
Configure Android Enterprise in FileWave
Configure Android Enterprise before enrolling a fully managed Android device or a personal device with a work profile (BYOD). The enterprise binding connects FileWave to your organization's managed Google domain or managed Google Play enterprise. It does not enroll a device by itself. Zero-touch enrollment uses this binding too, but is an optional route for reseller-registered devices.
Obtain the FileWave activation JSON
Android Enterprise management requires an activation JSON file from FileWave. During an evaluation, request it through your assigned FileWave Systems Engineer (SE), who can coordinate with Technical Support. Existing customers can use Customer Technical Support. Request the file for the FileWave environment you plan to use before scheduling your enrollment test.
Keep the activation file in approved secure storage. It is not the device enrollment token or QR code you will create later. Do not paste its contents into public tickets, email threads, or screenshots.
Set up Android Enterprise
Before you bind an enterprise
- Use a supported FileWave Server and matching Central version. Open your selected release in Downloads and check its platform support, including the Android version on your test device.
- Have the FileWave activation JSON ready.
- Use an organization-owned administrator account for the intended managed Google domain or managed Google Play enterprise, not an employee's personal account. Have the Google administrator available for any required domain or organizational-unit settings.
- Confirm Android Enterprise network access with the network/server owner. Default TCP and UDP Port Usage lists the Android EMM endpoints, ports and traffic directions; it is not an instruction to open every port in the article.
- Use authorized FileWave fwadmin access. Some enterprise-configuration controls are unavailable to lower-privilege accounts.
- Identify one approved test device, its owner and intended management mode. Review existing enrollment rules, default Android policy and inherited assignments before enrolling it. A new test group does not isolate the device from global policy.
Protect existing Google management before adding a binding. Google supports multiple EMM bindings, each with its own Enterprise ID, and lets administrators select a provider for user organizational units. That does not make adding a provider risk-free. Google documents that adding a third-party EMM affects advanced Google endpoint management and Android app management across the domain. If your organization already uses these services, stop and have its Google administrator review Google's managed-domain setup and coexistence requirements before changing anything. Agree on the test users, organizational unit and provider; do not replace or unlink an existing enterprise to make room for the evaluation.
Android Enterprise does not require the separate Google Cloud Messaging/Firebase configuration used by the Chromebook setup guide. Do not create a ChromeOS Firebase project or import its service-account credentials for this Android setup.
Configure the enterprise binding
If the intended enterprise is already configured, verify its identity as described below and continue to enrollment. Do not create a duplicate binding.
In FileWave Central, open Preferences → Google → Configure Enterprise under EMM Configuration. If the Google tab or required controls are missing, first check your account privileges, Central/Server versions and activation with your SE. Reopen Central after activation is confirmed. Hosted users must not restart services or edit server files. Your SE can coordinate any hosted-server work with Support. On a self-managed Server, only the authorized server owner should perform a service restart if FileWave recommends it, using the appropriate procedure and an agreed interruption window.
- In Set Up an Android Management Enterprise, select Choose File.
- Select the FileWave activation JSON, then select Upload.
- Enter a recognizable enterprise display name and select Sign Up. This name identifies the binding in FileWave and may appear on managed devices.
- Open the provided browser link and complete Google's registration with the organization-owned administrator account. Check the organization shown before confirming. For a managed Google domain, have its administrator complete the applicable provider/organizational-unit enablement in Google's setup instructions. Do not enable optional Google products or change existing management merely to finish this test.
- Confirm that the browser returns to the intended FileWave Server and displays Enterprise "[display name]" successfully created.
Return to Central and confirm that the configured account and enterprise are the ones you intended. If the identity does not match or registration is incomplete, stop and contact your SE before creating enrollment tokens.
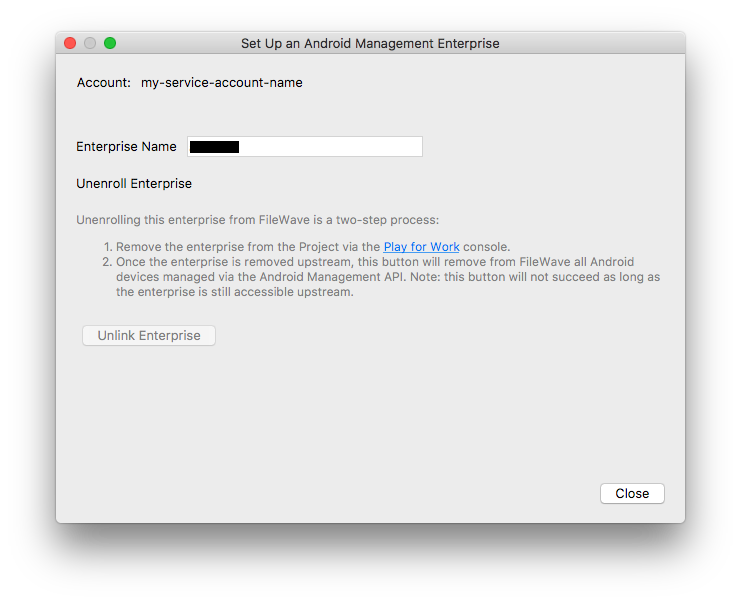
An older interface showing an already configured enterprise. The unenrollment controls are not part of this setup: do not choose Unlink Enterprise.
Enroll one Android device
You are ready to enroll a device when the intended enterprise is visible in Central and its Google management scope has been agreed on. Continue with Android Enrollment. Choose the ownership and management mode before following any factory-reset instructions.
No comments to display
No comments to display