
FileWave Central Preferences
AccessingWhat
FileWave Central Preferences
contains
Nowserver-wide configuration, platform integrations, content-delivery defaults, inventory behavior, and settings that youapply have logged in to FileWave Central, we will need to configure a few settings via the FileWave Preferences. The Preferences mentioned in this section are required for all FileWave installations. Any Preferences not covered in this section will be addressed in their own OS-specific section within the Evaluation Guide or linkedonly to the FileWavelocal KB.Central installation. Use this overview to find the correct area, then follow the linked workflow article for settings that need detailed preparation.
macOS: FileWave Admin16.4 navigation: This page reflects the Preferences categories and locations in FileWave Central 16.4. Earlier releases may place some settings elsewhere. In particular, automatic Booster-upgrade timing is under Preferences > General in 16.3.x and Preferences
Windows: File > PreferencesUpgrades in 16.4.0 and later.
SecureOpen Preferences
EachOpen instancePreferences offrom FileWave hasCentral. aThe supercategories user account 'fwadmin'. This account has permissions for all items. Other Administrators may be created and allowance of permissions may be granted,appear as settabs out inacross the KB:
Manage FileWave Administrators
Some settings though, will always require a password to be entered when attempting to make alterations, even where settings are granted. When prompted to enter a password, it should be the passwordtop of the FileWavewindow. Admin currently signed in.
Examples of items which will always password prompt, include:
Permissions will still need to be granted for any FileWave Administrator requiring the ability to even attempt to change these settings.
"Mobile" Preferences
The "Mobile" Preferences pane is one of the most important throughout FileWave as it sets the server's address so FileWave Central knows where to connect to.
Verify that the "Server Address" is correctly set to the fully qualified domain name (FQDN) of your FileWave Server.
Verify that the green light is visible to the right of the "Port" field.
Do not continue if the light is red and please address any DNS issues and/or configure FQDN for the FileWave Server.
Do not change the "Port" field value.
If "Shared Key" is set to "No Key (Not Secure)", please verify that the "Generate new key on Save" is checked.
After "Generate new key on Save" is checked, immediately click "OK" to save and close the Preferences window.

"General" Preferences
The "General" Preferences is the second most important Preferences pane as it controls the SSL Certificate used to protect all FileWave communications. We highly recommend using a true CA-signed SSL Certificate versus a self-signed certificate or free certificate available from services like Let's Encrypt. If you already have a wildcard certificate that covers the top-level domain the FileWave server will be hosted on then you can use it without needing to purchase another certificate. FileWave Cloud-Hosted Servers will have the SSL Certificate pre-installed.
Installing a Commercial Certificate from a Trusted Certificate Authority
Follow the instructions here for creating a .p12 certificate file from the .crt file provided by your certificate vendor. To ensure that you receive your certificate as a .crt file pick Apache HTTP for the download format. You will need to merge your SSL .crt file, private key, and possibly any required intermediate certificates into a single .p12 file. SSL vendors often provide multiple intermediate certificates in .crt format.
In the "SSL Certificate Management" section of the of the "General" Preferences tab of FileWave Central console click the "Upload PKCS12 Certificate" button, authenticate, and select the .p12 certificate file generated from Step 1.
Click the "OK" button to save the Preferences.
Ensure that the FQDN assigned to the FileWave Server is resolvable externally and that TCP port 443 has been forwarded correctly if your server is hosted inside of your firewall with a private IP. Verify the certificate trust chain externally using one of the external SSL checkers below.
https://www.sslshopper.com/ssl-checker.htmlhttps://www.digicert.com/helphttps://www.geocerts.com/ssl_checkerhttps://www.rapidsslonline.com/ssl-tools/ssl-checker.phphttps://certlogik.com/ssl-checker
The FileWave Dashboard can also be configured to alert you via email pending an SSL certificate expiration.
Generating a Self-signed Certificate
If you are unable to acquire a commercial SSL certificate from a trusted Certificate Authority then you should ask your FileWave Sales Engineer about testing on a hosted server that has a filewave.net DNS name. You may decide to stick with that for when you move to production as well.
"Manage Administrators" Assistant
So far, we've only discussed logging into FileWave Central using the default superuser account "fwadmin". Let us change the "fwadmin" password followed by creating a new user account for our normal daily actions or for another team member.
Change password for "fwadmin"
Open "Manage Administrators" from the "Assistants" menu in the main topmost menu bar of FileWave Admin.
Select the "fwadmin" account onUse the left and selectright "Setarrows password".when the window is not wide enough to display every tab.
An administrator needs the applicable permission before opening or changing a protected area. Sensitive operations can also require the currently signed-in administrator to authenticate again. Use named administrator accounts and least-privilege permissions for daily work instead of sharing the fwadmin account.
See Managing FileWave Administrators for account and permission management.
Evaluation and initial-configuration priorities
CreateReview aclient-upgrade newconcurrency, userfailure account
thresholds, Open "Manage Administrators" fromand the "Assistants"automatic menuBooster-upgrade indelay the main topmost menu bar of FileWave Admin.
Click the "[+]" button in the lower left-hand corner and select "Local Account".
Specify at least the "Login name" and "Set password".
Navigate to the "Permissions" tab and review all permissions you'd like to grant to the new user.
Click "Apply" to save the changes.
Allow new users to access existing VPP Tokens
After importing your organization's Apple VPP Tokens, we will need to allow each new user or LDAP group the ability to access the VPP tokens.
Open "Manage Administrators" from the "Assistants" menu in the main topmost menu bar of FileWave Admin.
Click the "Manage VPP Tokens" button from the lower section.
Authenticate using the "fwadmin" superuser credentials.
Click the boxes for each token and user you'd like to grant access to the VPP token.
FileWave Central 16.4 Preferences map
metadata
Byassociated default,with the FileWave environment and managed-device information.
Change Preferences safely
Related content
Managing FileWave Administrators LDAP Preferences VPP andAny Cloud-Hosted Server requested by your FileWave SE will have authentication disabled unless instructed otherwise.
Access the FileWave Server's Command Line Interface (CLI) via direct console access or via SSH using the default username "root" and default password "filewave".
SSH into FileWave Server
ssh root@myorg.filewave.netInstallNetwork "nano"Imaging for/ easierIVS modification of text files.
Install nano
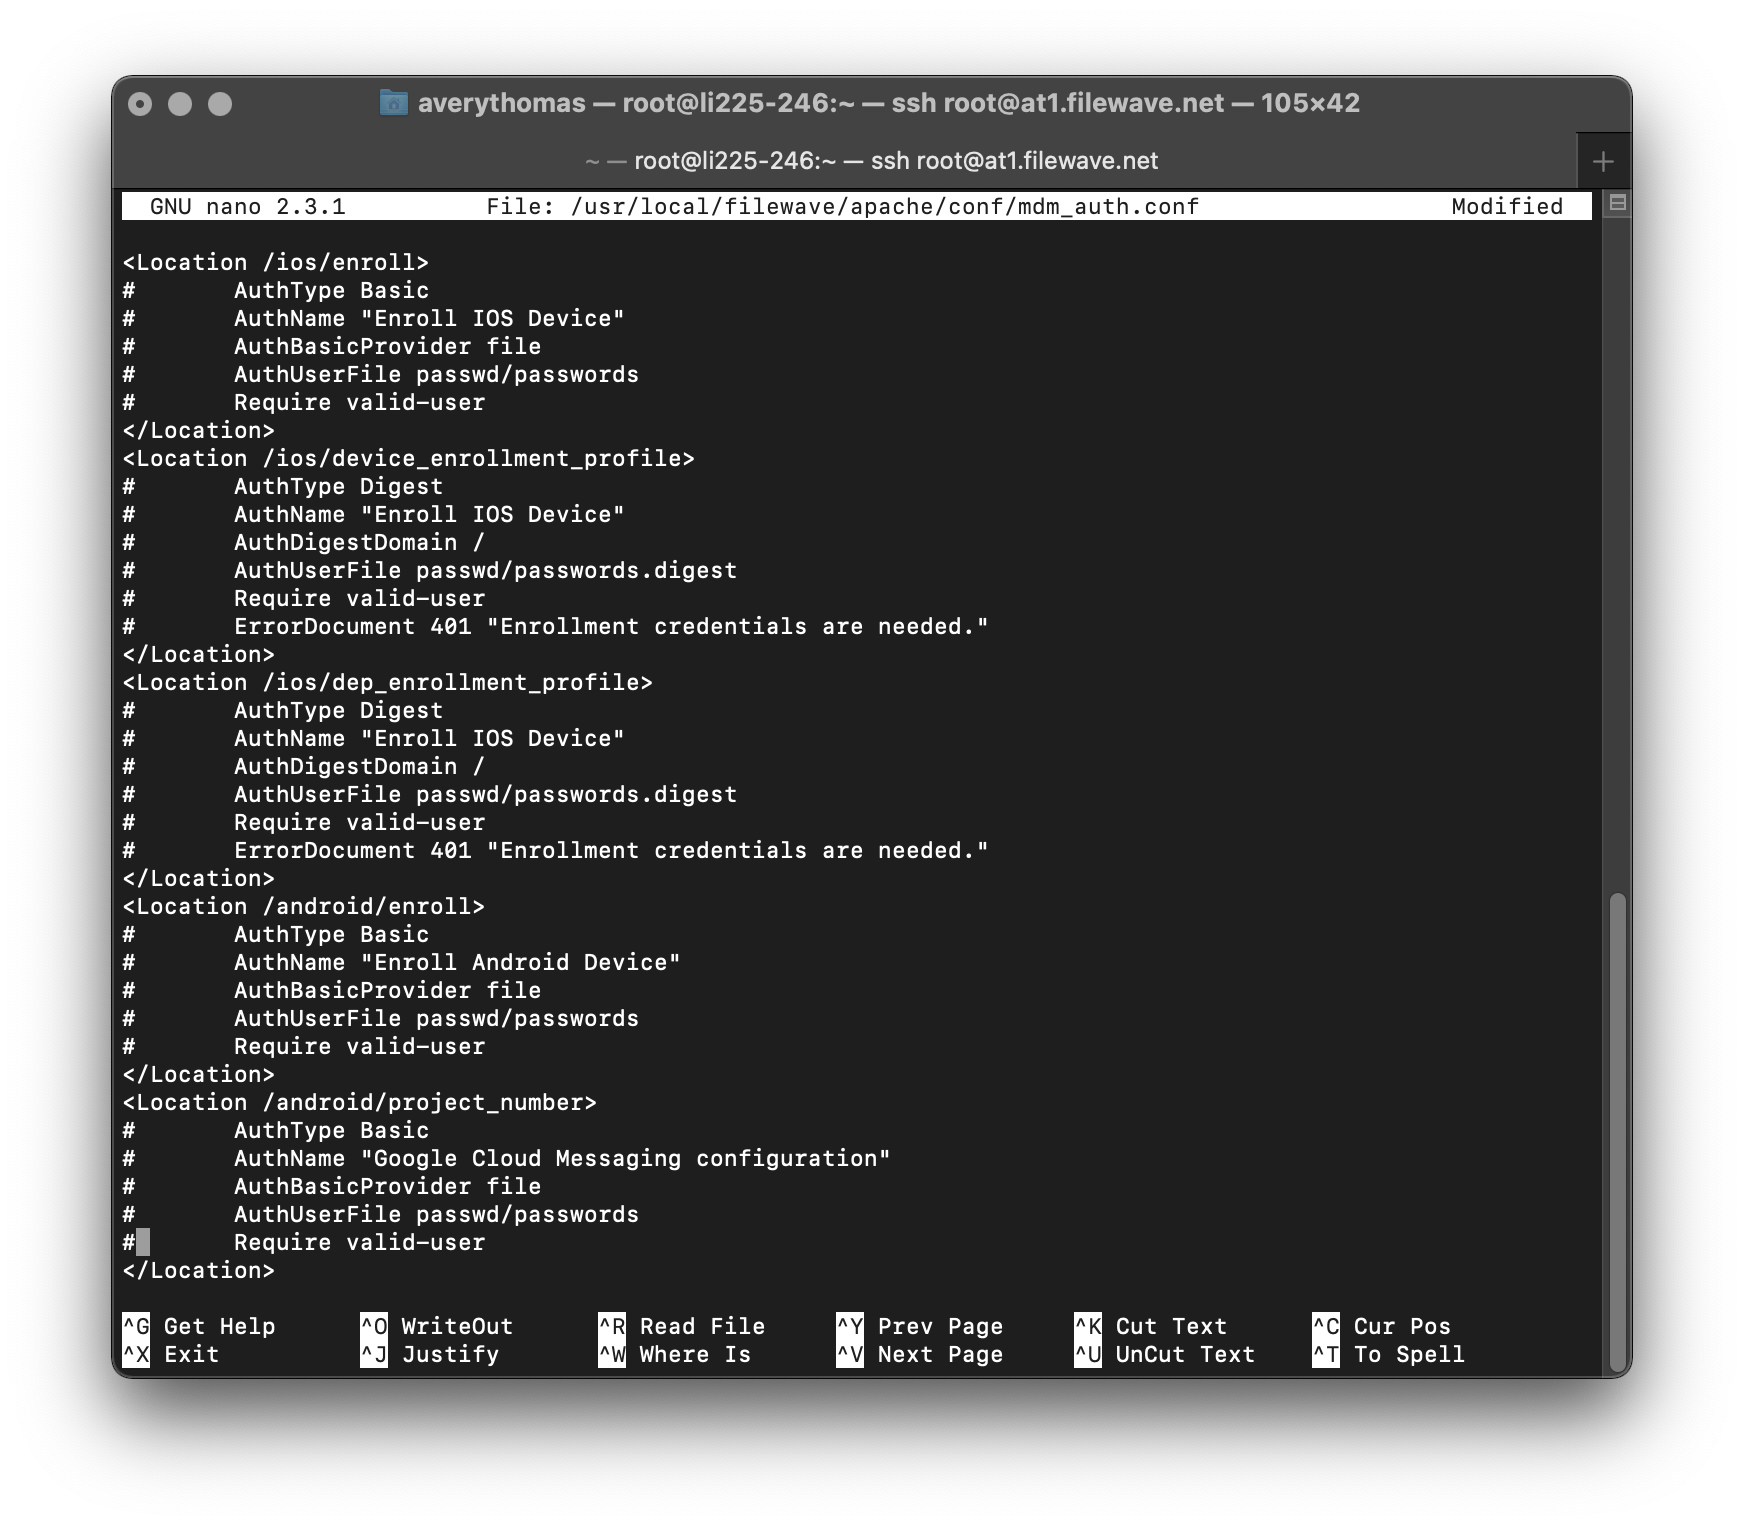
yum install -y nanoCommentSoftware outUpdates allAutomation lines between the "<Location> </Location>" tags using "#" in the file "/usr/local/filewave/apache/conf/mdm_auth.conf".
Edit mdm_auth.conf
nano /usr/local/filewave/apache/conf/mdm_auth.confSave changes and exit nano.
Save and quit "nano"
Ctrl + X
y
Enter
Restart the FileWave Apache process.
Restart Apache
/usr/local/filewave/apache/bin/apachectl gracefulVerify the changes by visiting your FileWave URL Enrollment page. Ex: https://myorg.filewave.net:20443/ios
The "enroll.mobileconfig" should download without need for authentication.