Managing FileWave Administrators
FileWave supports tiered administration so you can create additional administrators in order to spread the workload, you are not limited to the amount of admins you can have in FileWave.
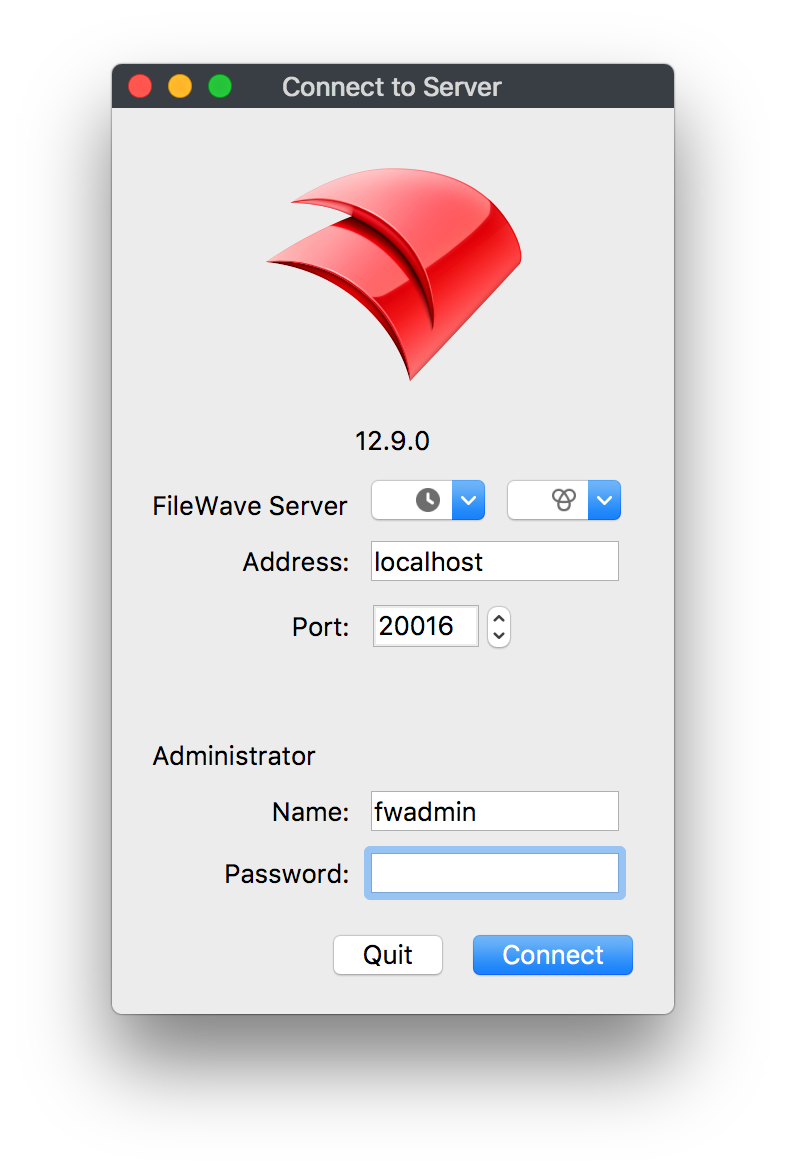
How to log into FileWave Admin
When you log into the FileWave Admin to access the FileWave Server you will be asked for the server address, and user credentials which can be a local account or an LDAP account.
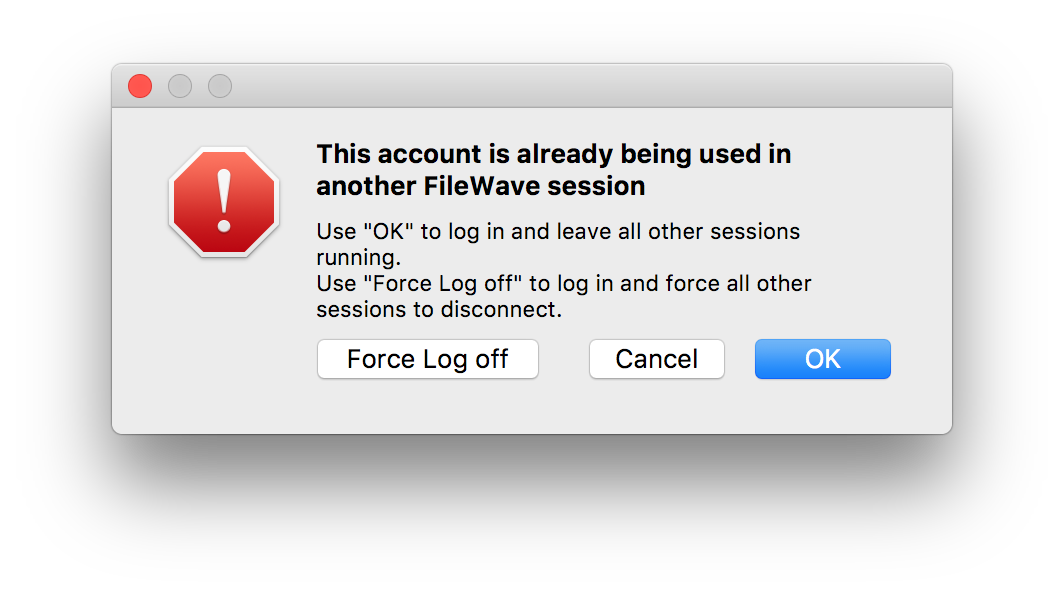
FileWave supports multiple admin connections from the same or separate admin accounts. If you try to log in with the same account that is already connected somewhere else you will get prompted to either end that first connection, start a second connection, or cancel.
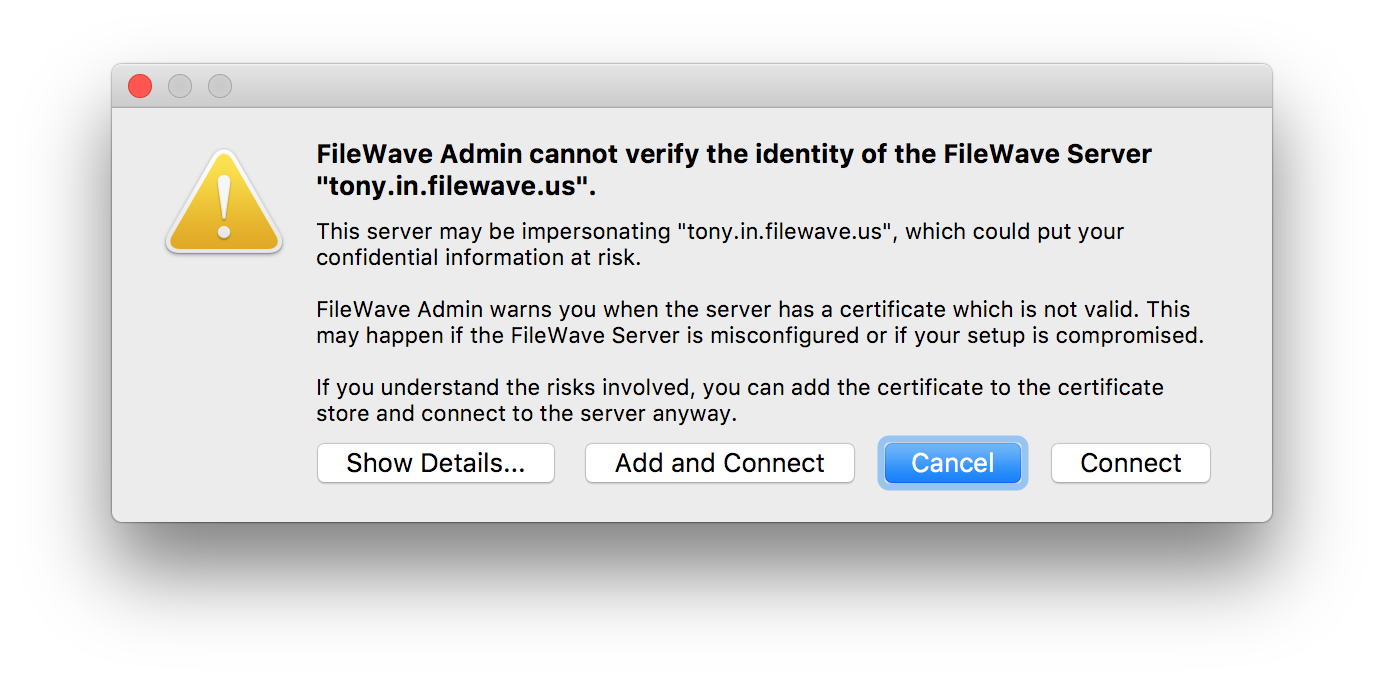
If you are currently using a self-signed certificate then you may also get a prompt that the Admin cannot verify the identity of the FileWave server. The recommend way to fix this is to, hit connect and then switch to a root trusted certificate. Please visit the KB linked here for instructions on how to do this.
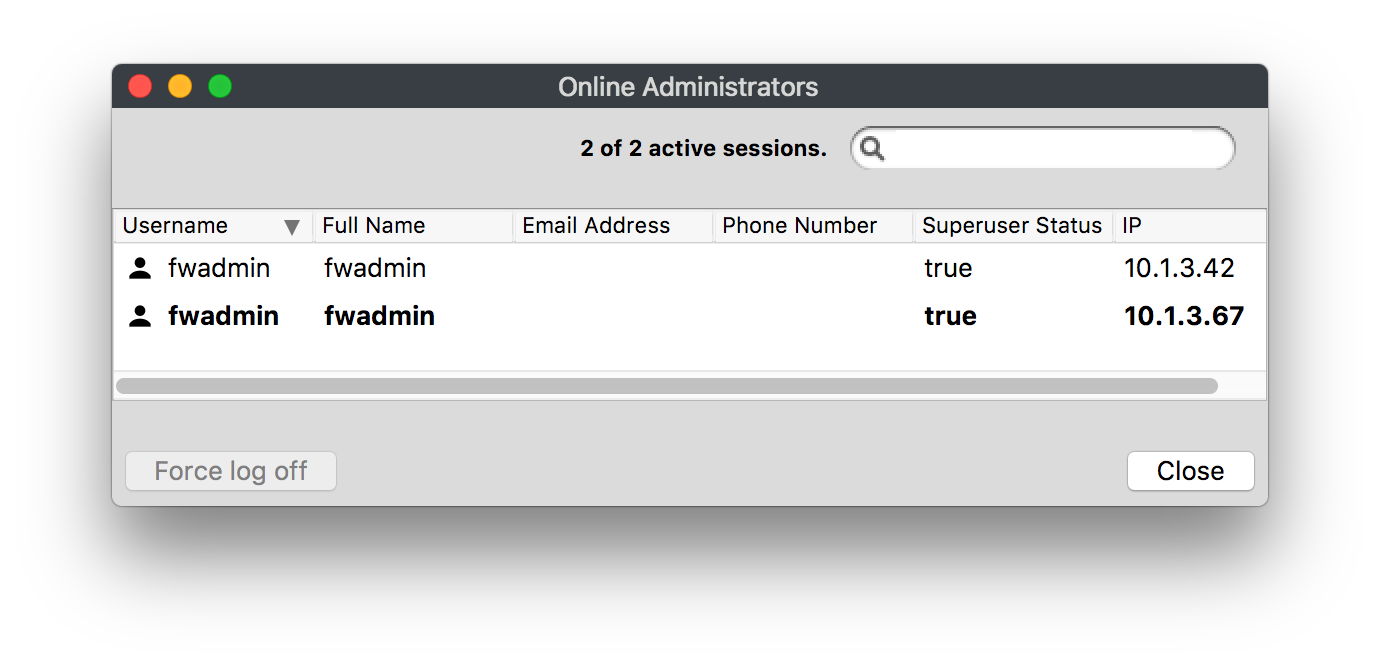
You will also be able to see two active connections if you look in the Administrators Online... window located under the Assistants menu
|
The bolded entry is your current connection |
FileWave Administrators and Inventory
In the FileWave Admin console you have the ability to set read/write/delete permissions to specific objects which include devices, filesets, and groups. These permissions will follow the user all the way into inventory so that only what the current administrator has access too can be seen in the inventory results.
Example:
- Right click on an object (user, group, fileset) and select Set Permissions
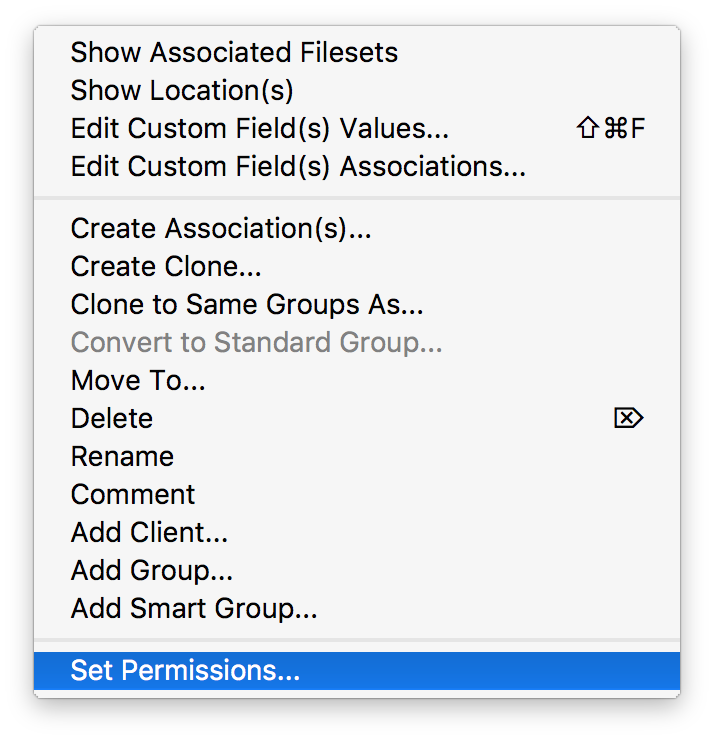
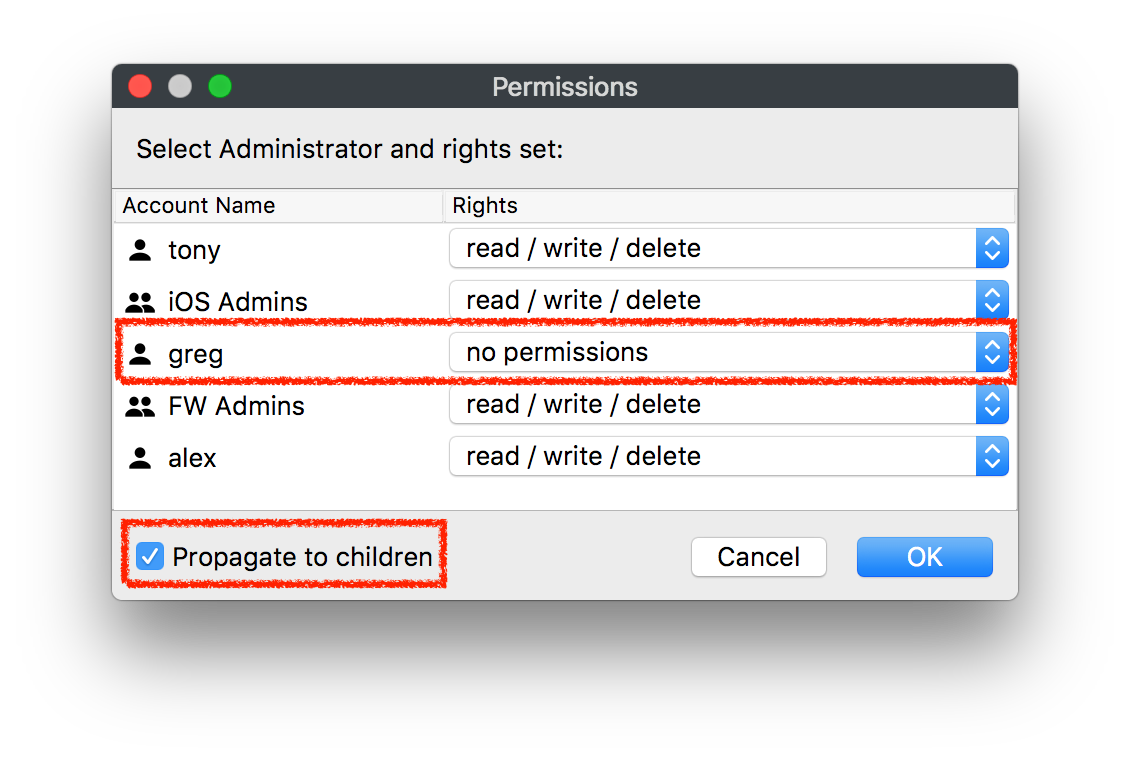
- Select the permissions you would like for each administrator. Setting it to No Permissions will make that object no longer visible for the administrator.
|
You have to select Propagate to children if you are setting permissions on a group and want those permissions to be added to sub-objects. read/write/delete permissions are received from the original object and the clones will get the same permissions. If you modify these permissions on a clone, only this specific clone will get them not the original or other clones. |
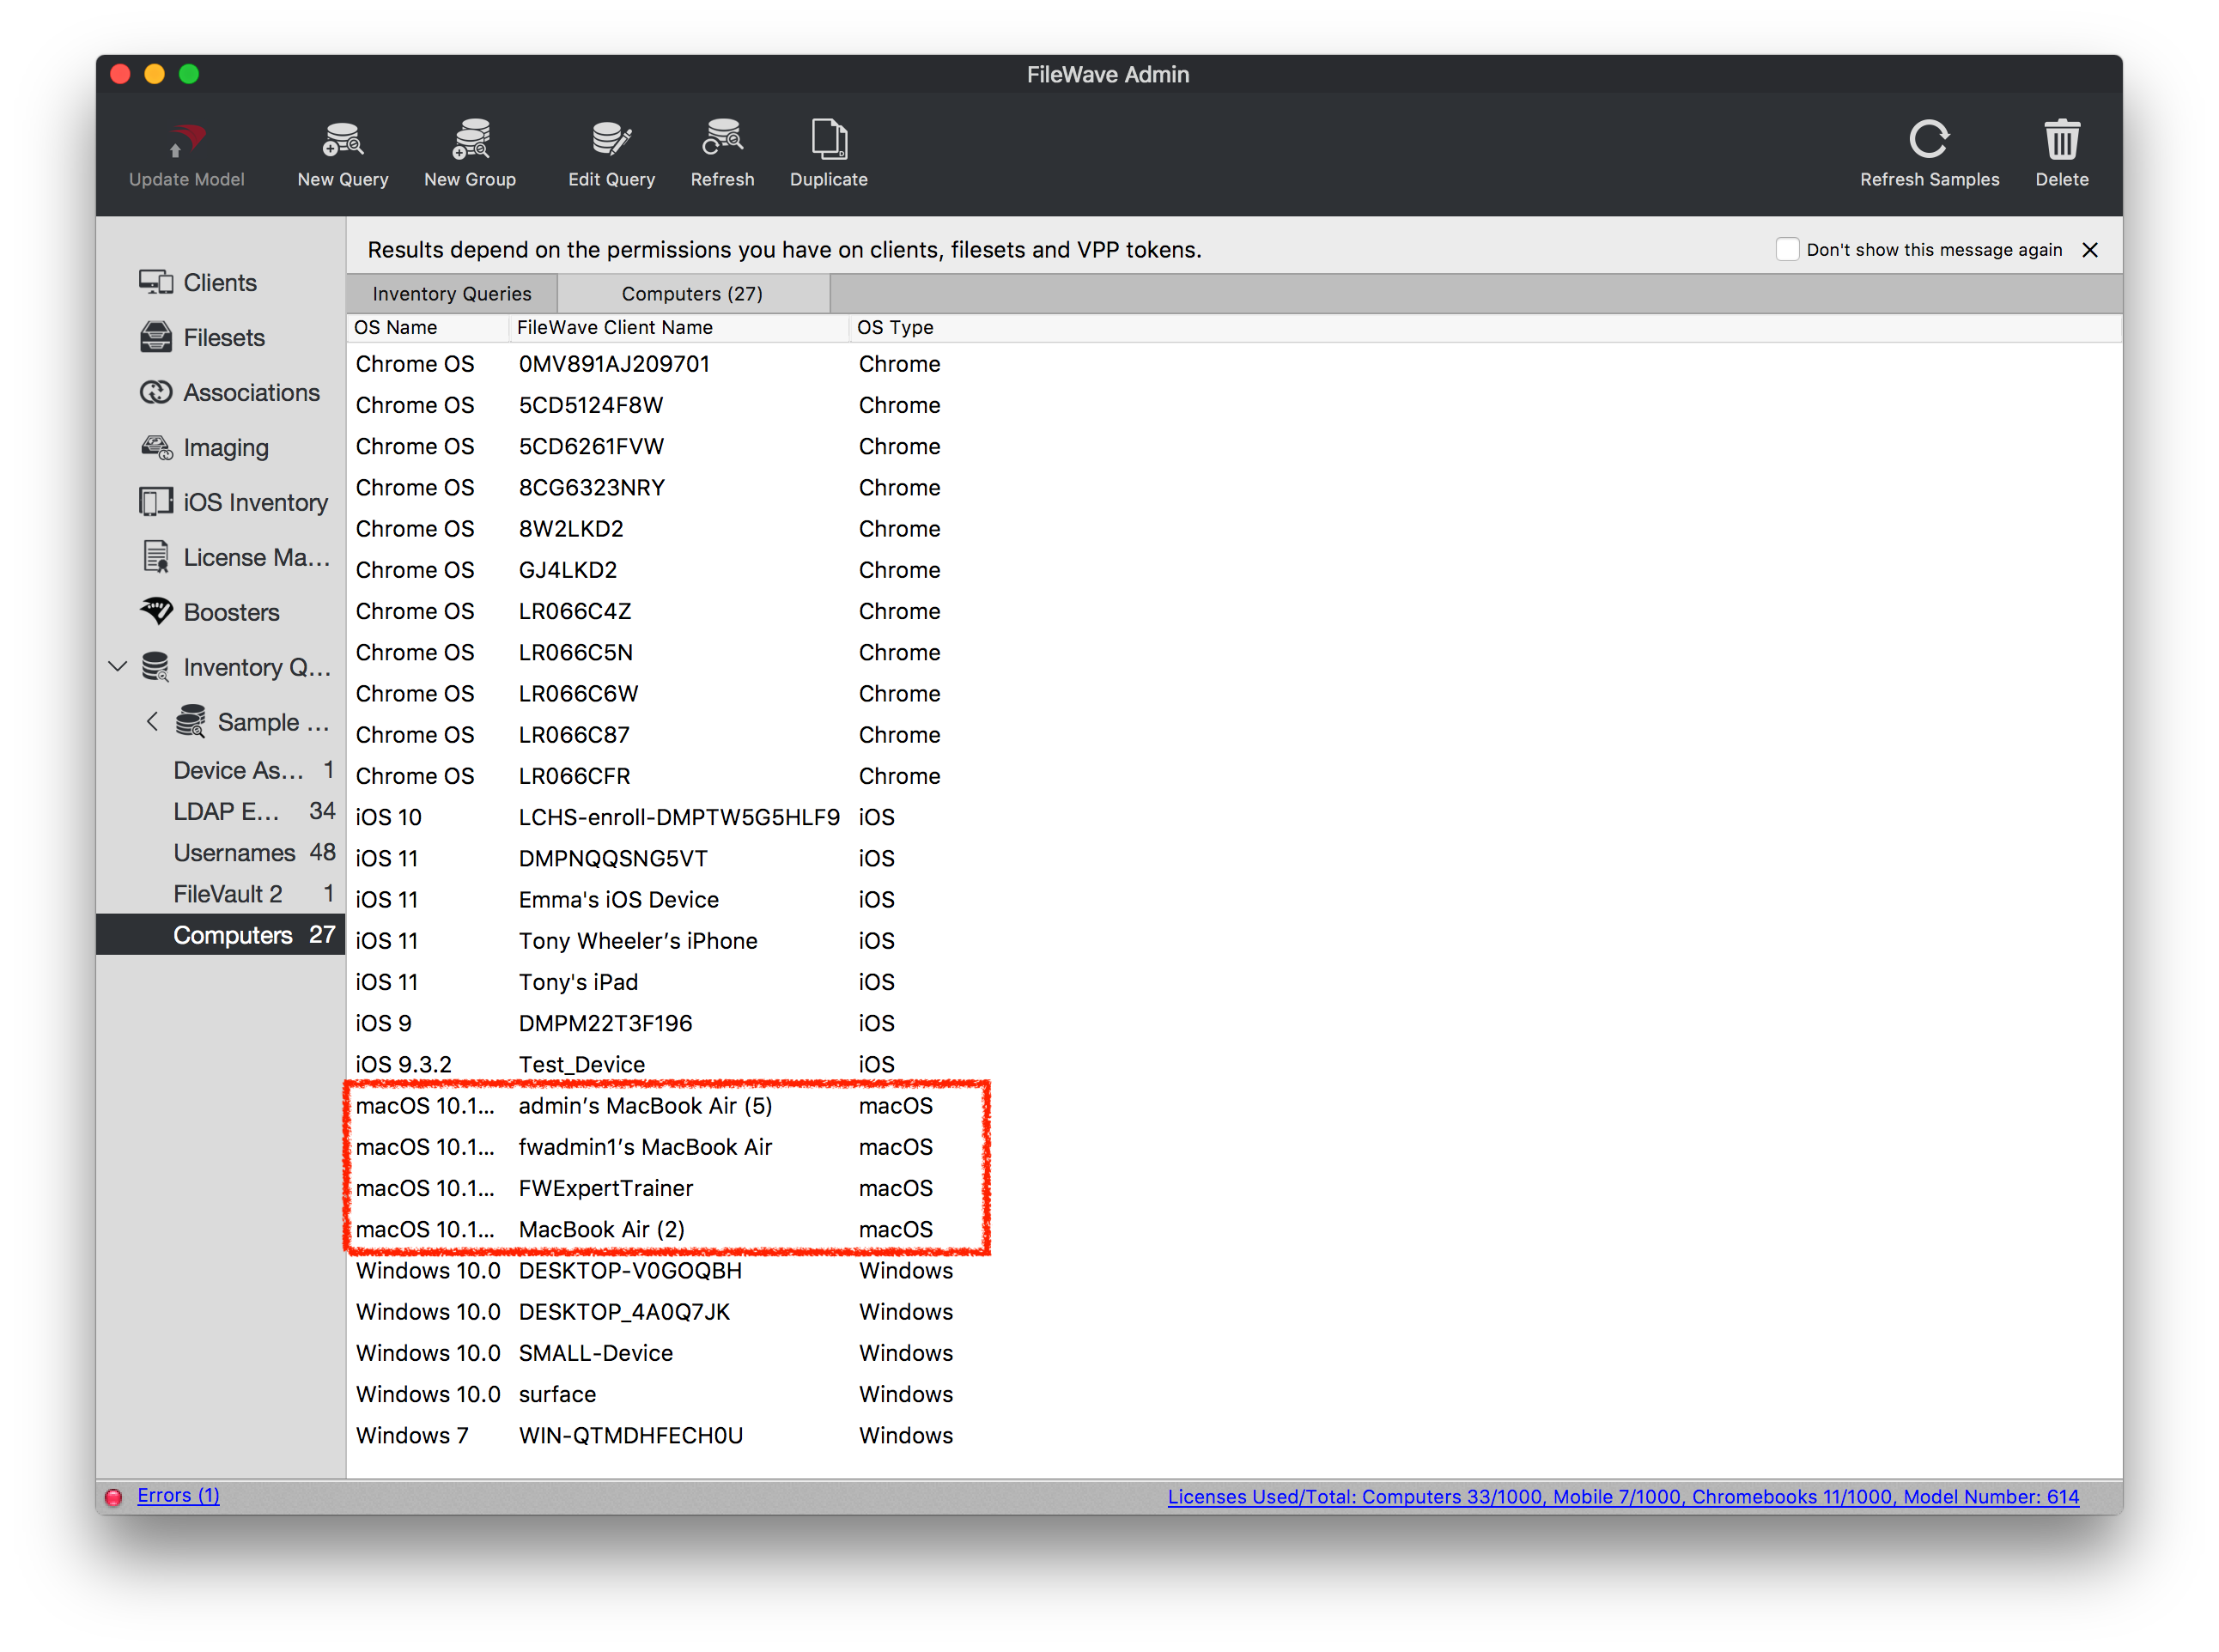
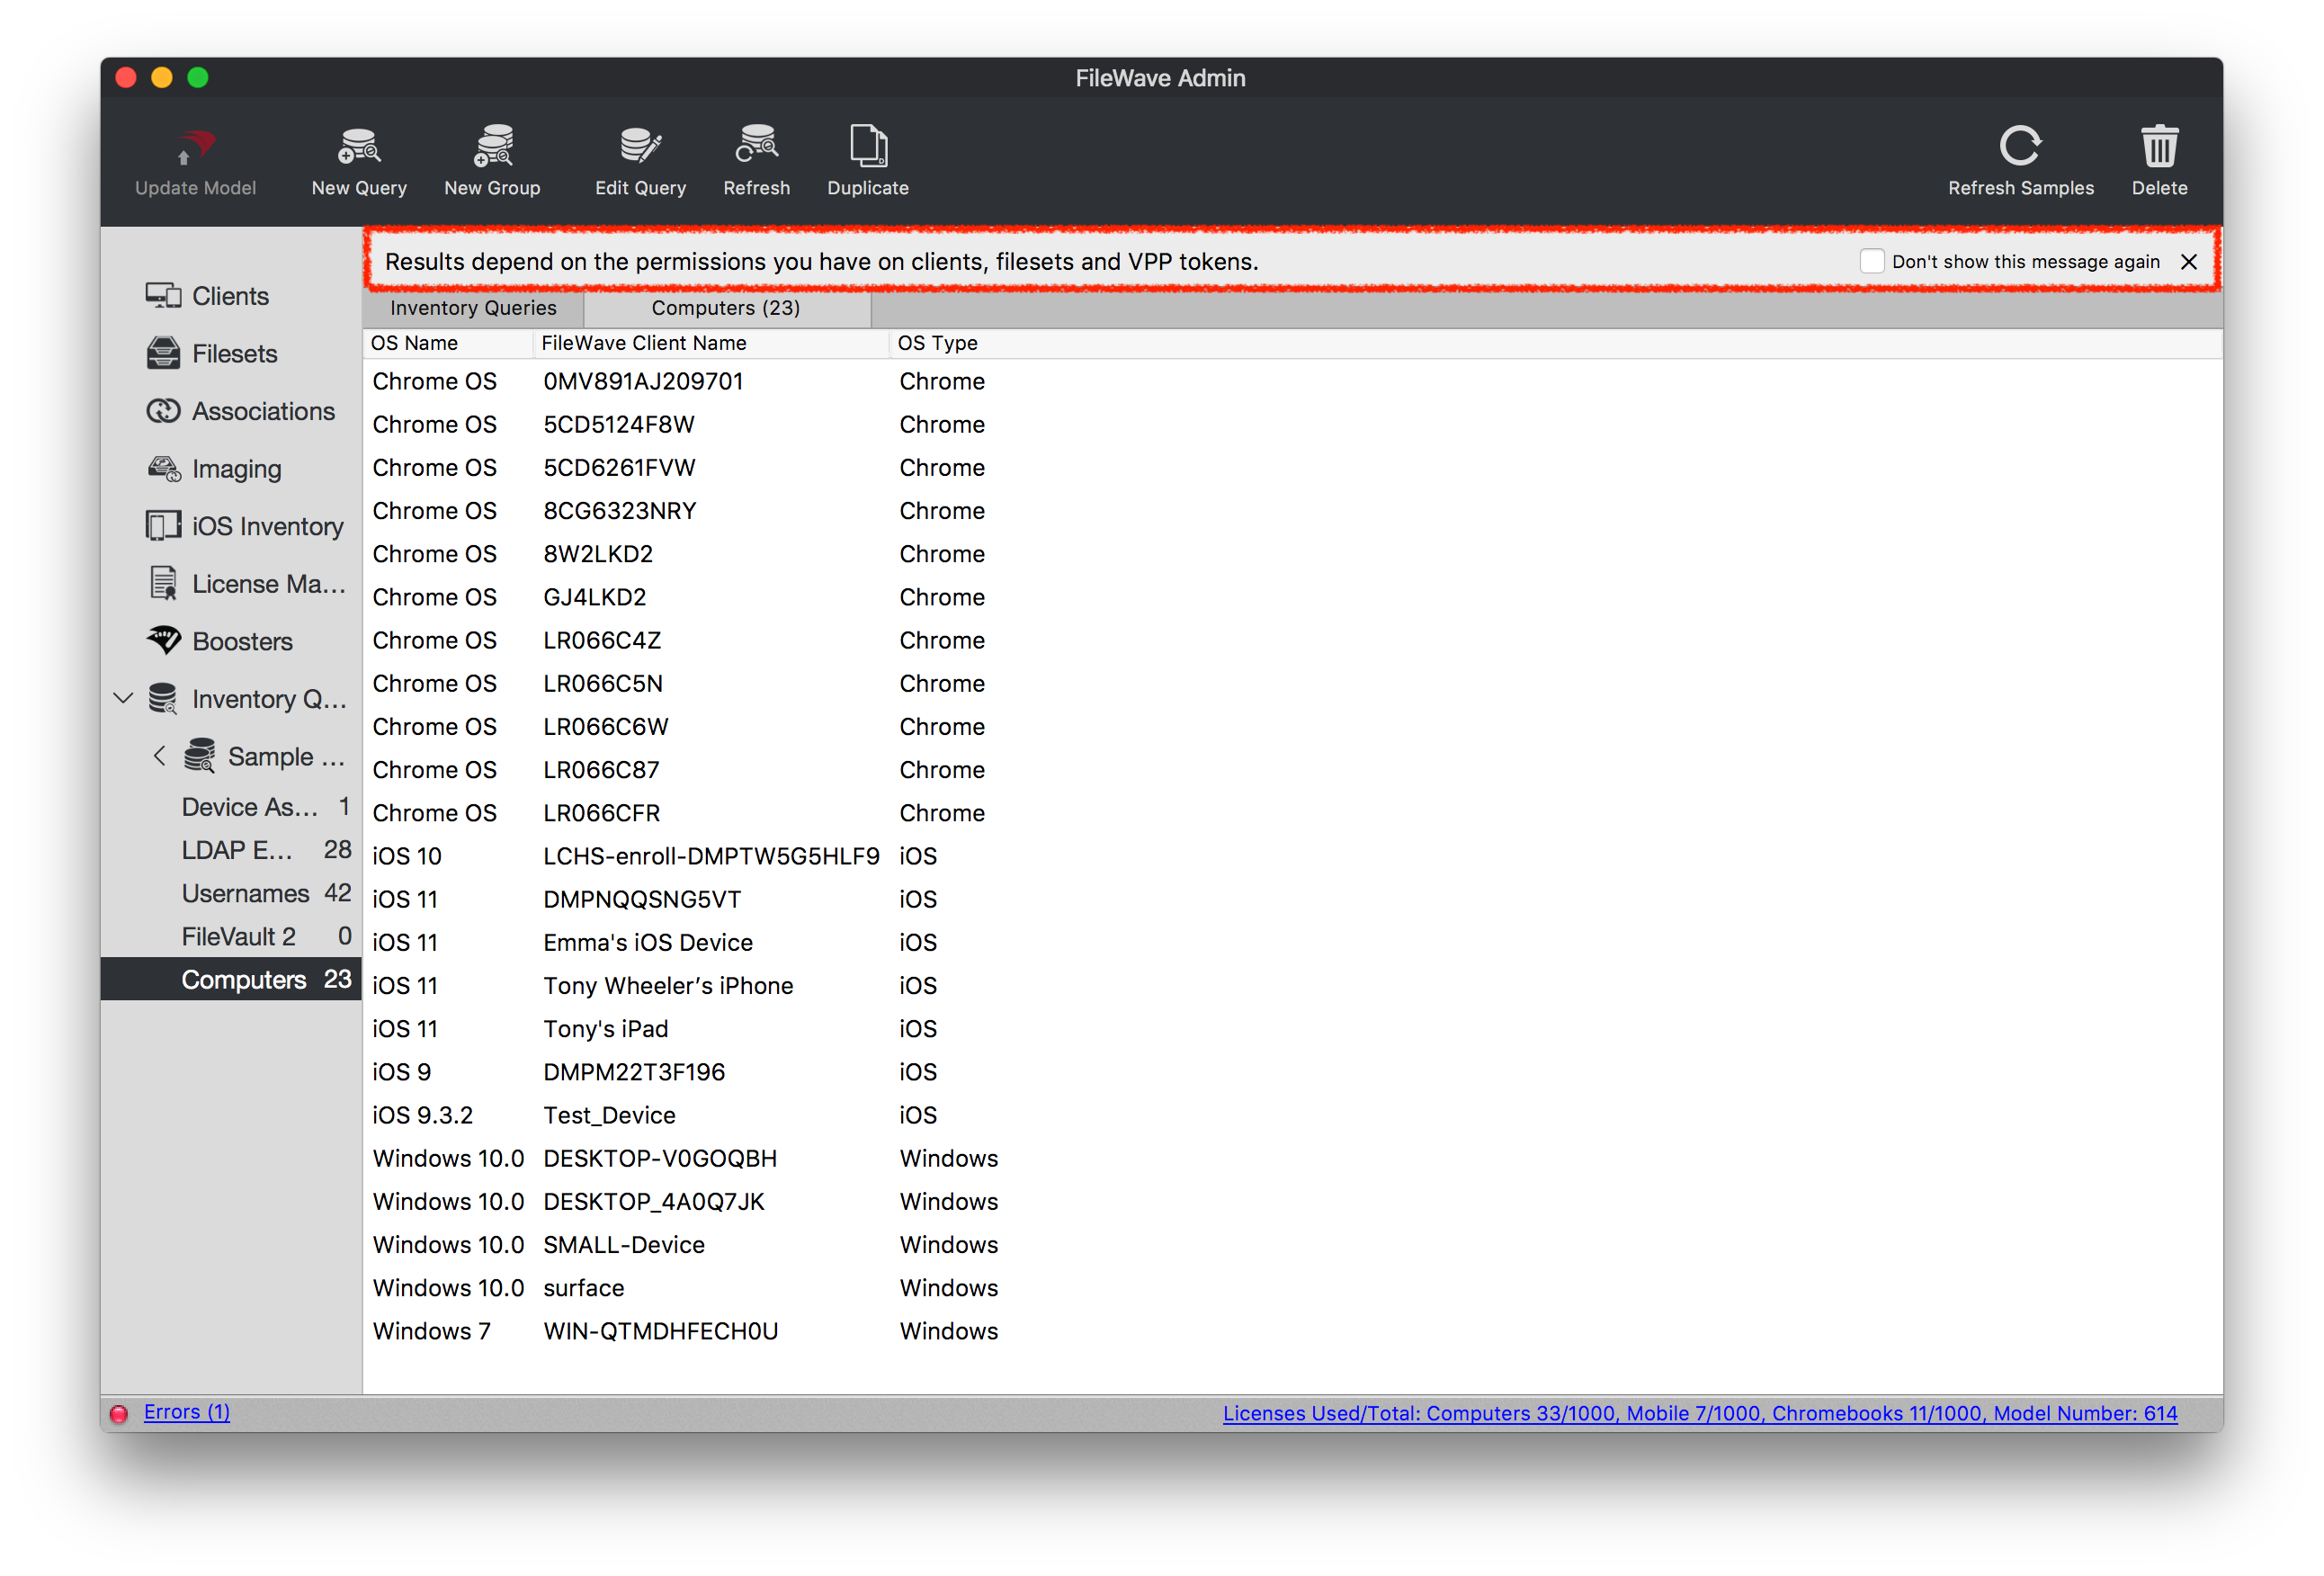
- In this case the user greg has no permissions for the group selected which is for all macOS devices and these permissions have been propagated to all sub-objects. So as you can see below the first screenshot shows what the user with full permissions sees and the second screenshot shows inventory information with the new permissions.
Types of Administrator Accounts
FileWave has three different account types;
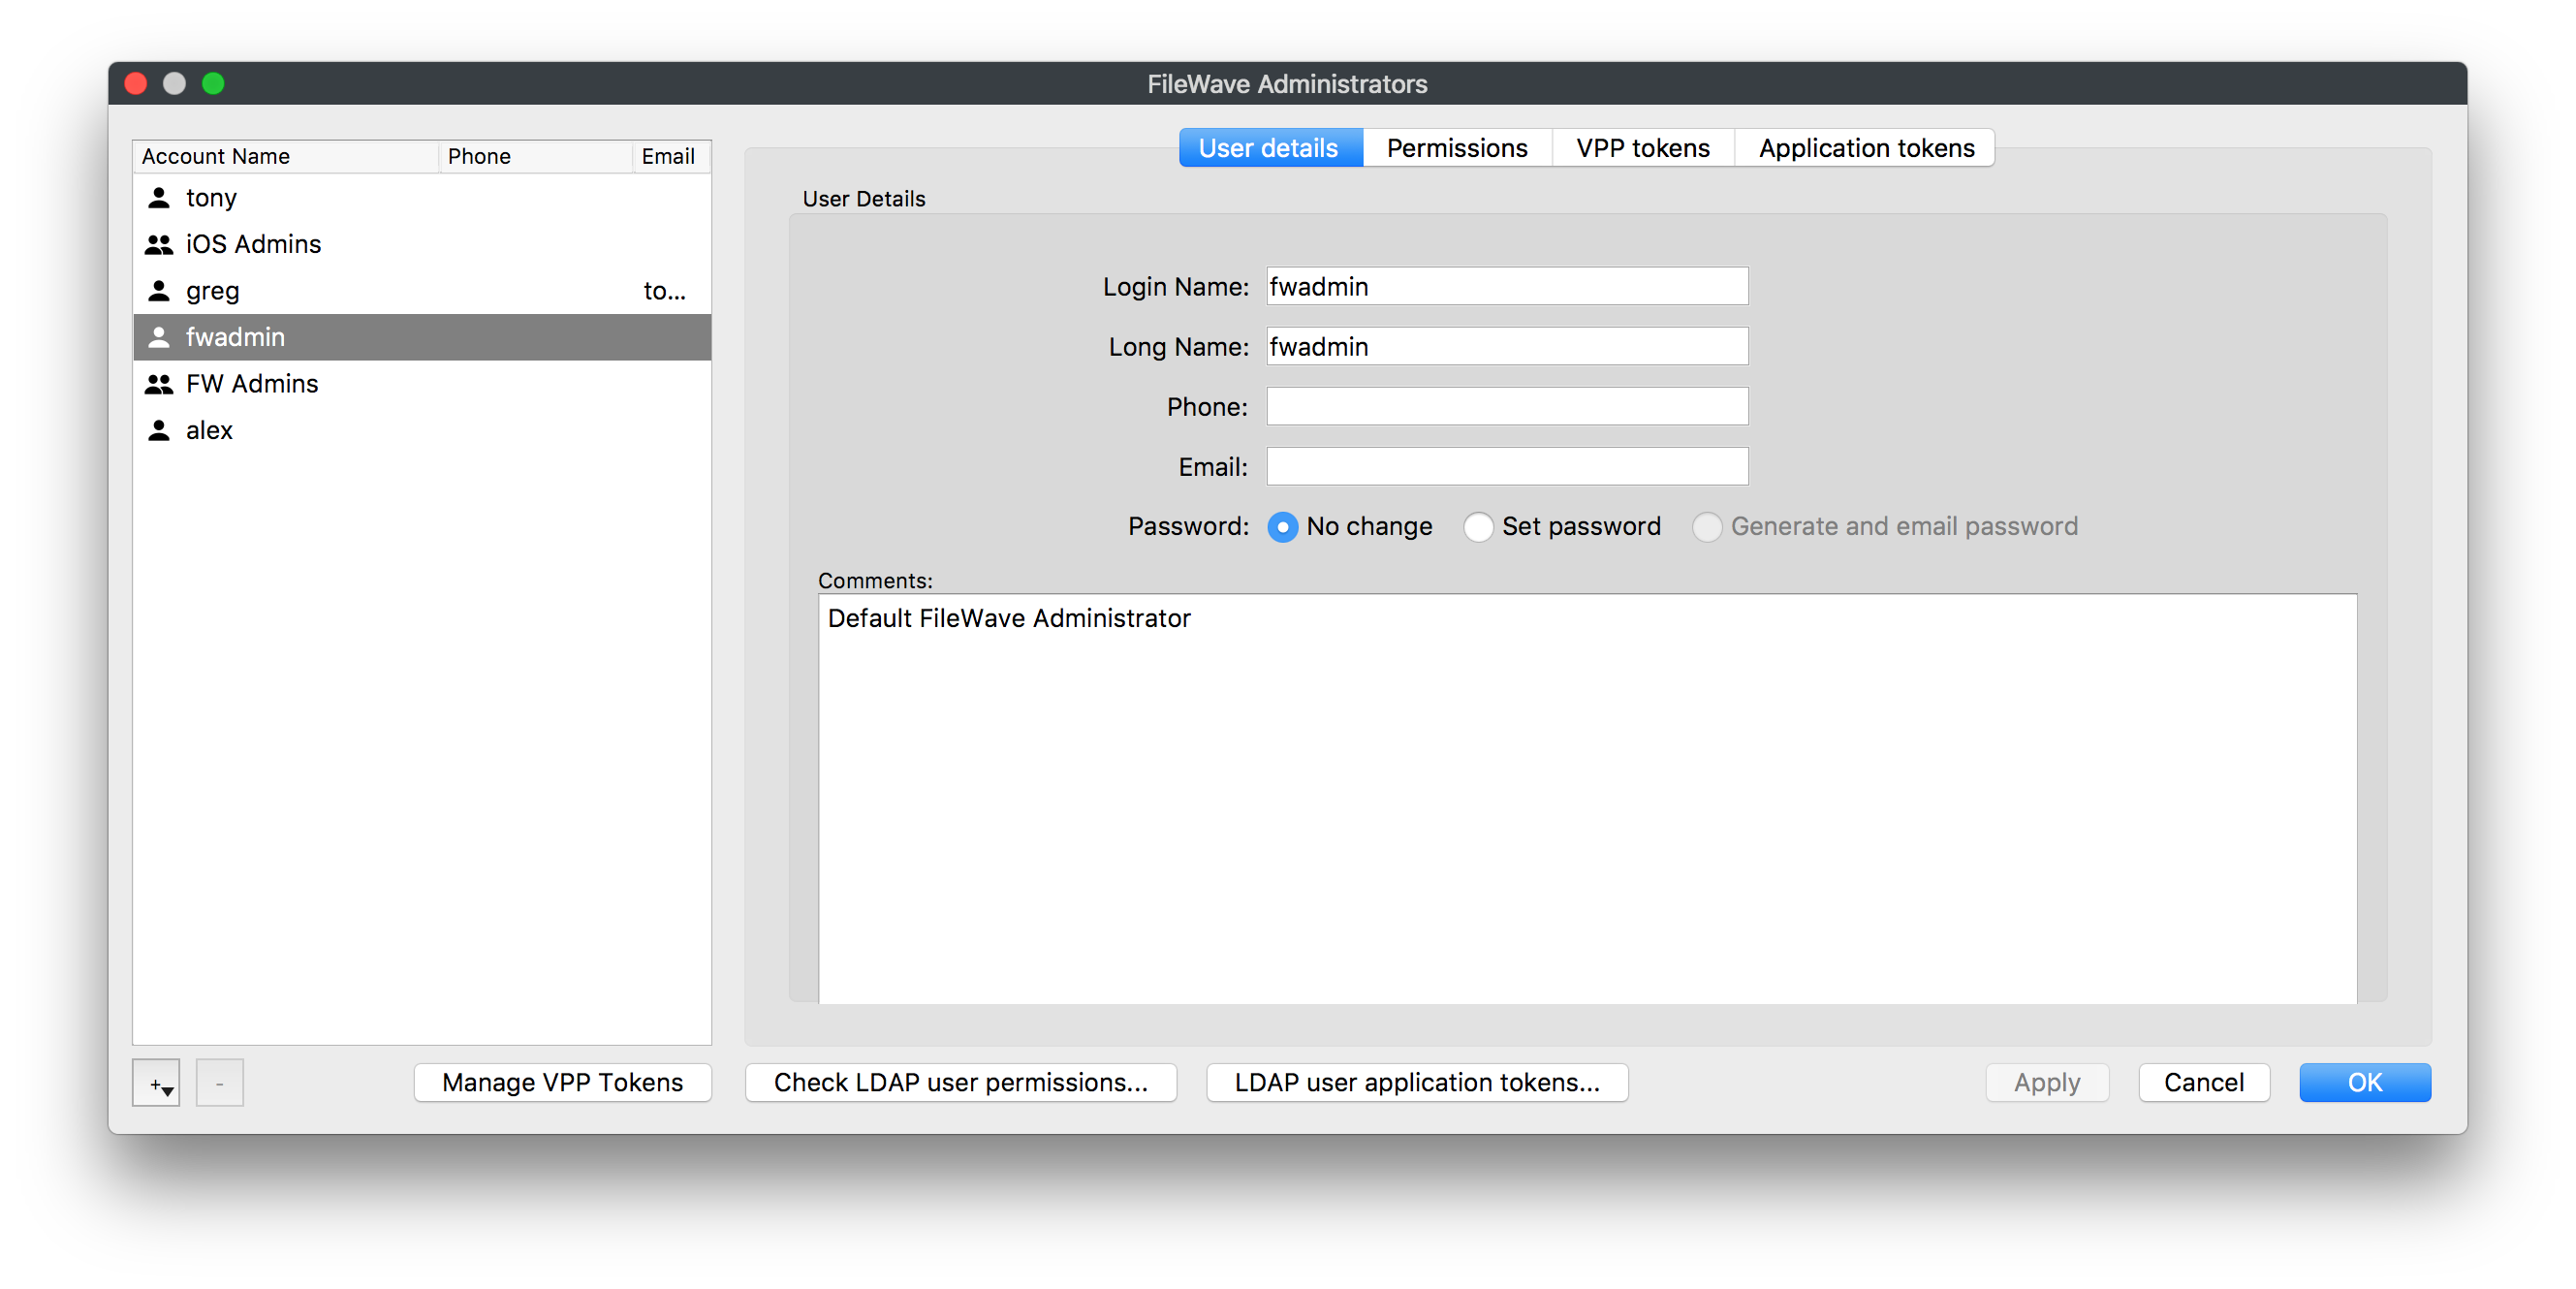
- Superuser - This will be the fwadmin account that came with FileWave by default, and is required for certain setup options in FileWave.
- Local User - A user name and password created directly from the FileWave Admin and saved on the server.
- LDAP Group User - Admin credentials are pulled from LDAP (Active and Open Directory)
Other than the Superuser, which has full rights by default, you have the ability set granular permissions for your Local and LDAP users.
Superuser
The default credentials for your Superuser account is fwadmin/filewave which FileWave highly recommends that you change so the password is something more secure!
There are areas and features in FileWave that can only be accessed with the FileWave Superuser account. Three of these sections won't even be visible to any other Admin account, one (Software Update) is grayed out for all but the Superuser, and the other features will trigger a dialog window requesting the Superuser credentials to be entered.
Only Visible from the Superuser logged in:
- Activation Lock Management (Assistants → Activation Lock Management)
- Force Logoff Admin (Assistants → Administrators Online...)
- Scheduled Reports Owner (Assistants → Scheduled Reports.. → "+" → Owner section)
- Software Update Sources Apple / Microsoft (Preferences → General)
All Admins will be prompted for Superuser credentials:
- VPP & DEP setup (Admin Preferences → VPP & DEP)
- Configure OAuth token (Admin Preferences → Chromebooks)
- Upload PKCS12 Certificate (Admin Preferences → Mobile → HTTPS Certificate Management)
- Configure GCM (Admin Preferences → Mobile → Android/Chromebooks)
- Upload macOS client package (Admin Preferences → Mobile → macOS)
- SIS - Edit Settings... (Admin Preferences → Education → SIS)
- Apple Classroom - Manage Certificates (Admin Preferences → Education → Apple Classroom)
- Force log off (Assistants → Administrators Online...)
- Manage VPP Tokens (Assistants → Manage Administrators → Manage VPP Tokens)

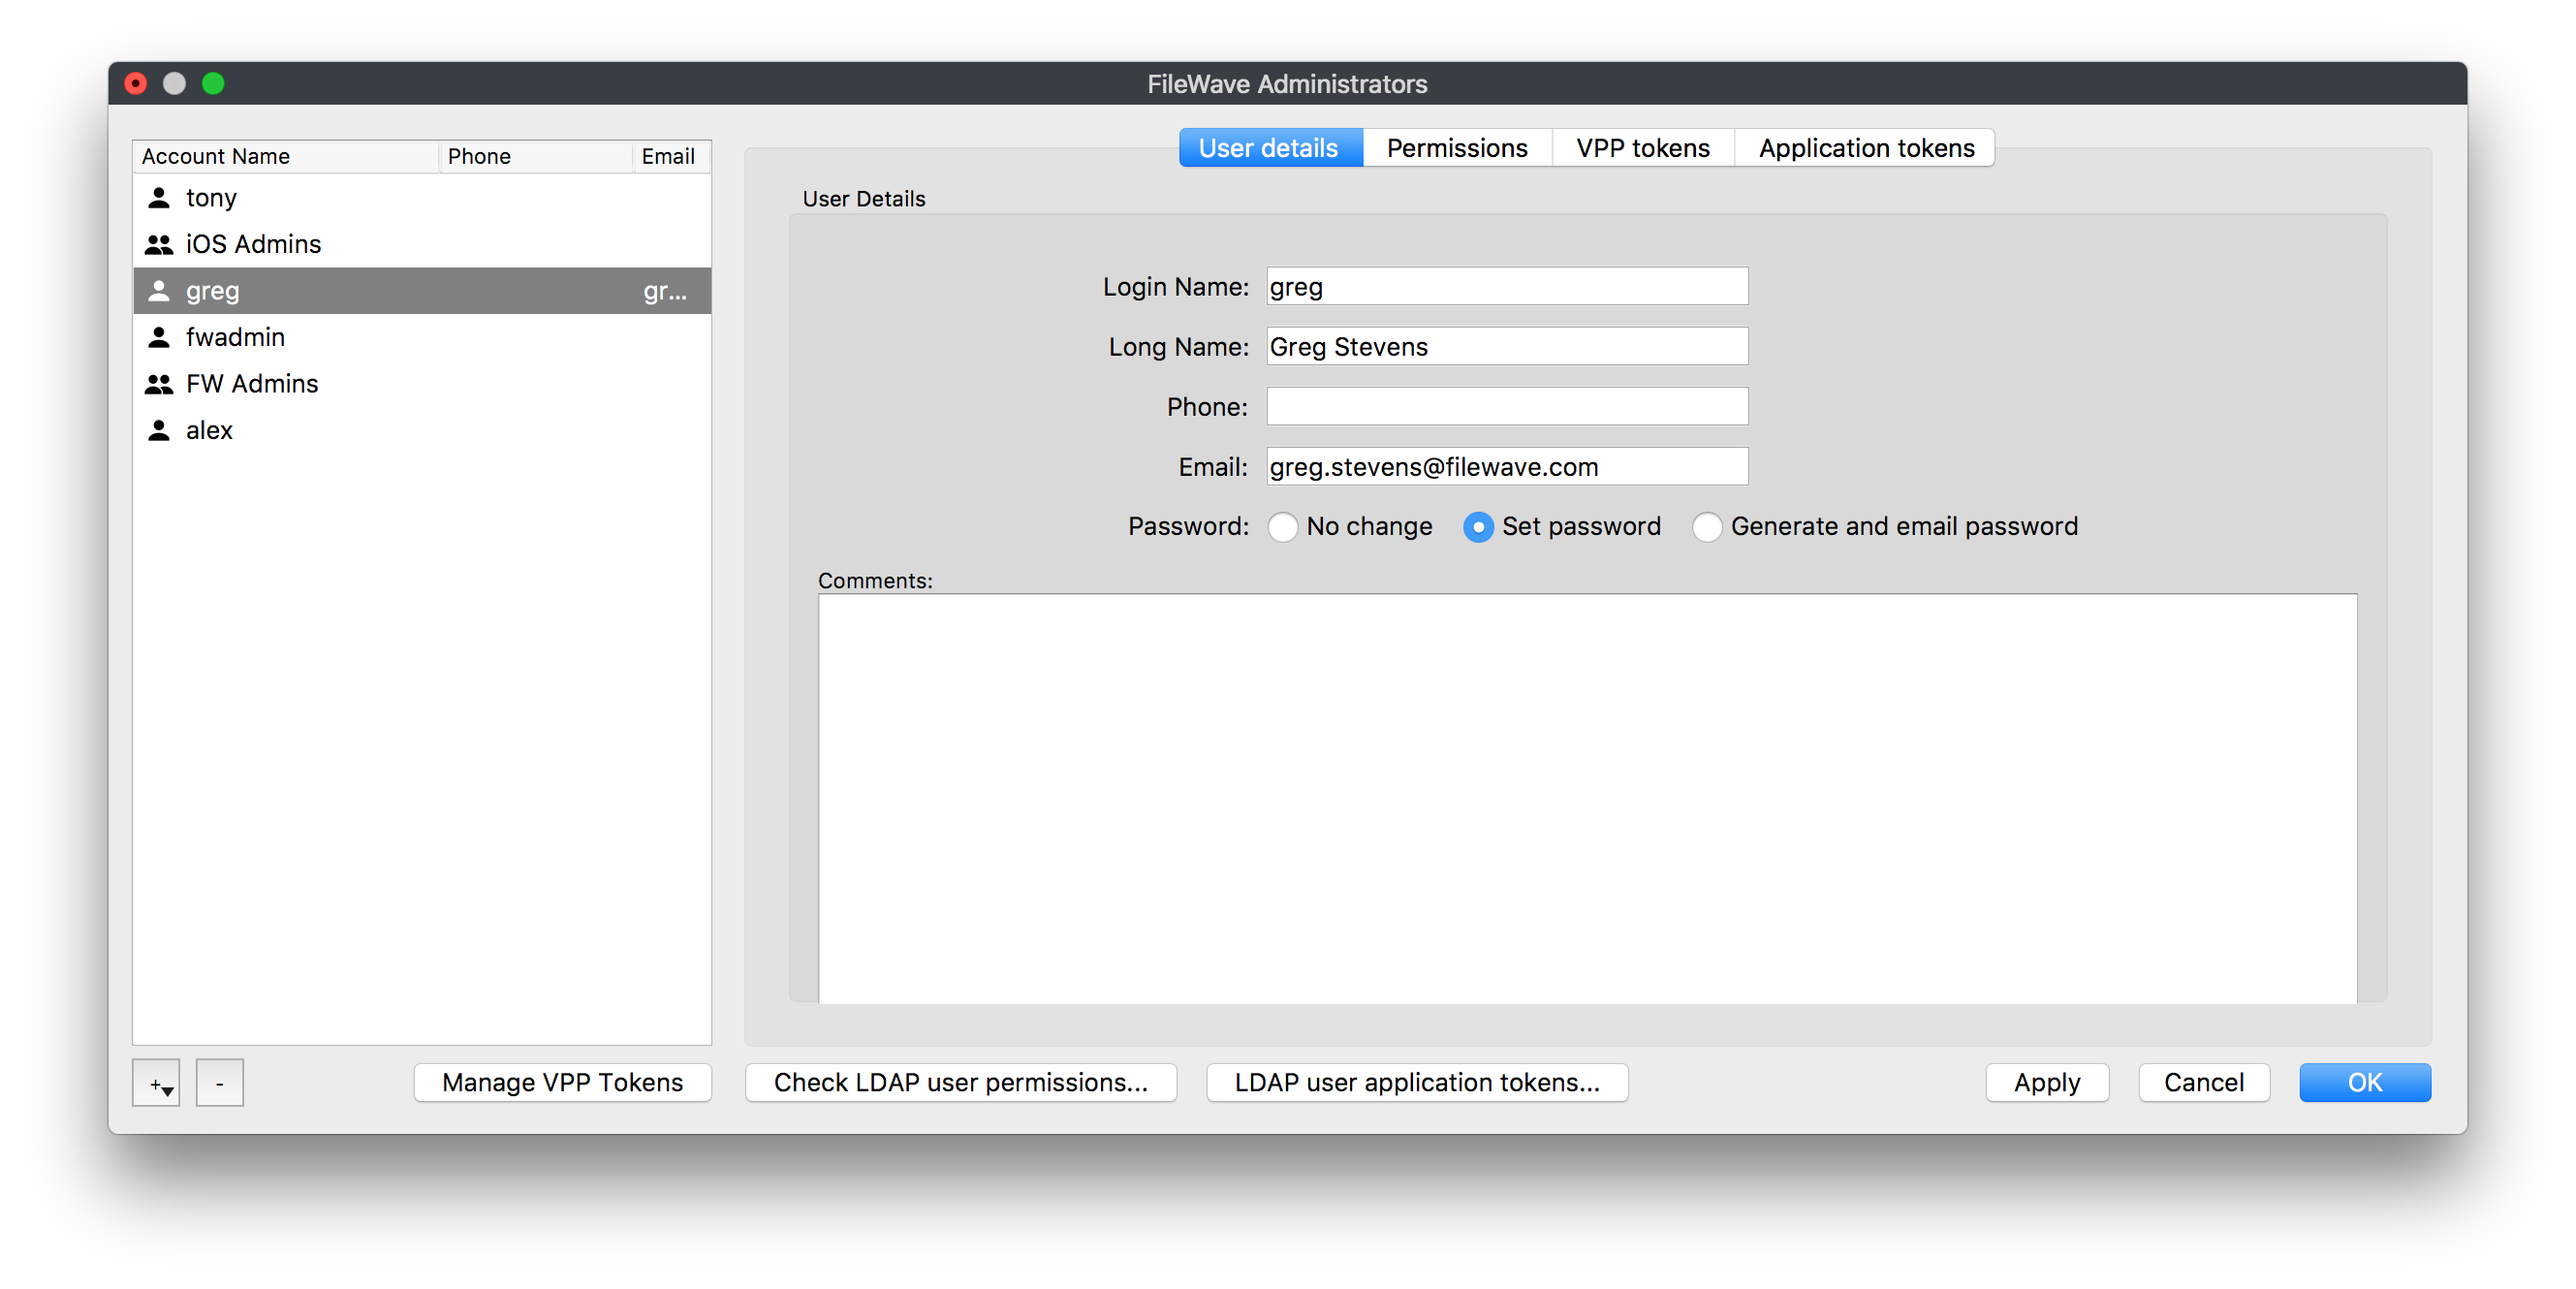
Local Account
Local Accounts can be created very simply and then given whatever permissions you wish them to have. Keep in mind even if a Local Administrator Account is given full rights they will still be prompted for Superuser credentials in the areas listed in the Superuser section above.
To create a Local Account for the FileWave Admin follow the steps below:
- Go to Assistants→ Manage Administrators
- Click on the the "+" sign at the bottom left
- Then select Local Account

- You will now be able to fill in the user information under the User details tab. Since this is a new user you will also have to set a default password by selecting Set Password or Generate and email password (this will only work if you provided an email for this user and you also have the Email settings completed in the Admin Preferences)
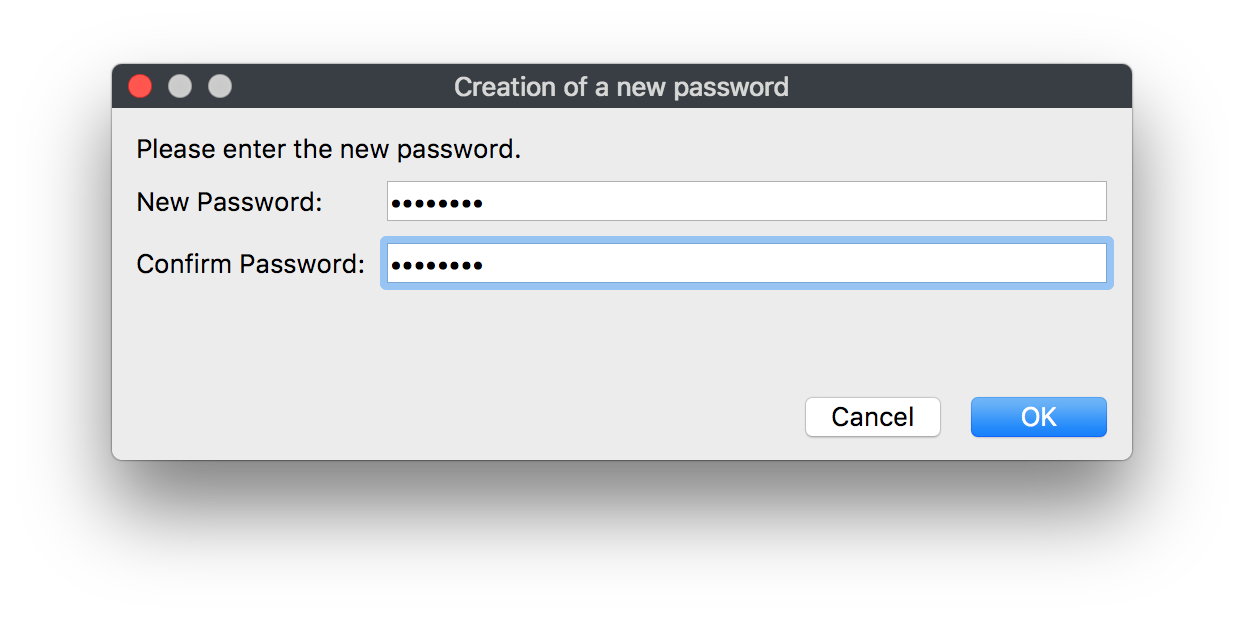
If you selected Set password you will get the following window to type in the user's password:
If you selected Generate and email password you will need to hit the Apply button at the bottom of the FileWave Administrators window and you will then get an email with the following information:

- Next you will need to give this user permissions in FileWave. You do this by selecting the user and going into the Permissions tab and checking which options you want this user to have. (There will be more information on what each of these options do at the end of this section)
LDAP Group Account
If you have a LDAP server configured within your FileWave Preferences, administrators can authenticate using credentials stored in the LDAP server, based on Group membership. If a user is a member of multiple Groups, the final permissions will be the UNION of the permissions of these Groups. Only Active Directory is able to detect recursive membership. FileWave will not be able to detect nested Groups in an Open Directory or eDirectory.
|
To setup LDAP please see: LDAP Preferences |
To create a LDAP Group Account for the FileWave Admin follow the steps below:
- Go to Assistants→ Manage Administrators
- Click on the the "+" sign at the bottom left
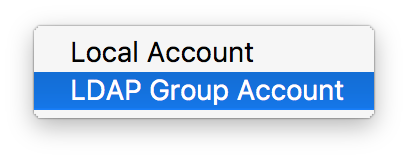
- Then select LDAP Group Account
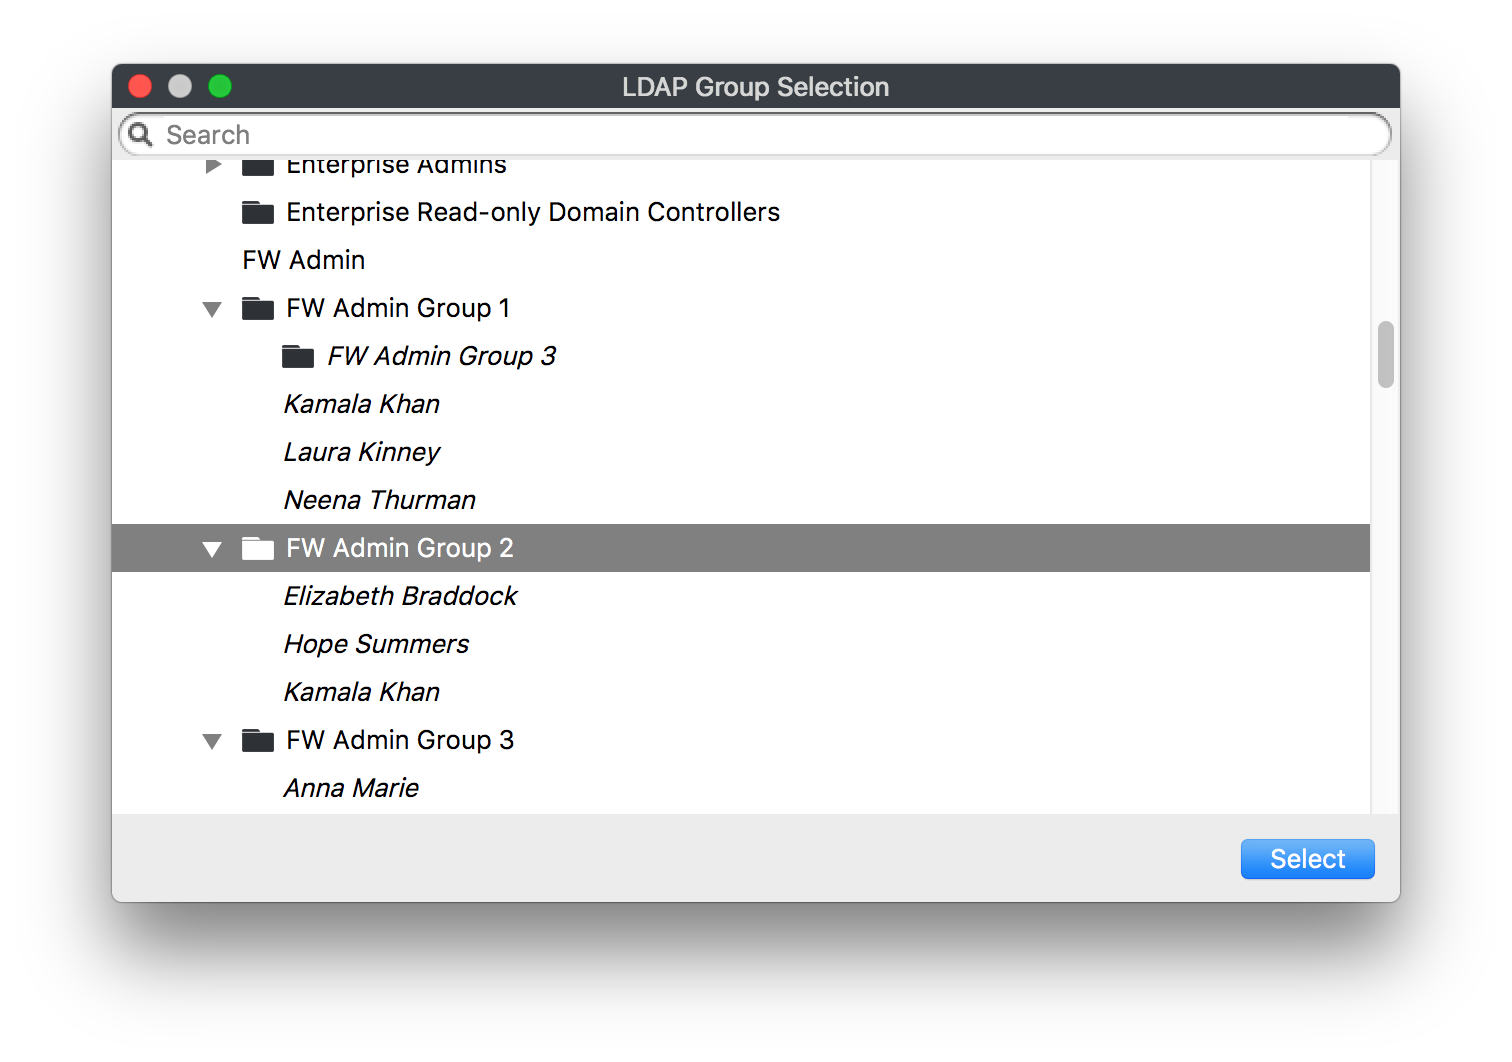
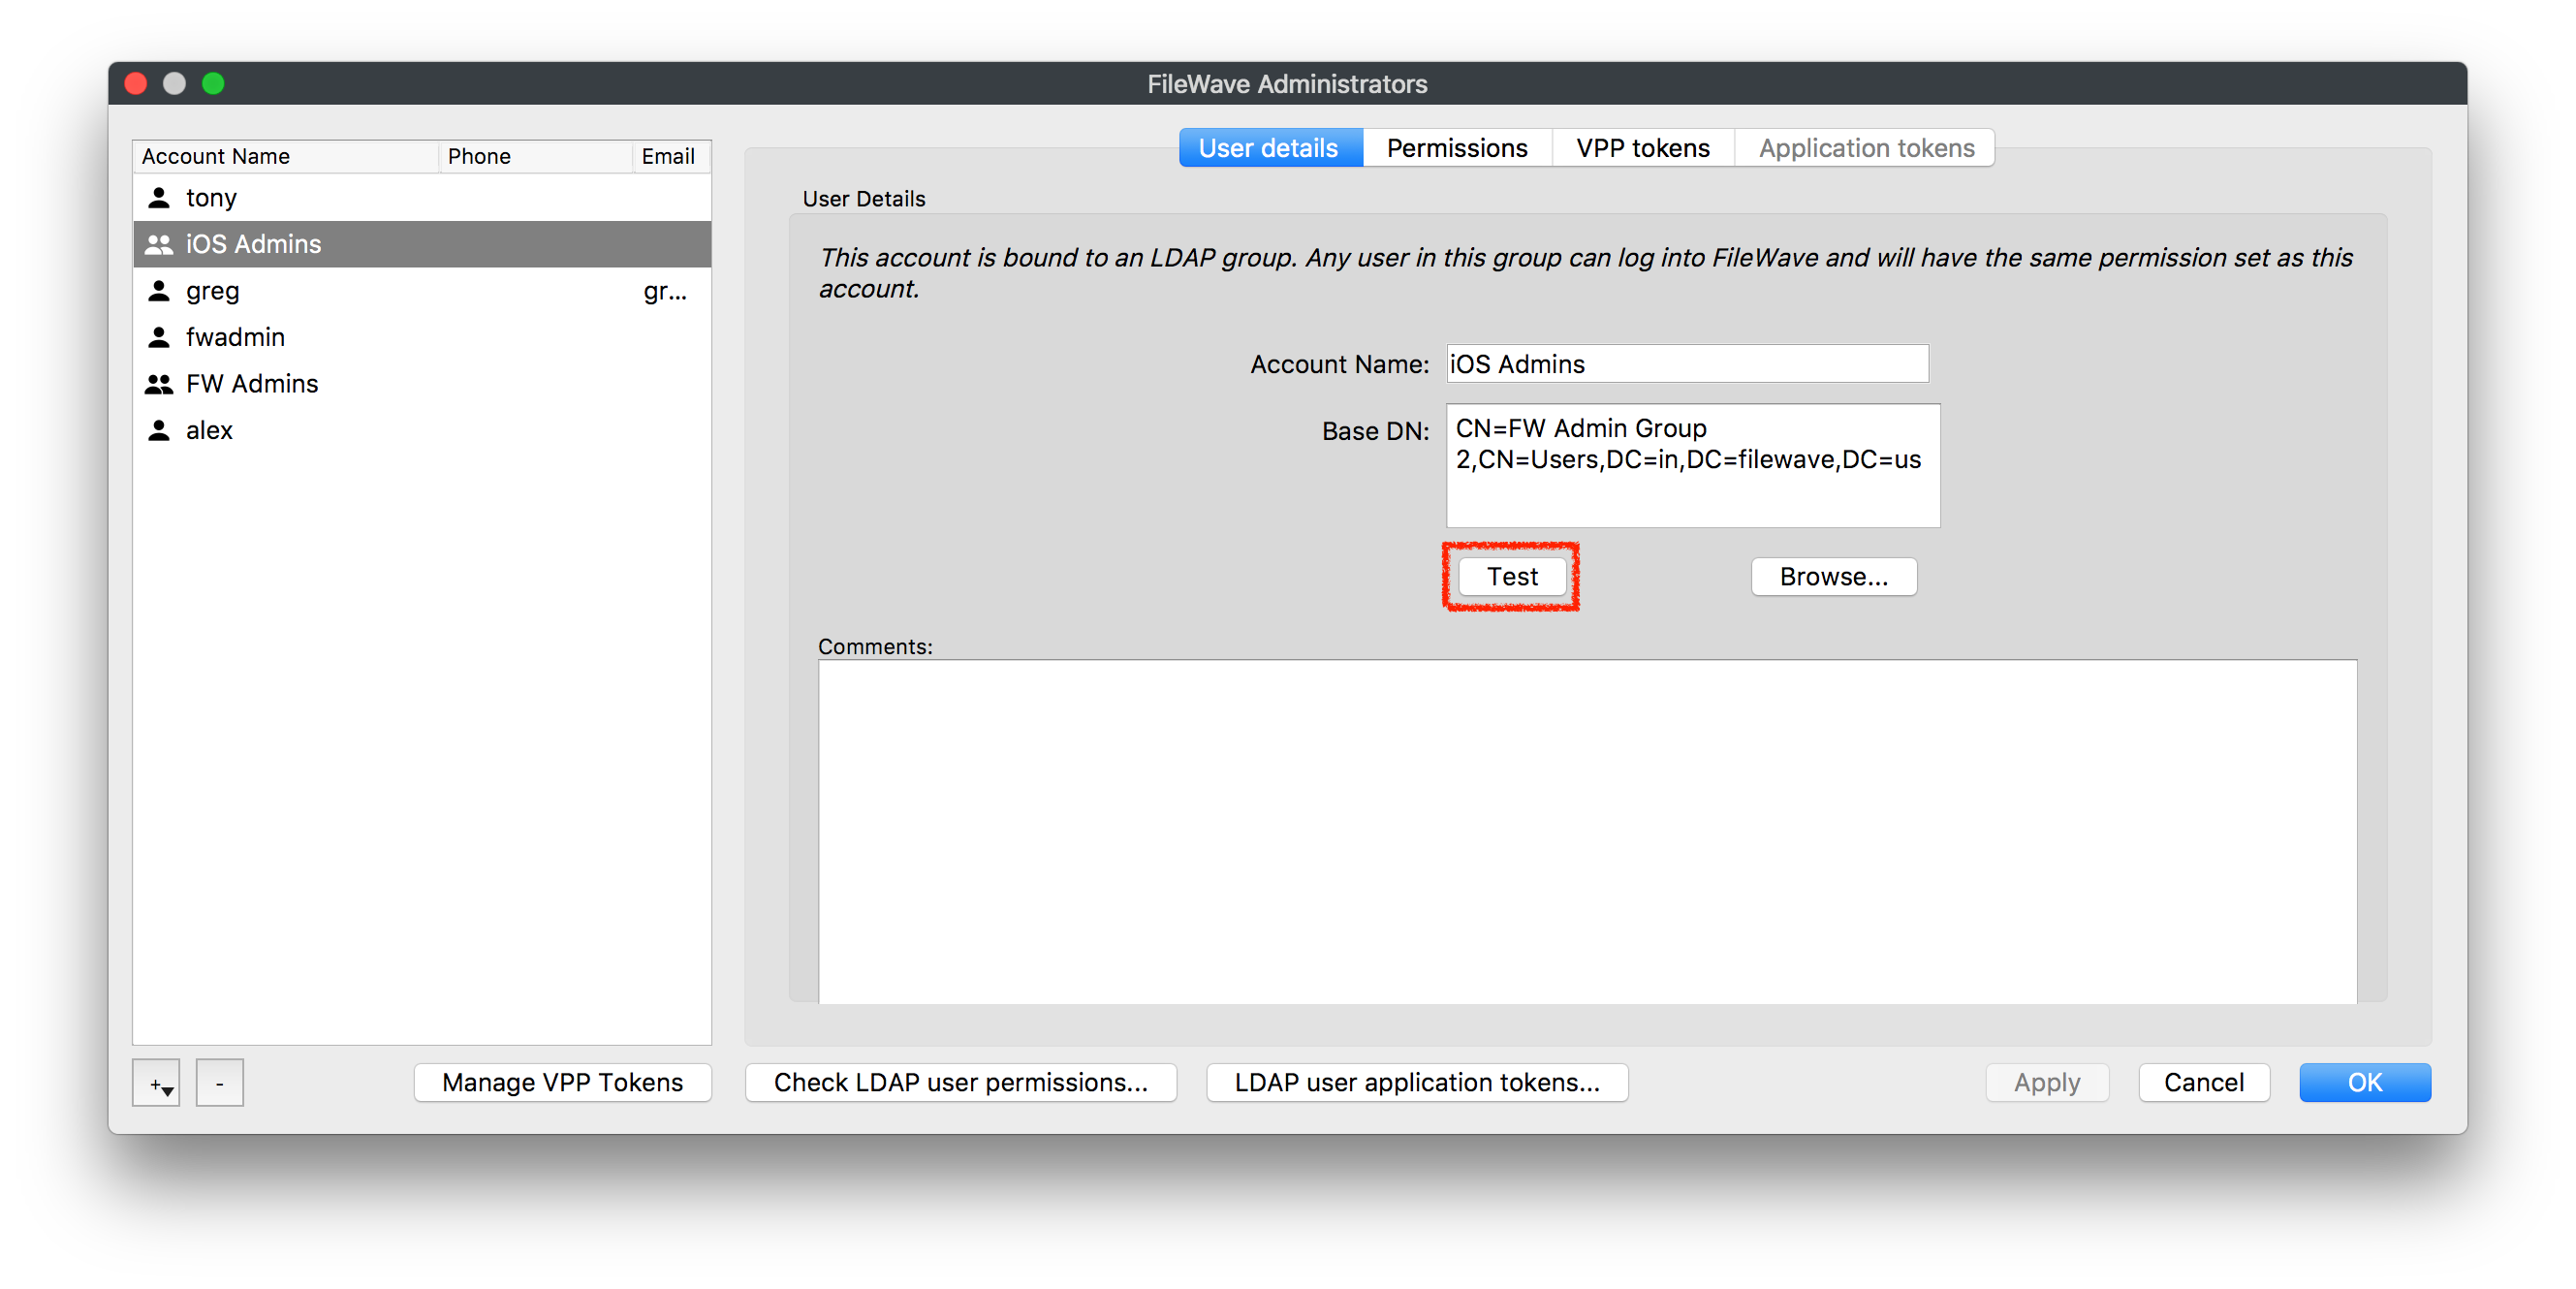
- You will now be able to link this LDAP Group Account with a Group from your directory service. Click the Browse... button in the User details tab
From here you will search through your LDAP structure to find the group you would like to use: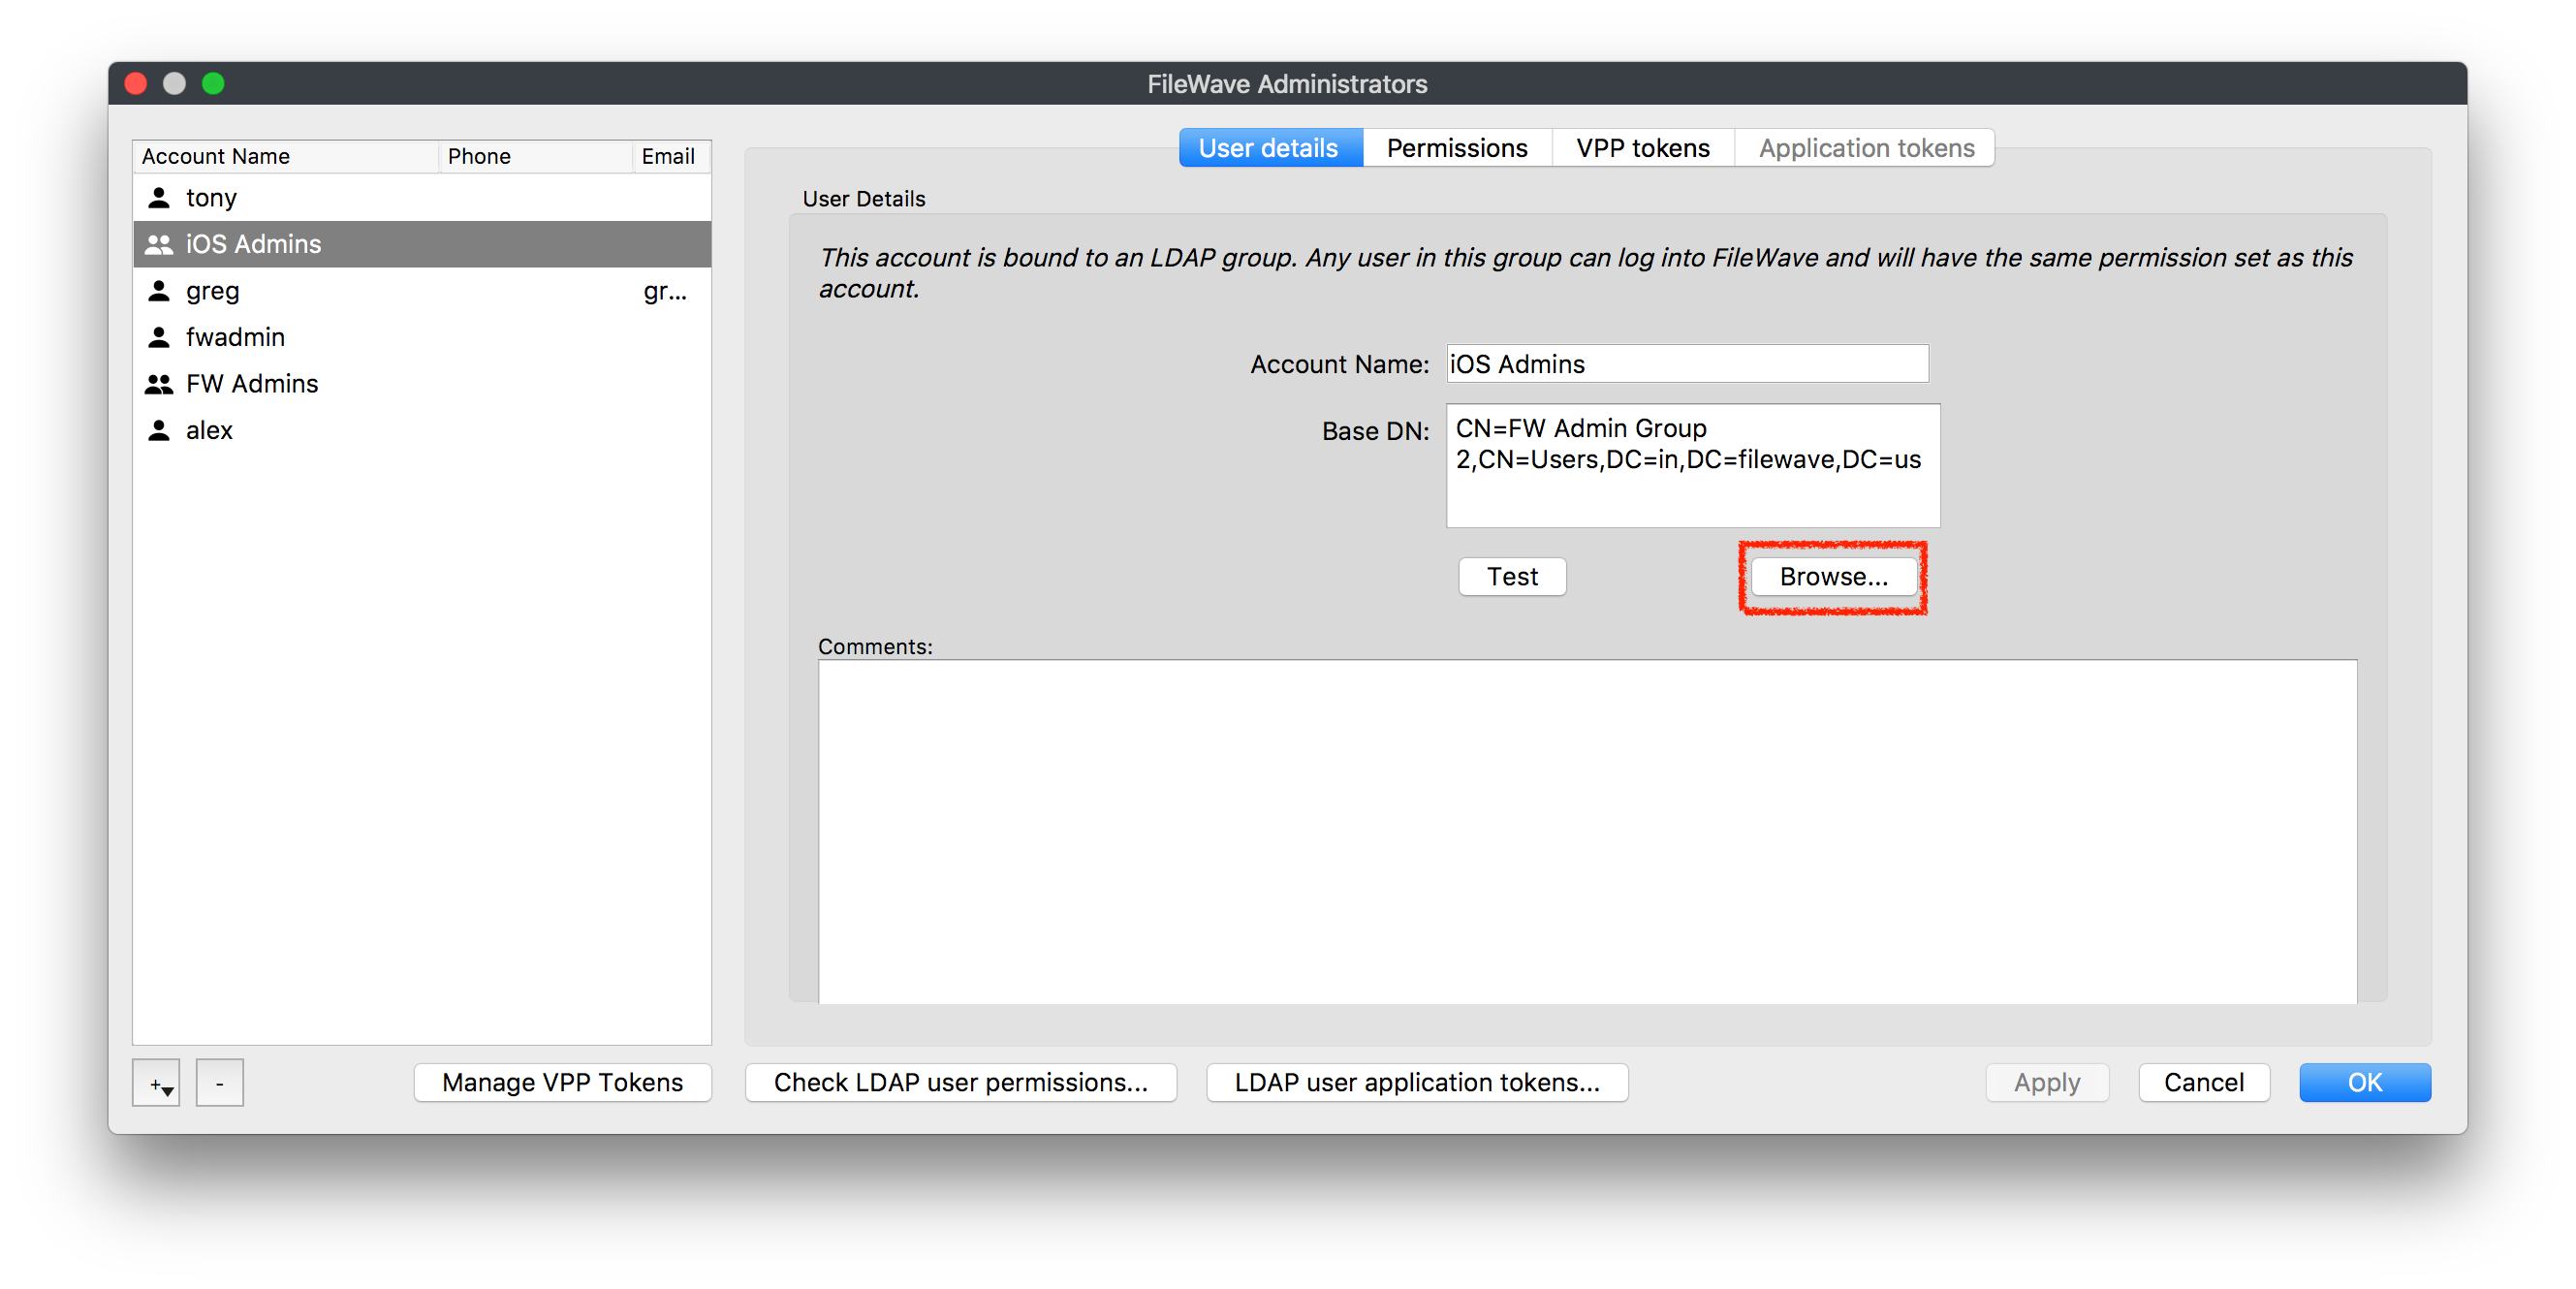
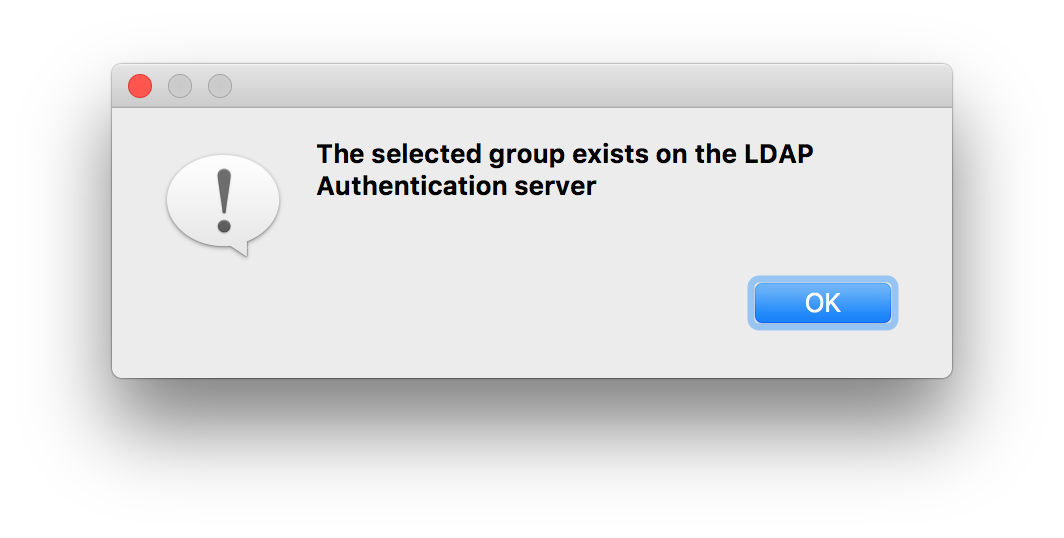
- (OPTIONAL) After the group is selected you can hit the Test button, this is used mainly if you typed in the DN instead of searching for the group in the browser
- Next you will need to give this user permissions in FileWave, you do this by selecting the user and going into the Permissions tab and checking which options you want this user to have. (More information on what each of these options do at the end of this section)

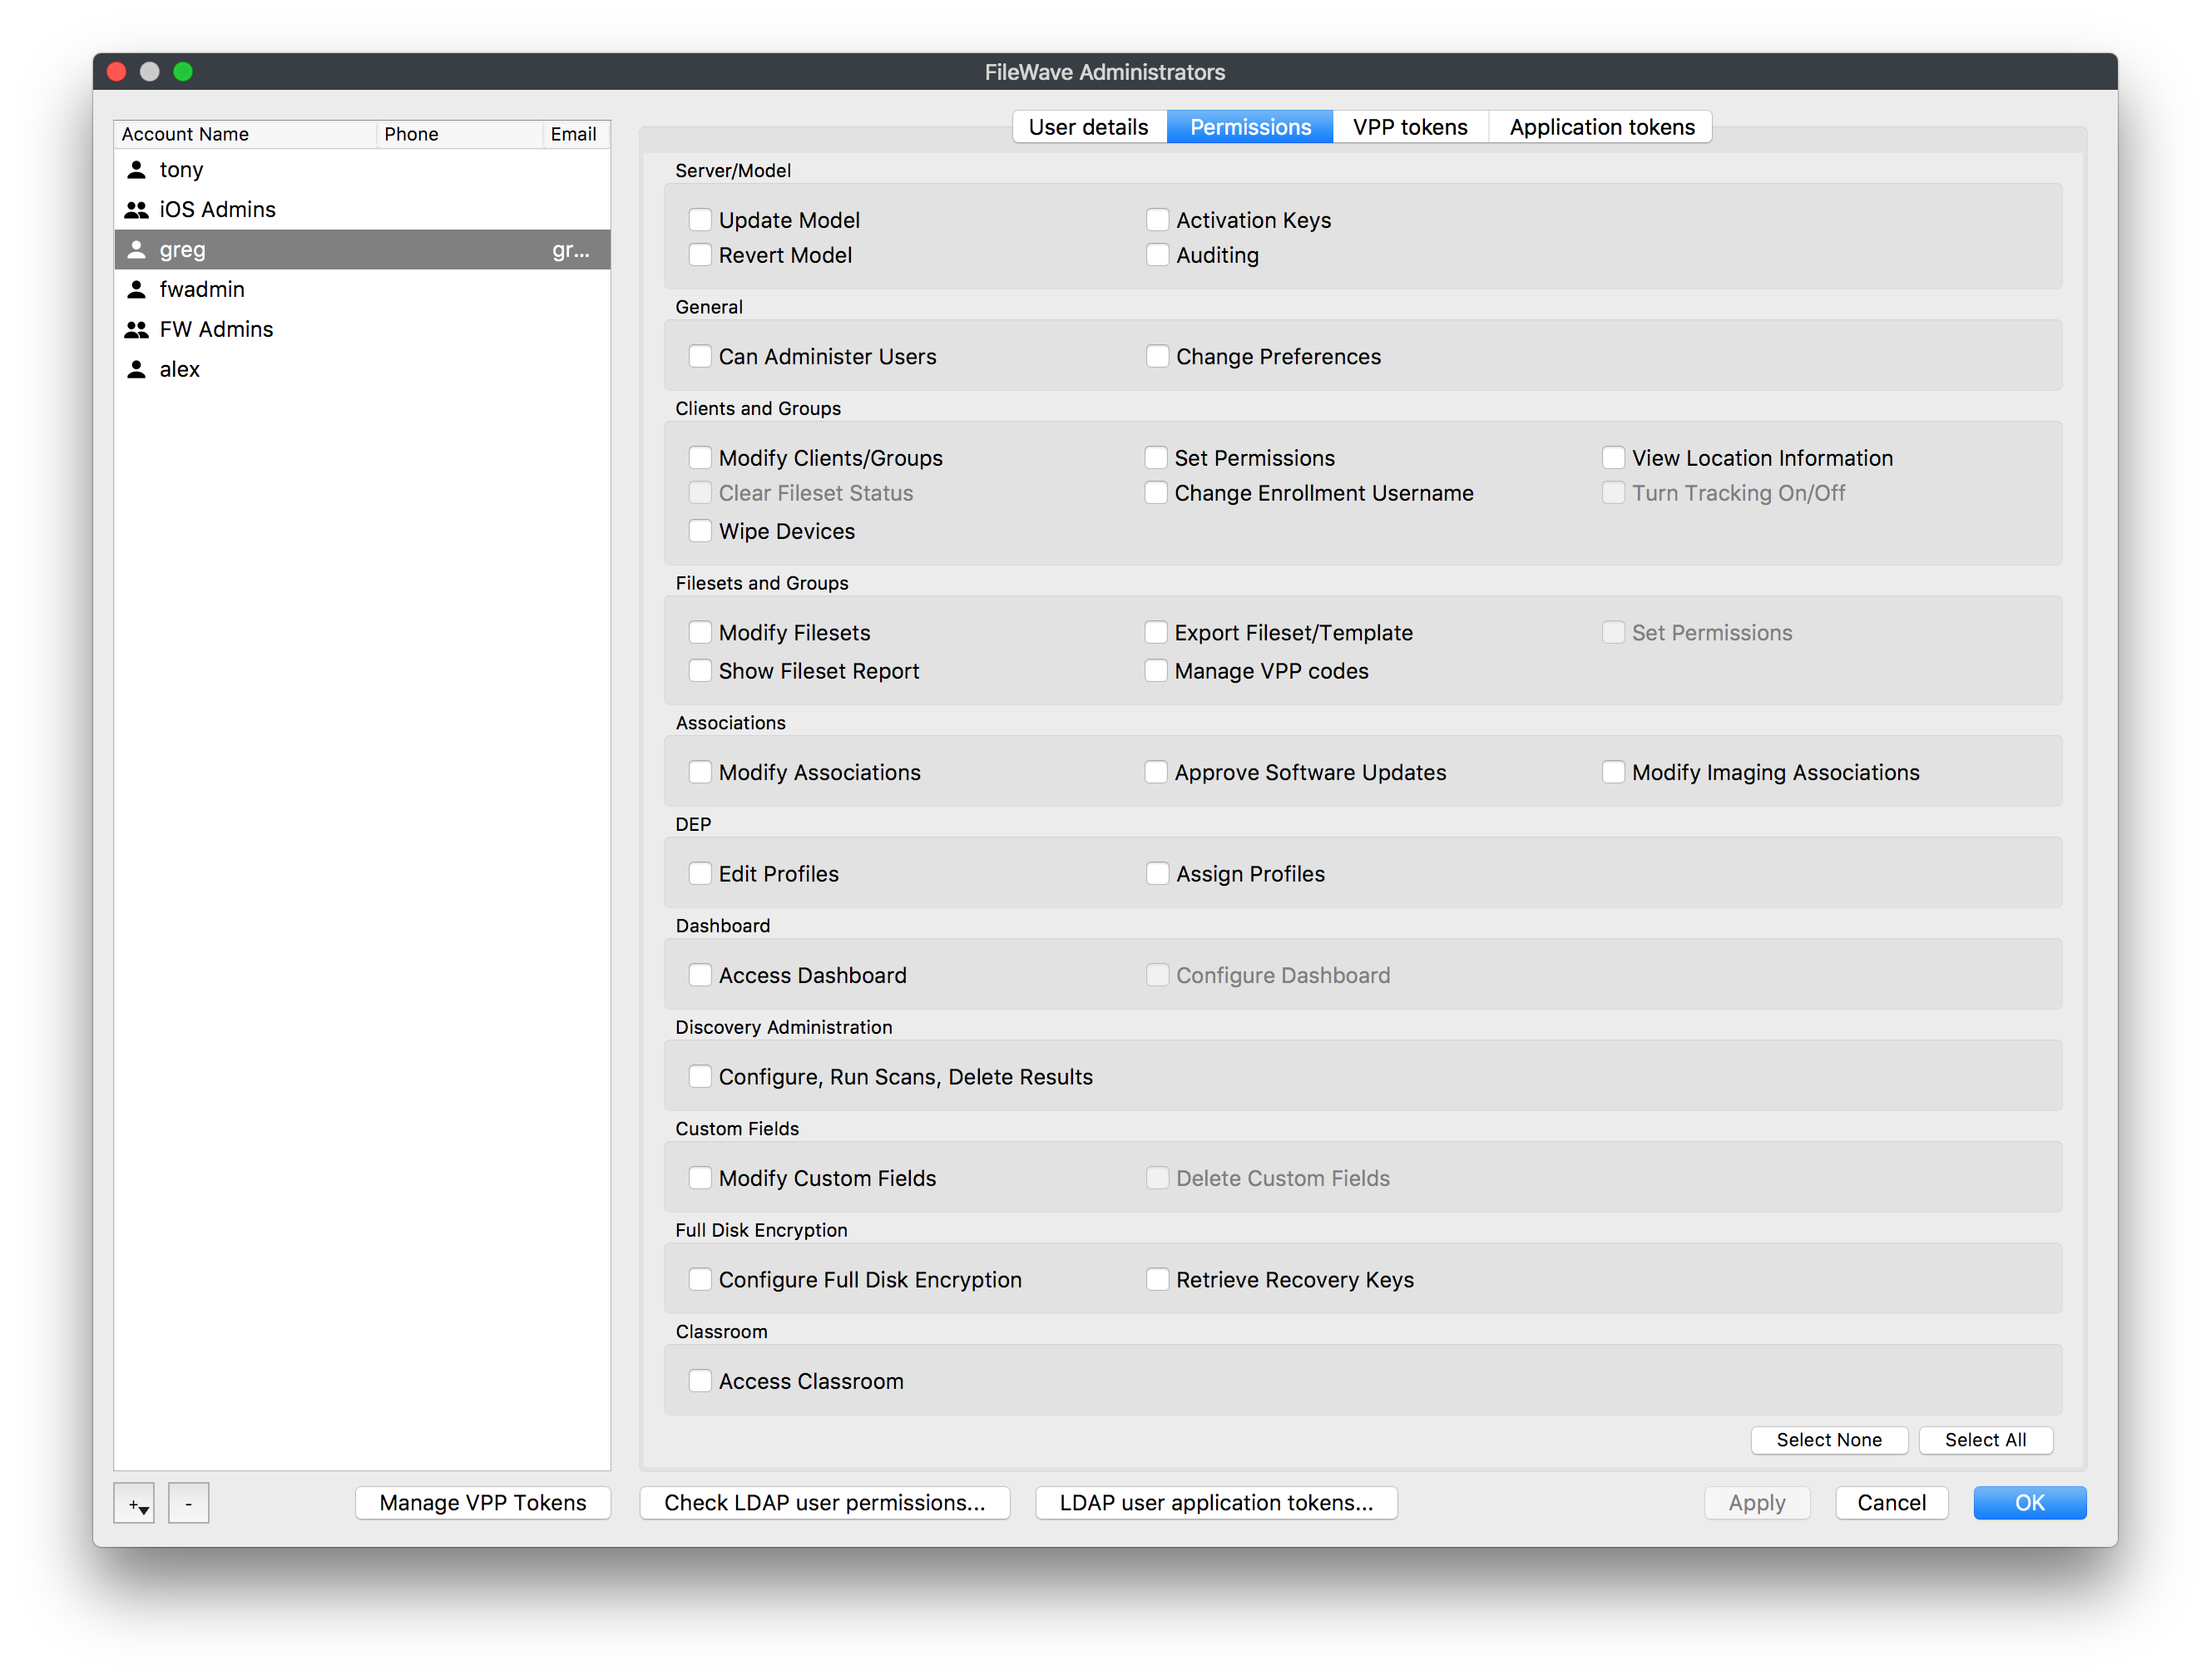
Permissions
Account permissions will determine what the Administrator can and cannot do in the FileWave Admin.
Selecting your Local Account or LDAP Group account and then going into the Permissions tab will give you all the permissions you can select for that user or group of users from LDAP.
LDAP Group Account Permissions
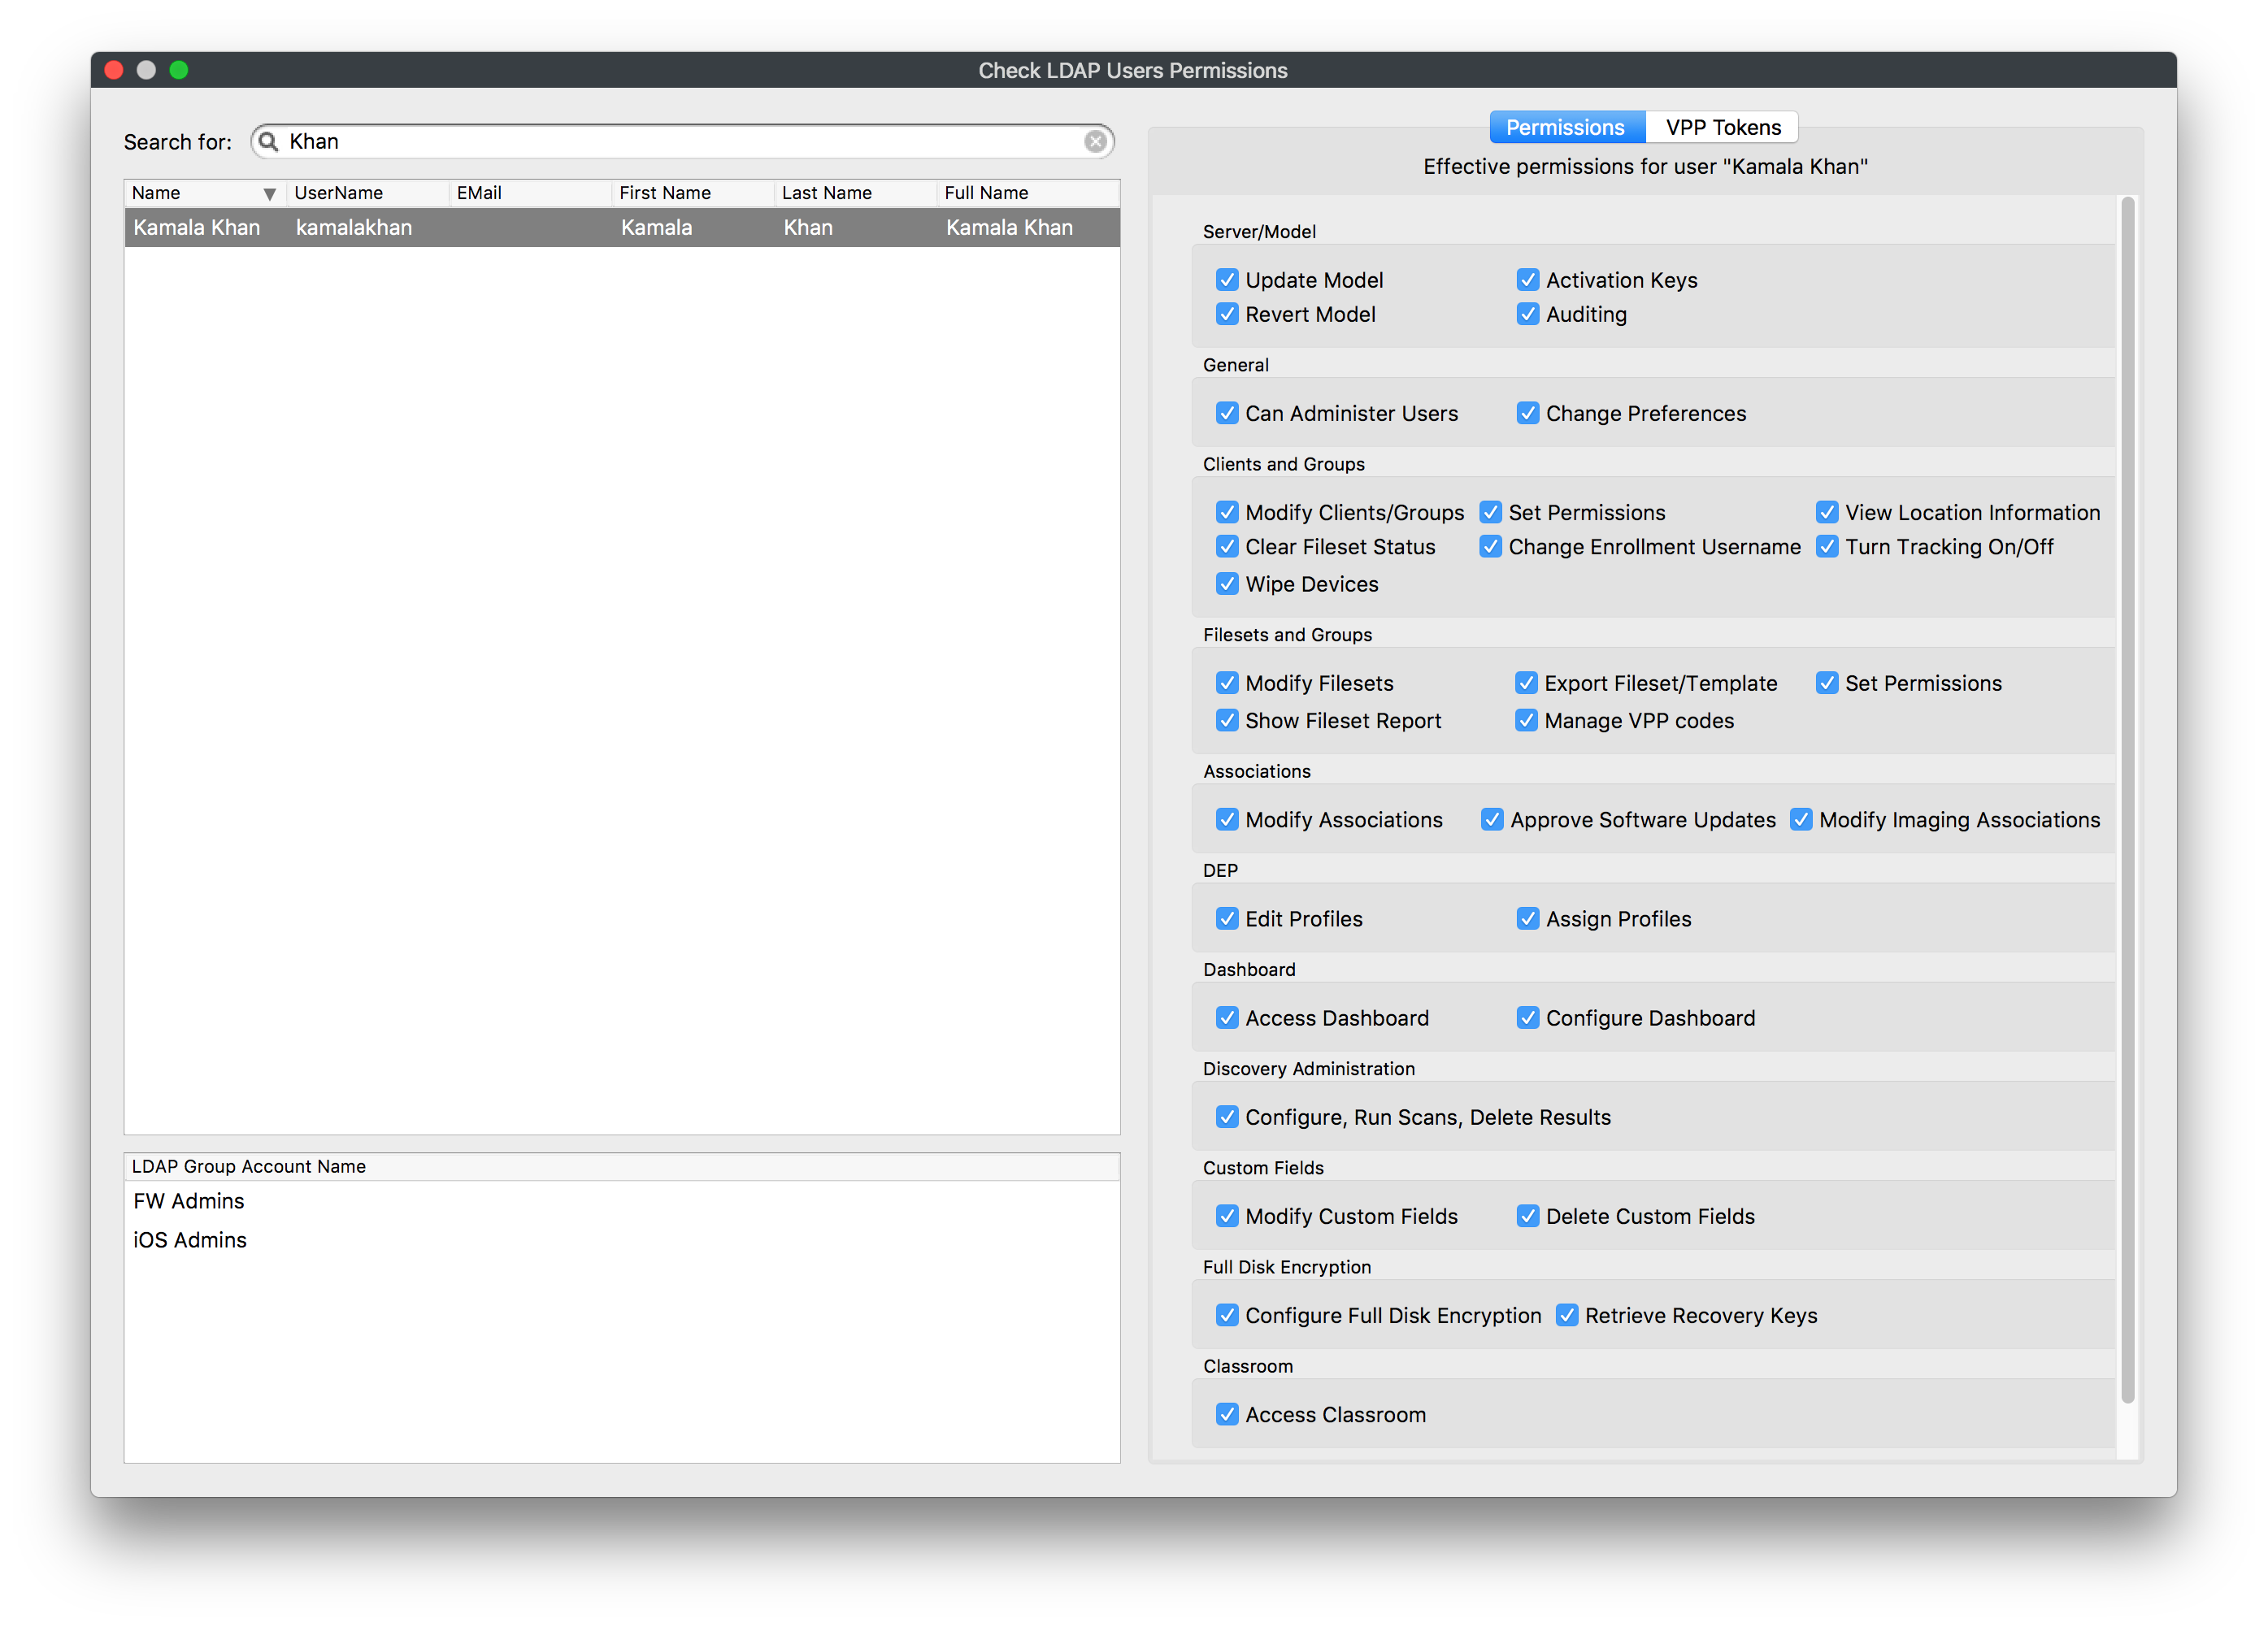
If you have a user in multiple LDAP Group Accounts the user will take the collective permissions from each group. You can check on what permissions a LDAP user will get by selecting the LDAP user application tokens... and searching for that user:

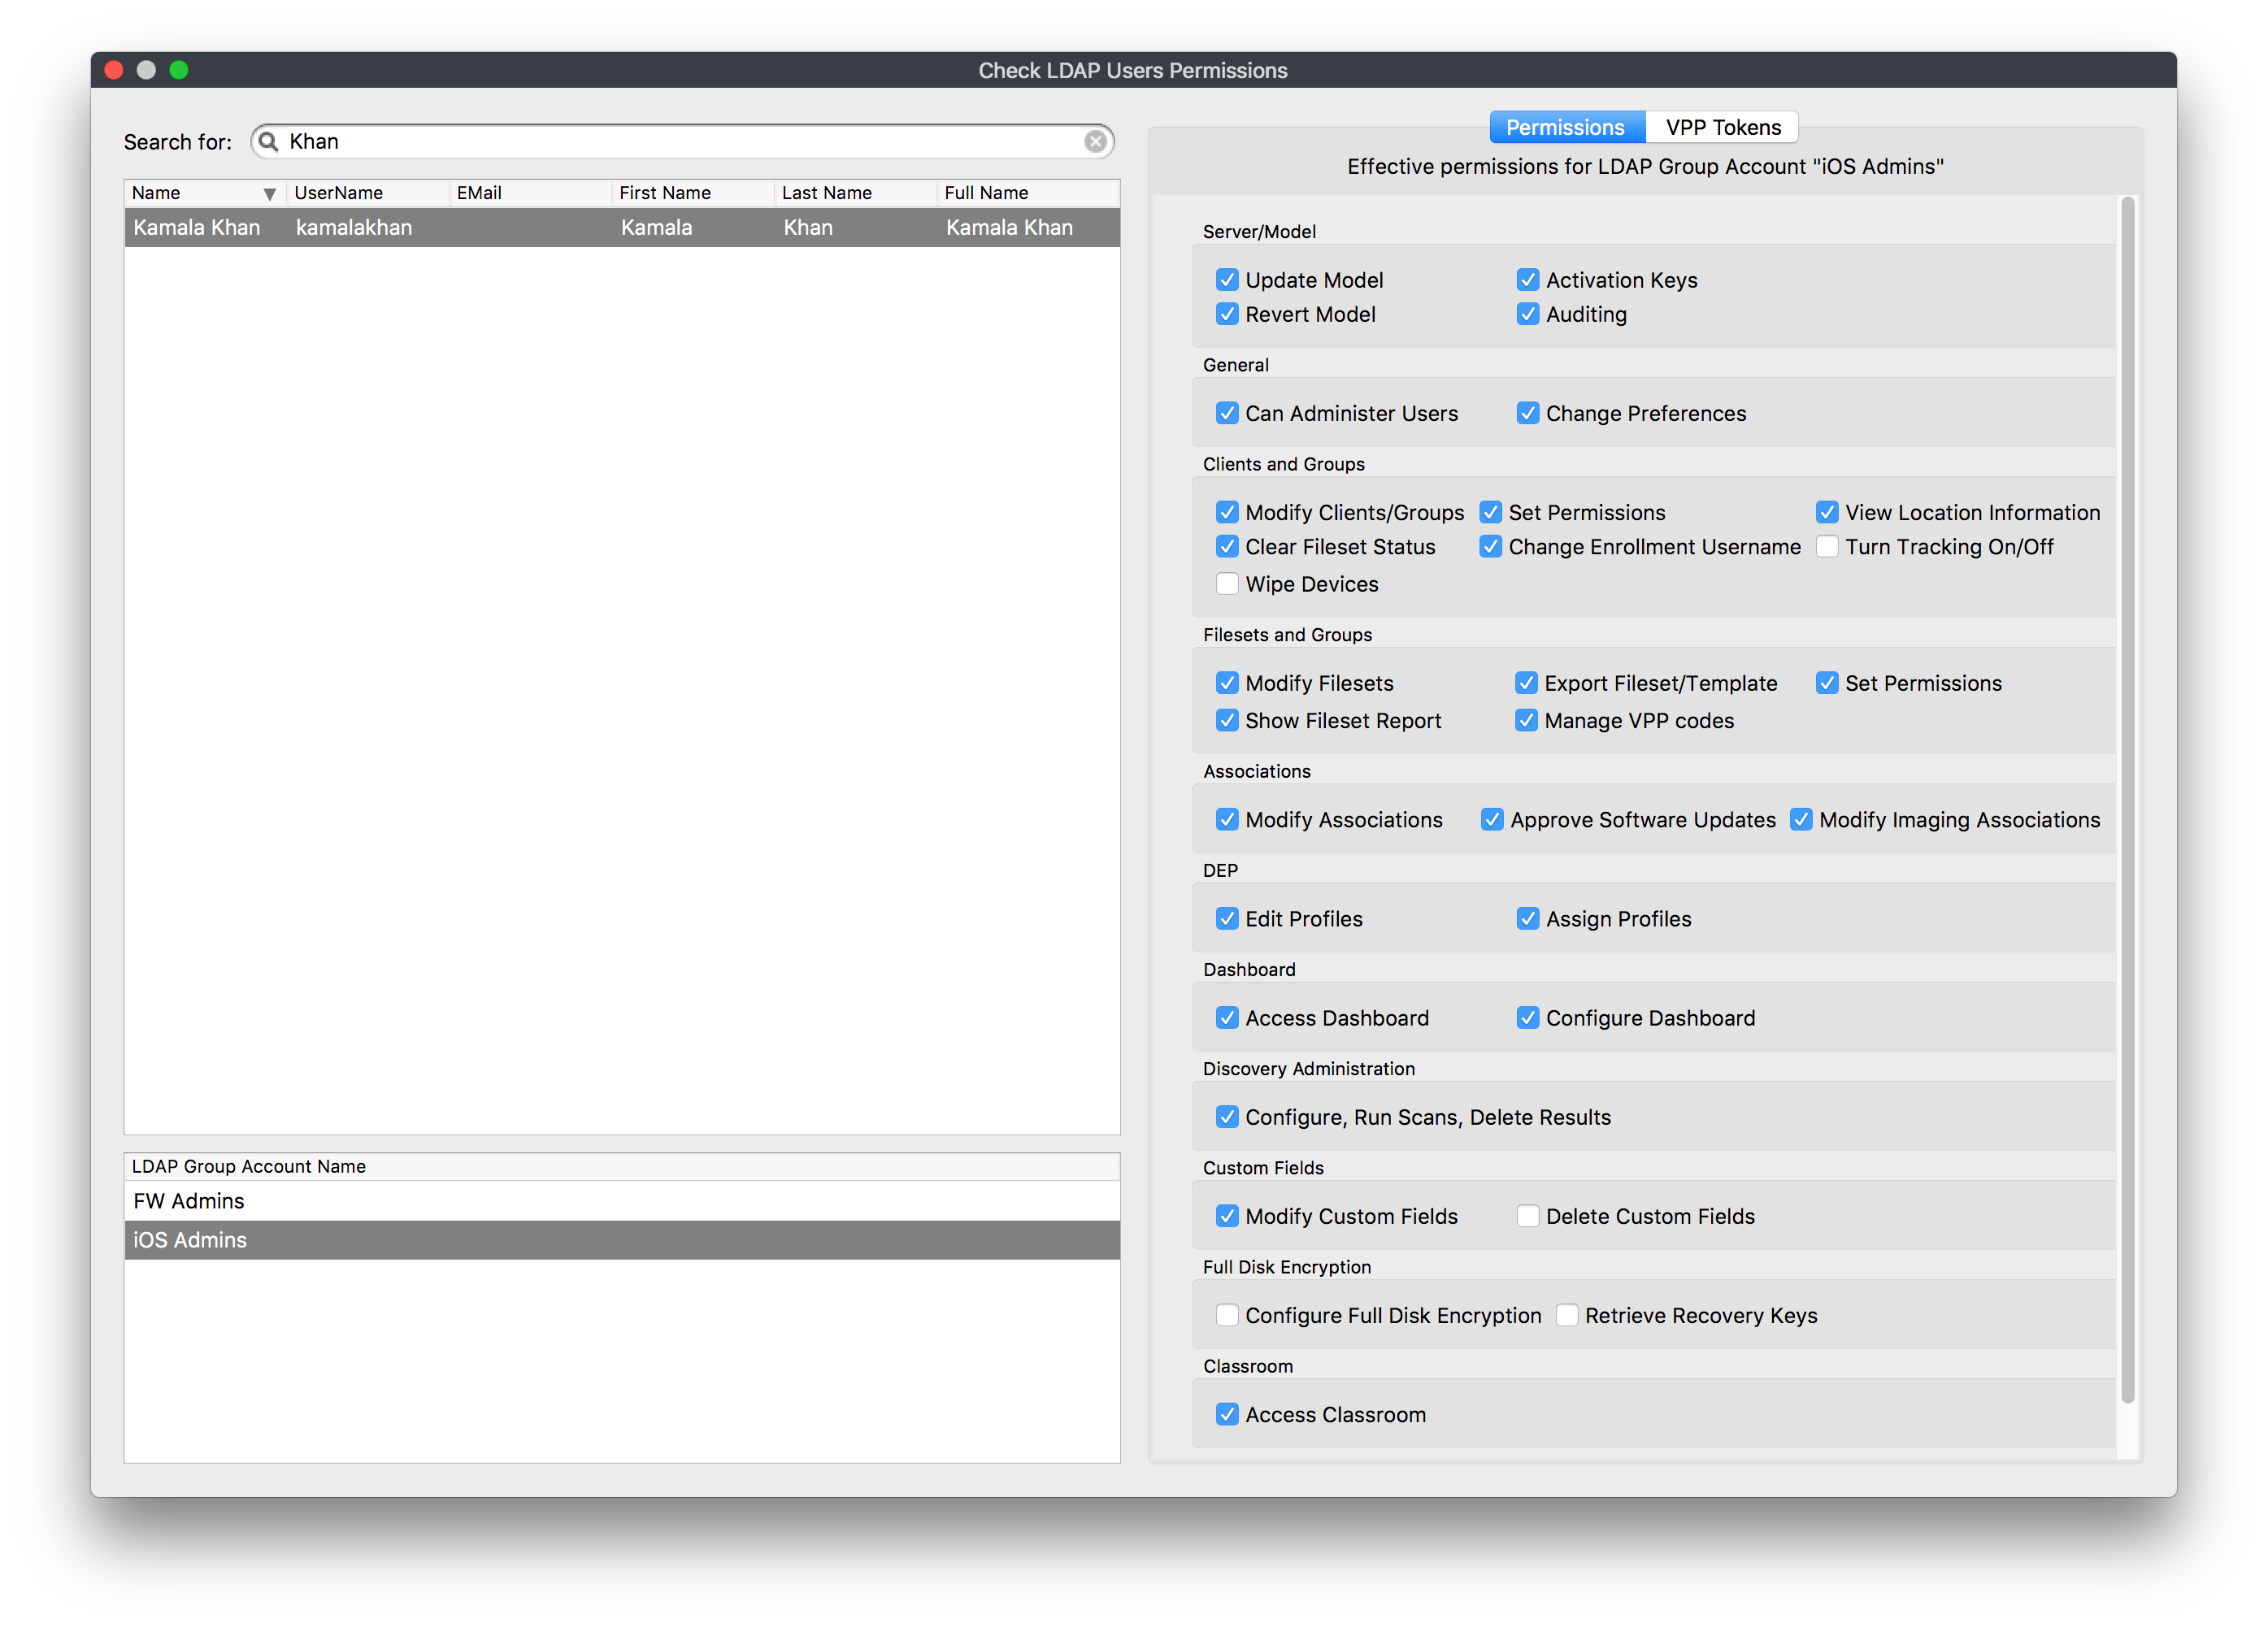
As you can see in the screenshots above the user Kamala Khan is in both the FW Admins and the iOS Admins LDAP Group which has fewer permissions than the FW Admins group does. So this user will use the permissions gathered from both of these groups which will give her full access as you can see in the screenshot below:
What are all the permissions you can choose from?
Server / Model
- Update Model - allows the administrator to approve changes to the server model. Updating the model sends notifications to all FW clients of any possible changes to any Filesets they have.
- Revert Model - allows the administrator to cancel changes made at the last model update and revert to the previous model version.
- Auditing - allows the administrator to view the Audit History of all actions logged by FileWave.
- Activation Keys - allows the administrator to enter, change, or update the activation keys for the FileWave server.
General
- Can Administer users - allows administrator to add, edit, or delete administrative users.
- Change Preferences - allows administrator to access the FileWave Admin Preferences
Clients and Groups
- Modify Clients / Groups - allows administrator the ability to add, edit, and delete FW clients and client Groups.
- Set Permissions - allows the administrator to assign clients and client Groups to specific administrators.
- View Location - Location map will be shown if the device is reporting location data.
- Clear Fileset Status - allows administrator the ability to remove all messages in the client info window for a designated client.
- Change Enrollment Username - this allows the administrator to change the enrollment username for MDM enrolled device, located in the client tools.
- Turn Tracking On/Off - gives the administrator the ability to switch the client state of a device for location tracking to Normal, Missing, or Not Tracked.
- Wipe Devices - this allows administrators the ability to wipe devices in the FileWave Admin.
Filesets and Groups
- Modify Filesets - allows administrator to edit Filesets , add or delete content within a Fileset.
- Export Fileset / Template - allows the user to export a specific Fileset or a template for use on another FileWave server, or for archival purposes.
- Set Permissions - allows the administrator to change the permissions within a Fileset or Fileset Group.
- Show Fileset Report - allows administrator to view the Fileset report showing the status of that Fileset.
- Manage VPP codes - with this unchecked and disallowed this will prevents administrators from accessing all VPP settings and menus, will also prevents the admins access to setup DEP tokens.
Note: If you do not allow an administrator to Manage VPP codes then they will not be able to see any of the VPP purchased applications or ebooks. This is especially important if you have multiple VPP token support.
Associations
- Modify Associations - allows the administrator to change the associations settings between a client or client Group and any Fileset or Fileset Group.
- Approve Software Updates - allows the administrator to designate specific software updates as pre-approved for association by other administrators.
- Modify Imaging Associations - allows the administrator to change which Imaging Filesets are associated with which devices
DEP
- Edit Profiles - allows the administrator to change the characteristics of DEP profiles, including naming conventions, setup assistant workflow, and certificate assignment.
- Assign Profiles - allows the administrator to designate specific client devices to be managed by certain DEP profiles.
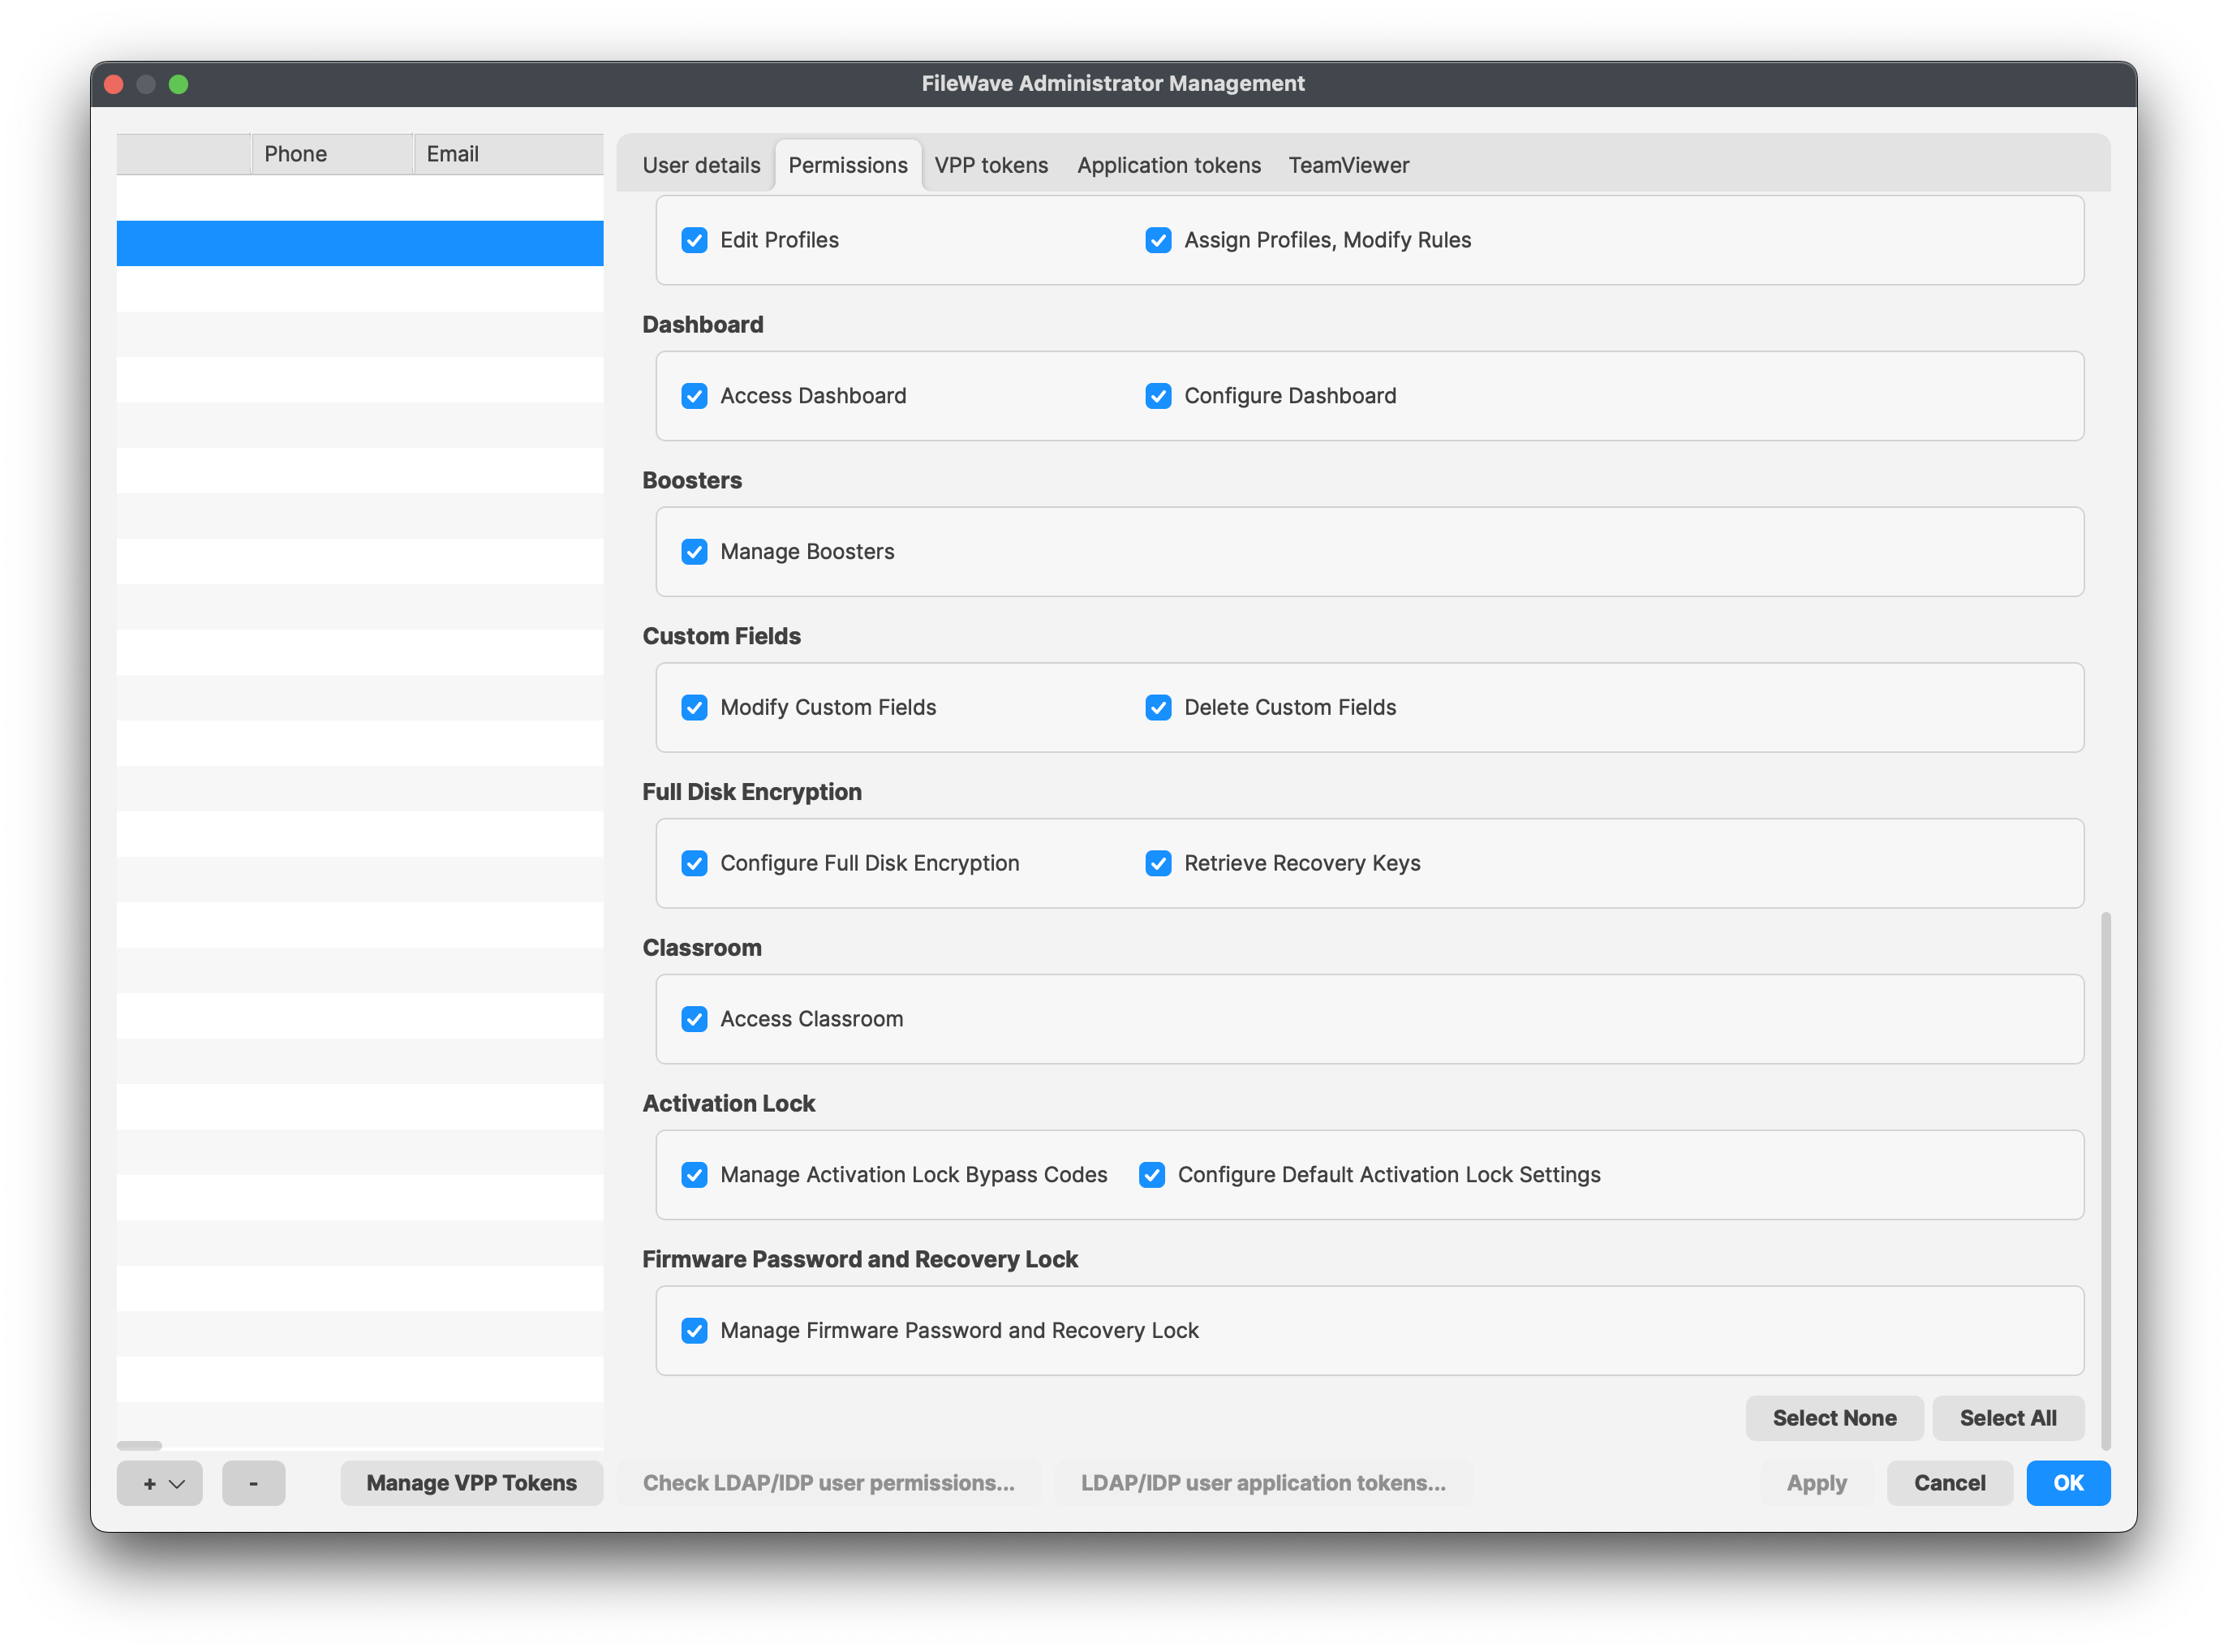
Dashboard
- Access Dashboard - Which administrators can see the Dashboard in the FileWave Admin or via web browser.
- Configure Dashboard - This determines which administrators have access to Dashboard Alert settings.
Discovery Administration
- Configure, Run Scans, Delete Results - administrator can configure and control network scans and delete discovery results.
Custom Fields
- Modify Custom Fields - Allows administrators to create, modify, and assign custom fields to devices.
- Delete Custom Fields - This will allow the deletion of custom fields
Full Disk Encryption
- Configuration Full Disk Fields - allows the FileWave administrator to access and configure FDE Configure Management located in the Assistant menu
- Retrieve Recovery Keys - allows the FileWave administrator to access and configure FDE Recovery Key Management located in the Assistant menu
Classroom
- Access Classroom - allows the administrator to access the Classroom section in the FileWave Admin, this includes carts, cart clones, cart associations
|
Important Note: If you are upgrading from below FileWave 12.9 this Classroom option will be unchecked by default. So you will no longer able to view Classroom in FileWave until this is checked for selected administrators. |
Activation Lock
- Manage Activation Lock Bypass Codes - allows the administrator to access and manage Activation Lock bypass codes.
- Configure Default Activation Lock Settings - allows the administrator to configure the default Activation Lock behavior.
Firmware Password and Recovery Lock
- Manage Firmware Password and Recovery Lock - allows the administrator to manage Firmware Password and Recovery Lock settings.
Application tokens
FileWave security for inventory has been built on top of a shared secret, which is a long token generated randomly and shared between the server (inventory server) and clients (admin, FileWave server, client machines, scripts, etc)
Any script or 3rd party component that needs access to FileWave Inventory will need to have this token that has been assigned to a user. These tokens can be revoked, re-generated, and a user can have multiple tokens assigned to it.
Every Local account starts with a Default Token which can be used along with any news ones that are created.
|
The Default Token for your Superuser will be the same token that was originally in the Inventory tab in FileWave Preferences in versions 12.8.1 and below. If you upgraded from 12.8.1 or below then all communication with this token will stay intact unless you Regenerate the default token. |
Local Account New Application Token Setup:
- Select your Local Account and go into the Application tokens tab
- Once there hit the "+" at the bottom left of the tokens pane
- This will then allow you create a new token

- This will show
- The raw token
- base64 encoded token
- An example script you can copy and paste to test with
LDAP user application tokens
Just like Local Accounts it is possible to define application tokens for LDAP users as well. This will not be done at the group level but for the specific LDAP Users.
To setup the application tokens for LDAP users follow the steps bellow:
- In the FileWave Administrators window click on the LDAP user application tokens... button located at the bottom middle of the window
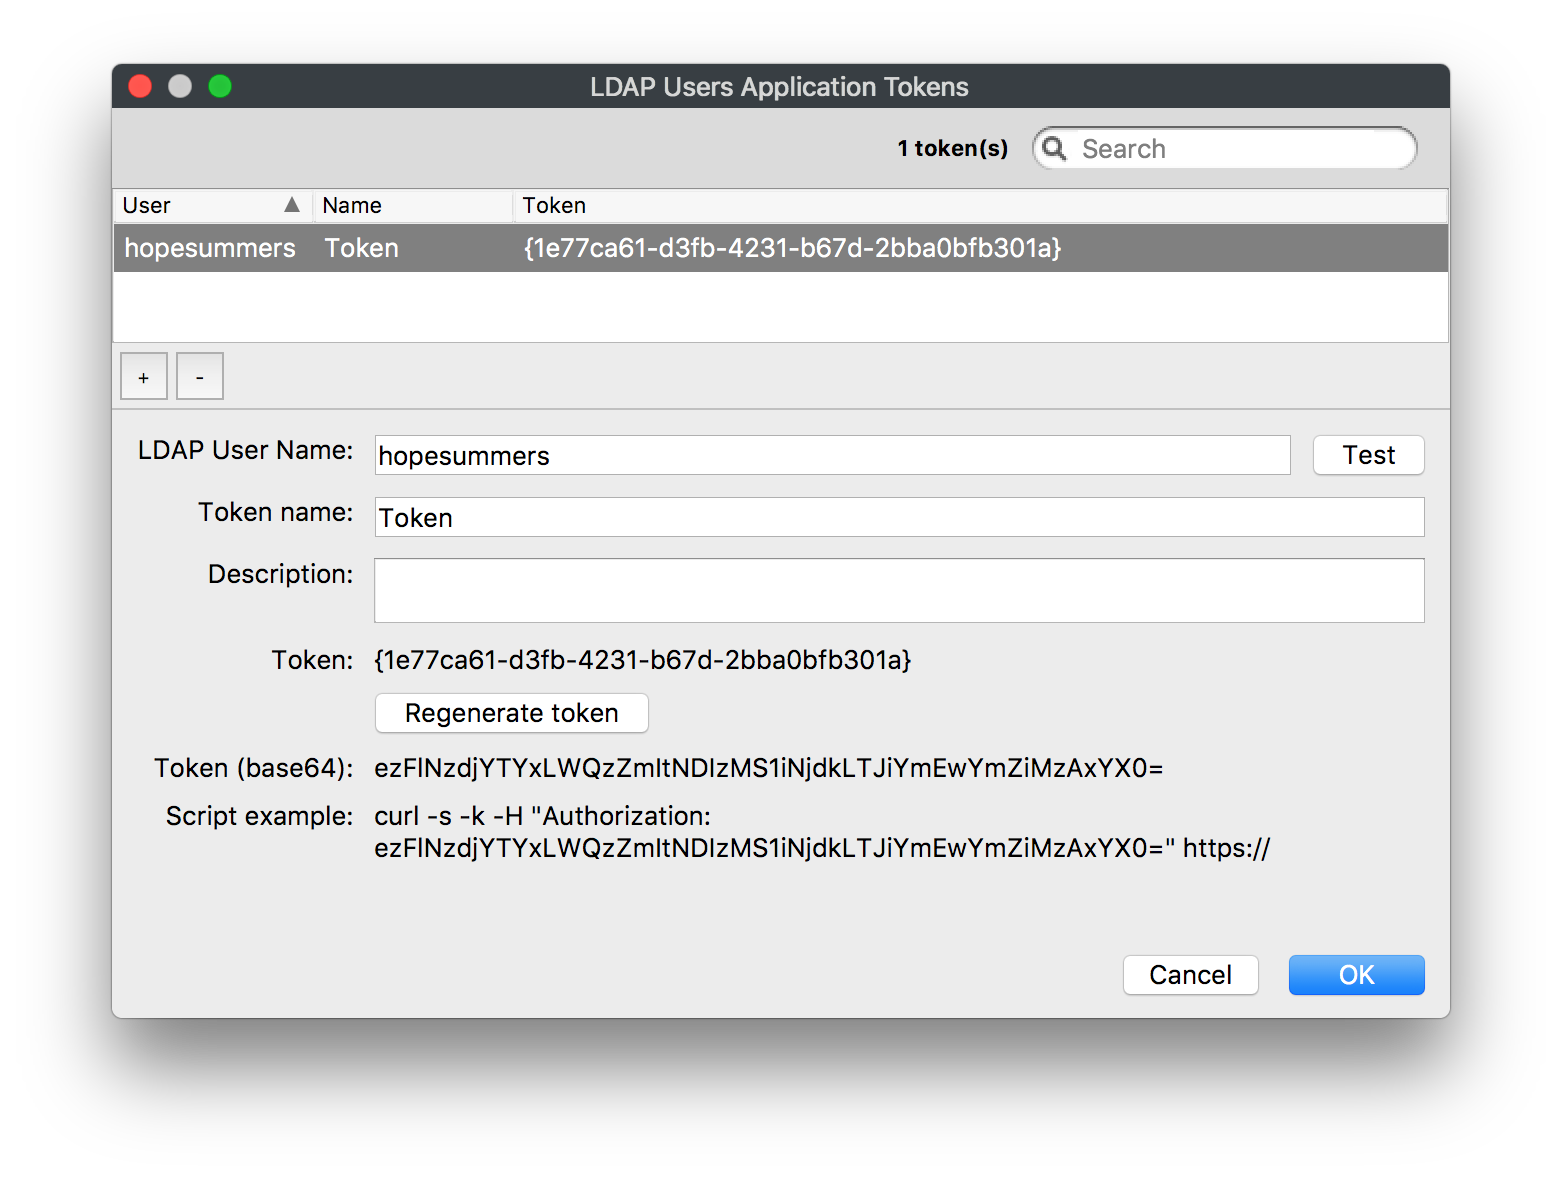
- You will then get the LDAP Users Application Tokens window, click the "+" at the bottom left of the token pane to create a new token
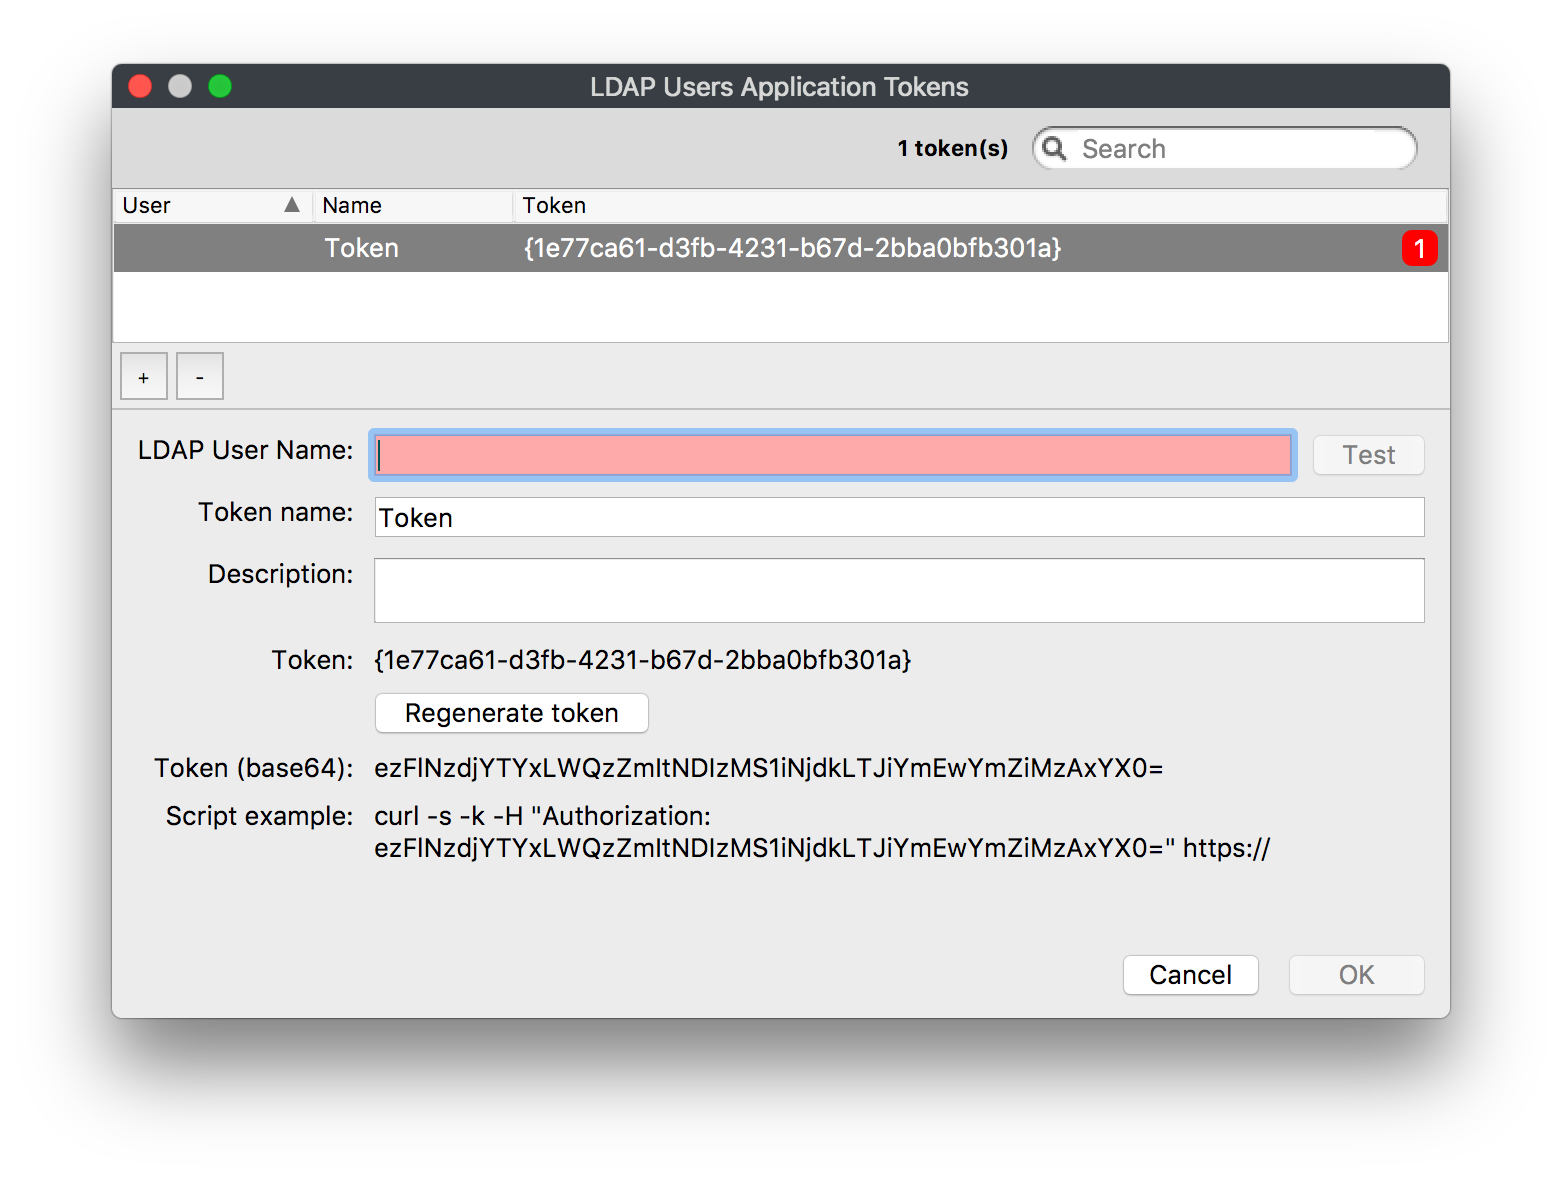
- Then you will need to type in the LDAP user you would like to use and click the Test button to confirm it

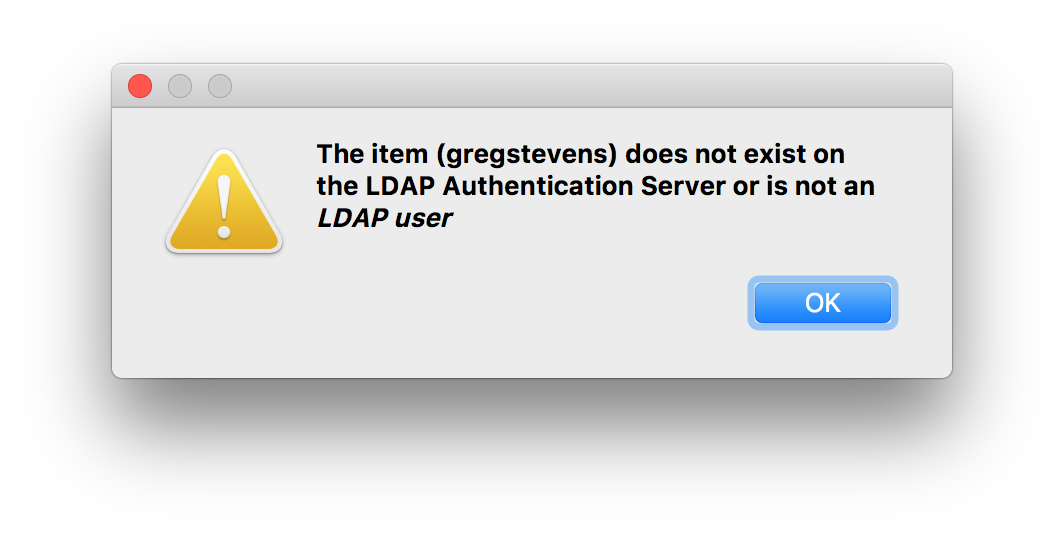
|
LDAP User TEST |
If you search for a user that is not in your directory service or it doesn't belong to an LDAP Group Account in FileWave it will fail.
- Once it has confirmed you are ready to use the token
Manage VPP Tokens
To allow specific FileWave Administrators to access and see VPP purchases they will need to be given access using this Manage VPP Tokens option in the Manage Administrators... section.
By default only the Superuser (fwadmin) has access to new VPP tokens imported in FileWave any other Administrators created needs to be given access.
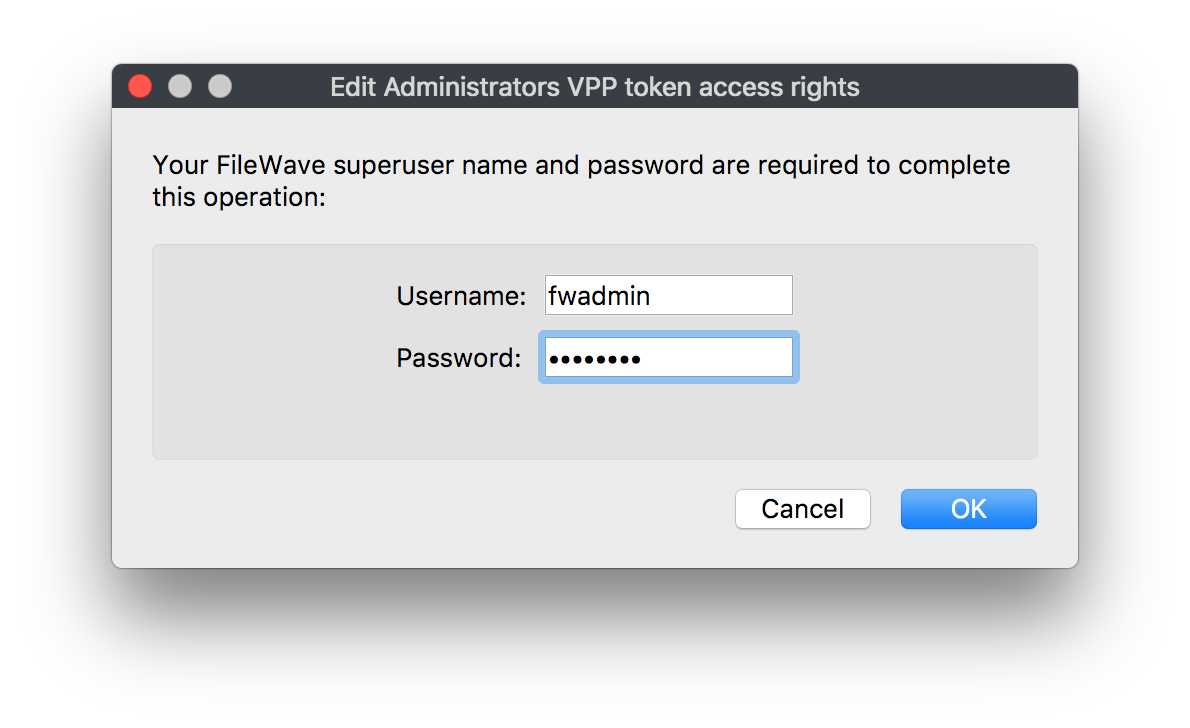
- Click the Manage VPP Tokens button at the bottom
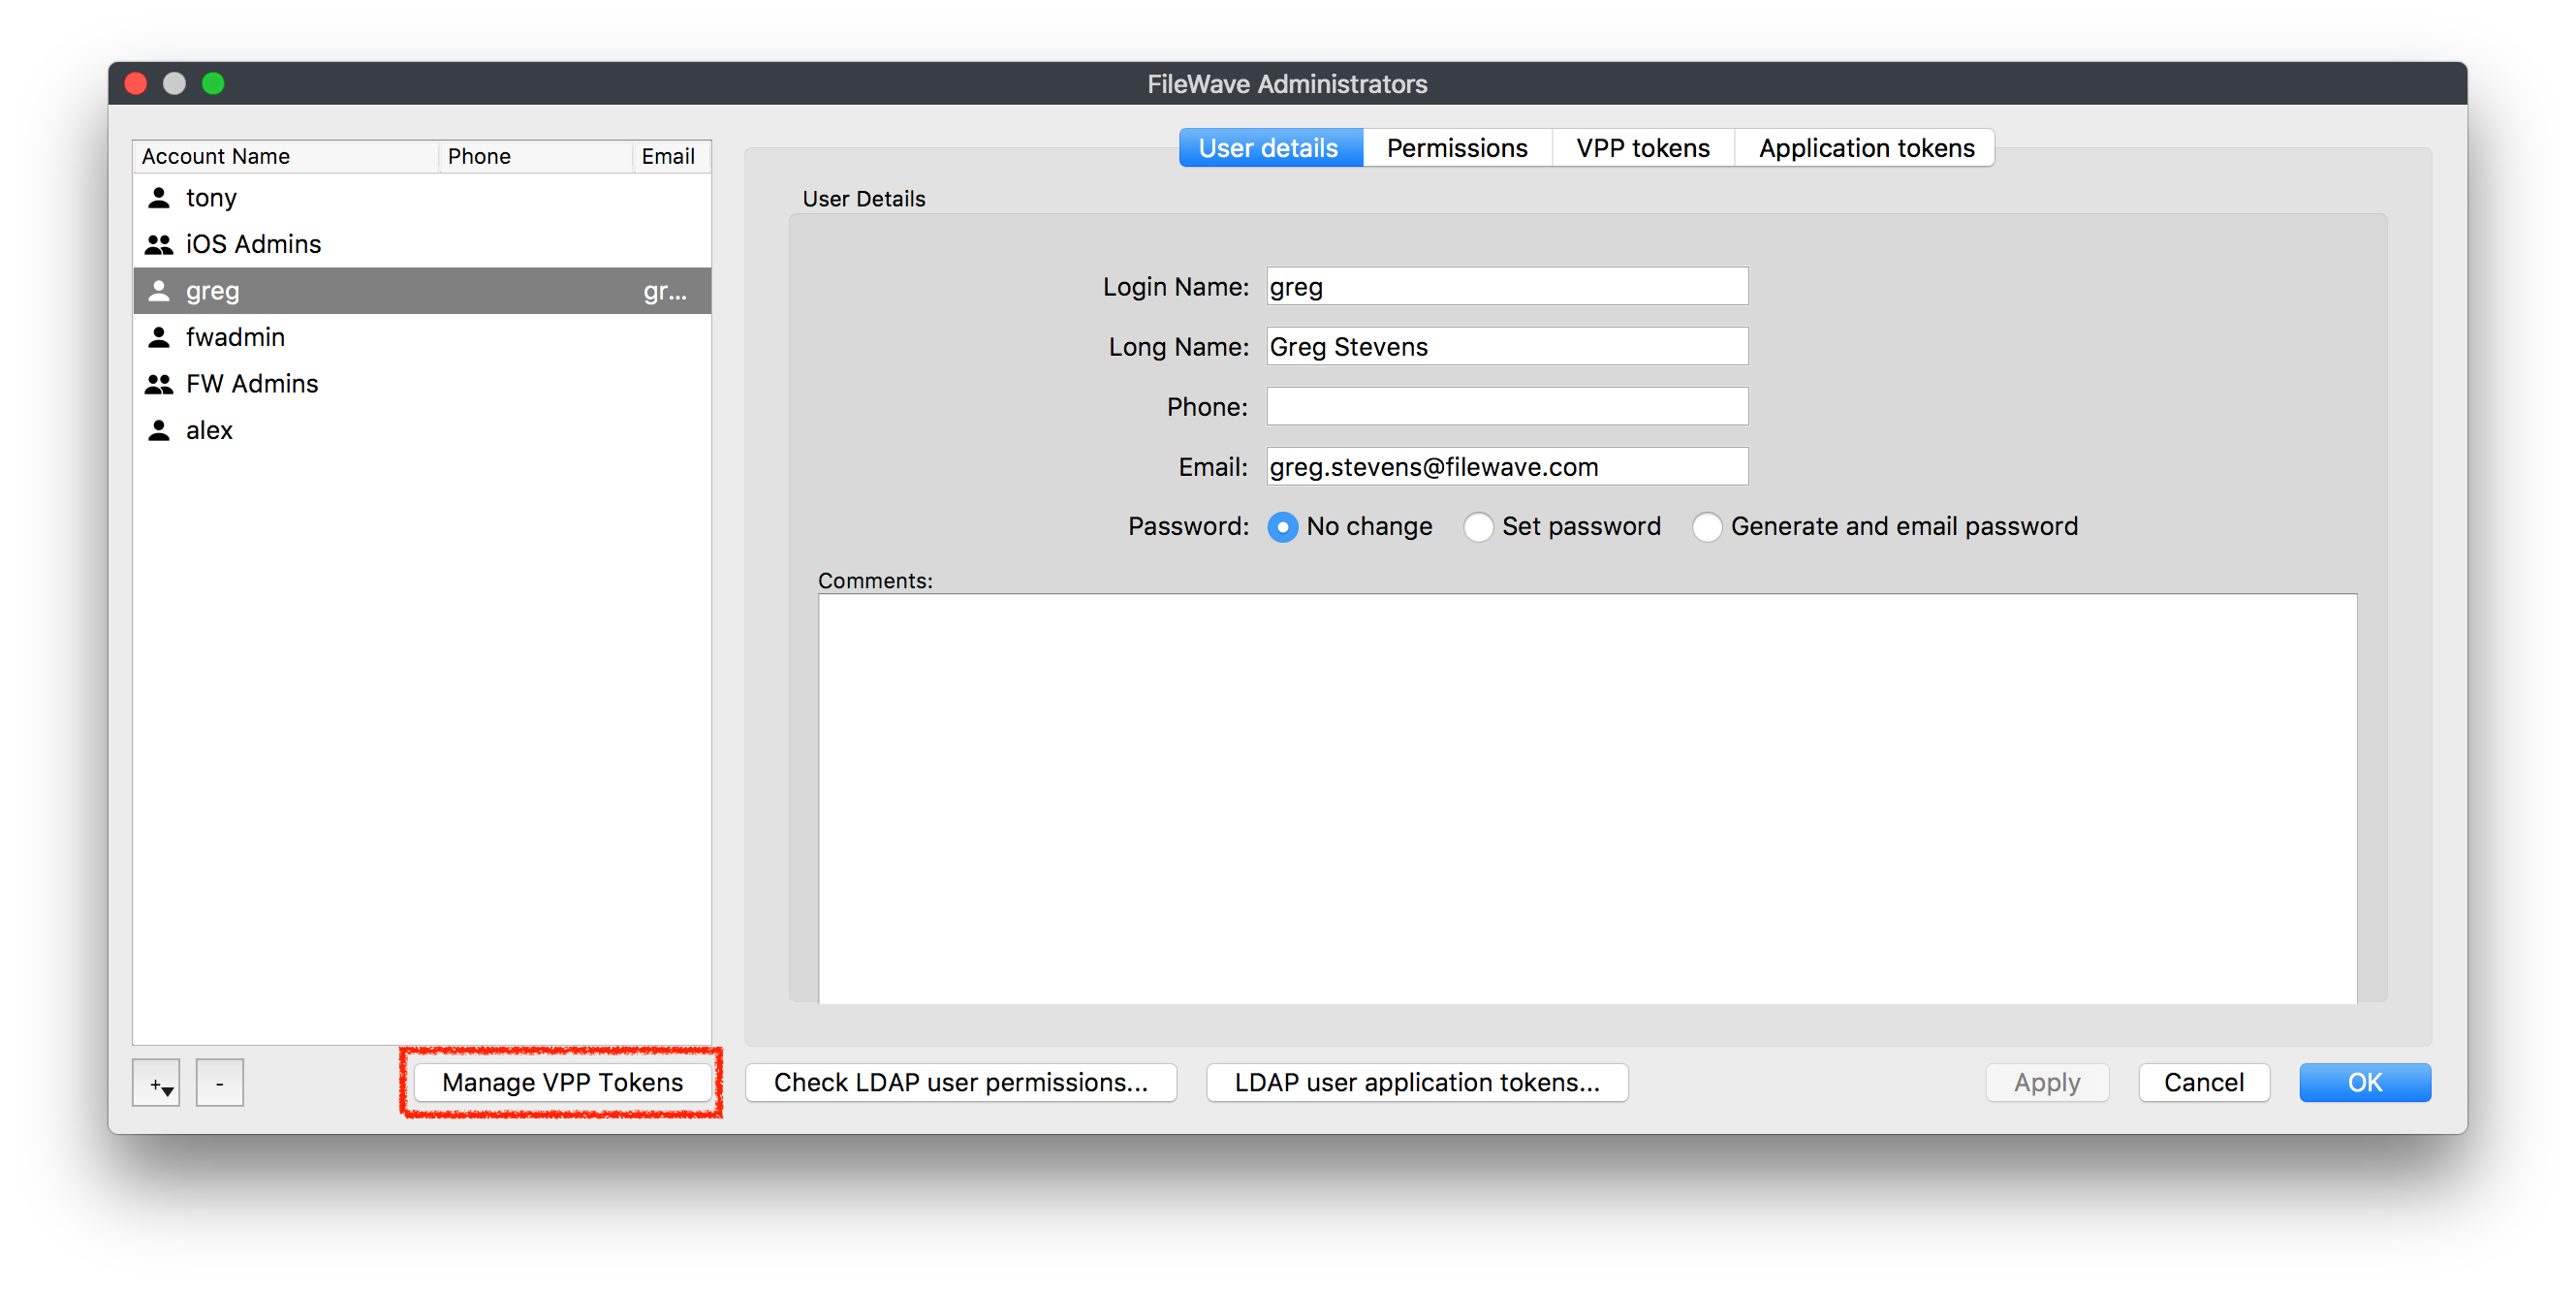
- You need to authenticate with the Superuser
- Now you will check which users you would like to manage which VPP Token
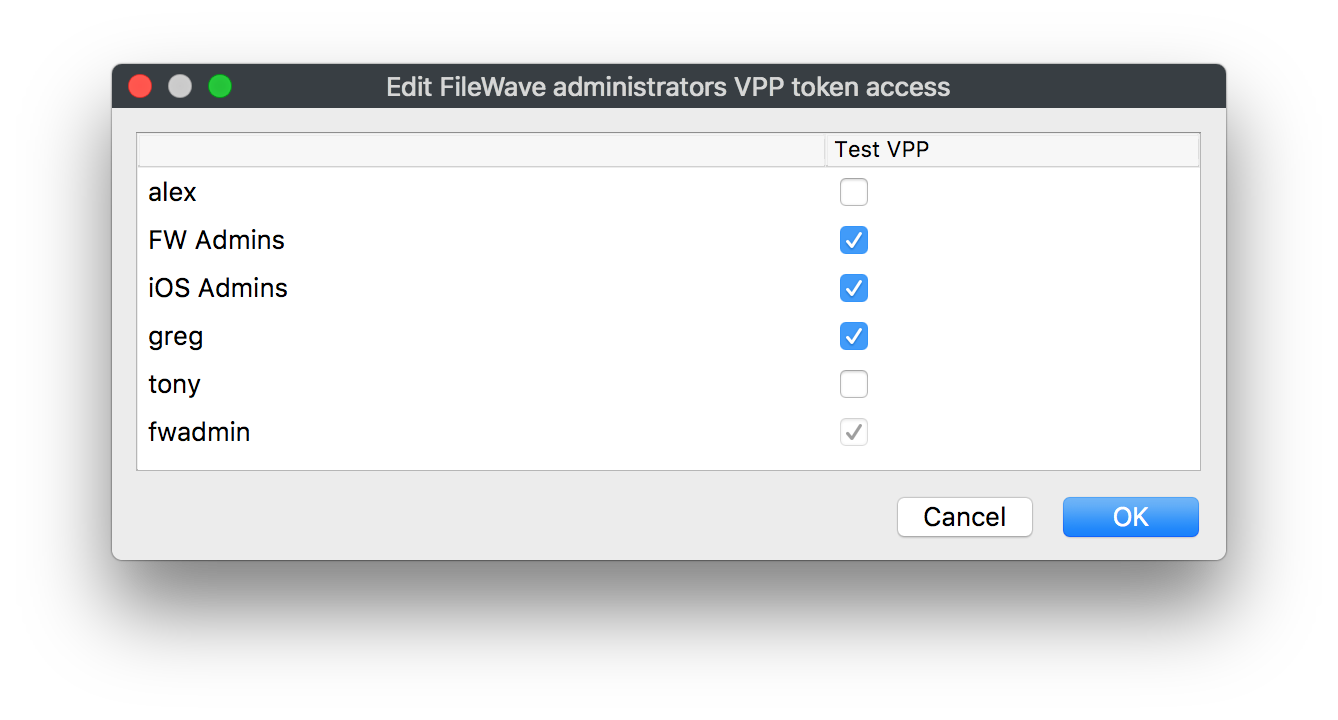
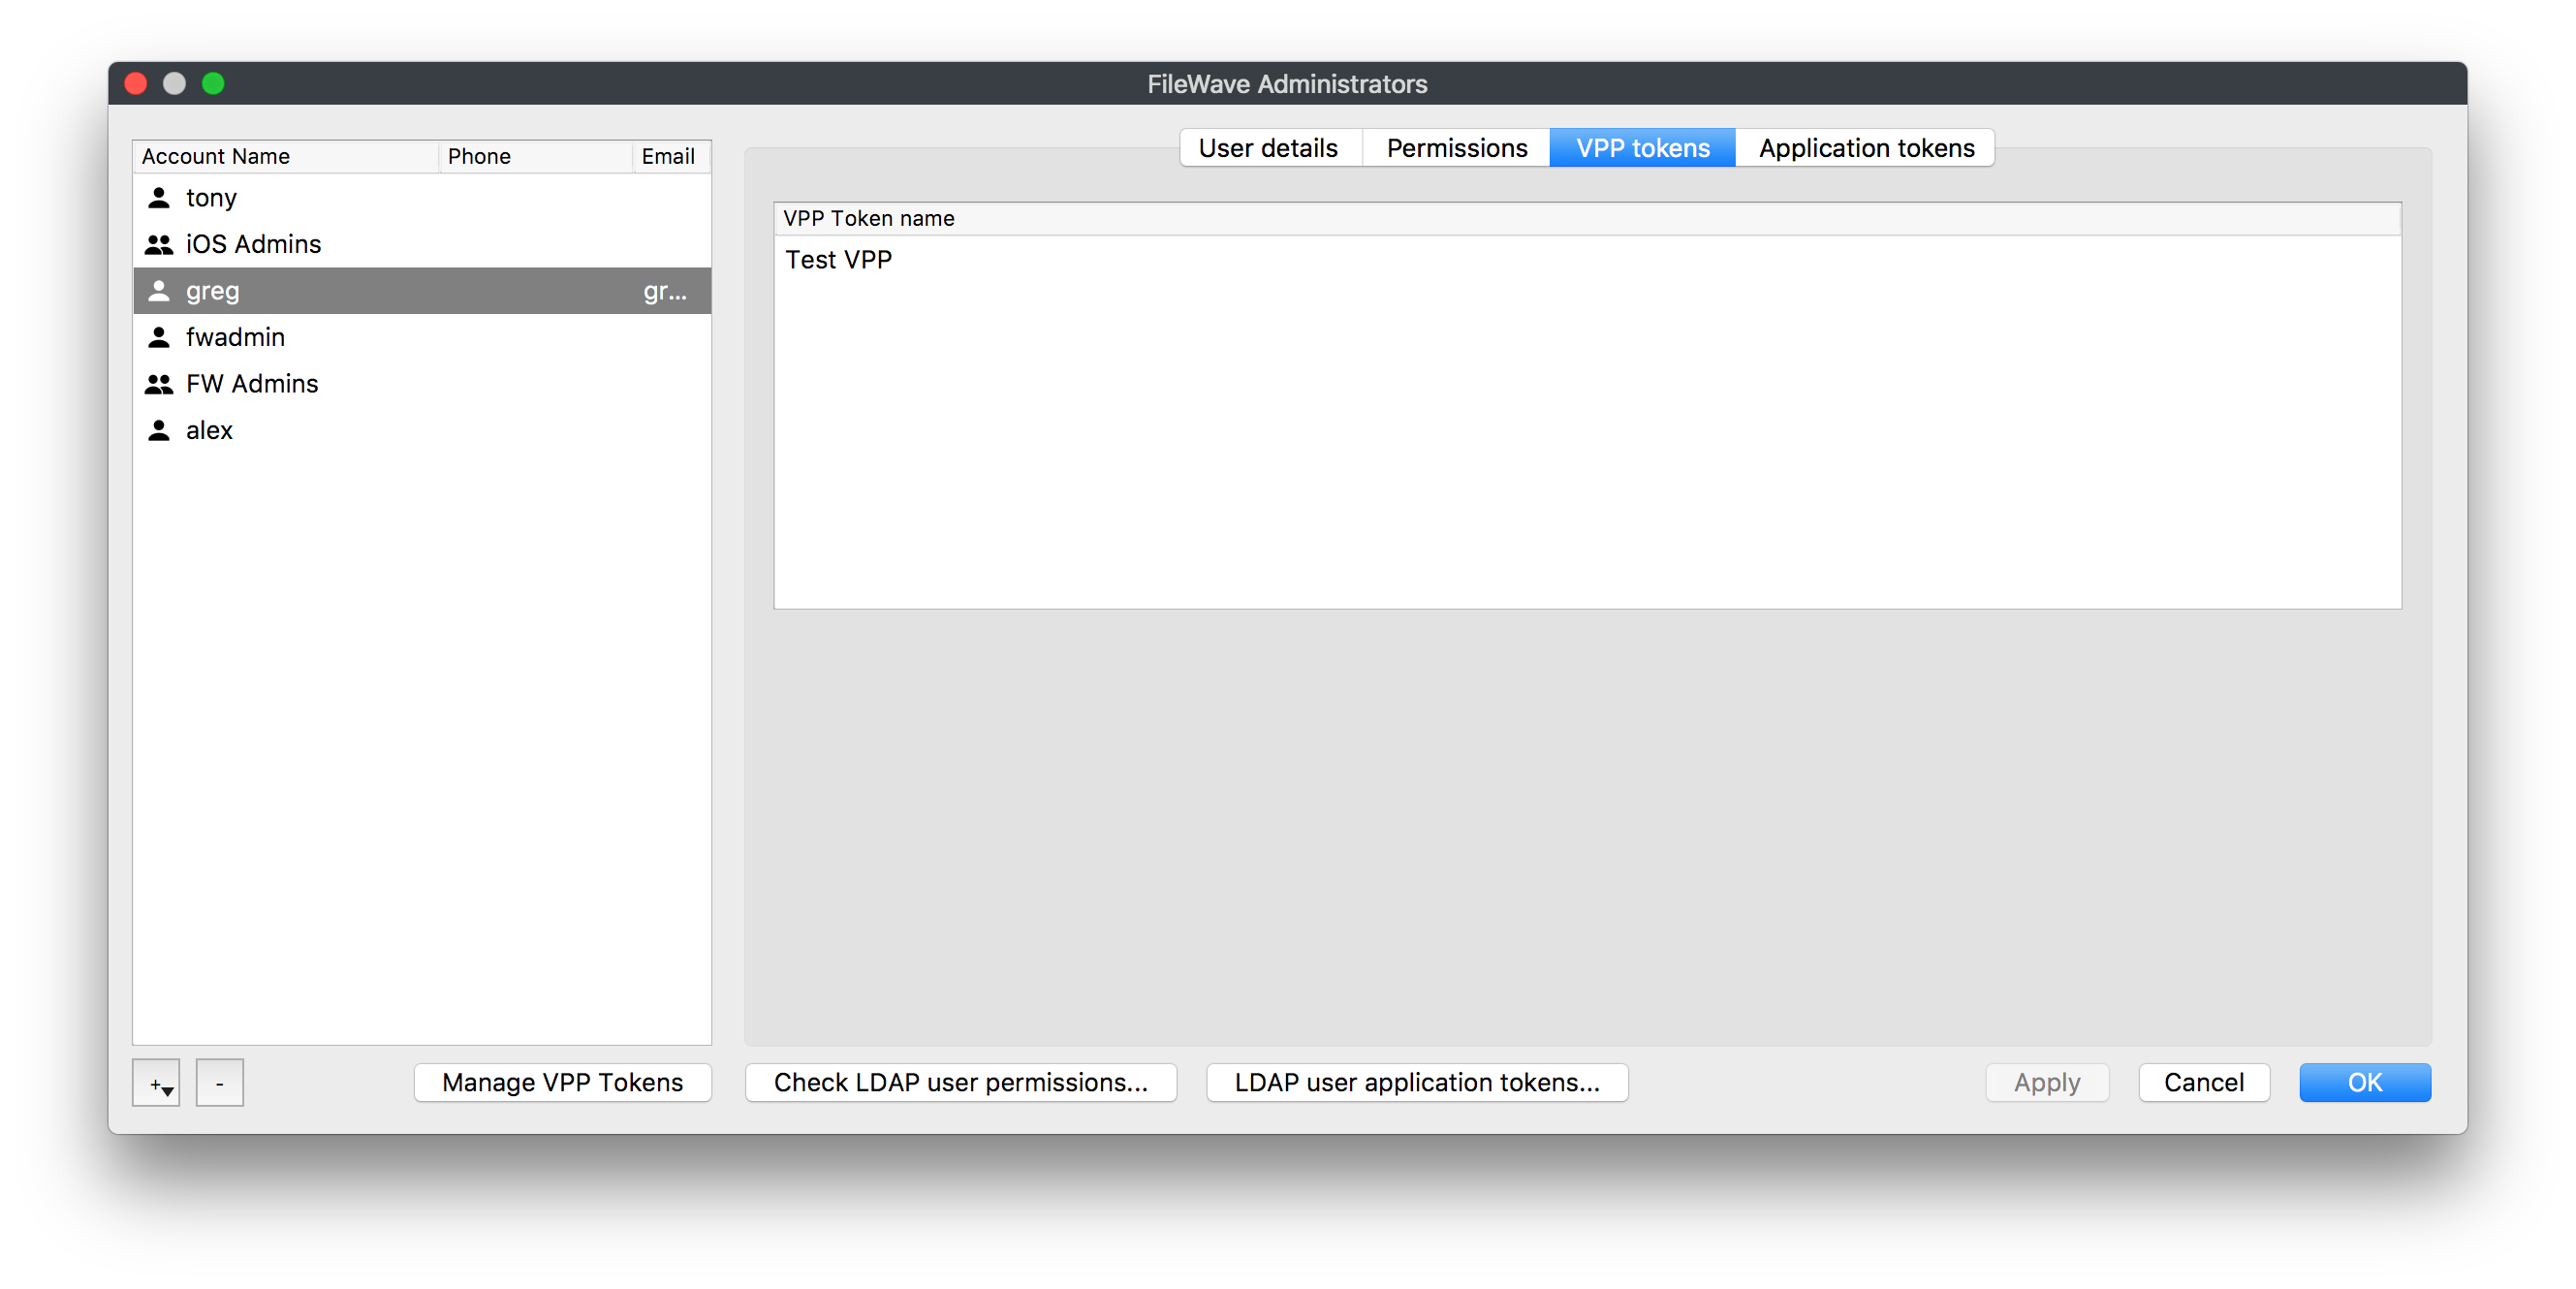
- Once you click OK you will be able to view which tokens a specific user has access to by looking in the VPP tokens tab
No comments to display
In the "What are all the permissions you can choose from?" section, there are two sets of permissions that are missing.
Otherwise, this KB was an unexpected, pleasant find! Much more detailed than I was expecting when I was searching! Thanks!
Hi Sean,
updated a new screen shot for the two sets of permissions that were missing.
No comments to display