Classroom – SIS Data
SIS Support
To know how to configure devices, FileWave needs to import SIS data; mainly person details and class organization.
We currently support:
- ASM import (AKA "roster API")
- CSV import
ASM data will be synchronized once every day (at midnight). You can force a refresh in Education settings of FileWave Admin Preferences.
Classroom
Classroom has import settings. The format for the CSV files is the same, but the syntax to import these is different
Importing CSV files for students, teachers, and classes for Classroom
SSH into the FileWave Server, then run the following commands as appropriate (note, the full path to python and django have to be specified):
/usr/local/filewave/python/bin/python /usr/local/filewave/django/manage.pyc sis_csv_data_import --teachers <full path to teachers.csv> [full|-incremental]
/usr/local/filewave/python/bin/python /usr/local/filewave/django/manage.pyc sis_csv_data_import --students <full path to students.csv> [full|-incremental]
/usr/local/filewave/python/bin/python /usr/local/filewave/django/manage.pyc sis_csv_data_import --classes <full path to classes.csv> [full|-incremental]
Required Data
Classroom is an application that allows teachers to use their iPads to manage student devices during a class. Classroom requires the devices to be configured by MDM; with the configuration defining:
For teacher devices:
- Which classes are lead by the teacher
- Which students are in the classes
- Which devices are used by those students
For student devices (1:1):
-
- Which device(s) are used by the student
- Which classes are attended by the student
-
- Which classes will use this cart (defined as a Group of devices used with Classroom, irrespective of whether they are in a physical cart).
- Which students will use this cart (because they are in the class)
This means that in order to configure Classroom, you need to know:
- Which devices you are managing
- SIS data, which tells you which students are in a class lead by which teacher
- A link between the device(s) and person(s):
- Either a direct link for 1:1 (teachers or for 1:1 students deployment model); or
- A link between a Group of devices ("a cart") to a Group of students ("a class")
Devices
Single devices
Any device already enrolled in FileWave can be used for Classroom. However, at times it may be useful to prepare your deployment system upfront, before devices are actually enrolled. This is more important in a 1:1 deployment model where you want to have your students unboxing and enrolling devices with their own usernames, but you don't want to wait hours (or days) until all VPP licenses finally land to the device.
FileWave 11.1+ allows the creation of placeholders for iOS devices and preparation of your deployment workflow as well as your classroom settings before real enrollment occurs:
- Any iOS device in a DEP account can be imported as placeholder (if not enrolled yet)
- You can import a CSV file based on serial number for non-DEP devices.
Carts
Classroom support introduces concept of Carts, which are nothing more than a special Group of iOS devices. These apply to the term Cart:
- A Cart contains only Clones of iOS devices.
- A device can have a Clone in one and only one Cart.
- You can create a Cart by clicking on the toolbar icon.
- You can add a device to a cart by right-clicking on an iOS device and select "Add to Cart" or by drag-and-drop. Note: this will move any existing Clone currently in another Cart into the target Cart.
Define how persons are using devices
You need to tell FileWave who will be using which device. This can be:
- A direct 1:1 association for teachers
- A direct 1:1 association for students in a 1:1 deployment model
- An association between Group of devices (cart) and Group of students (class)
- Import a CSV file for 1:1 associations
- Import a CSV file for cart:class associations

- Authentication for 1:1 with LDAP
You can configure FileWave to automatically associate a device to a person using the enrollment auth username. Upon enrollment, FileWave can then look into SIS data and if there is a person having the same identifier in your SIS data, then the auth username link will be made. This can be enabled in Classroom preferences.
- Manually via drag-and-drop
In order to import CSV files, you have to first specify that you will be using CSV files using the SIS pane of the Education settings of FileWave Admin Preferences, by clicking on the "Edit Settings…" button, authenticating as the super user (fwadmin), as shown on the next page.

The import dialog should default to "None / CSV" in the selection box of "SIS data source."
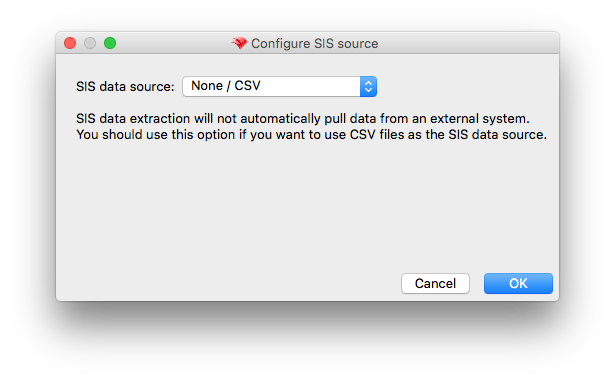
If not, select that option.
You then need to enable Classroom support in FileWave Admin by selecting the following checkbox in the "Apple Classroom" pane the Education tab of FileWave Admin Preferences.

Classroom security relies on SSL Certificates, which will be deployed on each device. FileWave has to create those certificates prior to configuring Classroom. The first time you enable Classroom, you'll then be prompted to generate those certificates:

You'll then be able to save the main CA (certificate authority) private key - you'll need it if you want to revoke / renew certificates. (You also need super user credentials for that):

You will then be warned that the Private Key will not be stored within FileWave. It is your responsibility to maintain a copy of this in a safe location. Be sure to note where you are saving this so that you can put is somewhere safe. Also note that the file will be named "FileWave Classroom Private Key.key."
Note: If you have Keynote installed on your admin machine, the icon for this file will be a Keynote deck icon!
The dialog will display the certificates in a tree structure, where the root CA certificate is the top level item in the tree. The serial number and the expiry date of each certificate are also displayed. Certificates that will expire in less than one month are displayed with a yellow background, while expired certificates are displayed with red letters. You can sort by any column and filter certificates by typing some criteria in the search box and pressing Enter.
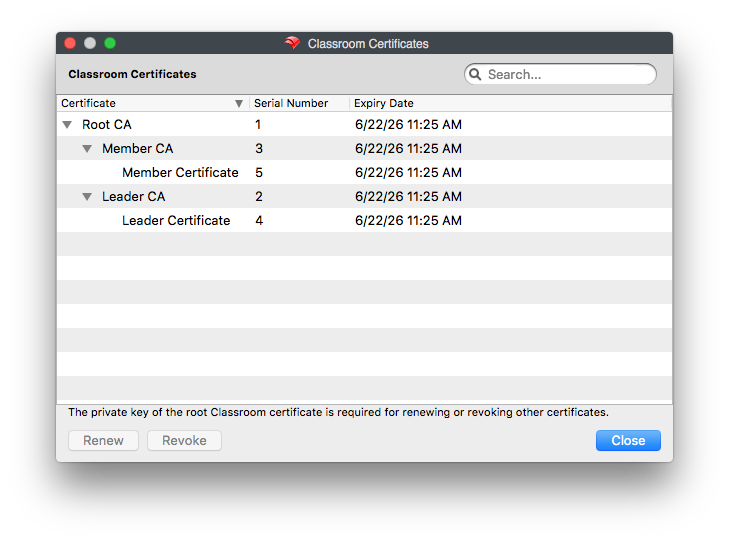
You can renew and revoke any certificates. In order to do so, select one or more certificates. The view supports multiple selection by holding the Ctrl key (Command or ⌘ on Mac) and clicking entries. You can then either right-click to get a contextual menu or use the corresponding buttons on the lower left corner of the dialog. When revoking a certificate, all its child certificates will also be revoked. The certificate and its child certificates will be renewed automatically right after revocation.
You don't need the private key for renewing or revoking leader or member certificates. However, renewing/revoking any intermediate CAs requires the private key of the Root CA that was generated before. The first time you renew or revoke an intermediate CA certificate, you will be asked to open the private key. It will be remembered for the duration of the dialog, so you won't need to open it again for any subsequent operations on CA certificates, unless an operation fails. If you close the dialog and open it again later, you will need to provide the private key again for renewing/revoking CA certificates.
Although not recommended, it is possible to revoke the root CA without providing the private key by clicking "Cancel" in the file dialog to open the private key. This is useful for example in case you lose the private key. After revoking the root CA, the whole certificate tree will be regenerated automatically.
After getting the certificates taken care of and storing your Private Key, clicking OK in the Preferences will result in the main window of FileWave Admin having a new category listed in the left-hand column labeled "Classroom."
CSV File Formats
The Entities supported
Before importing your mappings for Person:Device and Cart:Class associations, you first have to get Teacher, Student, Class data into the database, which you can do through the use of CSV files. There are three different entities for which you can import/update instances in the DB. Here they are with the supported fields you can specify in the CSV files:
Students:
-
- username (ID, required): username used for logging in.
- password: password used for authentication
- first_name
- last_name
- district_id
- school_id
- birth_date (ISO encoded date)
- grade
- managed_apple_id
Teachers
-
- username (ID, required): username used for logging in.
- password: password used for authentication
- first_name
- last_name
- district_id
- school_id
- title
- managed_apple_id
Classes:
-
- class_id (ID, required)
- teachers: a '|' (pipe) - separated list of teachers' usernames
- district_id
- school_id
- name
- description
- grade
- start_date
- end_date
- students: a '|' (pipe) - separated list of students' usernames
To import the CSV file, change your path to:
/usr/local/filewave/Django/ (on Mac or Linux)
then run this command:
/usr/local/filewave/python/bin/python manage.pyc sis_csv_data_import -classes <path to classes.csv> --teachers <path to teachers.csv> --students <path to students.csv> [-full|–incremental]Note: This is a single command without carriage returns at the end of the line.
Where:
- <path to classes.csv> gives the path to the CSV file that defines the classes to import
- <path to teachers.csv> gives the path to the CSV file that defines the teachers to import
- <path to students.csv> gives the path to the CSV file that defines the students to import
- --full or --incremental (default is --full): The full sync is handled so that a record that is in the DB but not in the file is marked as inactive (for later deletion). An incremental sync on the other hand is just updating or inserting records without touching the ones that are not referenced.
It's possible also to specify only one file
CSV Structure
Each file is a CSV with a header. In the header you have to specify which fields you want to insert/update for each of the records. Each entity type has a field that uniquely identifies it (see entity description for detailed info).
When a CSV file is imported, we try to find the corresponding record in the DB with that identifier. If we can we update the fields that are specified in the file (and leave the other fields as they were before).
The new "Classroom" view is not enabled by default. We do not want to have this showing for all customers unless they are using Classroom.
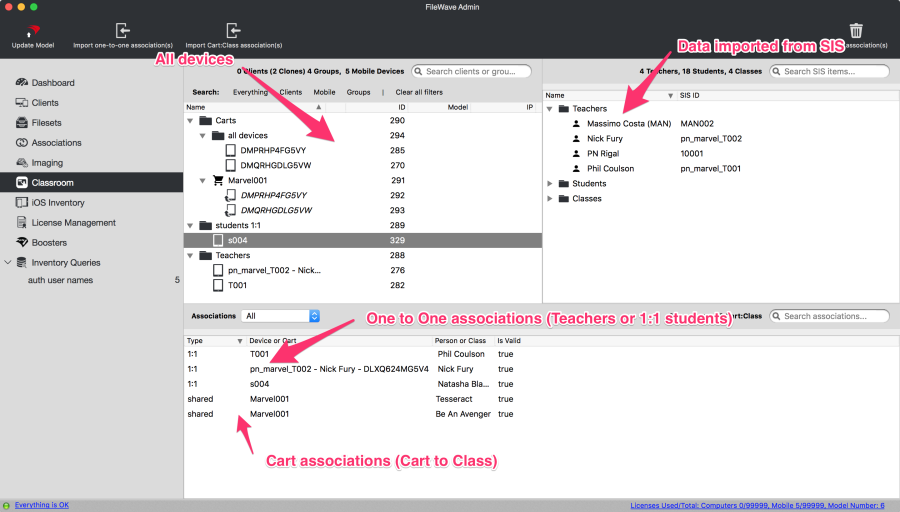
From the Classroom view you can:
- Import One-to-One or Cart associations CSV files
- Change associations via drag and drop:
- Drop one device to a single person for 1:1
- Drop one person to a single device for 1:1
- Drop a cart to a class for shared iPad model
- Drop a class to a cart
- See the current association state
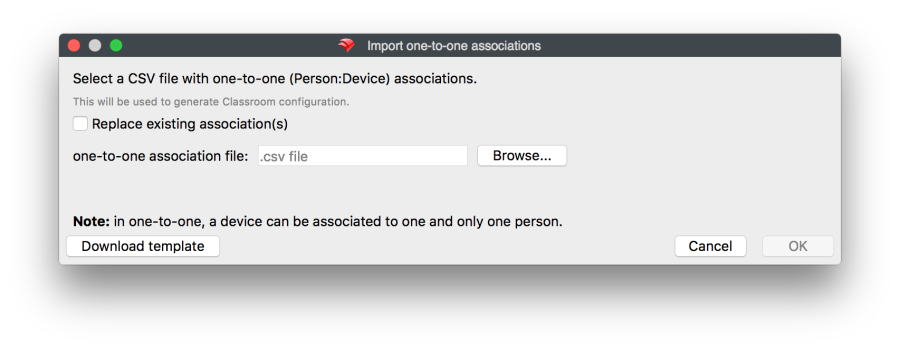
Clicking on "Import one-to-one association(s)" results in this dialog box:

Note the "Download template" button, which produces a CSV file that is commented to make it easy for you to produce files in the proper format.
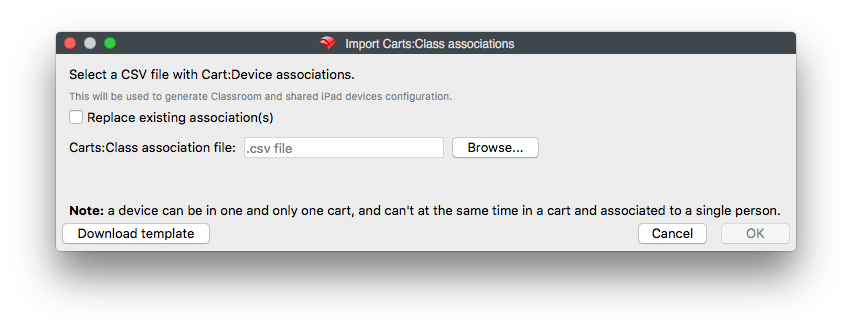
Clicking on the "Import Cart:Class association(s)" button results in this dialog box, which also has a "Download template" button:
Once the import is successfully done, you will receive a prompt asking if you want to re-generate the Education Profiles. In cases where you are importing both 1:1 associations and carts mappings, the suggested workflow is to generate the Profiles only after the second import.
Cart CSV File
You can also produce the Cart:Device associations via CSV import. The file format needs to contain three columns:
- cart_name: identifier of the cart
- devices: list of serial_numbers separated by pipe "|"
- classes: list of class identifiers separated by pipe "|"
This is an example
cart_name,devices,classes
cart-1,SN-1|SN-2|SN-3,class-1|class-2
cart-2,SN-4|SN-5,class-2
Notes:
- In incremental mode is possible to omit the devices or the classes column.
- So this file updates only the list of the classes:
cart_name,classes
cart-1,class-1|class-2
cart-2,class-2
- And this file updates only the list of devices belonging to the carts
cart_name,devices
cart-1,SN-1|SN-2|SN-3
- A device can belong only to one cart. If the same serial number is listed multiple times, the last assignment will be the final one
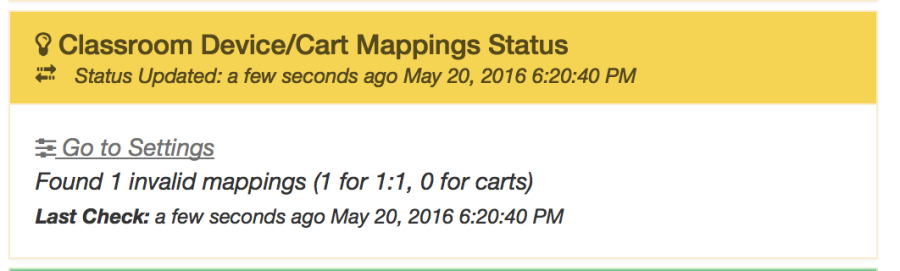
Mappings Validity
To validate the mappings (1:1 or cart/class) the code applies the following rules:
- Rule #0: a mapping is invalid if the related item does not exist
- Rule #1: Devices in cart cannot have 1:1 mapping
- Rule #2: A 1:1 device can have only 1 mapping
- Rule #3: Teachers can have multiple 1:1 devices assigned
- Rule #4: Students can have only 1:1 mapping and use cart devices
Each time the check is performed a mapping is validated only if it is compliant with all the rules, otherwise it will be marked as invalid.
Invalid mappings are not taken in account for Education Profile generation
Information about invalid mappings are shown in the Dashboard
No comments to display
No comments to display