Getting student images into Classroom
Do you want student images to show up in Apple's Classroom tool? You have come to the right place.
Overview
- Images
- Large and small format of each student's image
- Properly named
- %user_identifier% = SIS/Student ID
- %size% = large or small
- Web server to host images
- Some form of security
- Enter the URL into FileWave Admin Preferences
Images
Many photography companies will name and resize images to whatever you need. Try contacting them before spending too much time creating perfect images.
It might also be work checking out how you SIS and/or Library checkout system store and share images, you may just be able to share that folder.
Image Name
Student image files have three requirements.
- %user_identifier% = SIS/Student ID
- %size% = large or small
- extension = png or jpg
%user_identifier%
If I was looking at ASM (Apple School Manager), and my students were showing with IDs like S0001, S0002 etc.
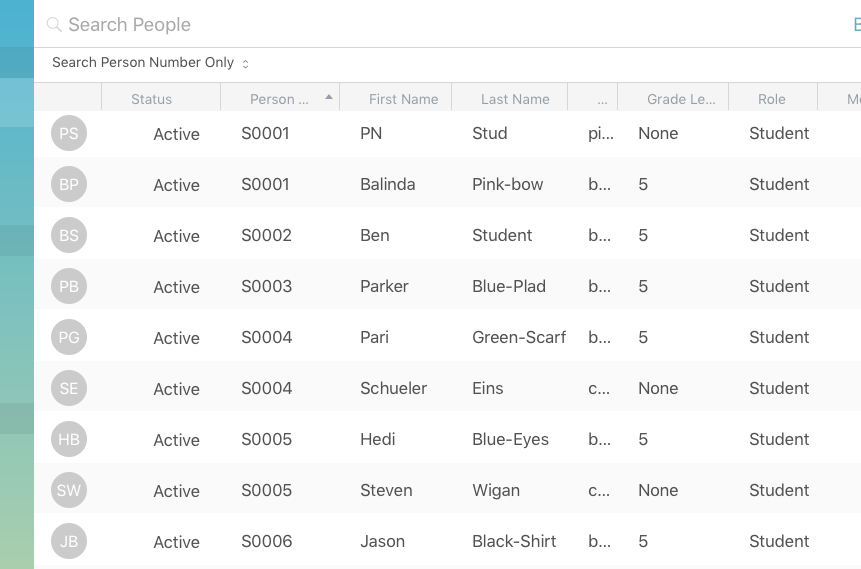
Then I would know that S0001 should be used for %user_identifier%
Be Careful: Apple School Manager lists "Person Number" and "Person ID" and you want to use "Person Number" when naming the images
%size%
As of the writing of this document, Apple has specified small and large versions of images are needed, but not the size.
FileWave's recommendation regarding image size are:
Small: 675x1024 pixels
Large: 2700x4100 pixels
Test a few before deploying hundreds of images to ensure that these sizes work well with your student devices.
Web Server
There are two main ways to list and share images (with some minor variation)
- A web server with a directory(folder) of student images
- A web server running some scripts (like python, java)
We will only talk about option one here, if you are advanced enough to program option two, you probably don't need FileWave's help.
What if I don't know which one to do?
If you don't know which one is best or you can do. A directory of images is by far the easiest. But always feel free to contact support with further questions and help.
Directory
In this setup you typically have a flat structure (meaning images are not in folders, just one folder will all student images in it), and would look something like:
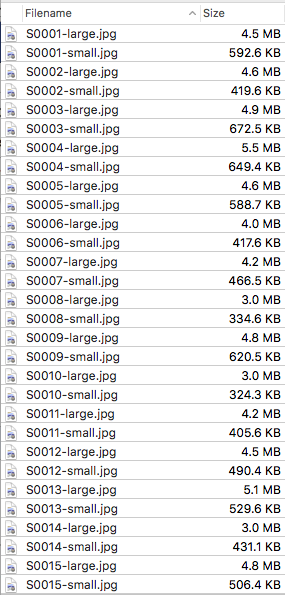
Setup for your web server will vary depending on which one you selected. But if you can navigate via a browser to a URL simular to
https://fwusa.filewave.com/images/stu/S0001-small.jpg
Then you are ready to move on
Security
Student images are personally identifiable pieces of information and are important to maintain privacy. You will want to give reasonable assurance that you have done your best to prevent these images being released into the wild.
Below could be considered minimum recommendation, but always make things as secure as you can.
Setup will vary depending on the web server selected, so please refer to best practice or hardening guides of the respective server solution.
Internal only
This web server should not be accessable from outside your network. So using the main district web server, a computer sitting in a Firewall's DMZ or a hosted server are all insecure solutions.
You could start up a virtual machine running a free linux OS, enable server.app's webserver on an macOS computer, or use windows. Whichever you do, use something that will always have the same IP/domain name, and is always running.
HTTPS
These days there are few excuses for not doing https. Certificates are cheap or free, and using a secure connections helps prevent data interception from source to destination. Just do https (Port 443/TCP), and even disable http (Port 80/TCP)
Password Protected
Many web servers can enable password protection for a whole site or even just a section of a site. If using apache an .htaccess file simular to this:
AuthType Basic
AuthName "Protected Student pictures"
AuthBasicProvider file
AuthUserFile /var/www/.htpasswd
Require valid-user
Can be placed inside the student images folder to password protect it.
(see https://httpd.apache.org/docs/current/howto/htaccess.html for more info on apache .htaccess files including setup and use)
And a user can be created by something like:
htpasswd -c /var/www/.htpasswd picture_user
Note: that the password file is the same /var/www/.htpasswd in both .htaccess and htpasswd (see https://httpd.apache.org/docs/current/programs/htpasswd.html for usage).
Constructing the URL for Admin Preferences
If we were able to access the images via browser at a URL like
https://fwusa.filewave.com/images/stu/S0001-small.jpg
Then we can use that as our template
https://fwusa.filewave.com/images/stu/S0001-small.jpg

Would become:
https://fwusa.filewave.com/images/stu/%user_identifier%-%size%.jpg
Note how the - needed to stay in the URL, and that it was an https server.

No comments to display
No comments to display