IdP Setup: Google
What
Before we can use Google for authentication from FileWave, we must configure Google Workspace and give FileWave access to it. The whole purpose of this configuration is to give FileWave permissions to talk to your Google environment.
When/Why
This configuration is required if you want to use Google for authentication during device enrollment or during login to the FileWave Web and Native administrator consoles.
How
The configuration for access is all driven through Google Workspace.
Introduction
Setting up Google as IdP in Filewave means that we want to support users to log in with their Google account. We also want to allow Filewave services to query Google Workspace account users and groups.
In order to use Google as IdP and configure it inside Filewave, one has to obtain the following credentials from Google.
- Client ID
- Client secret
- Service key (JSON file)
- Service account
The process on how to obtain these is described below.
|
To complete the steps below, one has to be logged in to a Google account and be a super administrator of the Google Workspace domain (more info) |
Required Items
- Google Domain
- Admin rights within the Google Domain
- Pre-existing Google Organizational Unit structure (RECOMMENDED)
- Running FileWave Server
- GCM Setup - Google Cloud Messaging (GCM/Firebase) Setup
- FileWave HTTPS Root Trusted Certificate setup.
|
NOTE: CANNOT be IP Address or self-signed cert. Must be FQDN - Instructions Linked Here |
Domain verification
Google's API access to user's data may need to be reviewed and verified once setup is complete. For information please review, Google's OAuth API verification documentation.
Client ID and client secret (Google)
Below is an excerpt on how to obtain a Client ID and client secret. For a more detailed tutorial and additional information, check the documentation.
|
Step |
Example screenshot |
|
(Step 1) - Navigate to https://console.cloud.google.com/apis/credentials |
/ |
|
(Step 2) - Click on "Create credentials" |
|
|
(Step 3) - Choose "OAuth client ID" |
|
|
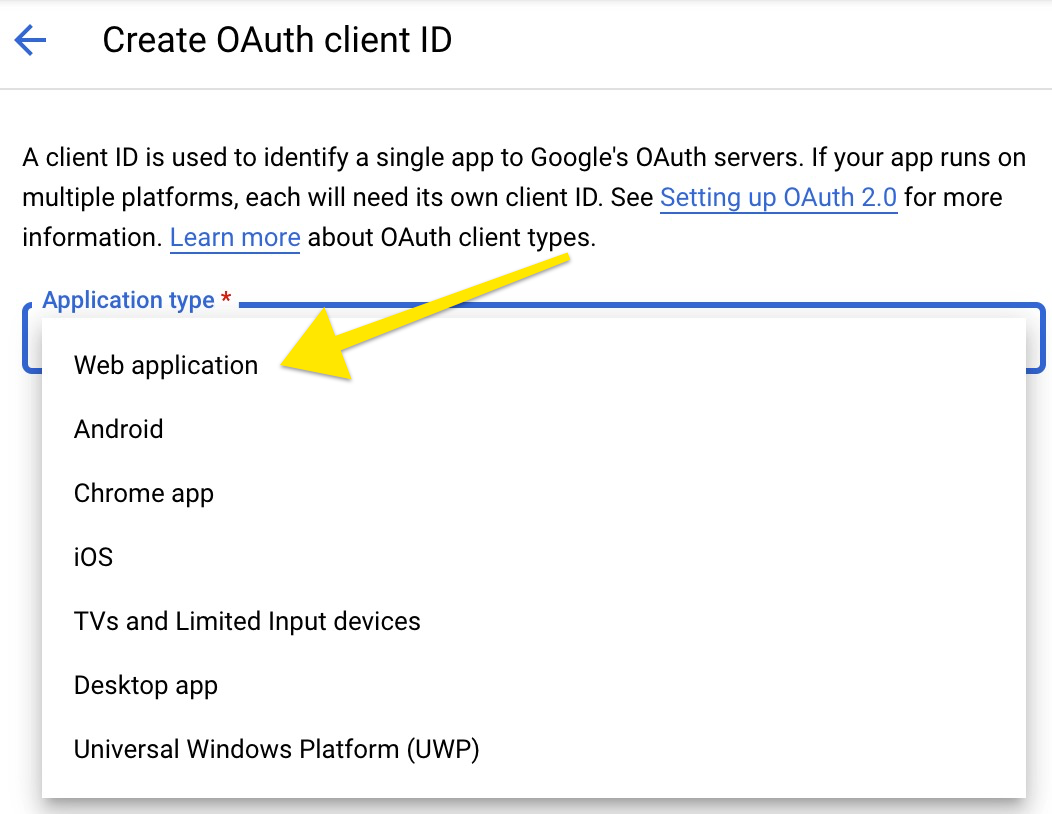
(Step 4) - In the next screen, choose "Web application" |
|
|
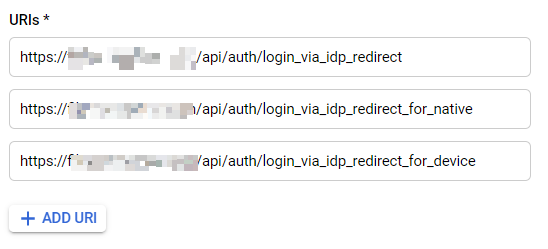
(Step 5) - In the configuration screen we need to name our OAuth client name and input correct Authorized redirect URIs.
PLEASE NOTE: Replace "filewave.server.com" with the correct URL of your server instance.
URL 1: URL 2: URL 3:
|
|
|
(Step 6) - Click CREATE, and your Client ID and Client secret will be generated. Please save them for later, as they are needed when configuring the FileWave server later on. Please note the message in grey about the OAuth access being restricted. You may also see a different message indicating that the consent screen needs to be verified. Click on the link in that grey text and ensure that the publishing status is In Production and that the User Type is External. |
|


Creating a service account (Google)
To support server-to-server interactions, first create a service account for your project in the API Console. - Google documentation
|
Step |
Example screenshot |
|
(Step 7) - Navigate to https://console.cloud.google.com/apis/credentials |
/ |
|
(Step 8) - Click on "Create credentials" |
|
|
(Step 9) - Choose "Service account" |
|
|
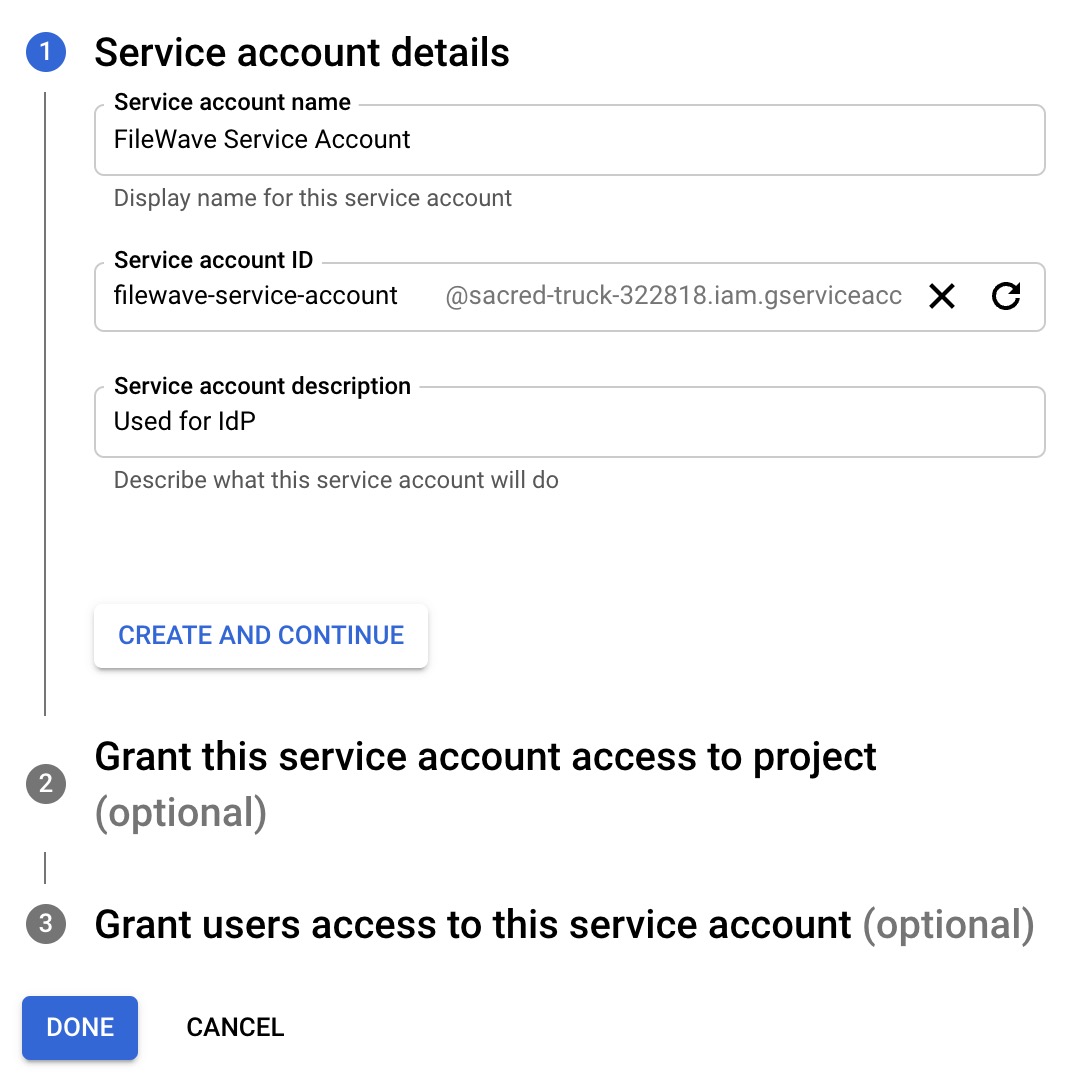
(Step 10) - Input required details and click "DONE". NOTE Skip optional steps 2 and 3, we will take care of it later. |
|
|
(Step 11) - Newly created service account should now be visible in the list of service accounts. (it might take few minutes) |
|
|
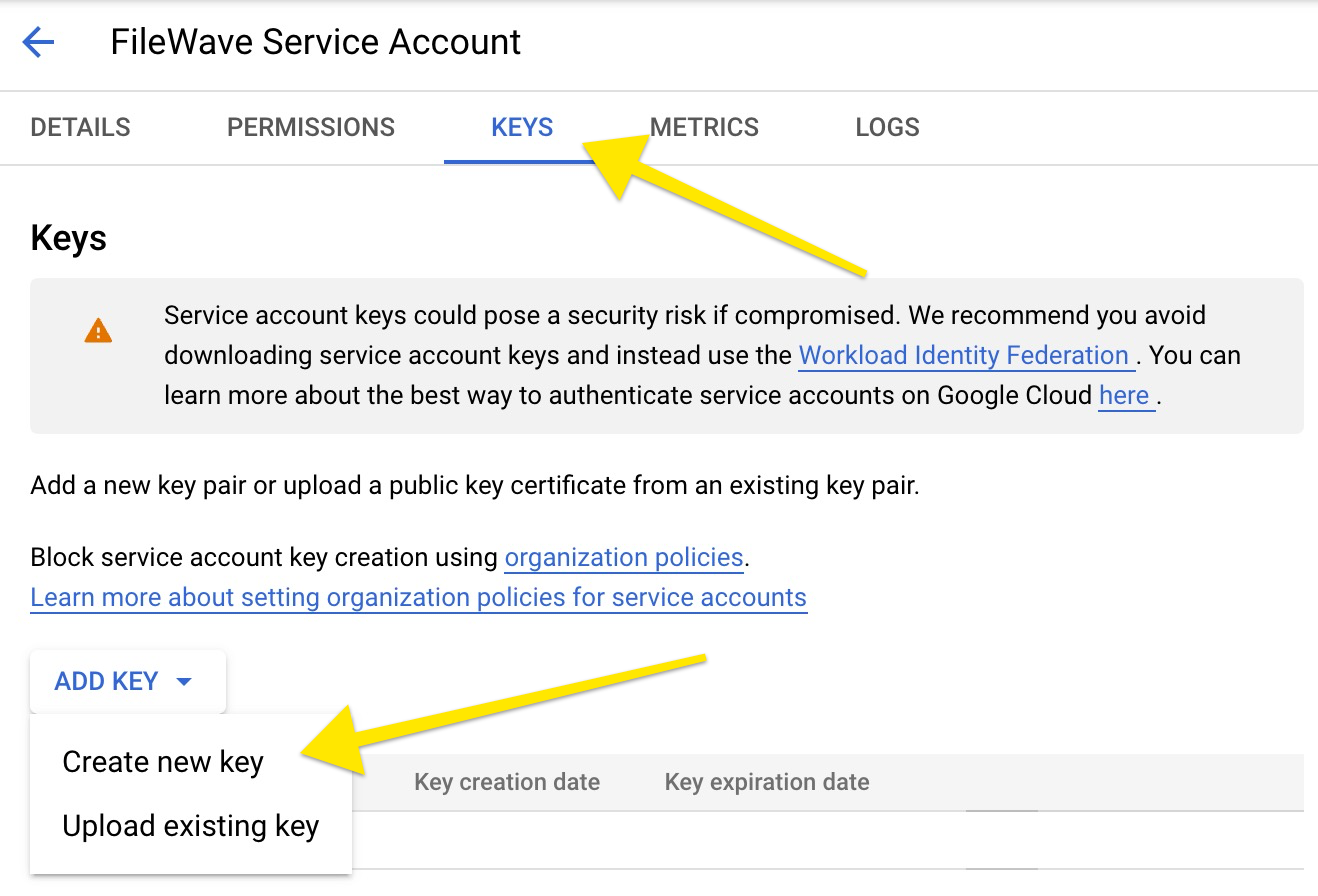
(Step 12) - To create a service key under a newly created service account, click on the service account name (step above), select the 'KEYS' tab, and click on "Add key". |
|
|
(Step 13) - Click on "Create new key", select JSON type and click "Create". |
|
|
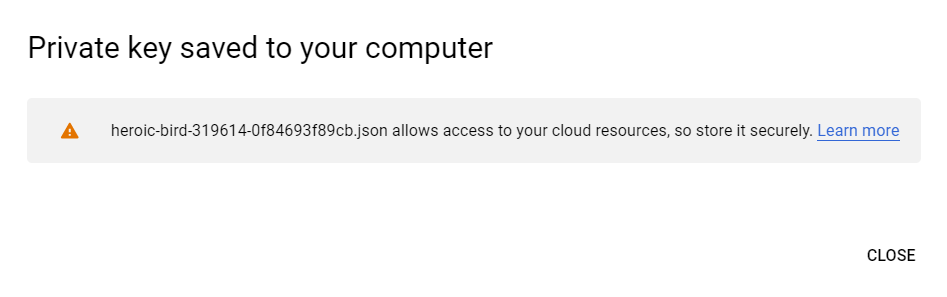
(Step 14) - Service key is now downloading to your computer. Save it, as it's needed in further configuration. |
|


Configure Domain-Wide Delegation
If you want to access user data for users in your Google Workspace account, then delegate domain-wide access to the service account. - Google documentation
|
Step |
Screenshot |
|
(Step 15) - Navigate to https://console.cloud.google.com/apis/credentials |
|
|
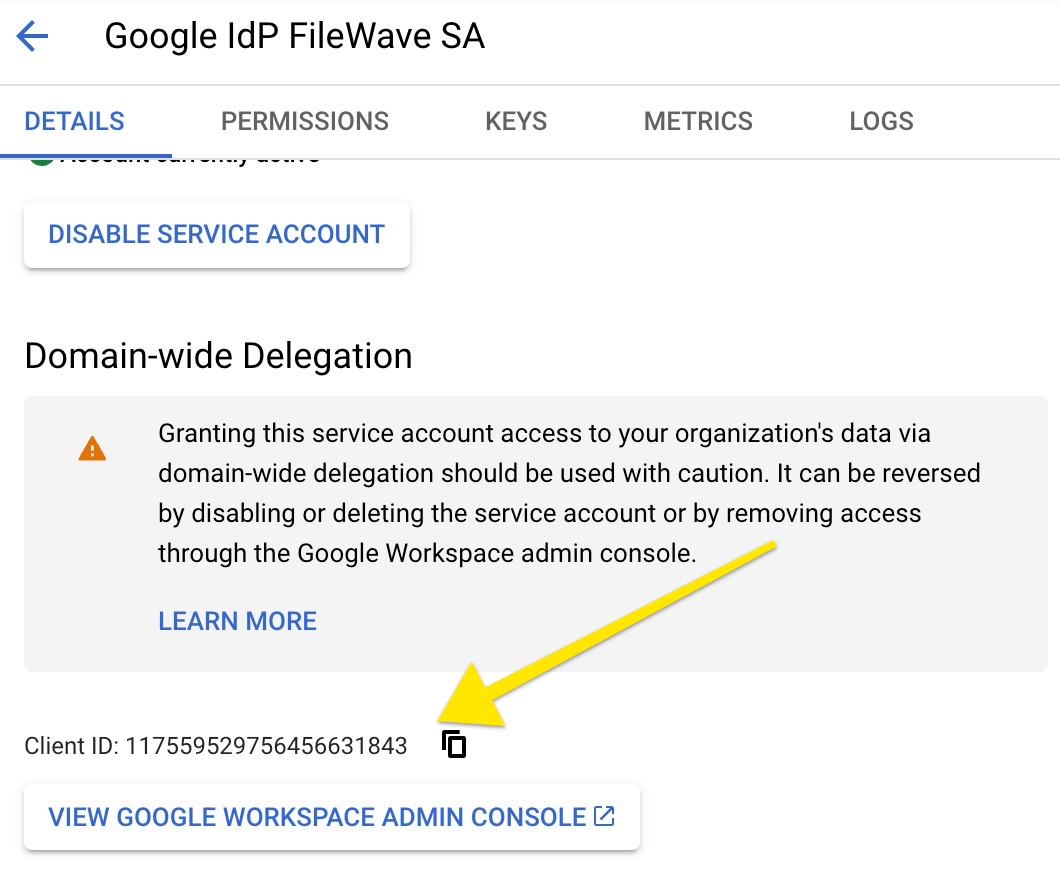
(Step 16) - Open newly created service account details, by clicking on the service account name. Click SHOW ADVANCED SETTINGS. Save Client ID as it will be used later on.. |
|
|
(Step 17) - Navigate to https://admin.google.com/ac/owl/domainwidedelegation |
|
|
(Step 18) - Click on "Add New" to create a new domain delegation. NOTE You will need super administrator permissions for this step. |
|
|
(Step 19) - In the Client ID, put in the Client ID from step 16. In the OAuth scopes, put in the following. https://www.googleapis.com/auth/admin.directory.user.readonly, |
|


Service account and permissions
|
Step |
Screenshot |
|
(Step 20) - The next to last piece is setting up a service account. A service account is a user, that is going to be used in order to access resources. In order to add a user to a service account, navigate to https://console.cloud.google.com/apis/credentials and then click the service account you created, click on the Permissions tab, and add a user you'd like to use for accessing Google Workspace resources. NOTE Make sure the user has at least read access to the User and Group resource. |
|
|
The selected user's email becomes your service account token. |
Example "josh.levitsky@fwx.io" |

Configure Filewave server to use Google as IdP (Filewave)
|
Step |
Screenshot |
|
(Step 21) - The last piece of the puzzle is setting up Filewave to talk to Google. Navigate to https://filewave.server.com replacing the address with your FileWave server. Login as fwadmin to be sure you will have proper permissions to make the next changes. |
|
|
(Step 22) - Edit the Terms & Conditions to have appropriate text for your organization. This text is displayed when using an IdP to enroll devices. |
|
|
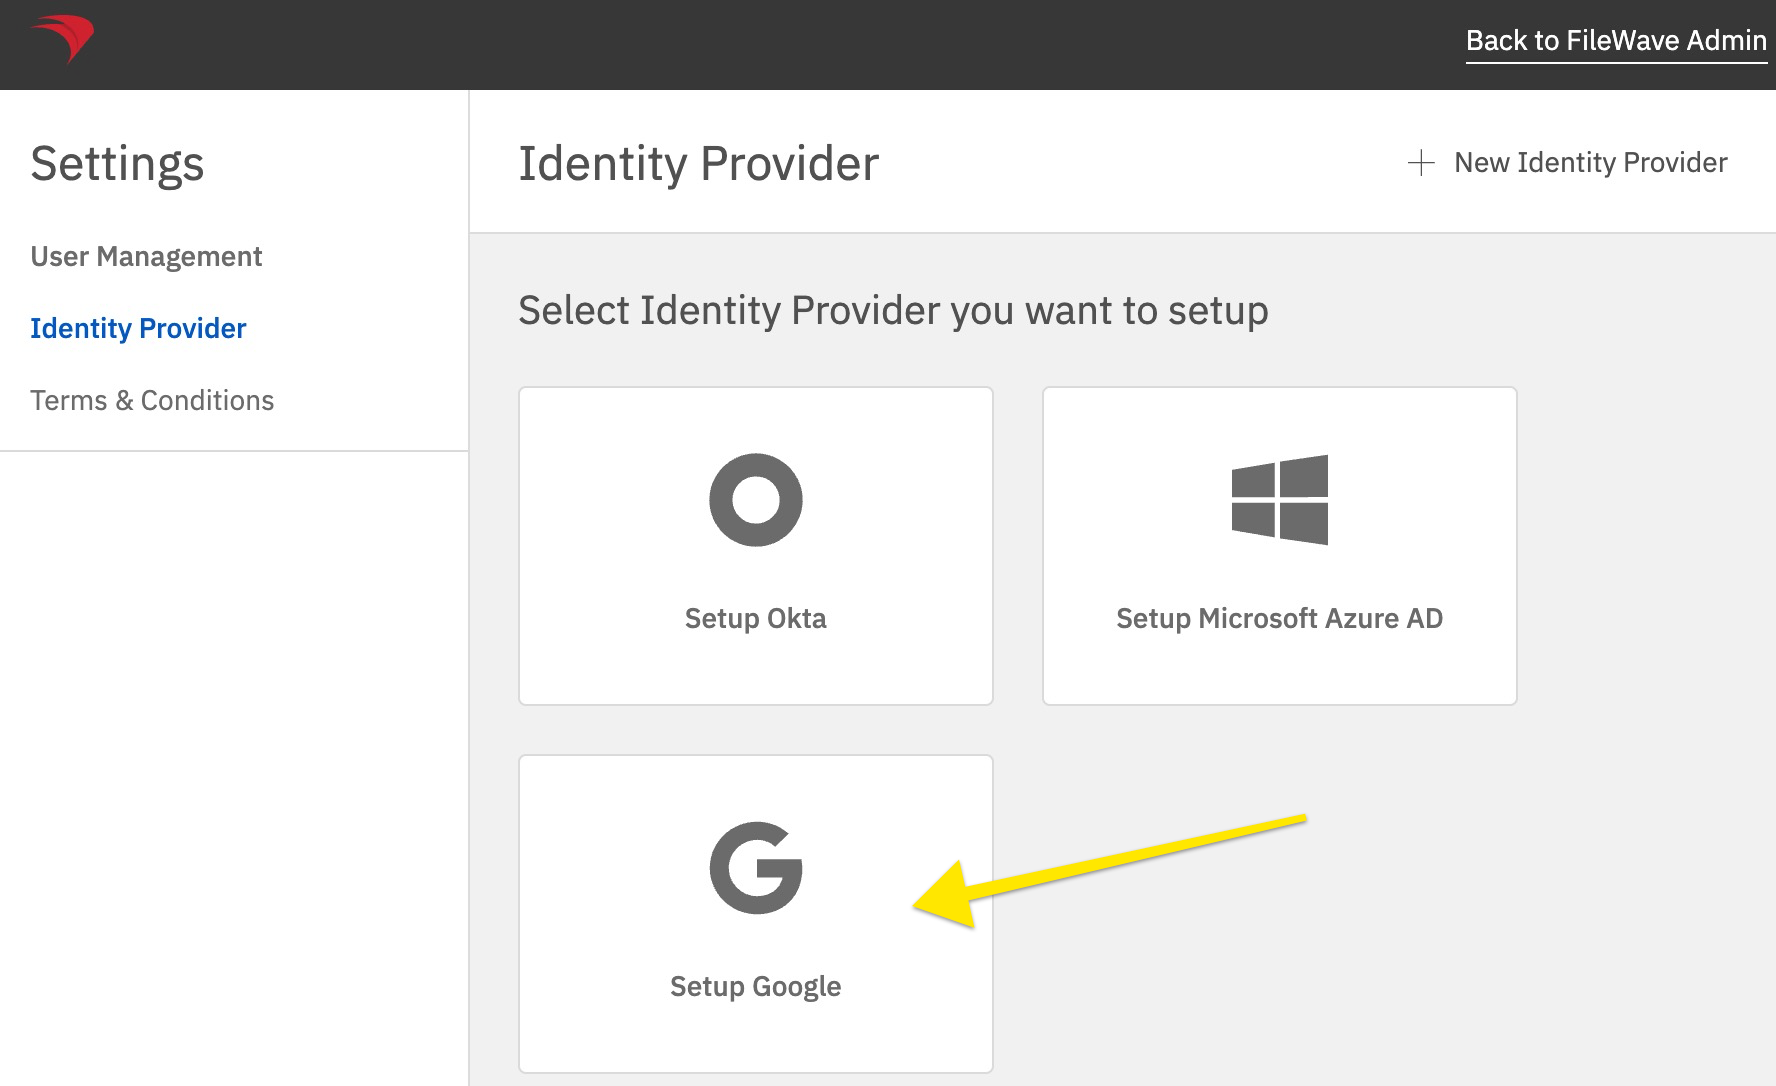
(Step 23) - Click Setup Google or if you already have another IdP setup then click New Identity Provider on the top right because this screen will look different. |
|
|
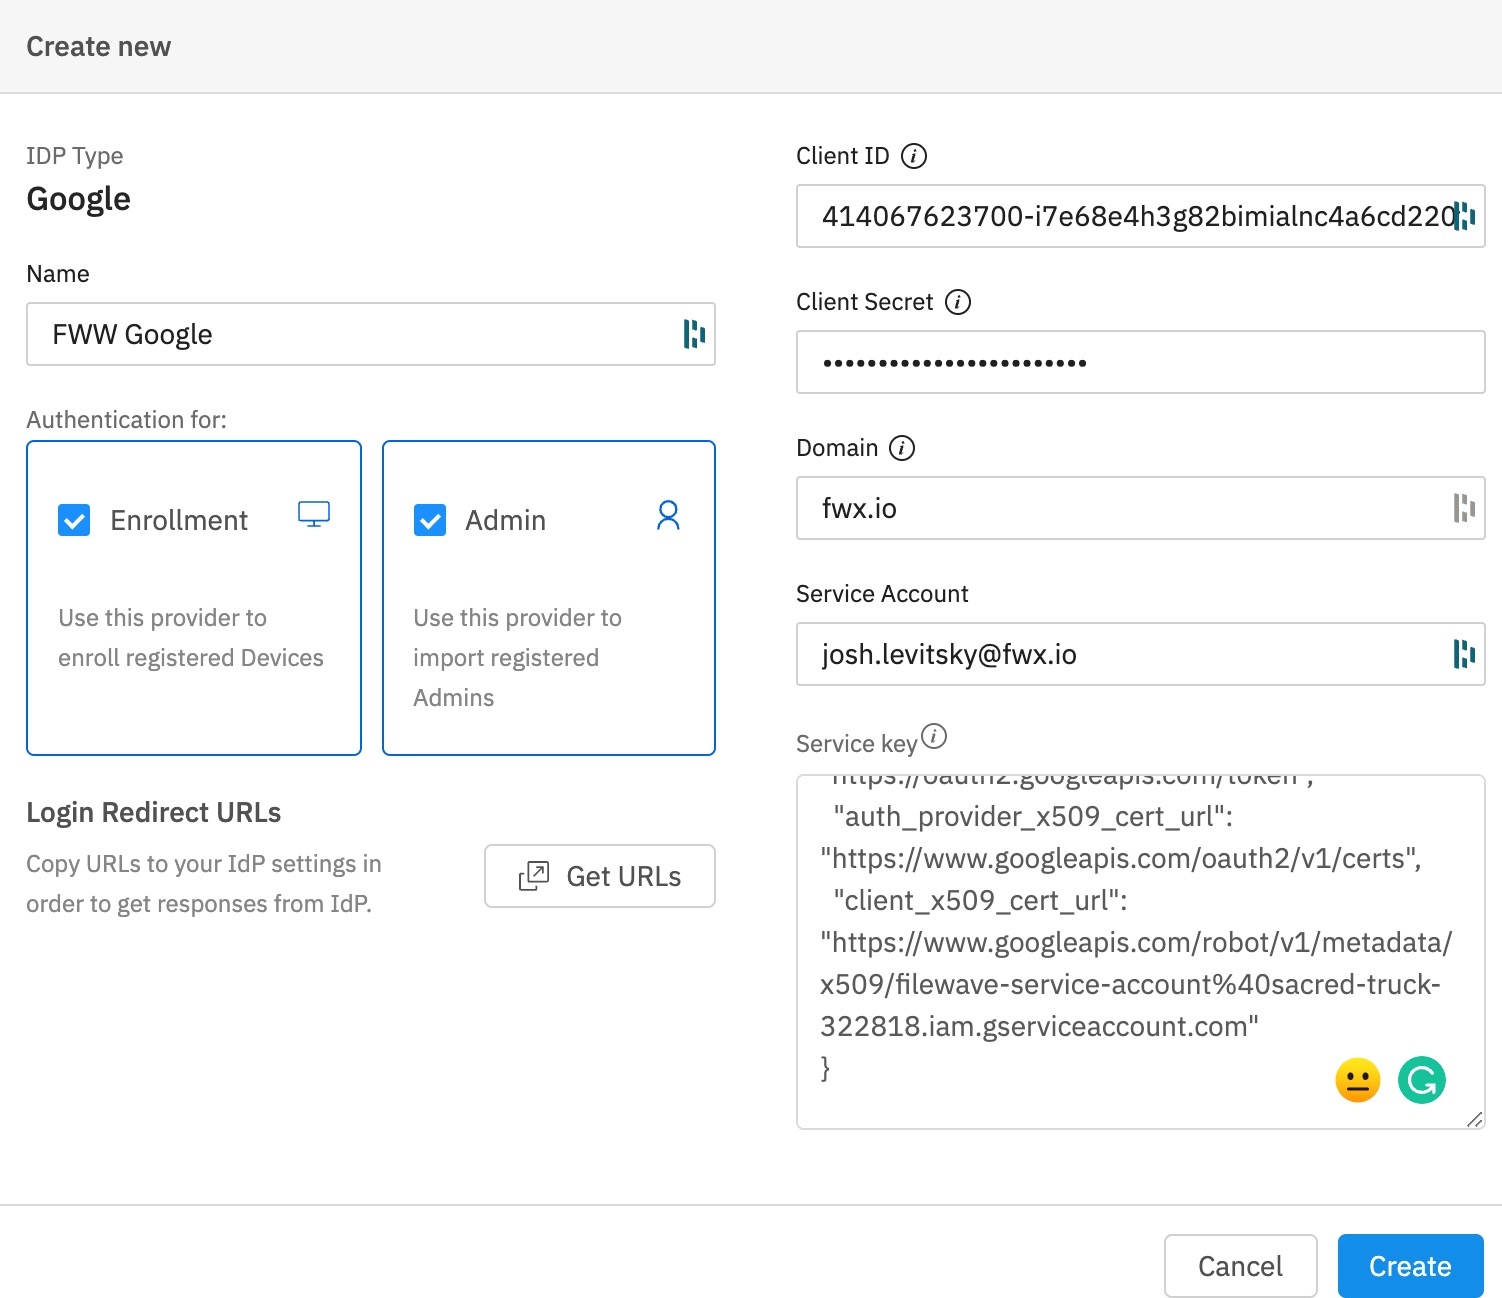
(Step 24) - This is where everything comes together. The Name is whatever you want to call this connection. Select if you want to use this for enrollment or for adding administrators or both.
Enrollment here if selected will be to prompt a user on macOS or iOS/iPadOS to enter credentials so that you know who has the device.
Insert the Client ID and Secret that you saved from step 6. (Not the Client ID from later on) The Domain is your domain. The Service Account was the user you granted access to the project in step 20. The Service Key is the contents of the JSON file you downloaded in step 14. Click Create once you have entered all of this information. |
|


Enable Admin SDK API for your Firebase Project(Only needed if you haven't already setup Chromebooks in Filewave)
|
Step |
Screenshot |
|
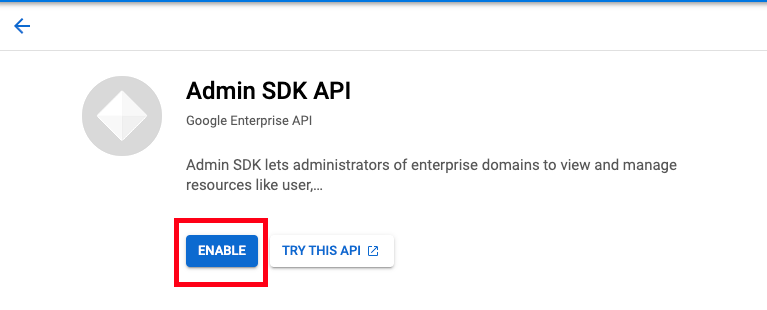
(Step 25) - Now we need to enable the Admin SDK API for your project. Navigate to https://console.developers.google.com/apis/api/admin.googleapis.com/overview?project=<project-number> Fill in <project-number> is from Firebase/Project settings/General/Project number If you are unsure what this is you can find it via logging into http://console.firebase.google.com/ > click your Firebase Project > Click the gear icon at the top left to the right of "Project Overview" > Project Settings |
|
|
(Step 26) Copy the Project number and add that to the link. E.G https://console.developers.google.com/apis/api/admin.googleapis.com/overview?project=600195963358 |
|
|
(Step 27) Click the Enable button |
|


Configure Filewave to allow Admins to use Google as IdP (Filewave)
|
Step |
Screenshot |
|
(Step 28) - Now that you have configured FileWave to talk to Google for Admin you need to go into the Native Admin to enable admins to actually log in and set their permissions. |
|
|
(Step 29) - Click the + on the lower-left corner and pick IdP Group Account. On this screen, it is important to clarify that you are not defining a user here but a group of users. The Login Name is misleading here, and should be thought of as the name of the group of users so you might put something like Google - Desktop Techs and then for Identity Provider make sure your Google connection is selected that you set up in the prior steps. For Group click the Browse button and select the group that includes all of the users who will have access. If you will give all of your users the same level of permissions then you can use one group for all of your FileWave admins, but if you will use different levels of access then make an IdP Group Account on this window to define each of your groups of FileWave admins. In the image, you see a single entry for Google which might be appropriate if all of the FileWave admins are in a single group on the Google side. |
|
|
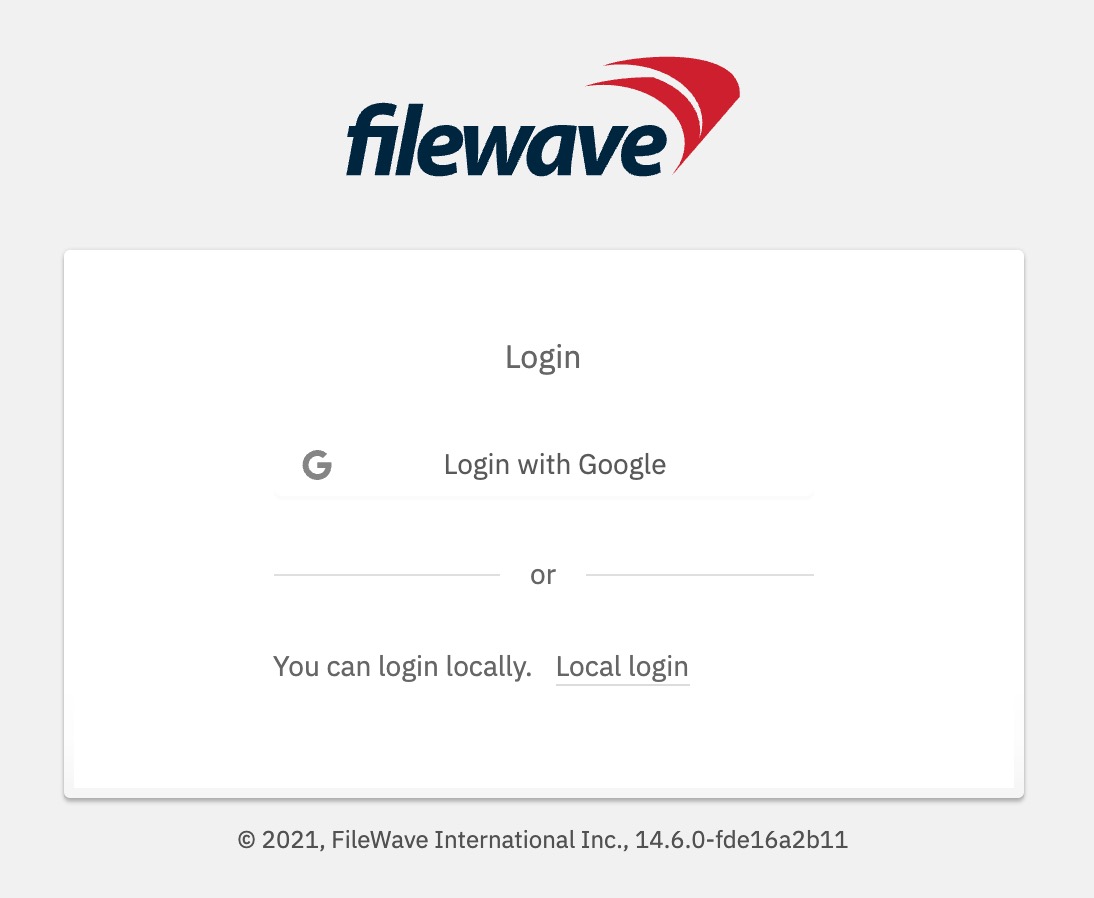
If everything was done correctly then your Web Admin login should look like the image shown. Click to Login with Google and try to log in. If you can not log in then the user may not be in a group that was given access in step 20 so go and check on the Google side to be sure. If the user can log in but can not perform tasks then ensure they are in the right group, and that you have configured the Permissions tab seen on step 20 to be sure they have the right permissions granted. |
|

Troubleshooting
If you try to login on via a browser, and get the error: "login-idp?Error=HTTPError" and "Error Authorization via IDP not carried out." or in the Django log you see [ERROR] 2023-08-29 09:23:42,063 (views): Authentication through IDP failed. Exception: (HTTPError) 403 Client Error: Forbidden for url: https://www.googleapis.com/oauth2/v3/certs then you may want to review FileWave Server should not have IPv6 enabled.
If you receive a generic error when attempting to iDP login, "iDP Authorization Failed", you may need to enable the Admin SDK API(steps 25-27 of guide) for the project by visiting the following sample URL (replace <project_ID> with your project ID) and clicking "Enable":
https://console.developers.google.com/apis/api/admin.googleapis.com/overview?project=<project_ID>
If you have access to the Django log for the server, it will give you the full details and direct link, so you can copy/paste/enable:
cat /usr/local/filewave/log/filewave_django.logSample Error:
"googleapiclient.errors.HttpError: <HttpError 403 when requesting https://admin.googleapis.com/admin/directory/v1/groups?domain=<domain>&alt=json returned "Admin SDK API has not been used in project <project_ID> before or it is disabled. Enable it by visiting https://console.developers.google.com/apis/api/admin.googleapis.com/overview?project=<project_ID> then retry. If you enabled this API recently, wait a few minutes for the action to propagate to our systems and retry.". Details: "[{'message': 'Admin SDK API has not been used in project <project_ID> before or it is disabled. Enable it by visiting https://console.developers.google.com/apis/api/admin.googleapis.com/overview?project=<project_ID> then retry. If you enabled this API recently, wait a few minutes for the action to propagate to our systems and retry.', 'domain': 'usageLimits', 'reason': 'accessNotConfigured', 'extendedHelp': 'https://console.developers.google.com'}]">"
No comments to display
No comments to display