Chromebook Client Pre-Requisites
Before beginning the setup of the Chromebooks, we must first provide you with a temporary Activation Code to license the amount Chromebooks you currently have under management in Google Admin Console. Please email the total number of "Provisioned" Chromebooks to your FileWave Account Executive or FileWave Systems Engineer, and we will send the Activation Code to you as soon as possible.
If you are unsure whether or not you are able to use Chromebooks with FileWave, please click to see the resources below.
List of countries where Chrome OS Management licenses are sold directly by Google to end customers:
Go to https://eduproducts.withgoogle.com/ , click 'contact sales', and then look at the drop-down menu 'Country' - if the country is in the list, it's supported.
Even if the country is not listed under the link above, a local google partner might be able to help :
https://www.google.com/a/partnersearch
Chromebook features
-
Location Tracking
-
Disable / Deprovision device
-
Historical user login activity
-
FileWave and Google Custom Fields
-
Google OU creation, renaming, and move device
-
Full hardware and software (extensions) Inventory reporting
- Powerwash & Wipe Users
- Reboot
Setup
Required Items
-
Google Domain
-
Admin rights within the Google Domain
-
At least one Chromebook
-
Chromebooks Enterprise enrolled
-
Pre-existing Google Organizational Unit structure (RECOMMENDED)
-
-
Running FileWave Server
-
Enough FileWave Chromebook licenses to cover every Chromebook in the Google OU
-
FileWave Server must use a root trusted SSL certificate and not a self-signed one
Google Cloud Messaging / Firebase Setup
First, you’ll need to configure Google Cloud Messaging (GCM/Firebase) so that FileWave can send push notifications to your Chromebook devices. The following steps will help you get your FileWave server setup with Google Cloud Messaging which is required for Android and Chromebook support.
-
Go to console.firebase.google.com in your web browser
-
Sign into your Google Account
-
Accept the user agreement (if necessary)
-
Select "Get started with a Firebase Project"
Enter name for the project and Agree to Terms – then click Create Project. Note below the fwx.io is the organization. Make sure the right organization is there or click on it and you can select the organization. Some types of accounts may not offer to let you pick an organization.
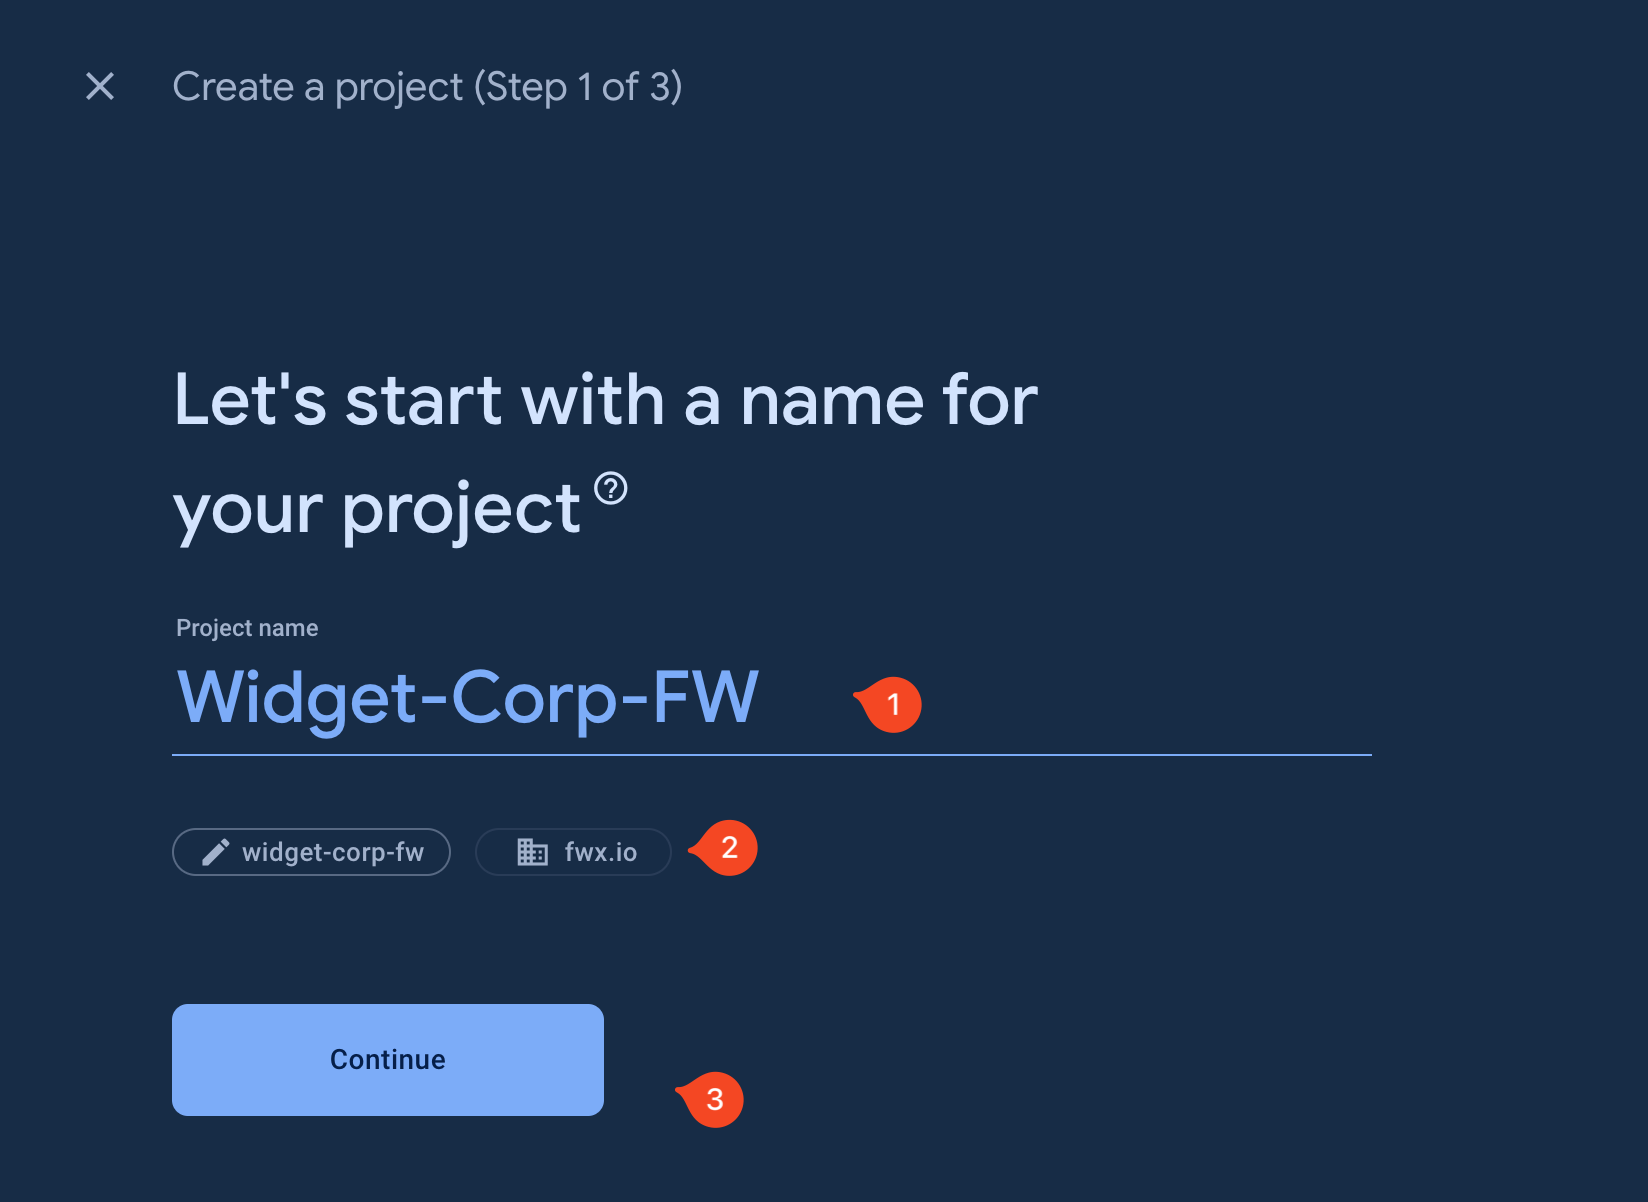
Choose to Disable Google Analytics for this project and then let it create the project.
Once the project creation has been completed, select Continue and you'll be on to the next steps.
Configuring Google Chromebooks to Sync with FileWave
The following processes and steps will walk you through setting up your FileWave server to manage Chromebooks. Current functionality will allow you to pull/query inventory data and utilize our location tracking feature in FileWave.
Enable Access to APIs
| 1. Go to the below address to start the process: https://console.developers.google.com/flows/enableapi?apiid=admin,calendar,classroom,drive,driveactivity.googleapis.com,gmail,groupssettings,licensing,plus,contacts,firebase.googleapis.com,fcm.googleapis.com If you just completed the Google Cloud Messaging / Firebase Setup, the project will already be selected and will use the project created during the GCM setup (this MUST be set up to continue). If it's not automatically selected, select the drop-down at the top of the screen and choose the correct project. You can also create a new one if you'd like. My Project is called 'FileWave Chromebooks'. 2. Confirm the Project and Enable the APIs for the project |
 |
Creating a Service Account and Credentials
| 1. Now a service account has to be created, click the hamburger icon in the top left corner and select Credentials under APIs & Services 2. Select Create Credentials > Service Account 3. Give the Service Account a name. I use the same name as my project but you may name it whatever you want 4. Select 'Create and Continue' 5. Grant this service account OWNER privileges under Basic 6. Click 'Continue' 7. Skip the next section by selecting 'Done' 8. On the next screen, click 'Manage Service Accounts' 9. Click the menu on the right side of the Service Account you just created and then click Manage keys 10. Select 'ADD KEY', then 'Create New Key' and download the JSON file Save this JSON file. We'll use it later. |
Adding a Delegated User
|
OAuth Client ID & Authorizing API Scopes
| 1. In the same Service Accounts window (IAM & Admin > Service Accounts), click on the Action menu next to your Service Account and select 'Manage Details' 3. Select 'Advanced Settings' to expand 4. Copy Client ID under Domain-wide Delegation, we'll use it in the next section. |
| 1. Open another tab or browser and navigate to Google Admin, admin.google.com 2. In the main menu, select Security > Access and data control 3. Select API Controls 4. Click Manage Domain Wide Delegation 5. Select Add New 6. Paste the copied Client ID from the previous step in this section into the Client Name field 7. Copy and paste the following into the One or More API Scopes field all at once then hit Authorize |
Sync Google with FileWave
| 1. Be sure you have already set up Google Cloud Messaging / Firebase Setup 2. Open your FileWave Admin Preferences and select the Google Tab 3. Once there, click the Configure OAuth token button at the top, you will be prompted for your credentials 4. After authenticating simply type in the Google Account you associated with the service account 5. The last step will be to import the .json file you saved at the beginning of this document 6. After you press OK FileWave will sync automatically with Google |
| Now if you go into the Clients section in FileWave you will see a Chromebooks group with the same structure and devices you have in your Google Admin. This may take some time. |
Deploying FileWave Inventory Extension to Chromebooks
|
1. In FileWave Admin open Preferences
|
Changing check-in frequency
If you want to change the frequency of check-in, you can modify the following attribute in the JSON to reflect check-in frequency (in minutes). The default is 1440, or once per day.
"UpdateIntervalInMinutes": {
"Value": 1440
}
Location Tracking Permissions
If you're wanting to use Location Tracking, you will need to "Allow sites to detect Users' geolocation" in Google Admin. You will find this option in Devices > Chrome > Settings, on the page that loads it will be under Security > Geolocation. For this setting, you want to ensure that you set it at the level in the organization that it should apply. In the image below we only enabled it for Foundry Chromebooks but did not set it for all. If you would like to enable Geolocation for all devices then make sure you set it at the domain level and also make sure that none of your OUs are set to ignore the inheritance of this setting. Simply check the setting on each OU and you will see what it is set to.
Just like with the Extensions, it is important that the OUs that you enable this on either be all of them or, at a minimum, you need to enable it for both the User and Device OUs that you will be using with FileWave.![]()
Congratulations, you can now manage your Chromebooks with FileWave!
Troubleshooting
If for any reason you experience issues seeing your ChromeOS devices in FileWave or issues with reporting then see the notes in our Chrome Troubleshooting Guide
No comments to display
No comments to display