Migrating your On-Premise FileWave Server to new Hardware
Migration Process
When looking at migrating your FileWave server we recommend contacting our FileWave support team for an explanation of this process if any part of it doesn't make sense. Migrations are safe for you to do as long as you make sure you ensure that you Lock your clients and use the latest Backup script as mentioned in the next sections of this guide. If you'd like to hire Professional Services to do this entire process with you, we have a simple flat rate for migrations.
Your existing FileWave Server must be version 13.3.1 or higher before you can upgrade to FileWave 14.7.2 and then from 14.7.2 you can upgrade to 15.2.1. The minimum memory requirement for FileWave 14+ is 8GB and ensure you give at least the same amount of disk space to the new Server. Larger Servers can benefit from more RAM, CPU, and SSD storage.
If you need an older install of FileWave to complete this migration you should be able to find it in Downloads.
The below table gives you an example of the path to get to the latest FileWave running on Debian. Note that you can also run macOS for FileWave Server, and that is included in the steps of this article. As of December 2023, it is preferred to set up a new Server on Debian Linux, and the below table should help you understand how to get there. We are not planning on dropping macOS support for FileWave Server.
| Platform | Step 1 | Step 2 | Step 3 | Step 4 |
| Windows | Upgrade to 13.3.1 (Win) | Migrate to 14.7.2 (CentOS) | Upgrade to 15.2.1 (CentOS) | Migrate to 15.2.1 (Debian) |
| CentOS Linux | Upgrade to 15.2.1 (CentOS) | Migrate to 15.2.1 (Debian) | ||
| macOS | Upgrade to 15.2.1 (macOS) | Migrate to 15.2.1 (Debian) | ||
| Debian Linux | Nothing to do. |
1. Lock Desktop Clients
You must Lock all of your Desktop clients before migrating your FileWave server. That way, you can verify that the new server is running correctly and prevent issues with your macOS and Windows Clients if the migration is not successful. To Lock the clients, highlight all of your Desktop devices → right click on them → select "Lock" and then perform a Model Update so that the server database is 1 model ahead of clients.
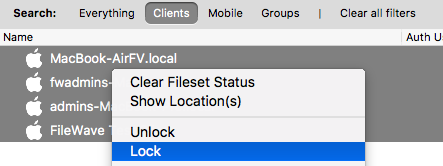
Locking a device binds that client to the current model number. Meaning, that if something unexpected should happen during a migration or update, a connecting client ignores the new manifests from the server. See: Locking Devices
2. Backup your FileWave server for the migration
The backup you create for your FileWave server is what you will use to migrate your server to your new hardware. For this, you will need to use the backup script that we provide to backup your server. This is the only way to make sure you pull all of the necessary files to your new server and will not lose any information. We offer this knowledge base article for this process and the commands you will need to run as well as information on checking the backup file.
The backup script is changed. Even if you currently use the script, please check that you are using the latest version.
Ideally, you would download the script and make sure there is enough free space and then run a command like the below one to make a fresh backup folder that has all of your config files and data.
sudo ./backup_server_osx_linux.sh run /tmp manualOnce you have created the backup folder with the script we offer, shut down the FileWave server services so that you do not make any changes after running the backup that will be used to migrate servers. You would find "fw-backups" in /tmp if all went well. You can choose a different location if that makes sense for your storage setup. If you make changes on the old server after the backup, the changes will not move over during the migration. To stop the services, you can run the below commands. Do not shut off the old server completely, because this Backup file will need to be transferred in the next few steps.
Do not delete or wipe the old server yet! It is always best to keep the old server and just turn it off for a few weeks after the migration just in case you need any information from the server.
2.1. Stop the FileWave Server
macOS / Linux
sudo fwcontrol server stopWindows
In an Administrator Command Prompt, run the following command. You can also stop all FileWave Services using the Services tool.
fwcontrol server stop3. Migrating to the new Server
Once your backup is completed, it is time to start the migration process to your new FileWave server.
If you have any questions about the process or would like assistance on this, please contact our FileWave support team and they will be able to assist you with this. Also, during the process, if you run into any issues or errors, please contact our support team as soon as possible so they can assist you.
3.1. Download FileWave Server for your new hardware or VM
If you want to Migrate to a Linux Virtual Server, we offer a pre-built appliance that you are able to bring up in your Virtual Environment. You would go to the FileWave Management Suite Downloads page. Scroll to the bottom of the software downloads page for the version of FileWave you need, and you will see the links to download a Virtual Server appliance.
You need to migrate the server to the same version of FileWave that you are currently running. For example, if you are running FileWave 12.1 you must migrate to a FileWave 12.1 server. If you try to migrate from a FileWave 12.1 server to FileWave 12.3 the migration will fail.

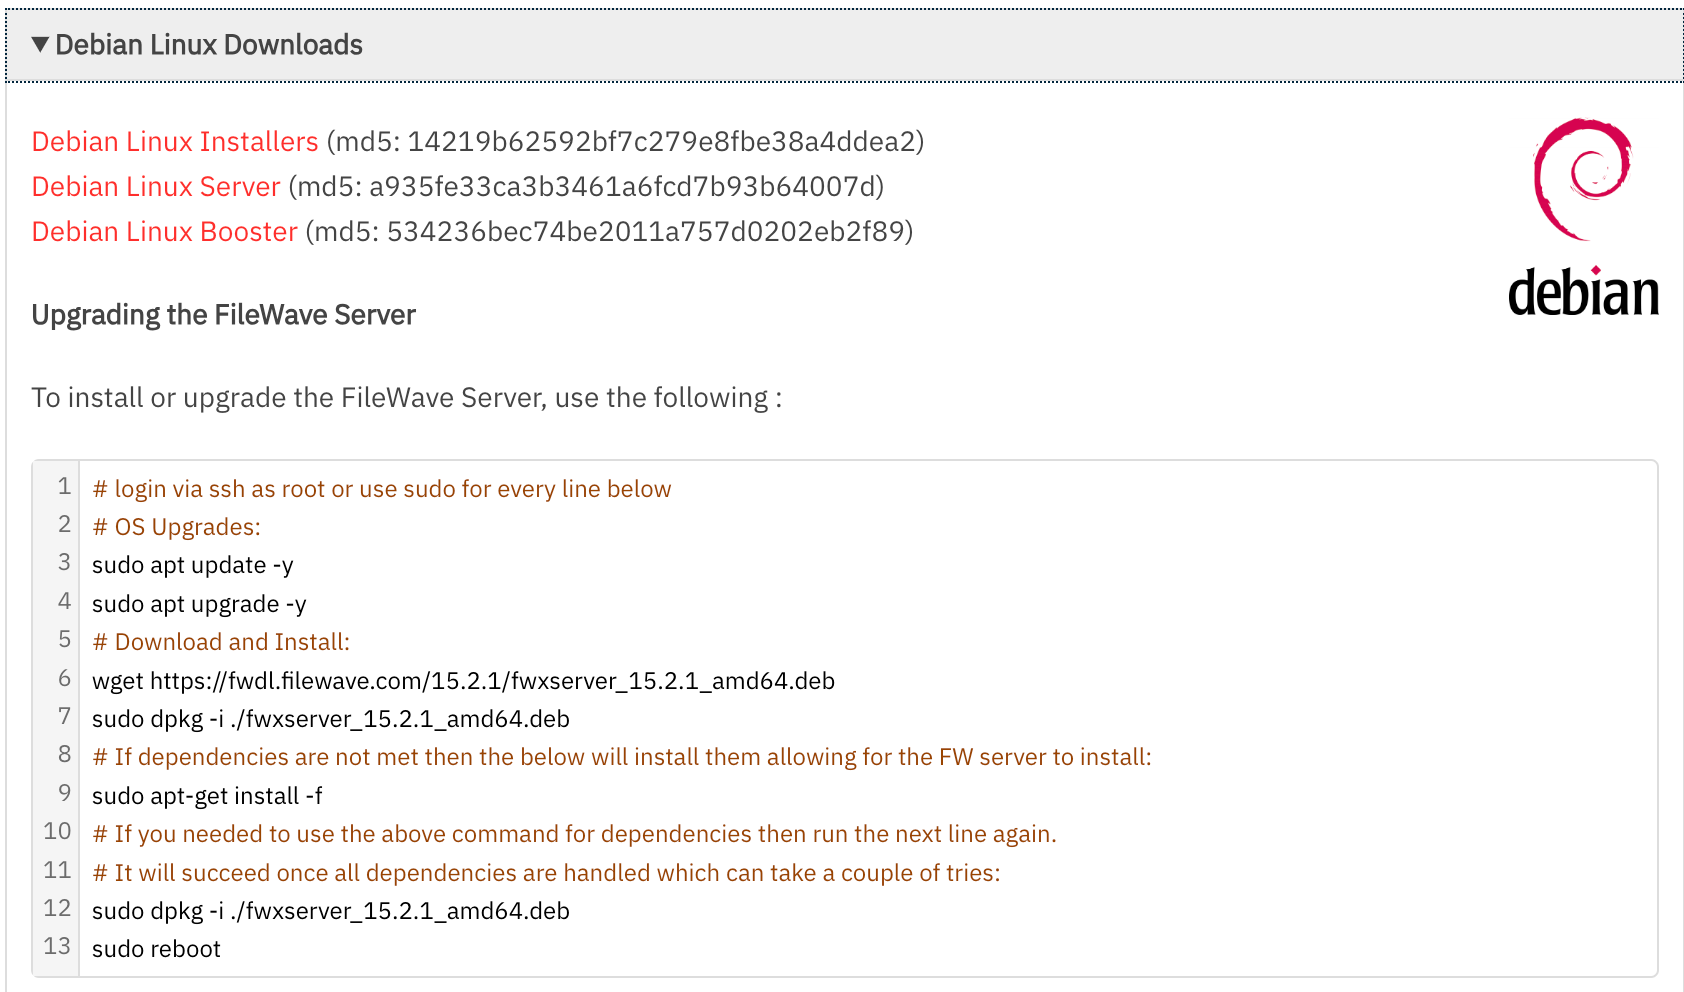
If you feel more comfortable installing a clean Debian Linux instance you can also find the .deb installers and instructions on the same download pages. Note that you can run your Linux server in any environment that you like such as Linode or contact Customer Experience about our own hosting solution.
3.2. Setup of the new Server
Initially you will need to have the new Server on a new IP address so that the old Server and the new one can both be online to copy the data over. After the next migration steps there is a step that talks about having the old IP / DNS name on the new Server. For the moment don't make that change. When the replacement server takes on the IP address it should also then be ok for Firewall rules. As a reminder the needed ports are here: Default TCP and UDP Port Usage
For the setup steps of the new server follow this guidance: FileWave Server Setup to ensure that you change the root password and please keep in mind that SSH should not be exposed to the Internet. Once the server is installed on the new host you can continue with the next steps to copy the data and database over to the new host.
Name resolution check: Before continuing, confirm the new server can resolve DNS names and reach package/time sources. If NTP, package downloads, or other hostname-based checks fail, verify the DNS settings on the server itself. On a FileWave appliance, DNS can also be reviewed in Webmin under Networking → Network Configuration → Hostname and DNS Client.
If you find that you need more space in your Linux Appliance then see Expanding the Disk on a FileWave Appliance - CentOS / Debian for the commands to expand the volumes once you set VMWare/HyperV/VirtualBox/UTM to have a larger volume size set.
Also be aware that when you next run apt update and apt upgrade it will clear out /tmp so if you migrate your backup to /tmp on the new server just keep in mind you should not do an OS update until you have completed the migration or you will have to re-copy your data to the new server since /tmp would get emptied before you are ready.
3.3. macOS or Linux server → macOS or Linux Server
This will be the most common migration path moving from macOS or CentOS or even another Debian system to a new Debian Linux system. The folder structure and commands are the same no matter which way you are migrating with these OS. If coming from Windows there is a note on the Database step of restore, but you will almost certainly need help moving from Windows.
If you are using the Virtual Appliance that we offer for Linux you will not need to install the server as it comes pre-installed. Just remember that for a migration the original and new server must be on the same version. If you are migrating to Debian that means upgrading your CentOS or macOS Server to 15.2.0 or higher in order to have a Debian release that aligns with it. For macOS you'll want to consider if the version of FileWave that you are running on the old server is supported on the new one as well.
-
On your workstation go to FileWave Management Suite Downloads Page. (You will select the same release that you are running on your current server. For the screen shots I am migrating to a FileWave 15.2.1 server)
-
For Linux you will then scroll down on the page until you see "Virtual Appliance Downloads". Follow the steps in FileWave Server Setup to at least get an IP address and change the root password on the new appliance. You would want to use a different IP than your old server for now so that you can copy files from the old server to the new one. For macOS you can download the FileWave Server from the macOS Downloads section of the page.

-
Next step would be to connect to your FileWave server. For this there are a few options you are able to use depending on if you are running a macOS or Windows computer as your workstation or if you have direct keyboard/monitor access to the new server. Two options you are able to do is to use ssh to the server using Terminal on macOS or use putty on a Windows machine. For macOS keep in mind that SSH is not enabled by default so you may want to enable it so that you can scp files over or ssh in to it. You'll want to become root if you are not already:
sudo -s -
Once the new server is on your network and reachable, you will Stop the FileWave server services that are running on the new server so that you can restore the backup to it. At this point FileWave should not be running on either the old or the new server.
fwcontrol server stop -
Now we will copy the FileWave backup that you created previously on your old server to the new server. You are able to do this however you would like. Two ways that are most common is by copying the backup to a network share or using scp command on the server. You will need to copy all of the files created in the "/tmp/fw-backups" folder including the zipped folder, Data Folder, ipa folder and any other contents. We would suggest moving it to the /tmp directory on your new FileWave server to keep things simple. For all example commands we will show from that directory.
scp example copying to a new server 192.168.1.10 using root on the remote server. In this example this command is run from the original server and is copying file over to the new server. For macOS remember that root is not enabled by default so use your admin user:
scp -r /tmp/fw-backups root@192.168.1.10:/tmprsync example copying to a new server 192.168.1.10 using root on the remote server. In this example this command is run from the original server and is copying files over to the new server. For macOS remember that root is not enabled by default so use your admin user:
rsync -avz /tmp/fw-backups/ root@192.168.1.10:/tmp/fw-backups/All command examples will be shown as if the backup is in the /tmp directory
Compare Data Folders
After the files are transferred, compare the size of your Data Folder to the one on the original (old) server. You can see this by navigating to the backup files and running the following command. The Data Folder is located in /usr/local/filewave/fwxserver/ on the original server. They should be the same size. If the transferred Data Folder is considerably smaller than the original, redo the transfer.
Command on original server:du -hsx /usr/local/filewave/fwxserver/Data\ Folder/Command on the new server:
sudo -s du -hsx /tmp/fw-backups/Data\ Folder/ - Once the backup has been successfully copied to the new server the next step is to unzip the tar.gz file that is inside of the "/tmp/fw-backups" folder. This zip file contains the configuration and Database files that you will be using for the migration.
Run this command to become root if you didn't already on the last step because all of the next steps will need it.
Move to the location of the backup file. My backup is in the /tmp/ directory of the server.sudo -s
cd /tmp/fw-backups/Then unzip the tar.gz file. The file will be named based on the date it was made.
tar -xf *.tar.gz - The next step is to start moving files from your backup to locations on your new FileWave server. You will need to replace the files already in the location. For the commands below we will move the file that is at the location of the new server so that you are available to replace it easily with your backup. For the commands below the backup is located in the "/tmp/fw-backups" directory of the new server. The commands will be slightly different on your server depending on your file path and name of the backup folder since it is named by default with the day and time the backup was taken.
Move the default certs folder to be called certs.bak
Copy the "certs' folder from your backupmv /usr/local/filewave/certs /usr/local/filewave/certs.bak
Move the default media folder to be called media.bakcp -r /tmp/fw-backups/fwxserver-Config-DB-Jan-12-18--10-34/certs /usr/local/filewave/
Copy the "media" folder from your backup - Sometimes this will be emptymv /usr/local/filewave/media /usr/local/filewave/media.bak
cp -r /tmp/fw-backups/media /usr/local/filewave/Move the default ipa folder to be called ipa.bak
Copy the "ipa" folder from your backup - Sometimes this will be emptymv /usr/local/filewave/ipa /usr/local/filewave/ipa.bak
cp -r /tmp/fw-backups/ipa /usr/local/filewave/Copy the fwxcodes license file from your backup
cp /tmp/fw-backups/fwxserver-Config-DB*/fwxcodes /usr/local/etc/fwxcodesCopy the user_postgresql.conf from your backup
cp /tmp/fw-backups/fwxserver*/user_postgresql.conf /usr/local/filewave/conf/Review settings_custom.py if your old server used custom settings
The backup may include
/usr/local/filewave/django/filewave/settings_custom.py. Review this file before copying it to the new server, and only carry forward custom values that are still required for your environment.
Grafana# Review before copying; do not blindly overwrite the new server's settings. ls /tmp/fw-backups/fwxserver-Config-DB*/settings_custom.py
If you use Grafana then you will likely want to copy over your YML files and database. If you do not have any dashboards that you have setup then you can ignore this step.
fwcld Foldercp -f /tmp/fw-backups/fwxserver-Config-DB-*/grafana.db /usr/local/filewave/instrumentation_data/grafana/ cp -f /tmp/fw-backups/fwxserver-Config-DB-*/prometheus_http_jobs/* /usr/local/etc/filewave/prometheus/conf.d/jobs/http/ cp -f /tmp/fw-backups/fwxserver-Config-DB-*/prometheus_https_jobs/* /usr/local/etc/filewave/prometheus/conf.d/jobs/https/
Copy the custom MSI or PKG if they exist. If they are not in your backup then you can ignore this step.
Data Foldercp -f /tmp/fw-backups/fwcld/FileWaveClient.msi /usr/local/filewave/fwcld/ cp -f /tmp/fw-backups/fwcld/FileWaveClient.pkg /usr/local/filewave/fwcld/
If you are running FileWave server version 13.1.5 or higher, the fwxserver folder is located here: /usr/local/filewave/fwxserver. Please note the server version differences below:
Backup the default "Data Folder" folder to be called Data Folder.bak
Move the "Data Folder" from your backup. Note: In FileWave 13.1.5 and later, the fwxserver directory normally lives in /usr/local/filewave/fwxserver/. On older versions, it was located at /fwxserver/. During server migration, the fwxserver directory is moved, not copied, to prevent having two full copies consuming disk space on the new server.mv /usr/local/filewave/fwxserver/Data\ Folder /usr/local/filewave/fwxserver/Data\ Folder.bak
mv /tmp/fw-backups/Data\ Folder /usr/local/filewave/fwxserver/Apache files
Backup the "httpd_custom.conf" file on the new server.
mv /usr/local/filewave/apache/conf/httpd_custom.conf /usr/local/filewave/apache/conf/httpd_custom.conf.bakCopy the "httpd_custom.conf" file from your backup.
cp -r /tmp/fw-backups/fwxserver-Config-DB-Jan-12-18--10-34/httpd_custom.conf /usr/local/filewave/apache/conf/Backup the "mdm_auth.conf" file on the new server.
mv /usr/local/filewave/apache/conf/mdm_auth.conf /usr/local/filewave/apache/conf/mdm_auth.conf.bakCopy the "mdm_auth.conf" file from your backup.
cp -r /tmp/fw-backups/fwxserver-Config-DB-Jan-12-18--10-34/mdm_auth.conf /usr/local/filewave/apache/conf/Move the passwd files from the backup to the new server.
Move the "passwords" and "passwords.digest" file from the new server. (You may not have a passwords.digest file. If so you can skip without any issues).
mv /usr/local/filewave/apache/passwd/passwords /usr/local/filewave/apache/passwd/passwords.bak
mv /usr/local/filewave/apache/passwd/passwords.digest /usr/local/filewave/apache/passwd/passwords.digest.bak
Copy the "passwords" and "passwords.digest" file from the new server. (You may not have a passwords.digest file. If so you can skip without any issues).
cp -r /tmp/fw-backups/fwxserver-Config-DB-Jan-12-18--10-34/passwords /usr/local/filewave/apache/passwd/ cp -r /tmp/fw-backups/fwxserver-Config-DB-Jan-12-18--10-34/passwords.digest /usr/local/filewave/apache/passwd/ -
The next step is to get the database restored on the new server.
Database restore
Open a terminal session and give yourself root access for the next commands if you are not already root from the prior steps. After entering the command you will need to type in the admin credentials for the new server.sudo -sFirst, you need to start the postgres process on your new FileWave server. You can do so with the below command.
FileWave server 13.1.5 and newer:
sudo -u postgres /usr/local/filewave/postgresql/bin/pg_ctl start -w -D /usr/local/filewave/fwxserver/DB/pg_data -m fastFileWave server 13.1.3 and below only. Do not use the next command with anything newer:
sudo -u postgres /usr/local/filewave/postgresql/bin/pg_ctl start -w -D /fwxserver/DB/pg_data -m fastOnce postgres has been started you will now need to access the Database on the server using the below command.
/usr/local/filewave/postgresql/bin/psql postgres postgresThen you will need to drop the MDM table of the database
drop database mdm;Create a table you are then able to restore your mdm-dump.sql file to
create database mdm OWNER postgres ENCODING 'UTF8' TEMPLATE template0;Quit out of the Database with the below command:
\qNow you need to run the restore on the mdm-dump.sql file on your new server. You can do so with the below command. For my command the "mdm-dump.sql" file is located in the "/tmp/fw-backups" directory but the command you run will match the location of your backup. This command can take a little while to run. If you see any errors at the end of the output there is most likely an issue with the migration and please contact our FileWave support team for assistance. If you are migrating from FileWave Server on Windows please see 3.2.2. Windows Server → macOS or Linux before running the next command.
/usr/local/filewave/postgresql/bin/psql -U postgres mdm < /tmp/fw-backups/fwxserver-Config-DB-Jan-12-18--10-34/DB/mdm-dump.sqlOnce the command finishes we will now need to start running the migration for the Database manually. First migration you will run with the below command.
/usr/local/filewave/python/bin/python /usr/local/filewave/django/manage.pyc migrate --no-input --fake-initialThen we will need to do a server migration which can be done with the command below.
/usr/local/sbin/fwxserver -M -
Run the FileWave Server Repair Permissions script with sudo to fix the server's folder permissions and ownerships. If you do not do this step, then your server may not work correctly until you do.
-
After the permissions repair command finishes you are almost done with migrating the information for the server. The next step is to restart the FileWave services to start checking if the migration has completed successfully. This can be done with the below commands to stop and start the services.
Stop the FileWave services:
fwcontrol server stopStart the FileWave services:
fwcontrol server startIf you find that the fwcontrol control command is not found, you re-create the alias by inputting this command and then try the fwcontrol commands again:
alias fwcontrol='/usr/local/bin/fwcontrol' - With the FileWave server services started you are now done with migrating the Data on the FileWave server and Move on to Checking the migration in the FileWave Admin. Do not change your IP or DNS to match that of the old server yet. This will be one of the last things you do so you can make sure everything is correct before having your devices connect to the new server.

3.4. Windows Server → macOS or Linux
Because of the complexity of moving from Windows Server please connect with Professional Services & Training to get some assistance. The Windows version of FileWave Server is so old that this is a multi-step process involving the migration to CentOS followed by the migration to Debian.
Extra Database step for Windows
Additionally before importing the database from a FileWave on Windows Server in to a Linux or macOS Server you need to make an adjustment to the .sql export file.
- Run the following command to import your old database. Since you are coming from a Windows server you will need to modify the Administrator user for the Database. The below command will be able to modify the backup file mdm-dump.sql. For the example my file is in /tmp directory but the path would match the location of your backup.
vi /tmp/fw-backups/fwxserver-Config-DB-Jan-12-18--10-34/DB/mdm-dump.sql - Go to the end of the file and change where it says the user is "Administrator" and change it to "postgres". Change it to look like the below text.
Note: User"Administrator" will be the user you were logged in with when the backup was created.
REVOKE ALL ON SCHEMA public FROM PUBLIC; REVOKE ALL ON SCHEMA public FROM postgres; GRANT ALL ON SCHEMA public TO postgres; GRANT ALL ON SCHEMA public TO PUBLIC; - Save the mdm-dump.sql by hitting "esc" then entering in "
:wq" - Now you can continue on the import of the .sql file as discussed in Step 8 - Database in the prior section of this article.
4. Launch FileWave Central to confirm the Migration
The next step once the migration is complete is to Launch the FileWave Central admin application to connect to the newly migrated server. After a migration, you always want to connect to the server and verify everything is running and working correctly before you make any changes to the IP or DNS address.
If you change the IP address or DNS reservation first before confirming the migration was successful you run the chance of your devices losing Filesets and un-enrolling themselves. Do not hesitate to contact our Support Team quickly if you think there may be an issue so that we can help get you back up and running quickly.
4.1. Clear the Keys
When you try to log in you may get an error because the server is not at its original address. There is a simple command to clear the keys that would prevent login that you may need to do when first logging in and then later when you update the server to its final IP/Name which should match the original server.
To clear the keys you will connect via SSH or Terminal to the server and type;
sudo /usr/local/filewave/python/bin/python /usr/local/filewave/django/manage.pyc shell
Next enter the following;
from fwserver import name_value_pair
from filewave.fw_gpb.FWServerMessages_pb2 import MdmServerConfiguration
name_value_pair.set_mdm_server_configuration(MdmServerConfiguration())

from filewave.fw_gpb.FWInventoryMessages_pb2 import DjangoServerData
name_value_pair.set_inventory_server_configuration(DjangoServerData())

from ios.preferences_manager import PreferencesManager
PreferencesManager.set_shared_key('')
And you should get another prompt where you can type quit() and press return to exit. Below is an image of what this should look like:

After clearing the keys, you will have to restart the FileWave services.
fwcontrol server restartNow you should have success logging in with FileWave Central.
4.2. Login to FileWave Central
-
Log in to the FileWave admin to your new server. You will need to enter the IP address of the new server as you have not changed any of the DNS or IP information yet.
-
Once you are logged in you will need to open and close Preferences to save the new keys that were cleared in the previous step. To do so go to FileWave Admin → Preferences → "Mobile" tab → select "OK" to close Preferences. This will save the new keys.
-
First thing to check in the FileWave admin is the warning light in the bottom left hand corner. You are looking for it to say "Everything is OK" as shown below. If you have any warning or errors this may be an issue with the migration but is not necessarily depending on what is giving the error. If you see the light as yellow or red please select the message to view the error. Messages and their severity are listed below the image.

Imaging after migration: If existing imaging workflows stop working after the migration, open FileWave Central → Preferences → Imaging, edit the imaging server, select Generate new key on save, and save the change. Allow a minute or two for the new key to propagate.
-
APN, If you are using iOS and this is anything but green please contact our Support Team
-
Inventory, if this is anything other then green contact our Support Team
-
GCM, if you are using Android or Chromebooks and this is not green contact our Support Team
-
DEP, if this is yellow or red please open FileWave Admin → Preferences → VPP & DEP tab → OK, to close preferences. If it is still giving an error contact our Support Team.
-
-
Second thing to check is to make sure Filesets are showing. The easiest way to do this is to select the Filesets tab of FileWave admin and make sure you see your Filesets and structure. If you are having issues contact our Support Team.
-
If you have iOS devices, Select "iOS Inventory" to make sure you see rows of iOS device information. Also select "Refresh" from the top menu to make sure this information refreshes. The devices will not check in yet since the IP/DNS information has not been changed but you should see rows of information. If you receive any errors or information is not showing please contact our Support team.
-
Go to the Clients tab of the FileWave Admin and make sure you see your correct group structure and your Clients showing. If you do not please contact our Support team. Remember your FileWave Clients will not check in yet since the IP/DNS information has not been changed on the new server

As long as everything is green and showing correctly you are now ready to move on to changing the IP and DNS information so your devices will see the new server.
5. Changing the IP / DNS to match that of the old FileWave Server
Now you are able to change the IP or DNS information on the new server to match that of the old FileWave server. You are able to change your IP address on the new server so that it matches the old server or Change your DNS record for your FileWave server to point to your new server's IP address. If your old server was only using IP and not a DNS name you will need to make sure the IP does not change.
5.1. Changing the IP address
5.1.1 macOS Server
5.1.1 macOS Server
-
Turn off the old server so that it is no longer using the IP address.
-
Change the Network Configuration of your new server in System Preferences → Network
5.1.2 Windows Server
5.1.2 Windows Server
-
Turn off the old server so that it is no longer using the IP address.
-
Change the Network Configuration of your new server in Start → Control Panel → Network and Internet → Network and Sharing Center → Local Area Connection Status → Properties → Internet Protocol Version 4 (TCP/IPv4) → Properties → select "Use the Following IP address" → Enter the correct information you are wanting to set → OK.
5.1.3 CentOS Linux Server
5.1.3 CentOS Linux Server
Depending if you are using the appliance we offer for a CentOS Linux virtual server or a Linux machine you built the steps may be slightly different. The steps shown below will be for the FileWave virtual appliance that we offer.
-
Turn off the old server so that it is no longer using the IP address.
-
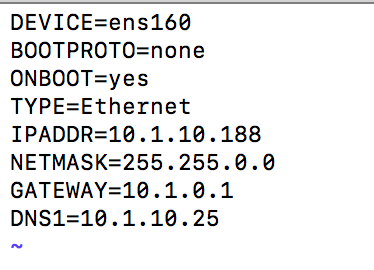
Configure the "ifcfg-ens160" file on the server. (This file will be different if you are not using our Virtual Appliance and will have a different name like "ifcfg-eth1" for example)
vi /etc/sysconfig/network-scripts/ifcfg-ens160 -
Change/add the following values of the file.
-
Change BOOTPROTO=none
-
Add "IPADDR", "NETMASK", "GATEWAY", "DNS1" to the file with your network configurations. I attached a screen shot of a completed file below. (If you want to add more then one DNS server you can add DNS2, etc to the file)
-
Save the file using "esc" then ":wq"
-
-
Now you will need to restart the network services on the server.
/etc/init.d/network restart -
Now the IP address is changed for the new server.

5.1.4 Debian Linux Server
5.1.4 Debian Linux Server
Changing the IP address in Debian 12 involves different steps compared to CentOS. The following guide is tailored for Debian servers using the interfaces file, but you could also use Webmin on your server assuming the server comes online initially with DHCP.
For Webmin know that you will need to go to Webmin -> Webmin Configuration -> Operating System and Environment and make sure it's set to Debian 12.4 (Or whatever version we are at when you set up your system. You can see this with cat /etc/debian_version on the server.
-
Disable the Old Server: Ensure the old server is turned off to free up the IP address.
-
Locate Network Interface:
First, identify the network interface you wish to configure. You can list all network interfaces using:
networkctl list
- Edit the /etc/network/interfaces file: Using 'nano', edit the interfaces file to set the network configurations.
nano /etc/network/interfacesYour default interfaces file should look something like this (your interface name may be different):
# The loopback network interface
auto lo eth0
iface lo inet loopback

# The primary network interface
iface eth0 inet dhcp
Change the file to look like this, using your network preferences (note 'dhcp' has been changed to 'static' in line 6)
# The loopback network interface auto lo eth0 iface lo inet loopback # The primary network interface iface eth0 inet static address 192.168.10.33 netmask 255.255.255.0 broadcast 192.168.10.255 dns-nameservers 192.168.10.254 192.168.10.255 - Verify Resolv.conf, hosts and hostname files: Verify that these files in /etc/ are configured correctly for your network and server.
/etc/resolv.conf: This file should list your DNS servers
/etc/hosts: This file should point your FQDN to localhost (127.0.0.1)
/etc/hostname: Specifies the hostname for your server. This is filewave by default. - Disable IPv6: Edit the sysctl.config file by adding the following lines to the end of the file
nano /etc/sysctl.confignet.ipv6.conf.all.disable_ipv6 = 1 net.ipv6.conf.default.disable_ipv6 = 1 net.ipv6.conf.lo.disable_ipv6 = 1 net.ipv6.conf.tun0.disable_ipv6 = 1 - Restart/Check Network Status:
systemctl restart networking.service systemctl status networking.service - Verify IP:
ip a

5.2. Changing the DNS record
For changing the DNS record to the new FileWave server you would change the DNS entry in your DNS servers and allow the new entry to propagate out to your computers. If you are using the same IP on the new server that you were previously using for your old one then there will be nothing to do here because the DNS record is already associated with that IP. It will also simplify any firewall changes because if you keep using the same IP then your firewall rules should remain the same as well.
6. Checking your FileWave server after the IP address/DNS entry is changed
Steps will be similar to what you checked previously, but now you will point the Admin to the DNS address and make sure your devices are checking in. Do not hesitate to contact our Support Team quickly if you think there may be an issue so that we can help get you back up and running quickly.
Unknown User Error?: Refer back to 4.1 Clear the Keys if you get an error when trying to login now that the migrated server is on a new address.
- Repeat the checks in 4.2. Login to FileWave Central to check that everything is still good.
- Now you will do an Update Model to ensure that it is functioning before taking the next steps to Unlock Clients.
7. Unlock Clients
-
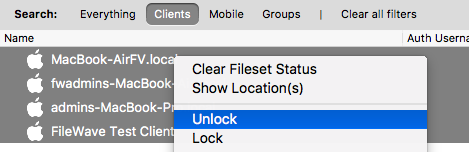
Go back to the FileWave client tab and unlock one or two clients that you know are on to make sure they are checking in correctly. We suggest checking a couple machines first before unlocking all of your clients.
-
After you make sure the couple of test devices you unlocked first are working correctly you can select all of your devices and unlock them.

8. Completed
You are now done checking the Server after the migration. If you have any issues do not hesitate to contact our FileWave support team as soon as possible so that we are able to assist you. Please do not destroy your old server for 30 days after the migration in case a problem is discovered with the migration. Keep the old server shut down so that you don't find that it comes online again and conflicts with the IP address of the new server or that clients might reach it and become confused.
Please remember to set up FileWave Server Backup on the new server because you will need to configure the script to run automatically. When setting up backups you should have the destination be a volume that is not locally on the server, and does not share the same network storage location. If there is a failure of your disk storage solution you do not want to lose both your FileWave Server as well as the backup information.
No comments to display
Went through this process several times, here are some of my takeaways - hope it can help someone else!
Name Resolution Error:
I received this when I attempted to do the NTP sync during the setup of the new server. Despite setting my DNS server in the 10-eth0.network file, it doesn't seem to actually take. What I ended up needing to do was go into Webmin after getting the IP/gateway/subnet set in the 10-eth0.network file, and then set the DNS server in Networking -> Network Configuration -> Hostname and DNS Client. After that I was able to set pool.ntp.org as the time server, as well as do everything else that you need DNS for.
Can't login via Filewave Central after Migration:
First, make sure you've done the steps outlined in 4.1. The first time through, I just read the title of 4.0, "Launch FileWave Central to confirm...", and then proceeded to beat my head up against it for awhile when it wouldn't let me login. Then I read on and realized you had to clear the keys - I thought that was to fix the initial error about not being able to verify the identity of the new server rather than the "Unknown user" error. However, what 4.1 doesn't mention is that you need to restart the server (fwcontrol server restart) after running the Python commands, otherwise you will continue to get the error.
Can't Image Computers after Migration:
If you find that you can no longer image after migrating, go into File -> Preferences -> Imaging, then double-click your imaging server. In the window that opens, select "Generate new key on save", then select OK, and then OK again to save the change. After a minute or two, I was able to image once again.
Anyway, hope that helps someone!
In reply to #1
Hi Sam!
Thank you for your feedback!
Name Resolution Error: I completely rewrote the Debian IP section of this article so this shouldn't be an issue anymore for those using this as a guide to migrate their servers.
Can't login via Filewave Central after Migration: I have added the extra step to restart the server.
Can't Image Computers after Migration: I will look into this and see if it's just a one-off issue or is something that needs to be done after every migration.
Again, I really appreciate the feedback! If you or anyone else has more, please feel free to share!
settings_custom.py is not included in the list of files to be copied from the fwxserver-config-DB folder
I also lack a way to migrate all Prometheus/Grafana data. For the migration of our test server we've done a rsync of the whole instrumentation_data dir (excluding /grafana/plugins) to retain all settings and data history.
In reply to #3
This is a good call out. I will adjust. /usr/local/filewave/django/filewave/settings_custom.py is in the backup script already so that one is just updating the above although you may not simply want to copy it. You may want to review the settings and make sure they are needed. For Grafana I'll take a look as well.
I think the article is a bit inconsistent on the use of folder names. Sometimes the full folder name for the backup from where to copy is given for example when copying the passwd file. Sometimes though the path is given with a wildcard so the command can actually be copied for production use without changing it, for example with user_postgresql.conf
In reply to #5
I agree with that. It's something I've wanted to come back to in order to clean up the article.
one topic to clarify about moving server hardware is encryption recovery keys.
when migrating server from old hardware to new hardware -- whether on-prem to new hardware, or from hosted to new hosted -- can the encryption recovery keys from old server be moved to new server ?
In reply to #7
The current directions should move everything FW related. Are we talking about OS encryption keys or FW?
In reply to #8
OS encryption keys.
upon further research, it seems a re-escrow has to be done in some manner (which seems to be true for any movement of MDM from old to new), either with decrypt/encrypt (definitely not ideal), using some mechanism like Escrow Buddy, or possibly macOS 26 Tahoe (with its promise to rotate the FV key if the profile is repushed to the device).
In reply to #9
In this scenario is it that the devices are moving from ServerA to ServerB and so a migration of FW itself wasn't done which would mean devices check in to ServerB that never got the keys escrowed to it? ServerA has the keys but the device was moved to ServerB through something like the option in ABM/ASM to tell a device to switch servers? Just trying to understand fully. In a typical migration of FW server you'd move the database and all content from ServerA to ServerB but I can imagine if you make a device move from ServerA to ServerB that in that scenario maybe the escrowed key is still sitting only on ServerA.
No comments to display