Windows Imaging - Import Image
What
The Import Image option in Filesets > New Fileset > Microsoft imports an existing FileWave Windows imaging folder into the current FileWave environment as a Windows imaging fileset.
Use it when you already have a FileWave-formatted Windows image folder and want to bring it into FileWave without capturing the image again.
After the import, the image becomes a normal Windows imaging fileset that can be assigned in the Imaging area just like an image created through the standard capture workflow.
Important: This is not for a raw WIM, ISO, VHD/VMDK, or an exported .fileset package. If you have a .fileset or .fwtemplate package, use the regular Import Fileset workflow instead.
When/Why
Use Import Image when:
- you already have a FileWave image folder from an earlier capture
- you want to reuse an existing FileWave image instead of building and capturing it again
- PXE capture is inconvenient in the current environment, but the FileWave image folder already exists
- you need to bring an existing FileWave image folder into another FileWave server or admin workflow
This option is helpful when the image already exists in FileWave's imaging format and the real goal is simply to ingest it into the current environment.
If what you have is a FileWave export package, use Import Fileset. If what you have is a generic Windows imaging artifact like a WIM or ISO, this menu option is not the right workflow.
How
1) Confirm you have the right source folder
A valid Import Image source is a folder that contains the FileWave imaging metadata file and the image parts that belong to it.
At minimum, the folder needs:
image.json- the image files referenced inside
image.json
If those required files are missing, FileWave will reject the import.
2) Open the Import Image workflow
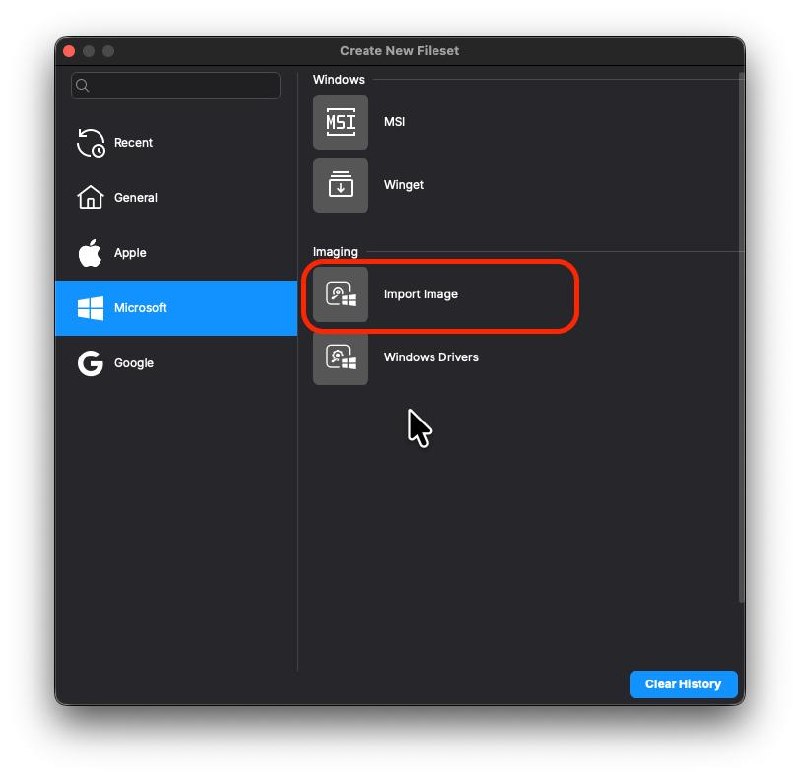
- Open FileWave Admin.
- Go to Filesets.
- Click New Fileset.
- Select Microsoft.
- Under Imaging, click Import Image.
3) Select the image folder
- Browse to the existing FileWave image folder.
- Select the folder itself.
- Confirm the import.
Do not select an individual .img file.
Do not use this workflow for a .fileset package.
4) Let FileWave create the imaging fileset
When the folder is valid, FileWave creates a Windows imaging fileset and uploads the referenced image data into the current FileWave environment.
The imported item will appear as an image fileset in Filesets, and it can then be used in Imaging.
5) Assign the imported image
After the import finishes:
- Open the Imaging area.
- Drag the imported image onto the target device, placeholder, or group.
- Optionally add a Windows Drivers fileset.
- Run Update Model.
- Allow the IVS to download the image before attempting deployment.
From that point forward, deployment works the same way as any other FileWave Windows image.
6) Troubleshoot common import failures
If FileWave shows an error that the folder does not contain the required files, verify that:
image.jsonis present- every image file referenced by
image.jsonis present in the same folder - you selected the folder, not a single file inside it
If the image was exported as a .fileset, use Import Fileset instead.
If you only have a WIM, ISO, or virtual disk file, you do not yet have a FileWave image folder for this workflow.
Related Content
- Windows Network Imaging - Capturing and Deploying Images
- Creating Windows Driver Filesets
- Including the FileWave client on an image
- FileWave Fileset Types
Digging Deeper
The confusing part is that FileWave has two different import ideas that sound similar but are not the same thing.
- Import Fileset is for FileWave package exports such as
.filesetand.fwtemplate - Import Image is for a Windows imaging folder that is already in FileWave's imaging format
That distinction is easy to miss in the UI, so it is worth calling out directly in support responses and in related KB content.
No comments to display
No comments to display