Enrolling Mobile Devices into FileWave
Mobile devices can be imported or represented in FileWave before enrollment so administrators can prepare groups, Filesets, and Deployments in advance. Apple mobile devices—including iPhone, iPad, and Apple Vision Pro—can enroll through Automated Device Enrollment (ADE) or the supported manual mobile-enrollment workflow. Android devices use the applicable Android enrollment workflow. After enrollment, the device has the FileWave certificate and MDM profile required for management.
Web-based enrollment - Apple mobile devices
To enroll an iPhone, iPad, or Apple Vision Pro over the Internet, use the URL that points to the FileWave MDM server. In FileWave Central, the existing interface label remains Assistants > Enroll iOS Device; this mobile-enrollment workflow also applies to supported iPadOS and visionOS devices.
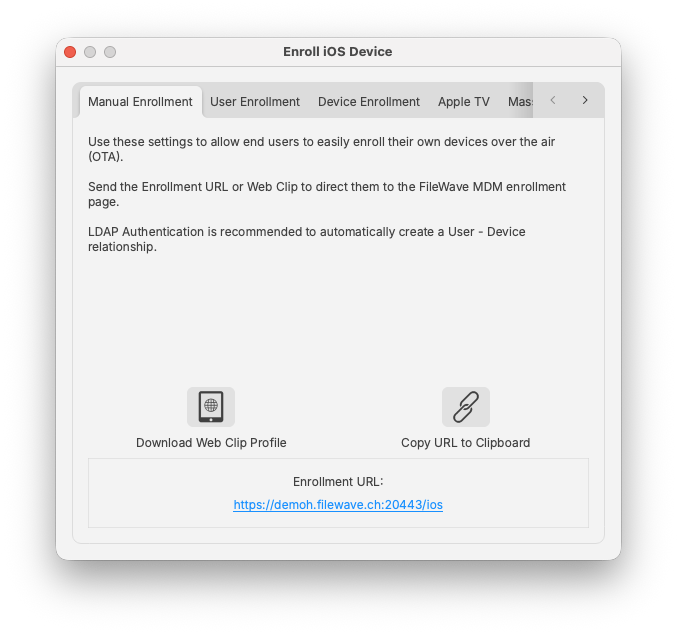
You can create a Web Clip with that URL embedded or copy the URL to the Clipboard and email it to your users. When they go to that URL on their mobile device, they will get instructions on how to properly enroll their device with your server. Having your FileWave server linked to your LDAP server allows the users to authenticate as themselves, instead of using a generic user account. This provides the benefit of having the user's LDAP record link its account information to the device. Another result of this is that the user can be automatically invited to link their Apple ID with your FileWave VPP service.
The user is presented with a dialog prompting to install a MDM server certificate, then enroll the device. The second step is when the user will be asked to authenticate - and this is where LDAP integration comes in handy. If not using LDAP, you need to inform users of the generic credential to use, or else they will not be able to proceed with step 2.
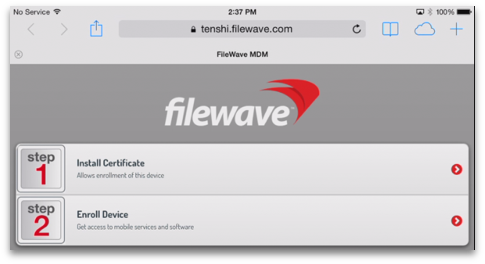
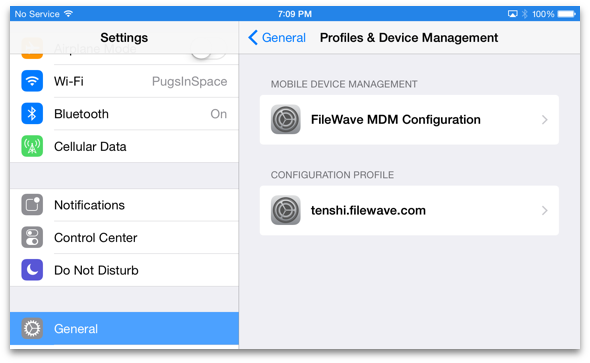
Once the user has completed these two steps, the device will display the new profiles that have been installed:
If the user's device is not yet a FileWave Client (no placeholder record previously created), it will need to be captured in FileWave Admin. You will go to the Clients pane, select New Client from the toolbar.
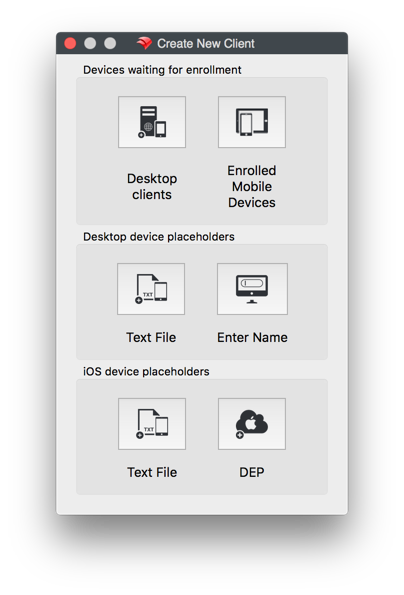
Select Enrolled Mobile Devices and you will get the list of all mobile devices that have performed an online enrollment, or have been activated by Apple Configurator:
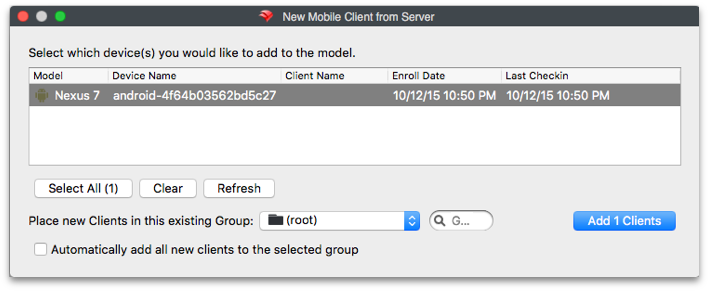
The device(s) can be automatically added to an existing client Group, or you can manually add them to a Group, if desired. If you have devices set to be automatically added to a specific Group, then you will just see them appear as members in that Group.
Note: Unless you want all devices that enroll during a specific timeframe to end up in a designated Group, you should leave automatic placement off. You should also think about using Clones instead of the actual device client as members of any Groups.
Automatic or Forced Enrollment - iOS
Another option for enrollment is using an embedded enrollment profile as part of a mobile device configuration. Apple Configurator allows you to import a FileWave MDM enrollment profile, which will then be used to assign the device to your FileWave MDM server.
Instructions are included here for Apple Configurator v2.2.1.
Single device enrollment
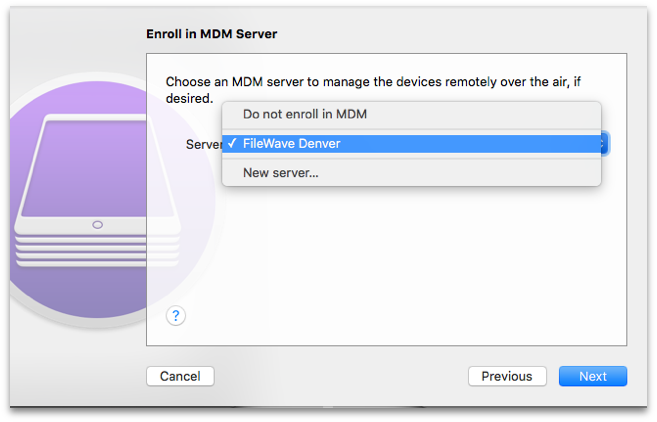
In FileWave Admin, under /Assistants/Enroll iOS Device, you select Device Enrollment:

Apple Configurator v2.2.1
Apple Configurator 2's blueprints let you record actions that can be applied to devices. You add configuration profiles and apps to blueprints, just as you would add them to a physical device. You can prepare a blueprint so it has the MDM data and supervision identify attached. Once you have the blueprint the way you want, you can apply it to a device. For detailed info on how to use Apple Configurator 2, see: http://help.apple.com/configurator/mac/2.0/
To create a blueprint, click  in the toolbar, select Edit Blueprints, then click on New in the bottom left corner to create a new blueprint. Perform your edits. When you finish, click Done.
AC2 allows you to configure sets of devices, re-installing iOS, setting up profiles, and assigning to an MDM server.
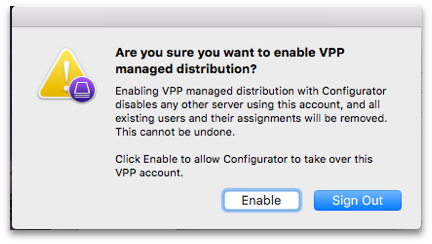
Apple Configurator 2 supports using an Apple VPP account to assign purchases to attached devices. You should only set this up if you are not going to be using VPP from your FileWave server to associate licensed content, or if you are going to use a separate account to apply specific core content to your iOS devices outside of any FileWave workflows.
Note: You cannot use the same VPP account token you are using on your FileWave server to distribute content!

App Store account
You can sign in to the App Store using the following:
Volume Purchase Program (VPP) account: You log in with the Apple ID associated with your VPP account or the Apple ID associated with a purchaser you specify
Your personal account: This is the iTunes account you use to purchase personal apps
WARNING: If your VPP account is already associated with another instance of Apple Configurator 2 or an MDM solution, all app assignments from those previous associations will be revoked.
Once you have enrolled your mobile devices, and added them as clients in FileWave, you should see a set of installed profiles like the ones below.

Using AC2 for direct assignment of applications allows you to preload your iOS devices with core applications without requiring user interaction. The workflow would create a layer in your deployment model that lets you preconfigure devices that will become FileWave Clients for all day-to-day operations and management; but come equipped with a starting set of tools.
Mass Enrollment for iOS
You can set up Apple Configurator for bulk enrollment of preconfigured iOS devices by using this option in the Enroll iOS Device assistant. The device must be connected to Wi-Fi already before this process will work. If not, then make sure you add a Wi-Fi profile to your Apple Configurator setup. This process is built into AC2 using the steps above, since it already supports setting up multiple devices simultaneously.
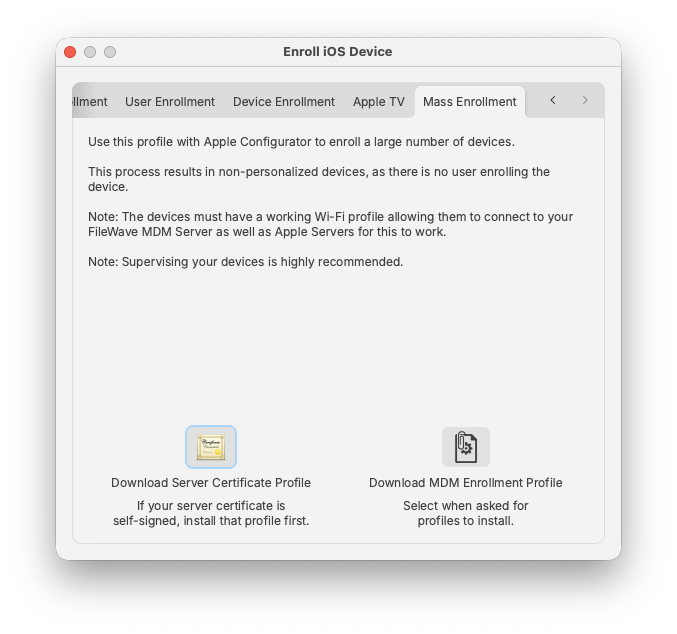
In this case, you would just download the MDM Enrollment profile, import it into Apple Configurator, and apply it to a set of iOS devices that were cloned with wireless settings, or a profile, already in place.
FileWave Enterprise App Portal for iOS
Starting with FileWave 8.5, iOS devices running iOS 7+ use a native iOS App Portal (Kiosk) instead of the web clip. iOS 8+ devices must use the App Portal. Instructions on how to deploy the App Portal are covered in Chapter 5 on mobile Filesets. When iOS devices are enrolled, they get the web clip version of the Kiosk. The new Enterprise App Portal automatically replaces the web clip and provides a more robust, responsive self-service tool.
Activation Lock Bypass
Since the introduction of iOS 7, device users have been able to enable a feature known as Activation Lock - which is linked to Find My iPhone. This feature ties a device to a specific Apple ID. In order to activate a device with an Activation Lock after a wipe or reset, the Apple ID credentials of the locking account are required. Where this can become problematical is having a 1:1 deployment where a user sets the Activation Lock on their device, then leaves without de-activating the lock. Prior to iOS 7.1, this issue was limited to unsupervised devices, since supervision inhibited the activation lock. Apple has provided a process now to supervise a device, yet still provide the activation lock - as well as a way to deactivate the lock when necessary.
FileWave Admin contains a new Assistant labeled Activation Lock Management. When an iOS device is enrolled in the FileWave MDM, its activation lock is stored in the FileWave Server.

If a device is sent a remote wipe command, the activation lock can be disabled at the same time.
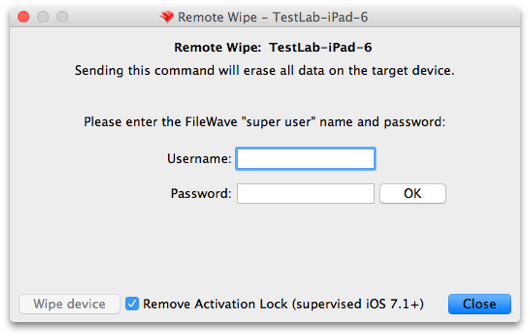
These lock bypass codes are stored in the FileWave server, and remain even when the device has been un-enrolled. The information concerning devices with bypass codes is even provided in Inventory queries. Best practice is to maintain the codes for institutional devices, regardless of the device's enrollment status, as a safety measure. If the device is no longer used, or taken offline, do NOT delete the device from your FileWave database, just archive the device. Once the device has been deleted, the activation lock information is deleted also.
Note: In order to access the Activation Lock Bypass controls in FileWave Admin, you must login as the superuser (fwadmin).
|
You can also configure Activation lock in the ADE profile: Working with Apple’s Automated Device Enrollment (ADE) |
iOS/tvOS Device Placeholders
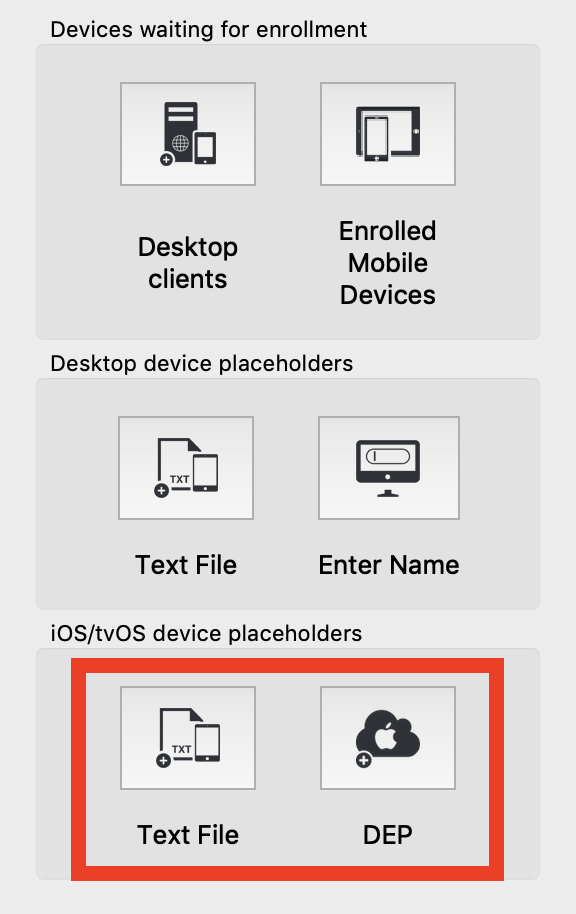
Text File (iOS Devices from CSV)
When importing from a CSV file, FileWave Admin will ask for the CSV file first. The following fields are supported:
- serial number of the iOS device;
- client name; and,
- comments (optional).
After opening the file, a dialog opens with the list of parsed devices, allowing you to select which devices to import. The dialog is the same as for importing text files.
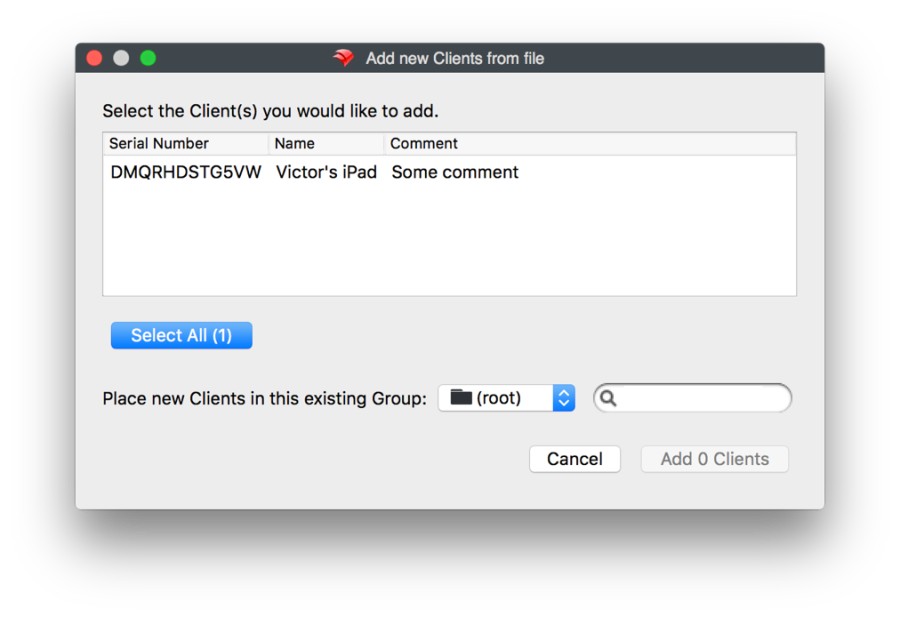
Just select any devices and click Add X Clients. After doing that, the new devices will appear in the Clients view. However, there's almost no information provided for them.
It's possible to create associations and manage licenses (VPP for instance) on placeholder records the same way as if the devices had already enrolled. Update the model and any associated Filesets will be deployed automatically when the devices enroll.
iOS Devices from ADE
A ADE account must be configured in FileWave Admin before being able to pre-import from DEP.
When importing from ADE, FileWave Admin will show the list of ADE accounts and the number of devices associated to that account that are iOS devices and whose serial number are not already used with your FileWave Server.
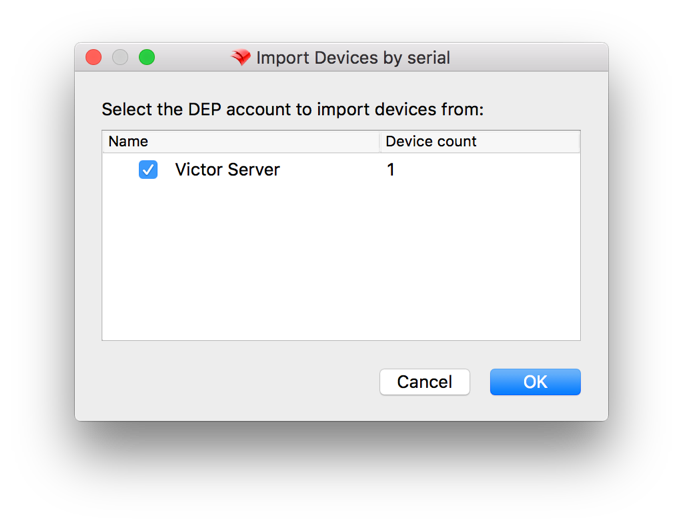
You check the ADE accounts from which you want to import devices, then click OK. After doing so, placeholders for all devices from the selected account will be created. You can create associations as usual, update the model, and their corresponding Filesets will be deployed when the devices enroll.
Once the device is enrolled, its name in FileWave transitions from the serial number to the actual device name. If there is a ADE naming convention, that will automatically apply.
|
See Placeholders for what can be done with the imported devices |
No comments to display
No comments to display