Superprefs Fileset
What
When you create a Custom Client installer, the FileWave Client preferences are packaged into that installer: server name, ports, Boosters, and related client settings. That is useful for the base configuration, but one preference set is not always right for every device.
A Superprefs file lets you deploy selected FileWave Client preference changes to macOS or Windows devices after the client is installed. You can use one Superprefs Fileset for a broad change, or multiple Superprefs Filesets for different groups of devices.
Only the settings included in the Superprefs file are changed. Settings that are not included remain untouched on the client.
When to use this
- Changing client logging level for troubleshooting
- Adjusting Booster or communication preferences for a specific group of devices
- Applying a new client preference without rebuilding and redeploying the Custom Client installer
- Returning temporary troubleshooting settings back to standard values after testing
Ingredients
- FileWave Clients on macOS or Windows
- FileWave Superprefs Editor
- FileWave Central Admin App
Create the Superprefs plist
The Superprefs Editor is installed with the FileWave Central Admin App:
| macOS | /Applications/FileWave/Superprefs Editor.app |
| Windows | C:\Program Files (x86)\FileWave\FileWaveSuperPrefsEditor.exe |
When the editor opens, it may ask you to open an existing plist. Cancel that window if you are creating a new Superprefs file.
Only settings that you add or edit in the Superprefs Editor are written into the plist. This keeps the deployment focused and avoids overwriting unrelated client preferences.
Example: set Debug Level to 99
Debug Level has three common values:
| 10 | Standard logging (default) |
| 99 | Debug logging |
| 101 | Trace logging |
To enable debug logging, open the Superprefs Editor, cancel the Finder or Explorer window if you are creating a new file, go to the Options tab, set Debug Level to 99, and save the file.
The file must be named fwcld.newprefs.plist.

The saved plist should contain only the changed key:
Dict {
    debugLevel = 99
}
Package the plist in a Fileset
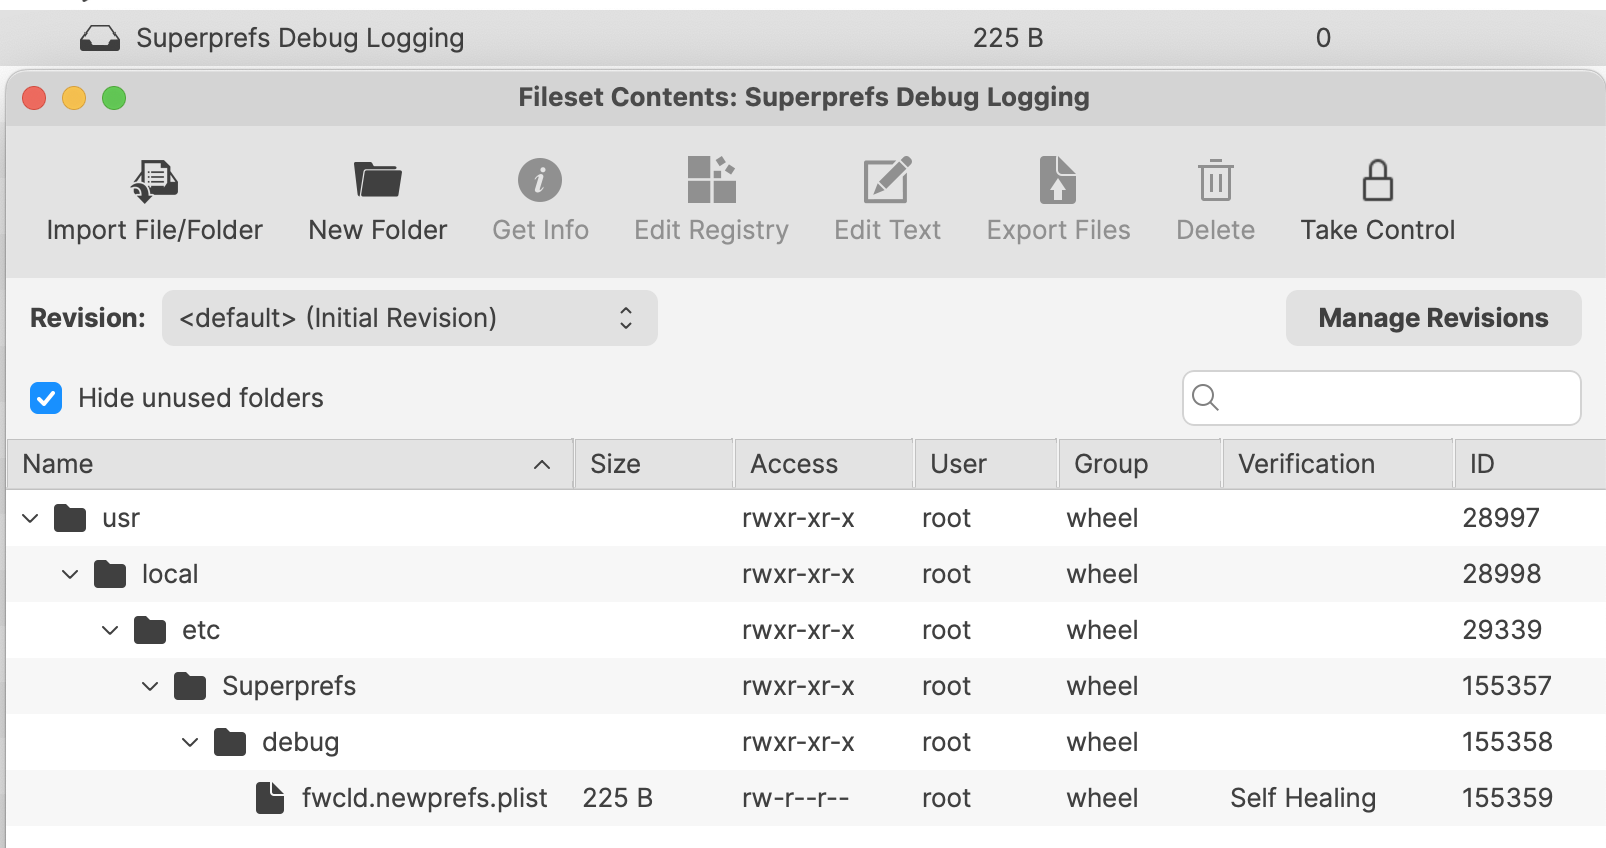
The fwcld.newprefs.plist file can be placed in any reasonable path inside the Fileset. A dedicated Superprefs folder makes the purpose clear and lets you keep separate folders for different preference sets.
| macOS | /usr/local/etc/Superprefs/debug/fwcld.newprefs.plist |
| Windows | C:\ProgramData\FileWave\Superprefs\debug\fwcld.newprefs.plist |
You can add the file to an existing Fileset, but a dedicated Fileset is usually easier to target, test, and remove later.
From the FileWave Central Admin App:
- Create a new Empty Fileset and name it clearly.
- Open the Fileset and disable Hide unused folders.
- Select or create the desired location for the plist file.
- Drag fwcld.newprefs.plist from Finder or Explorer into that location in the Fileset.
Using the debug logging example for macOS, the Fileset could look like this:
When the Fileset activates on a client, Debug Level should switch to 99 and the client log should reflect the change.
Always test with one device or a small pilot group before associating the Superprefs Fileset more broadly.
For temporary troubleshooting, create a matching Superprefs Fileset that returns Debug Level to the standard value of 10 when analysis is complete.
GUI observation
Some Superprefs Editor entries are Boolean values, such as Booster Routing. Boolean entries can be set to True, set to False, or left unset. A dash means the value is not included in the Superprefs file.
The three states appear as:
| False |
| True |
| Unset |
No comments to display
No comments to display