Apple Configurator 2 Enrollment
The following steps will assist you in the enrollment process for iOS devices with Apple Configurator 2 into FileWave.
This guide assumes you've already set up DEP in FileWave and that your devices are assigned to a MDM server within Apple School/Business Manager. If not, please review the KB article to add devices to Apple School/Business Manager.
Prepare
Before starting be sure you have:
- A running FileWave server with your HTTPS certificate, APN, and DEP (if using DEP) settings in the preferences completed
- To set up DEP, see "VPP and DEP preferences" and "Working with Apple’s Device Enrollment Program (DEP)"
- For HTTPS certificate and APN setup, follow the Quick Start— MDM guides for OS X or Win, according to which OS your Admin is installed on: Apple General Settings (APN)
- Wi-Fi profile: This can be created in AC2 File > New Profile > Wifi; alternatively, you can create this in FileWave.
- An OS X 10.11 device with Apple Configurator 2 installed
- iOS device 7.0+ and lighting cable
- Access to the ports specified below
Network Considerations
Clients and the FileWave server need to be able to connect to each other and to Apple with the following ports:
- 20443-20445
- 2195-5223
DEP AC2 Enrollment
-
- Make sure you've created your association in FileWave, in the DEP Association Management window under the Assistants menu (between the DEP profile and devices). Simply click and drag the devices over to the right pane, on top of the profile you created. This profile contains settings such as whether the device will be supervised, setup items, and how the device will be named.
- You're now ready to work in AC2, so connect the iPad to your Mac with a lightning cable and launch AC2.
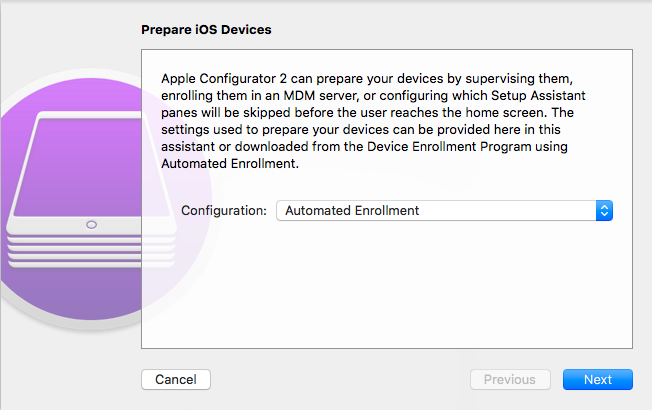
- When you see the device in the Connect Device pane, left-click the device and hit the Prepare button at the top, with the gear icon.
- Select the Automated Enrollment option from the drop-down menu and hit Next.
-
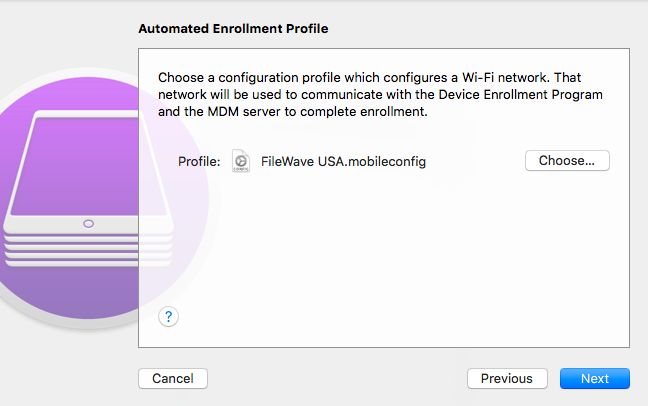
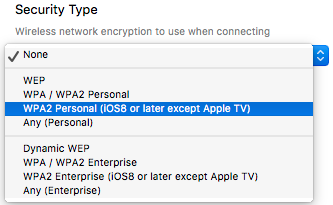
- You'll then need to upload a Wi-Fi profile. Hit Choose and locate the profile via Finder. When you create the Wi-Fi profile, select the "(iOS8 or later except Apple TV)" option for your WPA2 security types.
-
- Choose the Security Type
-
- You'll now be prompted for Automated Enrollment Credentials, which should have been created during your FileWave MDM setup using the Quick Start guides (linked to in the Prepare section at the top of this article). If you want to use LDAP authentication, you'll need to type in one set of credentials. If you have multiple devices connected, you won't be able to use a different user name/password for each device with AC2.
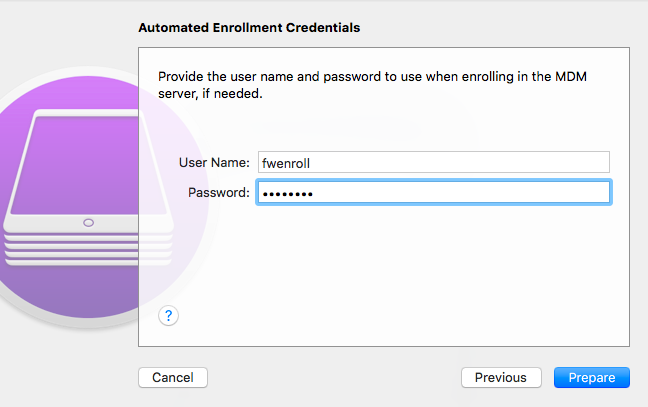
- After you type in your credentials, hit Prepare, which will start the configuration. If you've already prepared the device, you'll be prompted to hit Restore or Stop. You must hit Restore to allow AC2 to finish the process as follows:
- Downloading iOS
- Unzipping iOS
- Installing iOS
- Downloading activation record for the iPad
- Activating iOS on the iPad
- Downloading and applying cloud configuration
- Awaiting final MDM configuration
- The iOS device will prompt you to "Slide to continue" at the Hello screen. Next, go through the setup options (such as Location Services) that you previously set up to enable or skip in the DEP profile in FileWave. Completing these steps will land you on the home screen of the iOS device, where you'll see the FileWave App Portal.
- If you don't have auto-enrollment set up in FileWave (located in the Checked-in Clients section), go into the Admin to bring the device into the system.
Congratulations! You have now enrolled a DEP iOS device with Apple Configurator 2 into FileWave!
Non-DEP AC2 Enrollment
-
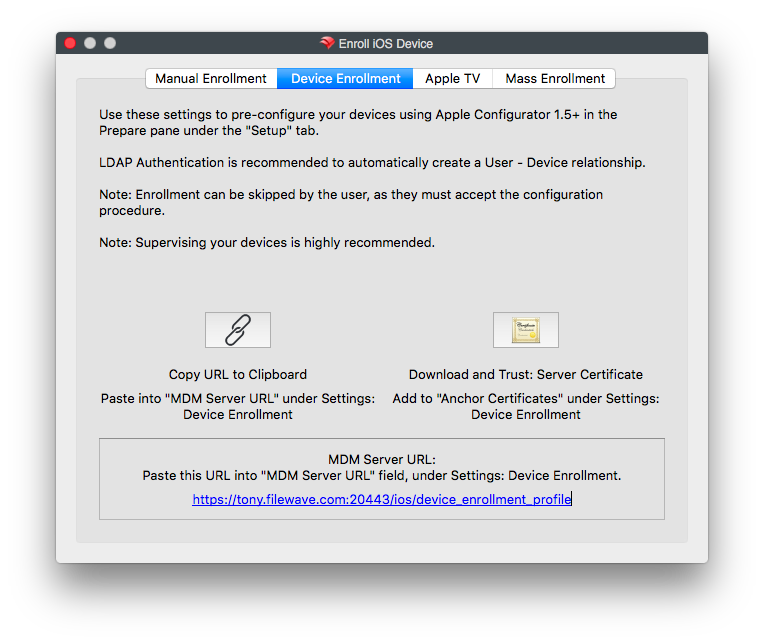
- Copy the URL at the bottom of the Device Enrollment tab in the Enroll iOS Device window. (Assistants > Enroll iOS).
-
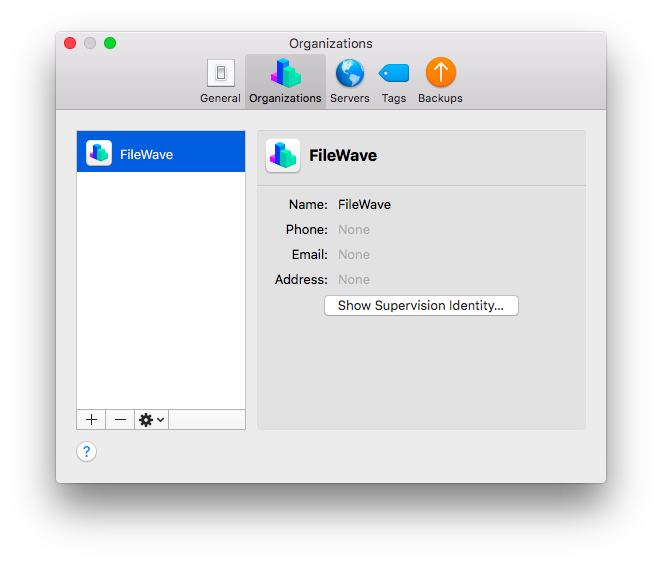
- Under the AC2 Preferences, create an organization
-
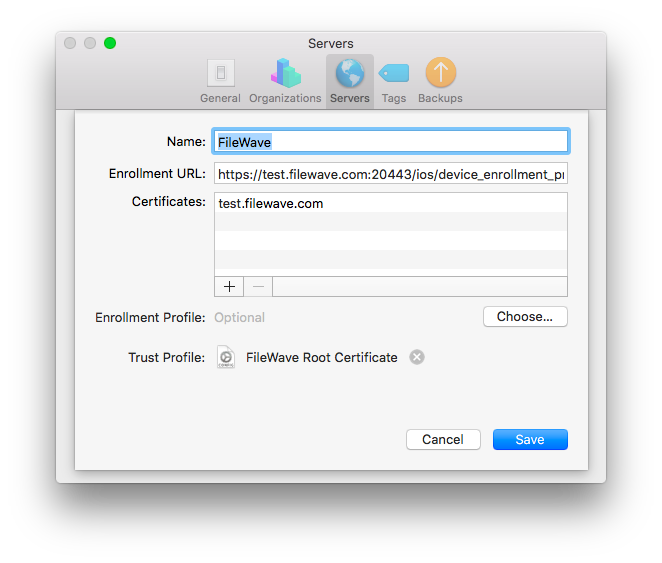
- Under the Servers tab, hit the + sign at the bottom left.
- Name the server, and then paste the Enrollment URL you got from the FileWave Enroll iOS window. Hit Save. Note: AC2 tries to change the URL to "DEP" instead of "device_enrollment," so after you save the server, hit the Edit button, paste the enrollment profile, and save again.
-
- You're now ready to connect the iPad to your Mac with a lighting cable and launch AC
- When you see the device in the Connect Device pane, left-click the device and hit the Prepare button at the top, with the gear icon.
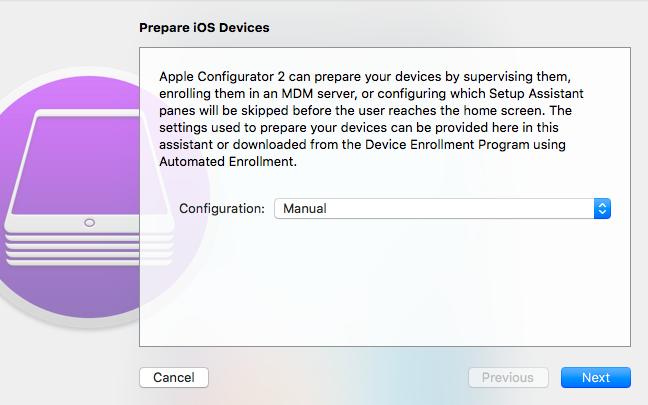
- Select the Manual option from the drop-down menu and hit Next.
-
- You will then be at the "Enroll in MDM Server" screen, use the drop-down menu to select the server you created in step 4
- You will then be at the "Enroll in MDM Server" screen, use the drop-down menu to select the server you created in step 4

-
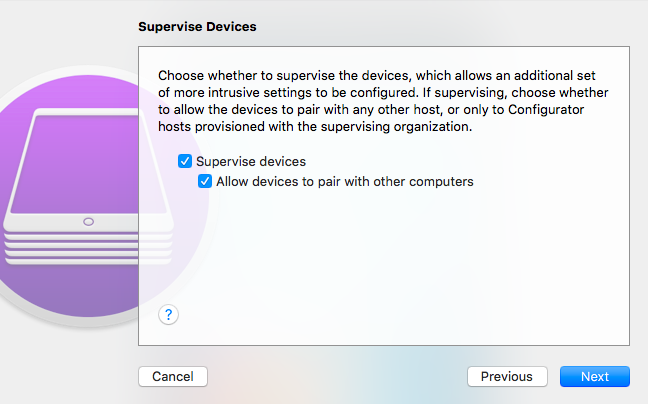
- On the next screen, choose whether to supervise your device. Supervision determines the amount of control you have over your device in FileWave. If you decide to start supervising the device later, the device will first have to be wiped.
- On the next screen, choose whether to supervise your device. Supervision determines the amount of control you have over your device in FileWave. If you decide to start supervising the device later, the device will first have to be wiped.
-
- On the Assign to Organization screen, pick the organization you created in Step 2
- On the Assign to Organization screen, pick the organization you created in Step 2

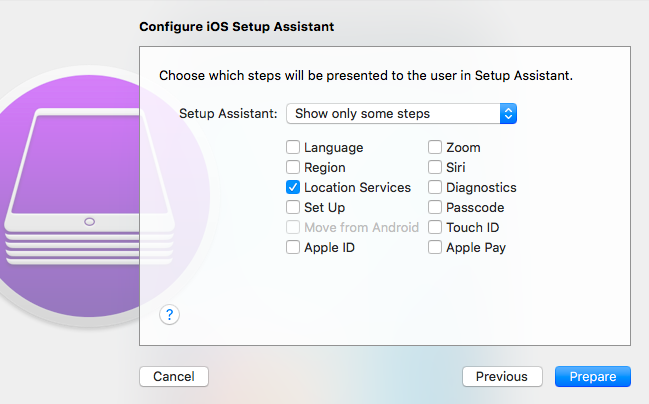
- Your final task in AC2 is to configure the iOS setup screen. This will allow you to skip certain steps during the configuration on the Hello screen. Note: If you're planning to use the location-tracking feature in FileWave, you'll want to enable Location Services during setup.
- Hit Prepare to start the configuration. If you've already prepared the device, you'll be prompted to hit Restore or Stop. You must hit Restore to allow AC2 to finish the process as follows:
1. Downloading iOS
2. Unzipping iOS
3. Installing iOS
4.Downloading activation record for the iPad
Note: If you get the AC2 error "This operation couldn't be completed. (NSCocoaErrorDomain - 0x64 91000))," hit Stop and try to prepare the device again. The preparation will go more quickly this time, taking only two steps.
- The iOS device will now be at the Hello screen. Hit Next and enter the Wi-Fi.
- Next, go through the setup options (such as Location Service) that you previously set up to enable or skip.
- Prompted now will be "your organization can automatically configure your iOS device". You'll be asked to apply or skip the configuration.
- After you hit Apple Configuration, you'll be prompted for a user name and password. This needs to be created on your FileWave server. To create a new user, use the following command on your FileWave Management Server, where [username] is the name you would like to use:
fwcontrol mdm adddeuser [username]
Then submit a password for the new user.
- After you accept the Terms and Conditions from Apple, hit Get Started. The iOS device will be on the home screen.
- If you don't have auto-enrollment set up in FileWave (located in the Enrolled Mobile Devices section), go into the Admin to bring the device into the system.
Congratulations! You have now enrolled a Non-DEP iOS device with Apple Configurator 2 into FileWave!
No comments to display
No comments to display