DEP Notify - How to provide progress visibility during ADE activation (macOS)
New to Automated Device Enrollment (ADE) process? Do you have a create full of macOS devices that need to be prepared and issued to end users? Did this need to happen yesterday?
The world of ADE device provisioning has been a great help and has improved the speed at which devices can be issued to end users. Gone are the days of monolithic imaging! Long live ADE! But what is happening when a macOS device is going through the Setup Assistant process? Want to get some visibility on what is being installed during the device activation? Traditionally, when a device goes through the ADE assistant, any number of applications can be deployed to the device. The problem with this approach is that there is not any indication given to the end user as to what is happening during this time interval. To an end user, it could appear that there is a problem with the device, and they may create support tickets to your Help Desk on the subject.
In order to avoid that, we need to provide some visual indication of what is happening behind the scenes during this setup time. To do so, we will leverage two separate open source projects that are in use in the mac community, namely InstallApplications and DEPNotify.
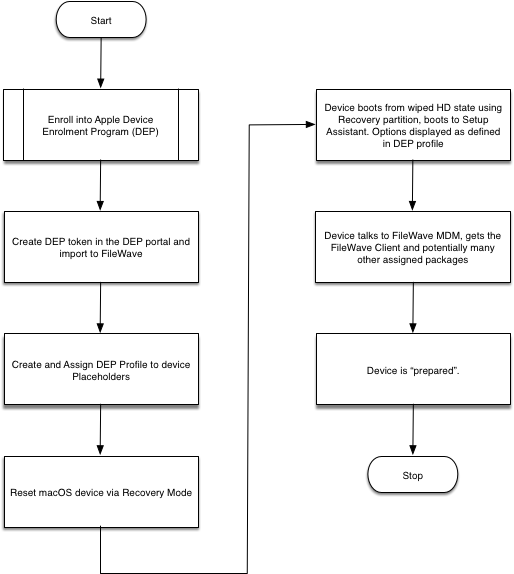
FileWave, by default, will provision a ADE device, enroll it into the MDM server, then deploy the custom macOS client to the device. The process looks something like this:
We need to instruct the FileWave server to deploy the open source package InstallApplications first so that we can set up the DEPNotify package and get feedback with all the great logging information that FileWave gives via its client log. The modified process looks something like this:

Step-by-step guide
Create, configure, and deploy the InstallApplications package
Create boostrap.json
- Visit Erik Gomez's blog to get a practical example of configuring InstallApplications as well as some history and background on the project.
- Visit Erik Gomez's github site and download the latest code. For the purposes of this document, I have used version 1.1.
- Follow the instructions on the above site to configure your bootstrap.json file. Also, see the section below "Generating your bootstrap.json" for a simple example to get started with. To make troubleshooting easier, configure one or two packages defined in your bootstrap.json and ensure your packages are downloading correctly and your Install Application launch agent and launch daemon work successfully. If you have too many packages defined, it may be more difficult to determine where your configuration problem lies.
- Generate your bootstrap.json with the generatejson.py script on Erik's site, which automatically generates the SHA256 hashes for you.
- Once you have the bootstrap.json file generated (below is a sample boostrap.json), you will need to host it somewhere (like your filewave server) in order for the macOS client to download it during DEP activation.
bootstrap.json
{
"preflight": [],
"setupassistant": [
{
"file": "/some_path/DEPNotify_installer.pkg",
"url": "https://<your_filewave_server>:20443/some_folder/DEPNotify_installer.pkg",
"packageid": "com.package.depnotify",
"version": "1.0",
"hash": "some_long_hash",
"name": "DEPNotify",
"type": "package"
},
{
"file": "/some_path/FileWave_installer.pkg",
"url": "https://<your_filewave_server>:20443/some_folder/filewave_installer.pkg",
"packageid": "com.package.filewaveinstaller",
"version": "1.0",
"hash": "some_long_hash",
"name": "FileWave Client",
"type": "package"
}
],
"userland": [
{
"file": "/some_path/EnergySaver.py",
"url": "https://<your_filewave_server>:20443/some_folder/EnergySaver.py",
"hash": "some_long_hash",
"name": "Energy Saver Profile",
"type": "rootscript"
}
]
}
Note: In the above bootstrap.json, the preflight stage is required, even if it is empty. If you don't have it defined, the script will error out (01/20/2018).
Hosting and Serving your packages via the FileWave Server (Linux)
To serve packages from FileWave, we will need to modify the httpd_custom.conf file for apache. To do this:
- On the FileWave server, open "/usr/local/filewave/apache/conf/httpd_custom.conf" and add the following:
Alias /custompkg /usr/local/filewave/custompkg <Directory "/usr/local/filewave/custompkg"> Options Indexes FollowSymLinks AllowOverride All Order allow,deny Allow from all </Directory> - Restart apache with "fwcontrol apache restart"
- Create the folder "custompkg" within /usr/local/filewave/. This will be the storage location for all of the packages that you defined in your boostrap.json file.
Testing the InstallApplications workflow outside of the ADE activation process
- Testing the InstallApplications workflow outside of the ADE workflow will save you time.
- To do this, execute the installapplications.py using the following command line on any macOS test device, such as a VM:
Launching installapplications.py manually
sudo python /Library/Application Support/installapplications/installapplications.py --jsonurl https://<your_filewave_server>:20443/bootstrap.jsonThere is also an option to skip the validation of the bootstrap.json file. Use this option to include the bootstrap.json in the installapplications package rather than download it via url.
sudo python /Library/Application\ Support/installapplications/installapplications.py --jsonurl https://<your_filewave_server>:20443/bootstrap.json --skip-validationIt turns out that the installapplications.py really doesn't like urls that have redirection. So, if you want to use some file hosting site like Dropbox, etc. think again. You may choose to host all the files on github, but then convert to raw links using rawgit.com; these links do not seem to redirect and worked fine to download installer packages via installapplications.py. Alternatively, you can choose to serve these files directly from your FileWave server.
Configure the InstallApplications LaunchDaemon and LaunchAgent
LaunchDaemon:
- Edit payload/Library/LaunchDaemons/com.erikng.installapplications.plist
<?xml version="1.0" encoding="UTF-8"?>
<!DOCTYPE plist PUBLIC "-//Apple//DTD PLIST 1.0//EN" "http://www.apple.com/DTDs/PropertyList-1.0.dtd">
<plist version="1.0">
<dict>
<key>Label</key>
<string>com.erikng.installapplications</string>
<key>ProgramArguments</key>
<array>
<string>/usr/bin/python</string>
<string>/Library/Application Support/installapplications/installapplications.py</string>
<string>--jsonurl</string>
<string>https://<your_filewave_server>:20443/custompkg/bootstrap.json</string>
<!-- <string>--iapath</string> -->
<!-- <string>/Library/Application Support/installapplications</string> -->
<!-- <string>--laidentifier</string> -->
<!-- <string>com.erikng.installapplications</string> -->
<!-- <string>--ldidentifier</string> -->
<!-- <string>com.erikng.installapplications</string> -->
<string>--depnotify</string>
<string>DEPNotifySkipStatus</string>
<string>Command: WindowTitle: Welcome to your Mac!</string>
<string>Command: NotificationOn:</string>
<string>Command: Quit: Thanks for your patience while we setup your new mac.</string>
<string>Command: WindowStyle: ActivateOnStep</string>
<string>DEPNotifyPath: /Applications/Utilities/DEPNotify.app</string>
<string>DEPNotifyArguments: -filewave</string>
<!-- <string>DEPNotifyArguments: -filewave -fullScreen</string> -->
<!-- <string>--reboot</string> -->
<string>--skip-validation</string>
</array>
<key>RunAtLoad</key>
<true/>
<key>StandardOutPath</key>
<string>/var/log/installapplications.log</string>
<key>StandardErrorPath</key>
<string>/var/log/installapplications.log</string>
</dict>
</plist>
In the above example, I left the reboot and fullscreen option disabled, but feel free to adjust this according to your needs.
LaunchAgent:
There was no need to adjust this, but if you wish to customize the install applications bundle ID, you will have to edit this file.
Signing your InstallApplications package
Prerequisite: Membership in Apple's Developer Program
- Use a package creation utility to generate the .pkg for installapplications. One type of tool to use is Apple's command line pkgbuild, for example:
pkgbuild --identifier com.erikng.installapplications --root <path_to_root_of_installapplications_payload> InstallApplications.pkg
- Only distribution style packages are supported, so to convert from a flat package to a distribution package:
productbuild --package InstallApplications.pkg InstallApplicationsDistr.pkg
- To sign the distribution package:
/usr/bin/productsign --sign "Developer ID Installer: <yourID> (XXXXXXXX)" InstallAppplicationsDist.pkg FileWaveClientInstaller.pkg
- To check your signing, you can issue:
pkgutil --check-signature FileWaveClientInstaller.pkg
The above command should return "Status: signed by a certificate trusted by Mac OS X".
Test the "InstallApplications.pkg" thoroughly on a test mac before attempting to deploy via the ADE Setup Assistant.
Steps for deploying your signed InstallApplications.pkg using FileWave
Instead of deploying the macOS custom pkg, you will be deploying the InstallApplications.pkg. If you are currently deploying the custom FileWave client in your ADE workflow as the starting point, I highly recommend testing this workflow out on a test server before deploying to production. The deployment scenario below considers that we are running FileWave on the linux appliance and have NEVER previously deployed the custom FileWave client before using the InstallApplication ADE workflow.
- Open an ssh connection to your FileWave server
$ ssh root@<yourfilewaveserver.com> - Run a complete backup of your filewave server.
- Backup the current ADE macOS installer package
$ cd /usr/local/filewave/fwcld $ mv FileWaveClient.pkg FWClient_old.pkg - Copy your signed InstallApplications.pkg on your mac to the /usr/local/filewave/fwcld folder on your FileWave server and change its name at the same time
$ scp /InstallApplications.pkg root@yourfilewaveserver.com:/usr/local/filewave/fwcld/FileWaveClient.pkg - Remove the MD5 hash of the old FileWave macOS custom pkg from the database. You should see that the above query should affect one row only.
$ /usr/local/filewave/postgresql/bin/psql mdm django -c "DELETE from ios_preferences WHERE key = 'dep_osx_package_md5';" - Set the MD5 checksum and version of the "FileWaveClient.pkg" (really now the InstallApplications package disguised as the FileWave client package).
macOS FileWave Server:
# sudo /usr/local/filewave/python/bin/python /usr/local/filewave/django/manage.pyc shell
from ios.fwcld_utility import get_package_sha256;
get_package_sha256(force=True)
from ios.preferences_manager import PreferencesManager; PreferencesManager.set_dep_osx_package_version("14.0.3")
exit()
fwcontrol server stop
fwcontrol server start
Linux FileWave Server:
# sudo /usr/local/filewave/python/bin/python /usr/local/filewave/django/manage.pyc shell
from ios.fwcld_utility import get_package_sha256;
get_package_sha256(force=True)
from ios.preferences_manager import PreferencesManager; PreferencesManager.set_dep_osx_package_version("14.0.3")
exit()
fwcontrol server stop
fwcontrol server start
Command to execute to generate the new MD5 for the "fake" Custom Client (InstallApplications.pkg):
from ios.fwcld_utility import get_package_md5;
get_package_md5(force=True)
This will generate a result like:
['70c829ddd9bd2aeafbe07fdd35f91c03']
Command to set the new "version" of the package:
from ios.preferences_manager import PreferencesManager; PreferencesManager.set_dep_osx_package_version("12.7.1")- Exit the psql shell with "\q"
- Restart the filewave server:
fwcontrol server restart
Result
During setup assistant, you will no longer get the custom FileWave client delivered first. The FileWave client will be installed by the InstallApplications script, along with any other crucial application / setup file that is needed (such as the Energy Saver) during ADE provisioning. Once the FileWave client is on the device, all other associated filesets can be deployed according to the needs of the end user.
No comments to display
No comments to display