
Android Enrollment
Enroll an Android phone or tablet
Before you begin, complete Configure Android Enterprise in FileWave. If Android Enterprise is already configured, use that connection. Have a device running a supported Android version and internet access to Google and FileWave services.
Choose the enrollment method
| Device | Method | Starting point |
|---|---|---|
| Company-owned phone or tablet for work-only use | Fully managed enrollment | A new or factory-reset device at the initial setup screen. |
| Personally owned phone or tablet | Personal-device work profile (BYOD) | A device already set up for personal use. No factory reset is needed. |
Fully managed enrollment lets the organization manage the whole device. A personal-device work profile keeps managed work apps and data separate from personal apps and data. For your first enrollment, use one test device and check which policies and group assignments it will receive.
A factory reset erases the device’s existing data. For fully managed enrollment, use a company-owned test device you can reset, back up anything you need, and have the account details needed to clear Factory Reset Protection. Do not reset a personally owned device for work-profile enrollment.
For reseller-registered devices, Android Zero-Touch Enrollment is another option. After zero-touch setup, continue with Add the device to FileWave Central and Confirm enrollment below. Company-owned work profiles and dedicated/single-app devices are different configurations from the two methods covered here.
1. Create an enrollment token in Central
The enrollment token connects the Android device to your FileWave environment. Create it in Central, then follow the device setup steps for the method you chose above.
- In FileWave Central, open Assistants → Enroll Android Device….
- Select + to create a token and open its Details tab.
- Under Reusable, select Single-use only for one device. Choose Multiple enrollments when you want several devices to use the same token. This setting controls token reuse, not the device’s ownership or management mode.
- Set Duration to the validity period you need. The dialog may initially show 2 Years; change the validity period to suit your enrollment schedule. Tokens are no longer limited to 30 days.
- Leave WiFi Profile unselected if you will connect the device to Wi-Fi manually. To include Wi-Fi settings in the QR code, follow Include Wi-Fi in the QR code before selecting Create. Add a recognizable Comment, such as Android evaluation.
- Select Create, then open the token’s QR Code tab. Keep this available while enrolling the device.
Keep the token and QR code private: they authorize enrollment. Share them only with the person enrolling the device, and exclude them from public screenshots and tickets.
2A. Enroll a company-owned device
Start with the device at its initial setup screen. Keep Central open so you can add the device after it enrolls.
- Tap the same spot on the initial setup screen six times to open QR-code enrollment.
- Follow the network prompts and scan the FileWave enrollment QR code when asked.
- Follow the prompts to set up Android Device Policy, which applies the organization’s Android management settings. Check that the expected organization is shown.
- Complete the device setup, including Install Work Apps or Setup if those prompts appear. Manufacturer screens may differ.
- Continue to Add the device to FileWave Central below.
The six-tap QR method requires a new or factory-reset Android 7.0+ device with QR support. Your FileWave release must also support the device’s Android version. See Google’s device setup methods.
Alternative: afw#setup
Instead of the six-tap method, follow initial setup and connect to Wi-Fi. At the Google account prompt, enter afw#setup. This downloads Android Device Policy; scan the FileWave QR code or enter the enrollment token when prompted, then finish setup. Use this instead of the QR-start method, not after it.
2B. Enroll a personally owned device
With the device owner’s agreement, create a work profile for the organization’s apps and data. Personal apps remain in the personal profile. Review the management disclosure and requested permissions during setup.
This method does not require a factory reset. If another organization already manages the device or its work profile, resolve that existing enrollment before adding FileWave.
- Install and open Google’s Android Device Policy on the device.
- Scan the FileWave enrollment QR code from within the app.
- Confirm the expected organization and follow the prompts to create the work profile and finish work-app setup.
- Look for work-badged apps and the work Play Store, separate from personal apps. Depending on the launcher, these may appear under a Work tab.
Continue with the Central steps below. If this personal-device setup asks for a factory reset, do not proceed with that reset.
3. Add the device to FileWave Central
If your enrollment rules already add devices automatically, find the device in Clients and continue to the enrollment checks. Otherwise:
- Open New Client → Enrolled Mobile Devices in Central. Refresh the list if needed.
- Find your Android device using its identifying information and enrollment time, rather than its name alone.
- Select the device and the group you want to add it to. Click Add 1 Clients. For this manual enrollment, leave Automatically add all new clients to the selected group unchecked.
- Review your pending changes.
Model Update publishes all administrators’ pending changes. Coordinate with anyone else working on the Server before confirming; the confirmation dialog does not preview the changes. See How FileWave turns your changes into device work.
Then choose Update Model and confirm.
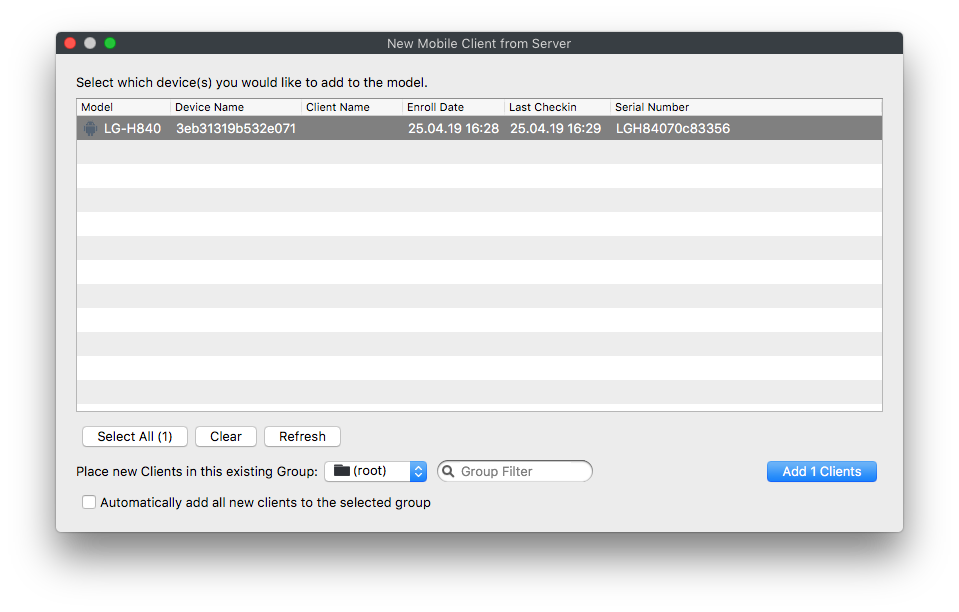
This earlier Central interface shows one selected Android device and the group selector. Choose your own destination group rather than the example’s root group.
4. Confirm enrollment
- Find the correct device in the expected Central group and check that it has communicated recently. Confirm the device is still online after its initial policies are applied.
- On Android, confirm that setup has finished and Android Device Policy shows the expected organization without an enrollment error.
- For personal BYOD, confirm that the work profile and work-badged apps are present. In FileWave inventory, Is User-Owned should be True; you can also add this field as a Clients-view column. A fully managed company-owned device should not report True. Both use the same Android icon.
Keep the device enrolled and continue to Android Software and Policies to deploy your first app.
If enrollment does not complete
- The QR code is rejected: check that the token is for the intended enterprise, has not expired, and has not already been consumed if it is single-use. Confirm the device can reach Google and FileWave services.
- The device is missing from Central: check Enrolled Mobile Devices and any automatic-add rules before repeating enrollment.
- Setup shows the wrong organization or ownership: check the enterprise and enrollment method before deploying apps. Do not repeatedly reset the device to troubleshoot.
- Android is in Safe Mode: return it to normal operation before enrolling.
- Device identifiers differ: some Samsung devices report two serial numbers. See Android EMM Known Issues and Historical Notes for the applicable version.
If these checks do not resolve the problem, contact your FileWave Systems Engineer with the error and the step where enrollment stopped. Do not include the token or QR code.
Optional: include Wi-Fi in the QR code
Before creating the token, you can select a Google Policy Fileset containing Wi-Fi settings in WiFi Profile. FileWave includes those settings in the QR code so you do not have to enter them on the device. You can also leave this field unselected and connect manually.
When Wi-Fi credentials are included, the QR code contains the password in plain text. Use a network appropriate for the evaluation and protect the QR code accordingly.
Close the QR display when finished and remove unnecessary printed or exported copies. Deleting a copy does not invalidate the token. If a reusable token is exposed, arrange to invalidate it.
Other Android capabilities
Location reporting is separate from enrollment. Force Location for EMM Android Devices covers the additional FileWave companion app, server configuration and location permission for fully managed devices. The Install Work Apps setup prompt does not by itself confirm that this companion app is installed. Plan location testing separately with user notice; do not apply that workflow to BYOD. FileWave handles any hosted-server changes.
When you eventually remove a personal device from management, use the work-profile removal procedure—not a full-device wipe.
No comments to display
No comments to display