Mobile Preferences - iOS / Android
The Mobile preferences are designed around Mobile Device Management for Apple's iOS/macOS and Google's Android/Chromebooks. This section discusses setting up the basic components in FileWave Central/Preferences.
Configure MDM Server
- MDM Server Address - Enter your MDM server's FQDN or routable IP address.
- Port - The default port for FileWave MDM is 20445.
- Shared Key - This is used to create a secure connection between the MDM Server and the FileWave Server. Generate a new key on Save only needs to be done once and is applied when the preferences are closed with the OK button.
Mobile Certificate Management (HTTPS Certificate Management)
This section shows the information used by FileWave to create a valid certificate that will be used to authenticate the FileWave MDM server with your clients and with Apple's Push Notification System.
- Details – Shows the details of the current certificate uploaded.
- Upload PKCS12 Certificate - This is used to upload a SSL certificate issues by a Certificate Authority.
- Get Current Certificate - Once you have a valid certificate, you can download a copy to be used with Apple Configurator.
Note: Self-signed certificates are no longer able to be generated in FileWave. A certificate signed by a CA is required for iOS, MDM enrolled Macs, and Chromebooks.
Apple Push Notification Certificate (APN) for iOS
The APN certificate is required to allow the application developers to send notifications to their applications, such as the Weather app getting current storm alerts. In order to allow the applications you deploy to your mobile devices to get these notifications, you request a secure certificate from Apple. The process for getting the certificate is detailed in the Appendix for FileWave administrators running either OS X or Windows.
Once you have received your APN Certificate from Apple, you will add it by clicking on the Upload APN Certificate/Key Pair button. This will configure your FileWave MDM server to support secure communications with Apple's Push Notification service.
Android/Chromebooks MDM Configuration
If you are deploying Android clients, then you will need to configure the Android/Chromebooks section of the Mobile preferences. You will need to get a Project Number and API key from Google. Instructions on how to accomplish that task are in the Appendix. Once you have those two items, go to the FileWave Preferences / Mobile pane and select the Android/Chromebooks tab.
Select the Configure GCM button, authenticate as the FileWave super administrator, then enter the Project Number and the Server API key you were given.
Click on Save and you should immediately see that GCM is correctly configured.
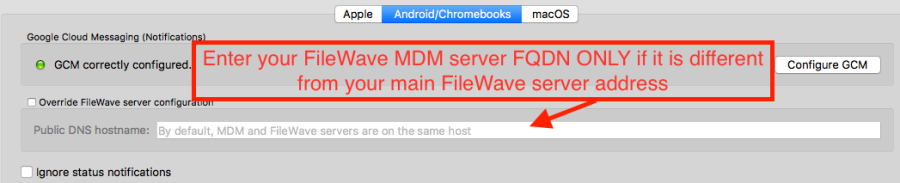
Override FileWave Server configuration
The Android client is a composite of the computer and iOS client. It must connect to both the FileWave Server and the FileWave MDM server. Enrollment is done the "iOS" way through the MDM portal; but the client must also connect to the main FileWave server for additional functionality. In most cases, this is not an issue because the FileWave Server and the FileWave MDM server are on the same system. However, it is possible for you to configure the two services to run on different systems with differing external IP addresses.
If you are hosting the MDM service on a different system, then you will need to check the Override FileWave server configuration checkbox and enter the FQDN name of your main FileWave server. Do not enter anything in this section if you are running your FileWave MDM services on the same system as your primary FileWave server.
macOS MDM configuration
For macOS devices, you will need to request a custom FileWave Client installation package (.pkg) and upload it to your FileWave server. This allows FileWave to provide the package for all MDM enrolled devices. When a MDM macOS device is added to your FileWave server, it will automatically receive the client installer package and will be configured as one of your client devices.
macOS Client Package Installation Triggers
The FileWave macOS client package will install on newly enrolled DEP and Profile MDM enrolled macOS devices. The macOS client package will also get pushed out to ALL existing enrolled MDM clients if you upload a new macOS client package into the FileWave Preferences. Be sure not to accidently upload the non-custom client pkg or upload a custom client pkg with the wrong FileWave server address, if you do then all exsisting MDM enrolled macOS devices will install the newly uploaded client and then in turn lose connection to your FileWave server.
The first step is to go to the FileWave Support site and request a custom installer: https://custom.filewave.com
Download the zip file and then expand it to have the PKG. When you have the package, you will upload it to your FileWave Server using the button in the macOS MDM preferences pane:

Authenticate as the FileWave Central superuser (fwadmin), then locate the newly downloaded package. Note: You must unpack/unzip the package before being able to upload it to your server!
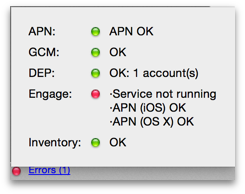
Ignore status notifications
In the lower left corner of the main FileWave Central window is the status box for your key external services - Apple Push Notification (APN), Google Cloud Messaging (GCM), Apple Device Enrollment Program (DEP), and Inventory. You have the option of installing the MDM services on a different system, or not needing APN, DEP, or GCM at all - assuming you aren't using any iOS devices, macOS systems with VPP, or Android devices. If any of these services are not running, the status indicators will show that there is a problem. You can disable status notifications and FileWave Central will report only the services you are using.
No comments to display
No comments to display