Working with FileWave Clients
Once the various devices have the FileWave Client installed, and they are enrolled with your FileWave Server, there are several options for configuring and working with these clients. This section will cover some of the common configurations and additional settings.
Upgrading macOS or Windows FileWave Clients? See Upgrading FileWave Clients for the 16.3.0 eligibility boundary, the Upgrade Fileset bridge for older clients, the misleading empty Client Upgrades state, and Early Access/Beta scheduling.
Clients View information
Within the Clients pane, you are presented with key information to help you track of the status of your devices:
- Name - The device or device Group name, or the Smart Group name
- ID - A unique ID created by FileWave to identify all devices, device Groups, or Smart Groups
- Model - the latest version of the FileWave model to have been loaded onto the device or Group
- IP - the IP address of the device as reported to FileWave (devices behind a firewall may all report using a NAT'd IP)
- Last Connect - the date time Group showing the last time the device reported to the FileWave server
- State - shows the condition of the device (Normal, Missing, Not Tracked, Archived)
- Free Space - shows the amount of free space reported by the device
- Platform - shows the reported operating system of the device
- Comment - custom comment entered by a FW administrator concerning that device or Group
- Lock - shows if the device has been locked down so that it cannot be affected by any model updates (see: Locking Devices)
When devices are enrolled in FileWave, you can start performing administrative and management tasks on them.
Search
At the top of the Clients view pane, you can see a Search: area that lets you quickly see one or four different views of all your devices (Everything, Clients, Mobile, and Groups) There is also a quick view of the total number of clients, Clones, Groups, and mobile devices. Finally, there is a global search field that allows you to type in a name or portion of a name, ID, database model number, or any other possible identifier to locate a specific device or Group. Any search you start can be cleared by clicking on the Clear all filters button just above the viewing window.

The next section discusses the types of tasks that you have access to from the Clients pane.
Client toolbar options

The toolbar that is active when the Client pane is selected gives you many options for performing various tasks on your devices. You can add new clients, create client Groups, create Smart Groups, associate devices with Filesets, monitor your clients, and perform several administrative tasks. First, we need to look at the global toolbar items; then we will explore the direct action tools for specific clients or client Groups.
Update Model
When you perform actions on your client devices, you should update the "Model." The Model is the current state of the FileWave database after changes have been committed by an administrator. When the Model is updated, all pending actions are written to the database and a new Manifest is generated for every device detailing any changes that have taken place.
New Client
This tool allows you to register with the database new clients for computers that have had the FileWave client installed and have checked-in initially, from mobile device that have enrolled with the FileWave MDM server, or by creating placeholders for devices or computers manually or using either text files or ADE.
|
See Enrolling Computer Clients in to FileWave |
New Group
The New Group tool allows you to create a named Group that will include individual Clients or Clones.
New Smart Group
This tool allows you to create a named Group of devices based upon inventory criteria.
New Association
The focal point of FileWave is being able to create and distribute Filesets to devices. This tool provides one approach for you to associate a Fileset or Fileset Group with a Client or Group.
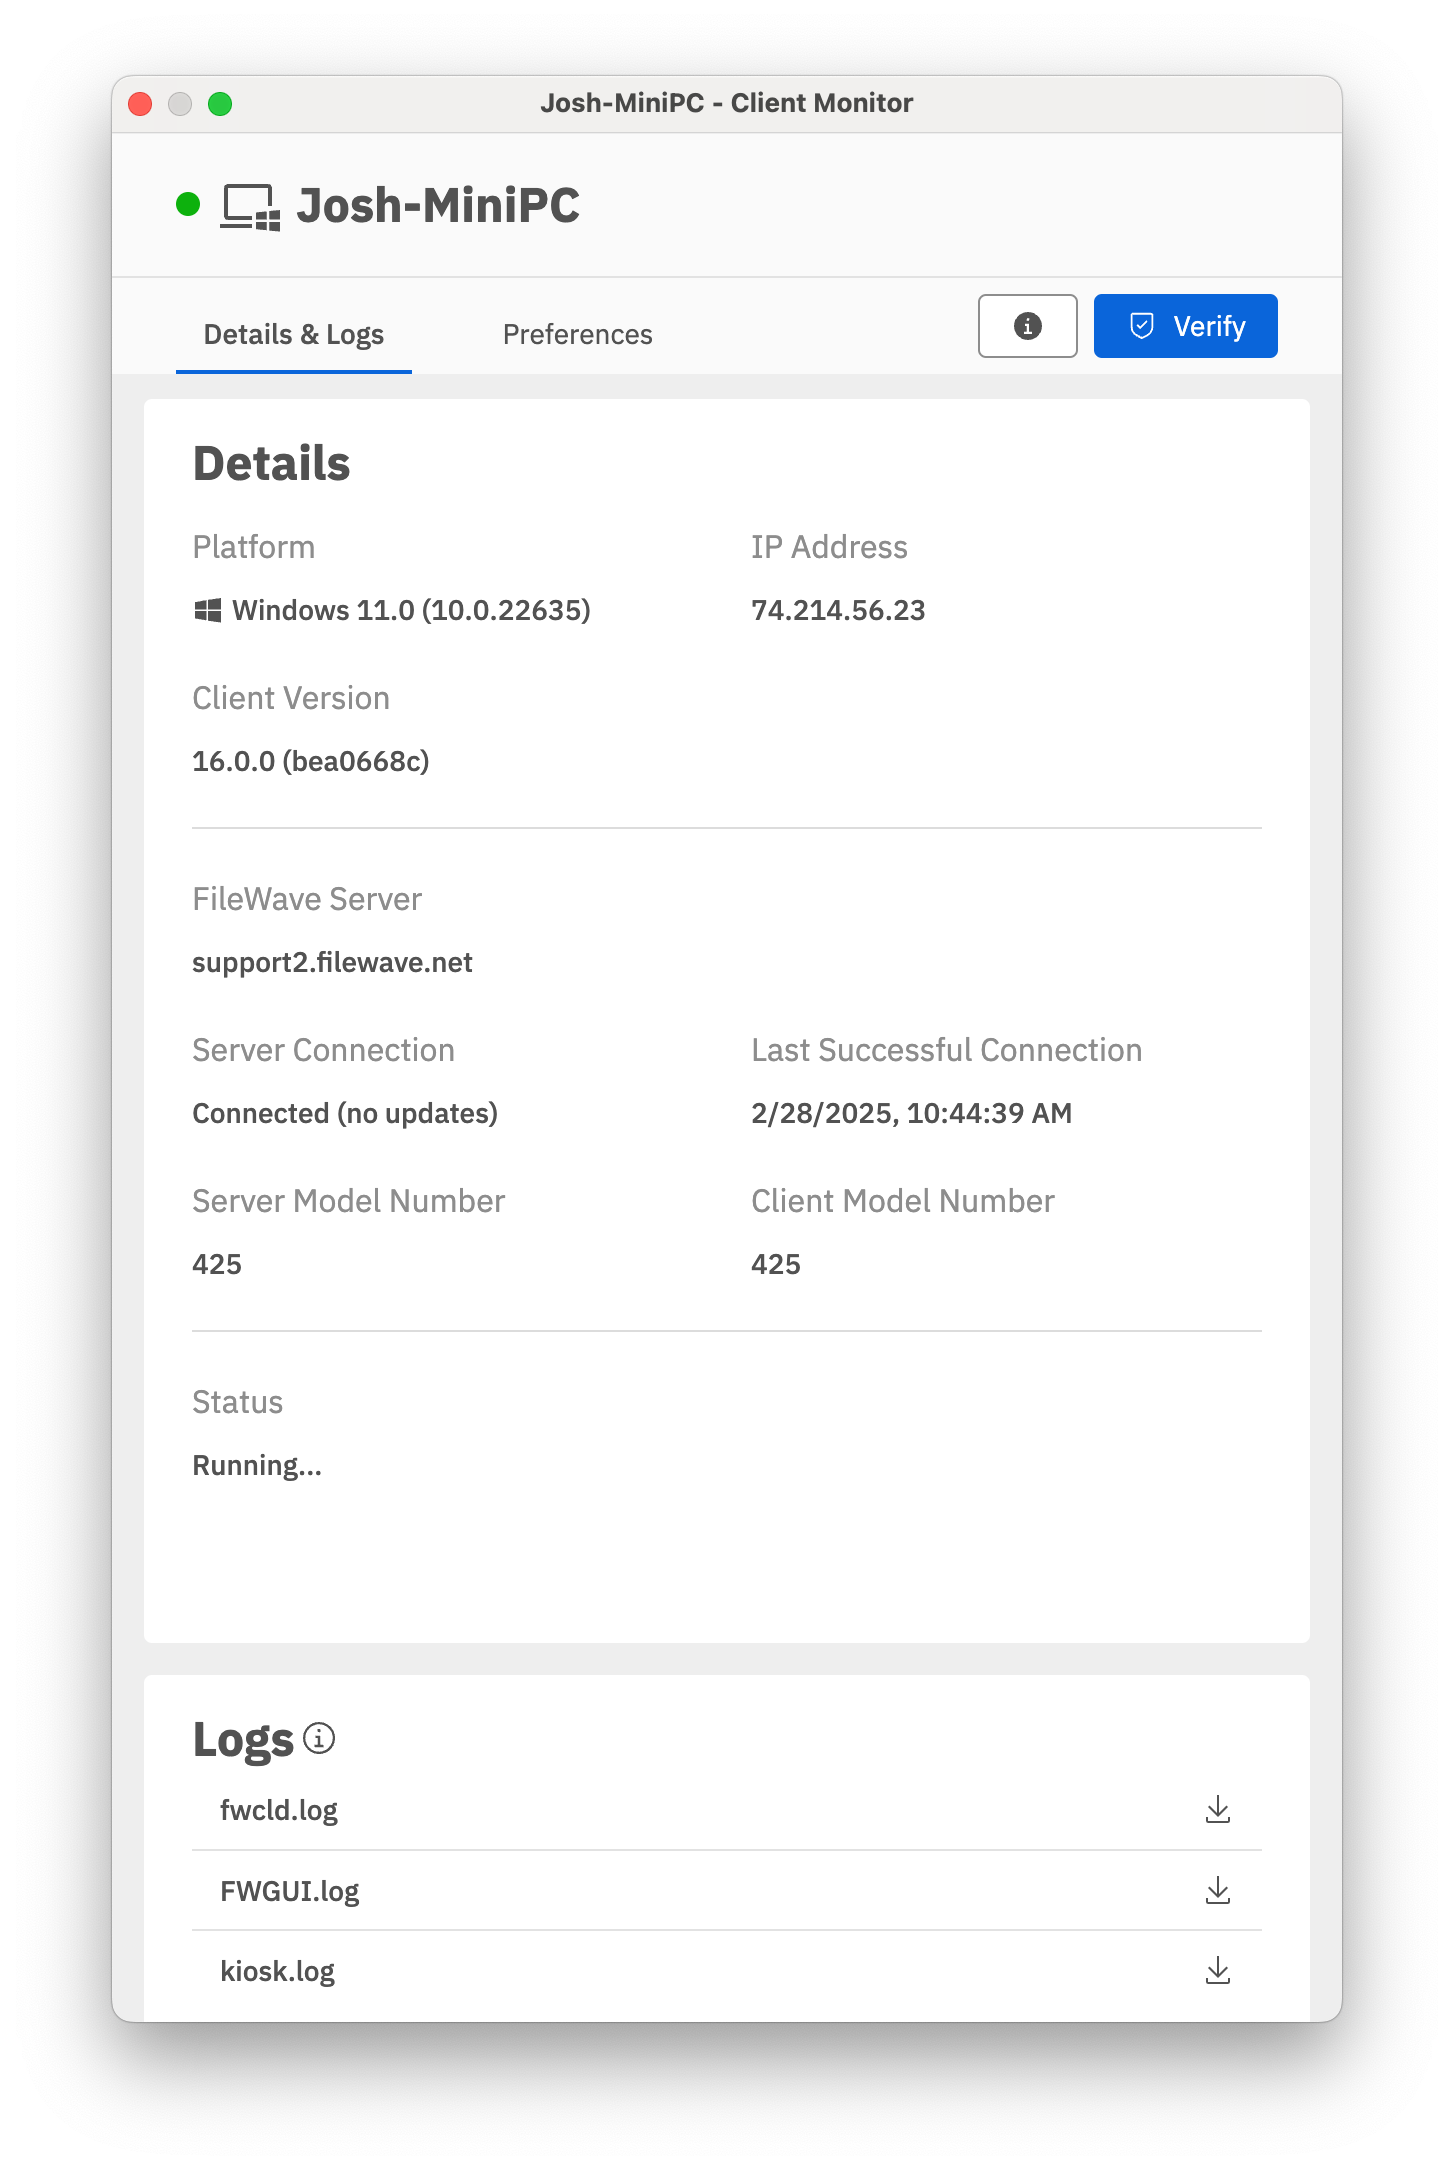
Client Monitor
The Client Monitor lets you view the current status of your Client after selecting that Client from the list. It provides you with quick look at the current FileWave model running on that Client, as well as allowing you to send a command to the Client to verify its status with the FileWave Server, and allows you to view the Client's FileWave log file.
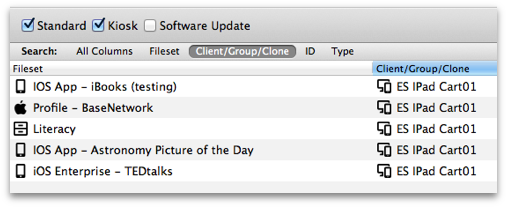
Customize Columns
You can edit the Client pane view by adding/subtracting data columns. You can remove all but three of the data fields (Name, ID, and Lock status).
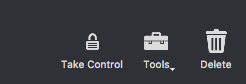
Take Control
By "taking control" in FileWave Admin, your administrator locks out all other FW administrators from making any changes to the FileWave model. This level of control is global, in that any other administrators, no matter where they are, cannot push any Filesets or changes to client devices or Groups. This ability is very useful when you are making large, detailed changes to clients or Filesets and do not need those changes being preemptively sent to your managed devices before you are finished. When you have finished being in "control" remember to release the lock so other FW Admins can resume managing their assigned clients.
Tools
The Client tools are tasks that you can perform on a selected Client or Group. The specific tasks available vary between the different types of client devices or Groups. The next section will go into detail on each of the tools as they relate to the various types of clients and client Groups.
Delete
The Delete tool will remove the selected Client(s) or Group(s) from the database. If you delete a Group, then all nested items within that Group will also be deleted.
Client Tools
Here are the tools you have to directly impact a specific client. Depending on the client device, you will see differing settings.
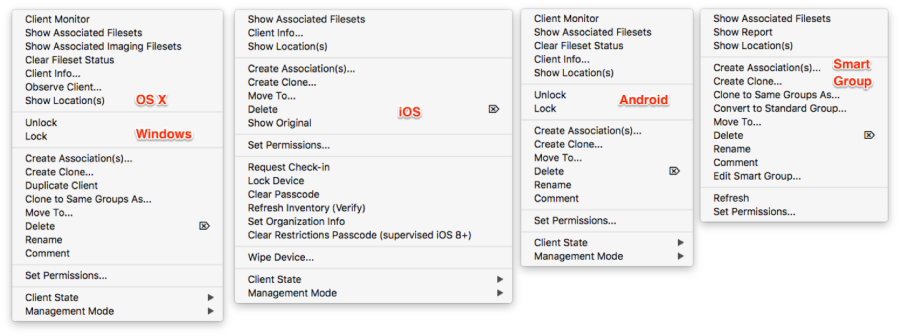
When you right-click on a Client, or select a Client then select the Tools task bar item, you will see the listed tools that are available to interact with that type of Client. The same happens if you select a device Group or Smart Group, with a lesser number of options. Let's take a look at the various options available in the Tools:
Show Associated Filesets
When a Client or Group has had Filesets assigned, or associated, with them, you can view those with this tool. The view will come from the Associations pane in FileWave Admin.
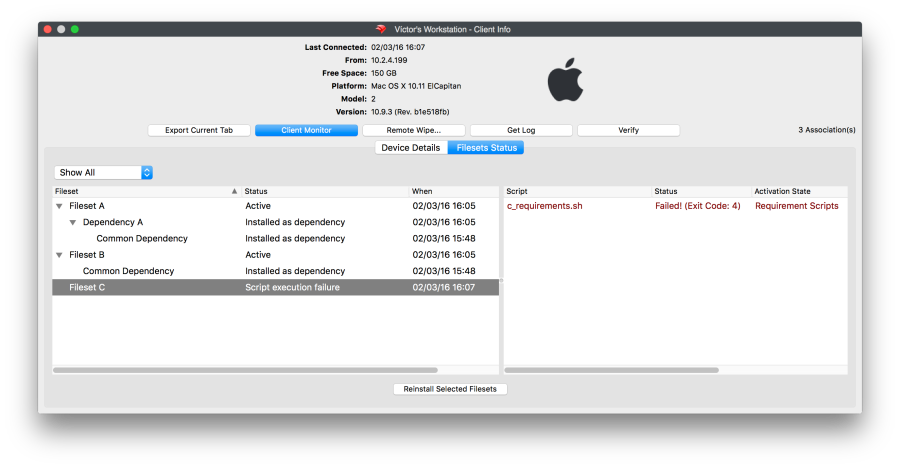
Client Info…
The Client Info window shows the current condition of a Client through Device Details and Filesets Status. You can see the status of associated Filesets, open the Client Monitor, send a remote wipe command, view the current log file, and push a Verify command, which causes the Client to verify that it's current state matches what the current manifest says it should be. Depending on the device, you will get differing amounts of information.
As of FileWave 11, the list of Filesets is displayed as a tree, where dependencies appear as children of the Filesets that require them. When a dependency is required by more than one Fileset, the same dependency will appear more than once in the list, as a child of each of the Filesets that require it.
There is a selection box on the top-left corner that allows filtering Filesets. By default, it is set to "Show All. Other values are "Only successful" and "Only failed," that cause only Filesets without errors/with errors to be shown. "Filesets without errors" means any Fileset in any normal state, when nothing failed. Filesets that are associated but haven't been installed yet are considered "without errors
If the client version is 11.0 or later, it also supports reporting the results of the scripts that were executed. In this case, selecting a Fileset causes a list to appear on the right side, where the results of the last round of scripts is reported. Whenever a script fails, processing stops, and the exit code of the script can be seen in the Status column.
Client Monitor
The Client Monitor lets you view the current status of your Client after selecting that Client from the list. It provides you with quick look at the current FileWave model running on that Client, as well as allowing you to send a command to the Client to verify its status with the FileWave Server, and allows you to view the Client's FileWave log files. Note that Client Monitor leverages NATS to be able to interact with systems on any network as long as they are able to connect to the FileWave Server. More detailed information is here.
The Client Monitor also lets you change several of the preferences used by the FileWave client.
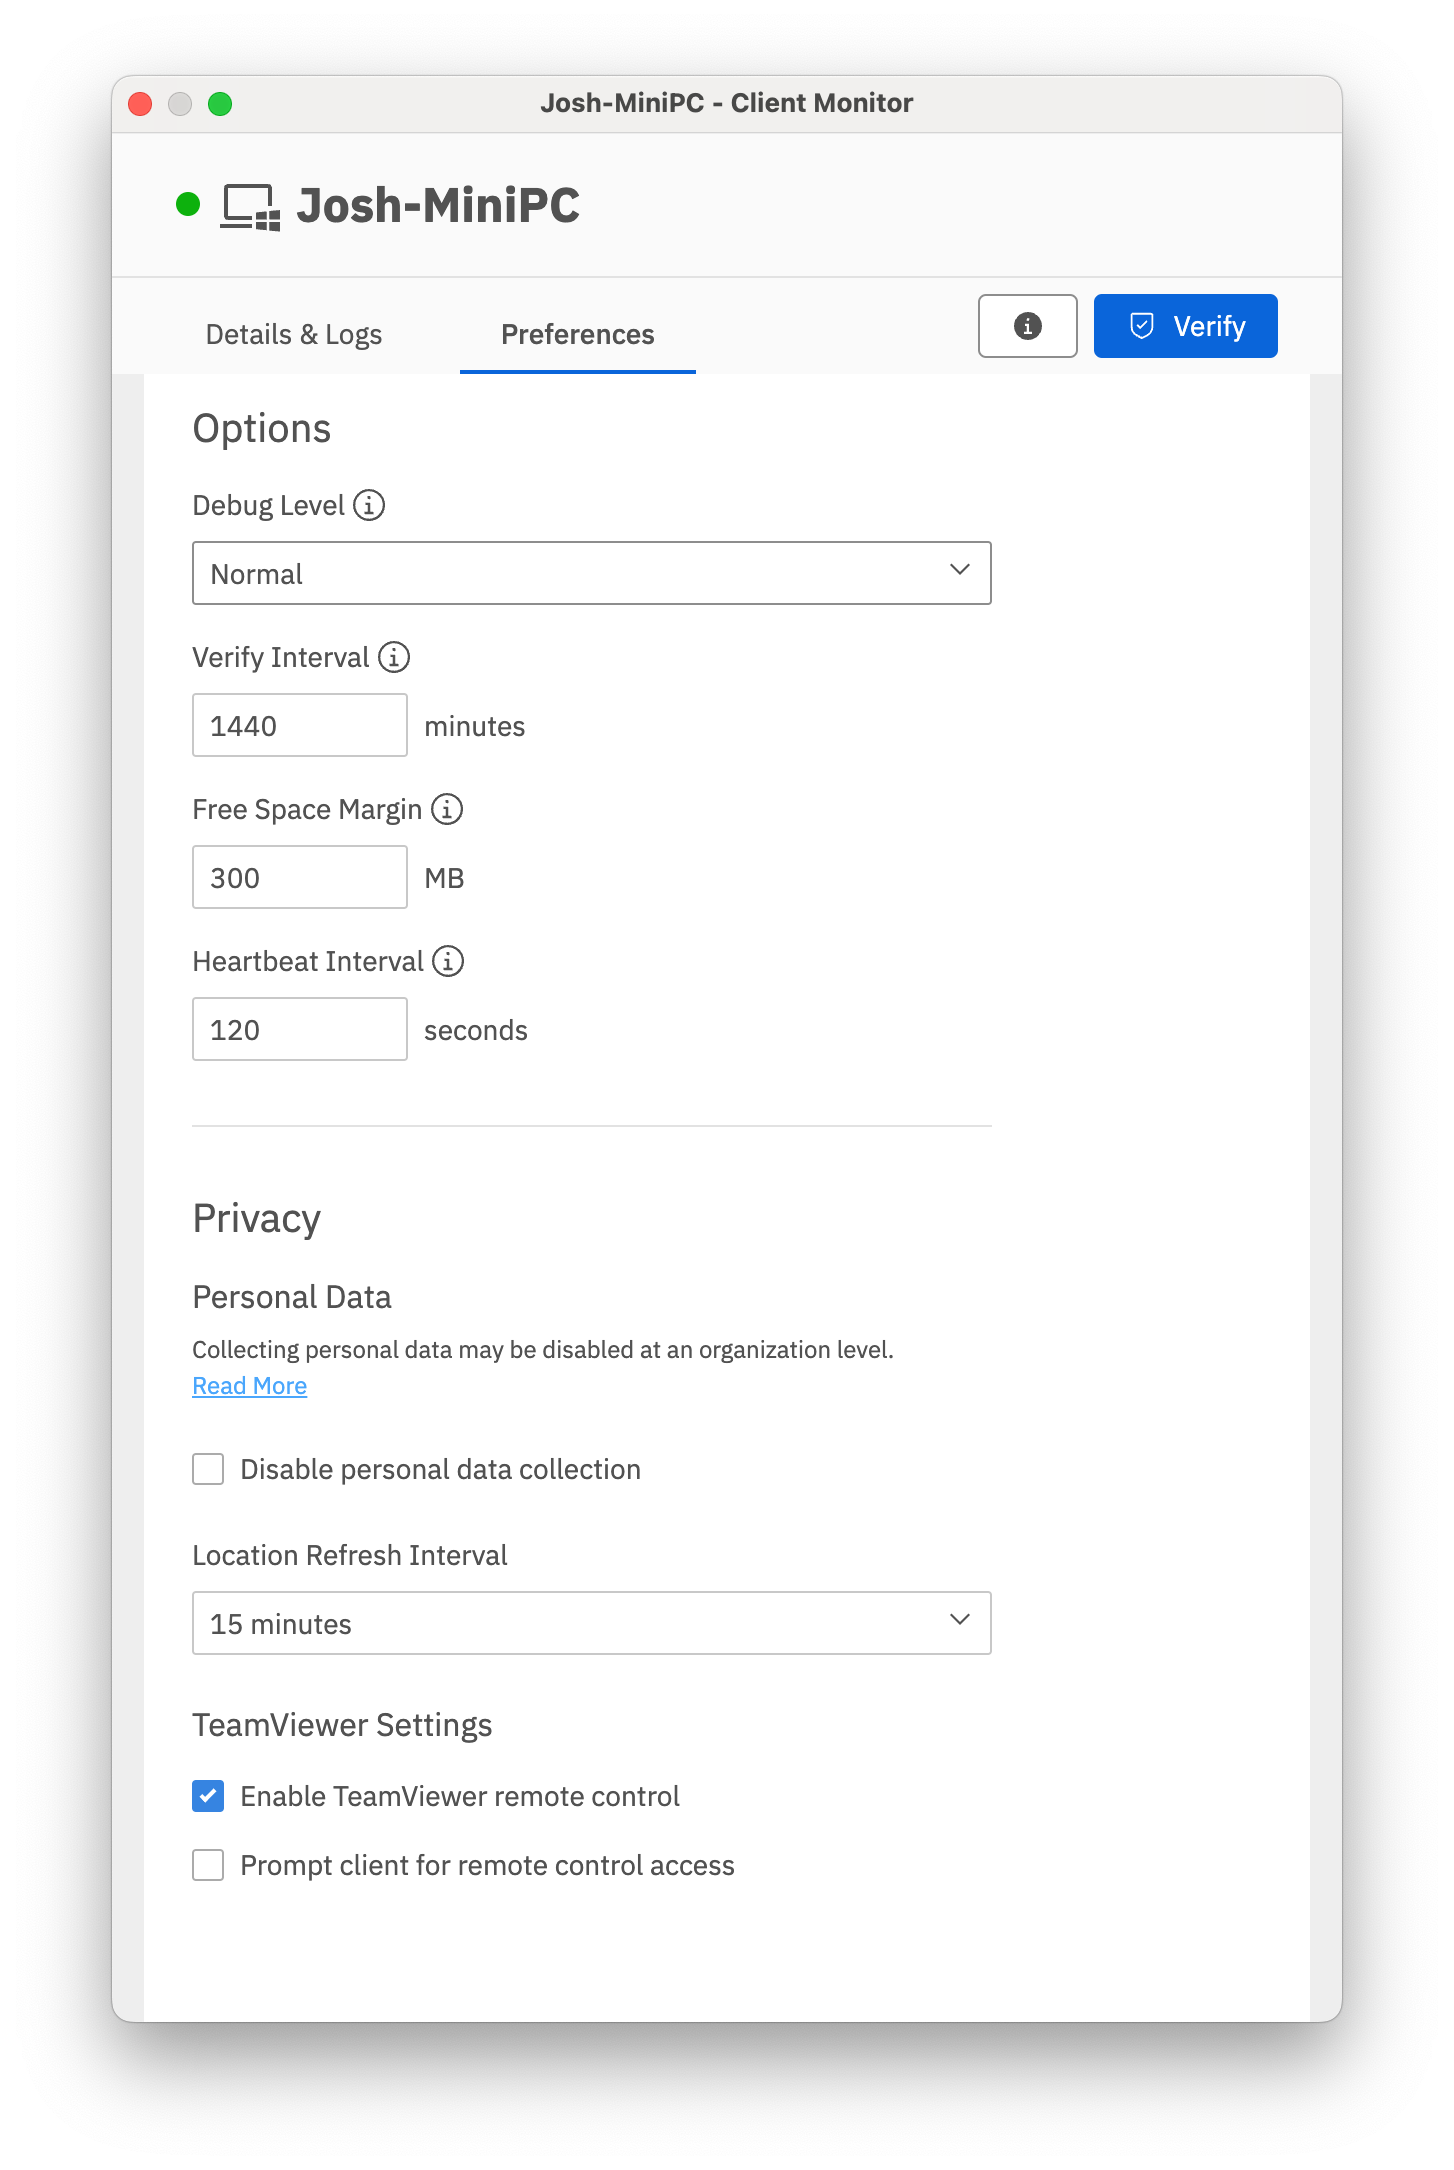
Many of these Preference settings can be configured during installation of the client; however, some of them exist only in the Client Monitor and in a Superprefs Fileset. The extras include settings such as the Debug level and the amount of free space that will trigger a disk full message.
Personal Data refers to device tracking . Tracking is covered in detail later in this Chapter.
TeamViewer refers to the remote screen sharing capability of FileWave. If you select Enable TeamViewer remote control, you will have access to observe / control that computer. If you select Prompt client for remote control access, you will present the end user on the computer with a dialog requesting permission to remotely control the device. If this dialog is not responded to with permission granted, it will time out in about 30 seconds and default to permission denied. There is a set of easy videos to learn how TeamViewer works in the Foundry here: https://go.filewave.com/foundry-teamviewer
Edit Custom Fields(s) Values
This option will allow you to change the values of Custom Fields that have been associated to this device or group of devices. For example if you manually change the value of a Custom Field that is syncing with LDAP with this option, then your change will remain until LDAP scans again at which point your change will be over written with whatever data is synced from LDAP.
Edit Custom Field(s) Associations
Here is where association between Customs Fields and devices are made. If you select one or multiple devices you can set which Custom Field(s) you would like those devices to have. If you select a group (smart or standard) then you will select which custom Fields you would like to set for the devices under this group. If new devices enter this group after you have the Custom Field associated, you would need reassign that Custom Field to the group or those new devices specifically. Custom Fields do not auto-associate to new additions in a group.
Lock / Unlock
When a client device is locked, it can no longer receive model updates from the FileWave server. You might use this setting if a device is being used for some operation that would be interrupted during a Fileset activation.
|
See |
Create Association(s)…
The primary function of FileWave Admin is to associate Clients and Groups with Filesets. This task will send you to the Associations pane and allow you to select Fileset(s) for association with the selected device. Detailed instructions on using Filesets and associations are in Chapter 5.
Create Clone…
Clones give you great flexibility with FileWave management. You create Clones of a device to add them to different Groups instead of dragging the device itself into a Group. This allows you to let a Client belong to several Groups based on organizational needs, geographies, or even just for application usage. A Client can belong to several Groups, and any associations made to any of those Groups will be reflected at the client.
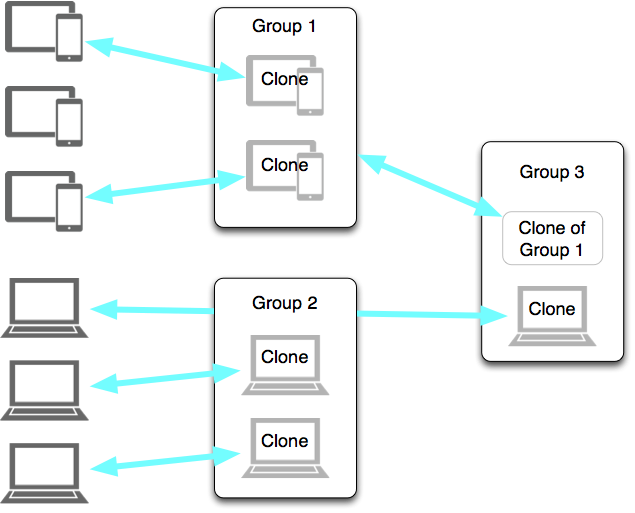
Since a Clone is essentially an alias of the original Client, you can leave the actual Client sitting in the "root" Group of the Client directory, and do all of your Group assignments by way of Clones. This way, if you delete a Clone from a Group, you have not impacted the original Client record. You may also create a Clone of a Group if you are going to add several sub-Groups into a larger Group. The Create Clone… task presents you with a list of your Groups into which you can place a Clone.
Clone to Same Groups As…
This task lets you choose another Client device as the template to create Clones of the selected Client. If the template device has Clones in several Groups, then your Client will end up with Clones in those Groups.
Move To…
This task lets you move your Client into a designated Group. This does not create a Clone; but places the original Client record into that Group.
Delete
If you no longer need a specific Client or Group in the FileWave database, you can delete it with this command. If you delete a Group, then all Clones and original Clients situated inside that Group are also deleted. Original Clients outside the Group will not be deleted, even if their Clones were inside the Group. Make sure you update the Model when you delete Clients or Groups.
Rename
To rename your Client or Group, use this command. You can also click twice on your client (slower than a double-click) to edit the name.
Comment
This task allows you to add a comment to your Client or Group record.
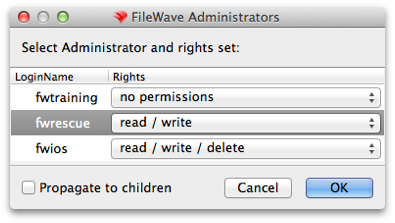
Set Permissions…
This task lets you specify which FileWave Admin accounts can access a specified Client or Group. You use this assignment capability to manage large deployments with many sub-administrators. For example, you could have an administrator designated to manage and maintain only the Windows computers and another to manage only the iPad cart in a classroom. Some administrators could be assigned only read permissions in order to create reports.
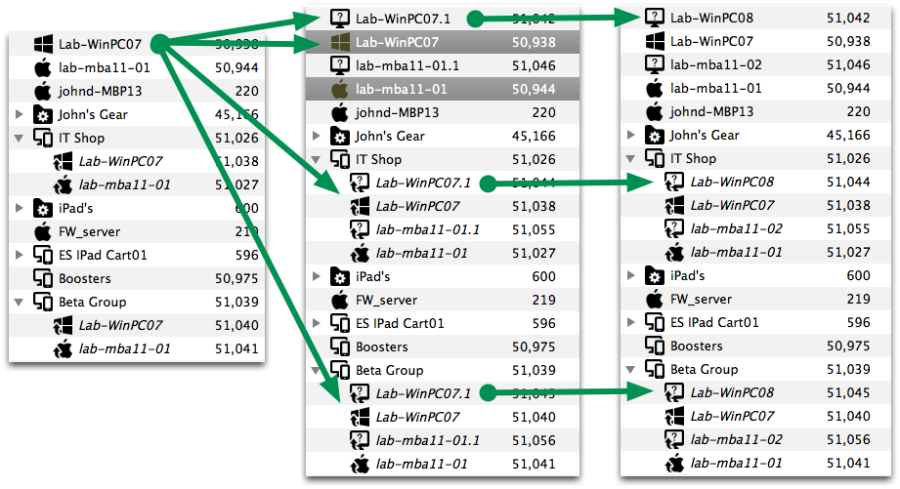
Duplicate Client
This task lets you take a Client as a template and create a new Client that can be renamed to match an, as yet, un-enrolled device. When the new device enrolls, it will assume the identity of that duplicated Client, as well as automatically being part of every Clone used by that duplicated client. For example, Lab-WinPC07 belongs to two Groups - Beta Group and IT Shop; the client gets duplicated and its new name is Lab-WinPC07.1 When the duplicate is renamed, all of it's Clones get renamed also, and when you enroll the new device with the name Lab-WinPC08, the new client automatically belongs to all the correct Groups.
Add Client…
This task is for adding a Client into the selected Group. Selecting this task opens the New Client window.
Add Group…
This task adds a Group to the selected Group. Selecting this task opens the Create New Group window.
Edit Smart Group…
This task allows you change the settings and criteria for a Smart Group.
Request Check-in
This task sends a command to the mobile device to check in with the MDM server. Sending the Check-in command will send along every item in the command history that has not been received.
Lock Device
This task sends the command to the mobile device to return it to the lock screen (as if the power button had been pressed). It sets a message on the screen to say that this device is "lost," along with an optional message and phone number to call if found. This is not the same as the Lock command for non-mobile devices.
Clear Passcode
This task turns off any passcode set on the mobile device.
Refresh Inventory (Verify)
This task sends a request to the client to report back to the FileWave Server an inventory report. This is more inclusive than the Check-in command in that the client gets a push command to supply the following information:
- Managed Application list
- Security info
- Restrictions
- Installed Application list
- Profile list
- Device information
Plus perform any self-healing needed and install/remove any Filesets that have been modified.
Wipe Device…
This task sends a command to mobile devices to erase all content and settings. For mobile devices, the command is located in the right-click popup. For computers, it's located in the Client Info… window.
You must enter the FileWave "super administrator" (fwadmin) credentials in order to proceed with the device wipe.
Set Organization Info (iOS only)
This command appends the Organization Info that is configured in FileWave Admin/Preferences to the selected device. This information is sent to the device at enrollment; but if the information changes, it needs to be manually updated using this menu item.
Clear Restrictions Passcode (supervised iOS 8+)
This command will flush the restrictions passcode set on a supervised iOS device.
Archive Client
This command allows an administrator to remove a Client from active use in the FileWave database. All inventory data on the device is frozen and the device is no longer counted as a client for license purposes. A Model Update is required to complete this action.
In order to re-add the client to the active FileWave database, you must fully remove it from FileWave, update the Model, then re-add it through the New Client window.
Archiving MDM enrolled clients will send a command to the device to remove enrolment, for any MDM enrolment type, if configured to do so in the Mobile Preferences.
Removal of the MDM Enrolment Profile should cause managed Profiles to be remove. Managed Apps and as such App Data may also be removed.
Groups & Smart Groups
Putting Clients into Groups gives you tremendous flexibility in overall control and management of your deployment. With Groups, you can configure sets of Clients by type, function, location, and any other association that you can think of. Smart Groups go even further by letting you create criteria that will automatically assemble sets of clients. The real power of Groups in FileWave comes from being able to associate Filesets with Groups at the same time, instead of having to match individual Clients with specific Filesets.
You can also have nested Groups.
Creating a Group
You can use any criteria you desire to create a Group. Select the New Group tool from the toolbar and fill in the name of the Group and, if desired, a comment on the Group, such as its purpose.
Once the Group is created, you can assign Clients to it either with the pop-up menu (right-click on the Group, select Add Client…) or you can add a Clone of a Client to the Group by holding down the Alt-key (Windows) or the Option-key (macOS), selecting the Client, and dragging the Clone onto the Group icon. You can also use the Create Clone… command to build a Clone of a Client, then add the Clone to the Group. Finally, you can create Groups to be sub-Groups, then add those Groups to the "upper" Group. When you associate Filesets with the uppermost Group in a set, all of the clients assigned to that Group, or to Groups inside that Group, will all get those associations.
Setting permissions for a Group
Once you have created one or more Groups, you might want to distribute overall management and maintenance of those Groups. The "Super Admin" account (fwadmin) will always be able to edit or delete any Client or Group in FileWave Admin. What you might want to have is one or more "sub-administrators" who can take over maintenance of one or more specific Groups. This is where the permissions come in; right-click on a Group (or select the Tools item in the toolbar) and choose Set Permissions…
All of the FileWave Admin accounts will be available and you can choose which administrators have permission to work with the selected Group. Your choices are:
- read/write/delete)
- read/write
- read
- no permissions, which equals no access.
The permissions can also be set to Propagate to children, which then assign the same permissions to any Group or Groups nested within in that Group.
Creating Smart Groups
The Smart Group is a collection of Clones based on specific criteria. The options you can choose are extensive:
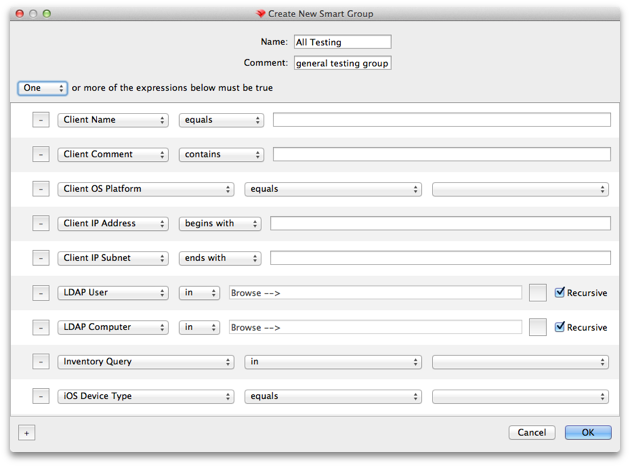
The specific criteria are defined as follows:
|
Search Type |
Qualifiers |
Criteria |
|
Client Name |
equals / contains / begins with / ends with / less than / greater than |
alphanumeric text of a client name or portion of a name |
|
Client Comment |
equals / contains / begins with / ends with / less than / greater than |
Any alphanumeric text comment or portion of a comment |
|
Client OS Platform |
equals |
OS X (Intel / PPC, 10.3 -10.9), Windows (XP, 2000, Vista, 7, 8) |
|
Client IP Address |
equals / contains / begins with / ends with |
Any logical numeric value that meets standard IP address format (xxx.xxx.xxx.xxx) |
|
Client IP Subnet |
equals / contains / begins with / ends with |
Any logical numeric value that meets standard IP address format (xxx.xxx.xxx.xxx) |
|
LDAP User |
in |
A user name in an associated LDAP directory server database |
|
LDAP Computer |
in |
A computer name in an associated LDAP directory server database |
|
Inventory Query |
in |
Any valid Inventory Query from the MySQL server (v.9.x) or from Inventory (FW v8.x) |
|
iOS Device Type |
equals |
iPad / iPod / iPhone / Any |
Once you have selected one or more search types and filled in the criteria, FileWave will automatically add a Clone of the qualified Clients to the Smart Group. You can use these types of Groups to track devices as they move around the institution, fall behind in updates, have their name changed, or any other combination of conditions you desire. Permissions for Smart Groups are set up with the same steps used to set permissions for regular Groups.
Using LDAP / Directory Services Groups
FileWave can create Smart Groups based on your LDAP server directories. If you have added LDAP server(s) to your preferences, then your Clients pane will be populated with an LDAP Smart Groups set. These Groups will be automatically populated with computers that are bound to the directory. You can associate Filesets and set permissions for any of these Groups. Devices registered by users with their LDAP credentials show up under Users in the LDAP Smart Groups listing. This links the user to the device for tracking purposes. To set up LDAP for authentication, see Chapter 2.
No comments to display
No comments to display